Hand Drill Fire: How to Make Fire with a Hand Drill
Hand drill fire is the simplest friction method on paper and the hardest in practice: you spin a long, thin, dry spindle between your palms against a soft hearth board until hot dark dust collects in a notch and glows as an ember. There is no bow, no cord and no bearing block, only two pieces of wood and your hands.
If you are wondering how to make fire with a hand drill, the honest answer is: with the right material, a precise notch, a good rhythm and a lot of practice. It is much harder than the bow drill, which is why we recommend learning that first. This guide covers stalks and boards, exact sizes, technique, the ember, troubleshooting and your hands. For the wider picture see fire starting basics and our bushcraft guide for beginners.
Step by step
-
1

Find dry stalks and a soft board
Look for long, straight, dead and fully dry stalks such as mullein, plus a soft, dry, non-resinous board such as lime, willow or poplar.
-
2

Prepare spindle and board
Trim the spindle to 60–80 cm, about 1 cm thick, with a rounded tip. Cut a flat board 25–35 cm long and 1–1.5 cm thick.
-
3

Burn in the socket, cut the notch
Spin lightly until the socket is black, then cut a notch of about one-eighth of the circle exactly to the centre.
-
4

Spin between your palms
Press down while rubbing, run down the spindle, return fast to the top without losing the socket, and repeat in a steady rhythm.
-
5

Build the ember
When thick smoke and dark dust appear, keep going a few more strokes, then stop and let the pile smoulder and consolidate.
-
6

Move it to tinder and blow
Slide the coal into a dry tinder bundle, fold it loosely and blow long, gentle breaths until it flames.
What is hand drill fire and why is it so hard?
The principle is the same as every friction fire: a spindle grinds against a hearth board, the friction heats the wood dust, the dust collects in a notch and, once hot enough, smoulders into a coal. What changes is how the spindle is driven. With a bow, a cord does the spinning and a bearing block does the pressing. With the hand drill, your palms do everything: they spin the spindle, they press it down and they keep it vertical.
That is why it is hard. Your hands can only travel the length of the spindle once before they have to return to the top, and during that return the spindle stops turning and the heat begins to leak away. You have to make enough heat in each short downward run to make up for the loss. A bow drill delivers continuous rotation; the hand drill delivers bursts.
- Material matters more. The bow drill forgives mediocre wood. The hand drill does not: the spindle must be very light and the board very soft.
- Technique matters more. Pressure, speed and rhythm have to be right together.
- Your hands are the limit. Friction against the spindle causes blisters long before an ember appears for most beginners.
- Humidity hurts. Damp air makes it far harder, see the section on wet conditions.
None of this makes the hand drill pointless. It is the lightest friction kit there is, nothing to carry but two sticks, and it teaches you more about heat, dust and wood than any other method. Treat it as a skill to practise, not as a plan for an emergency.
Hand drill vs bow drill
Hand drill
- Only spindle and board, almost no weight
- No cord to break or forget
- Needs very light, straight, dry stalks
- Bursts of rotation, heat leaks on the return
- Blisters and fatigue come fast
Bow drill
- Needs bow, cord and bearing block
- Cord can slip or snap
- Works with many common woods
- Continuous rotation, steady heat
- Far easier to learn, see the bow drill guide
Should you learn the hand drill first?
For most people, no. The bow drill teaches the same things (notch, dust, ember, transfer) with a lot more margin for error. Once you can make an ember with a bow drill reliably, you know what good dust looks like and how a coal behaves, and that knowledge carries over. The hand drill then becomes a refinement rather than a wall.
The two parts: spindle and hearth board
A hand drill set has only two working parts, plus helpers that make life easier.
- Spindle: a long, thin, straight, dry stem. Its lower end grinds in the board; your palms drive it along its length.
- Hearth board: a thin, flat board of soft dry wood with a burned-in socket and a notch where the dust collects.
- Ember pan: a bark chip or dry leaf under the notch, to catch the coal.
- Tinder bundle: prepared in advance, see natural tinder.

Because the spindle is so much longer than a bow-drill spindle, it is the part where small flaws show up most. A crooked or heavy spindle wobbles, jumps out and tires your hands. A board that is too hard or too thick turns every stroke into a struggle.
The best wood for a hand drill: spindle and hearth
The goal is the same as for every friction fire: dry, dead, non-resinous wood. For the hand drill there is an extra constraint: the spindle must also be long, straight and light. That is why classic hand drills use hollow or pithy stems rather than solid branches.
Spindle: long, light, straight and bone dry
Suitable spindles are dead, fully dried flower stalks and shoots of plants that grow tall and straight. Common choices:
- Mullein: a tall biennial of waste ground and roadsides. Its dead flower stalk is long, straight and light. A classic hand drill stalk in Europe and North America.
- Elder shoots: straight, long shoots with a soft pith. Use dry dead shoots only. Elder is not suitable for food contact (no skewers or cooking tools); see tree identification and wood types.
- Sotol, yucca and similar flower stalks: the traditional choice in dry regions of the south-western USA and Mexico.
- Other straight dry stems: dead reed or cane, goldenrod, cattail flower stalks, young straight shoots of willow or hazel left to dry for months. What matters is a straight, dry stem you can scrape smooth.
Mullein and elder are the stems you are most likely to find in central Europe, which is why they appear on most hand drill lists. Identification must be certain: if you are not sure what a plant is, do not use it. Our tree and wood identification guide helps with the woody species.
Hearth board: soft, dry, non-resinous
The board must be softer than or as soft as the spindle. Proven woods are lime (linden), willow, poplar and aspen. In other regions people use cedar (including western red cedar), cottonwood, clematis or old man's beard, and in the UK thick dead ivy stems. Avoid resinous pine, spruce and fir and hard woods such as oak or beech; the bow drill guide has the same advice and a longer comparison, see best wood for friction fire.
| Material | Use | Region | Notes |
|---|---|---|---|
| Mullein stalk | Spindle | Europe, N. America, W. Asia | Long, straight, light; must be dead and fully dry. |
| Elder shoot | Spindle | Europe, N. America | Straight shoots with soft pith; dry dead stems only; not for food use. |
| Sotol / yucca stalk | Spindle | SW USA, Mexico | Traditional dry-region choice. |
| Reed / cane | Spindle | Wetlands worldwide | Light and straight; check it is dead and brittle-dry. |
| Lime / basswood | Hearth | Europe, N. America | Classic soft board wood; also sold as carving blanks. |
| Willow | Hearth | Northern hemisphere | Reliable once fully dry; standing dead wood is ideal. |
| Poplar / aspen / cottonwood | Hearth | Temperate and boreal zones | Soft and even; must be completely dry. |
| Cedar, clematis, ivy | Hearth | Various regions | Soft, easy to carve; local availability varies. |
| Pine, spruce, fir | Avoid | Worldwide | Resin glazes the surfaces. |
| Oak, beech, maple | Avoid | Temperate zones | Too hard: smoke, almost no dust. |
Use dead wood and dead stalks only. Cutting living trees or plants usually needs permission from the landowner, and protected areas may forbid collecting anything.
The thumbnail test
Press your thumbnail firmly into the board. A clear dent means the hardness is right. If the nail sinks in and the wood crumbles it is rotten, and if you leave no mark it is too hard. For the spindle, scrape the surface with your nail: a pithy stem should feel light, dry and slightly springy, never soft or flexible. Bend a test piece gently; a green stalk bends and stays bent, a dry one resists or snaps with a crisp crack.

Hand drill dimensions: spindle, board and notch
Use these as starting values. The numbers match the notch and socket geometry from the bow drill guide, only the spindle and board are thinner and the spindle is much longer.
| Part | Size | Shape and material | Why |
|---|---|---|---|
| Spindle | 60–80 cm long, about 1 cm thick | Straight, round, rounded tip at the bottom | Length gives a long run for your palms; thin means less torque to turn. |
| Hearth board | 25–35 cm long, 4–6 cm wide, 1–1.5 cm thick | Flat on both faces, soft dry wood | Thin boards heat quickly; wide enough for your foot beside the socket. |
| Socket | About the spindle diameter | Burned in with the spindle, black | Fits the tip so the spindle stays seated. |
| Notch | About 1/8 of the circle (30–45°) | Cut from the board edge to the centre of the socket | Collects the dust and feeds air to the coal. |
| Ember pan | Palm-sized | Bark chip, thin wood, dry leaf | Lets you carry the coal without touching it. |
Preparing the spindle and burning in the socket
A spindle that rolls true and a socket that fits it are the foundation. Ten minutes here saves an hour of frustration later. You need only a sharp knife; a bushcraft knife is plenty, and the carving basics help if you are new to knife work. Check the knife laws where you live before you carry one.
Spindle and socket, step by step
 1Roll test
Roll the dry stalk across a flat surface. If it wobbles or rocks, it is bent. Choose another piece.
 2Trim bumps and scars
Shave off leaf scars, side shoots and rough spots with the knife, cutting away from your body and working over a stable surface. The surface must be smooth enough that your palms glide.
 3Round the tip
The lower end should be a slight dome, not a point. A sharp point digs a deep narrow hole and jumps out; a dome grinds a broad, shallow socket that holds the spindle.
 4Burn in the socket
Place the tip about 1.5 cm in from the board edge and spin with light pressure until the socket is black and fits the spindle. Do not hurry: a good socket makes everything that follows easier.
How to cut the notch: size and shape
The notch is a small wedge cut from the edge of the board to the centre of the socket. It does two jobs: it lets the dust fall into one insulated pile, and it lets air reach the glowing coal. Geometry here decides whether you get dust that holds together or dust that blows away.
- Size: about one-eighth of the circle of the socket, a wedge of roughly 30–45°. Soft woods often like it slightly narrower, harder woods a bit wider.
- Depth: cut straight down through the full thickness of the board so dust drops onto the ember pan.
- Tip: the point of the wedge must reach exactly the centre of the socket, not beyond it.
Picture a pie divided into eight slices: the notch is one slice pointing at the board edge. Cut on a firm surface, hold the board down with your foot or your free hand and keep the knife edge away from your body.

Each socket normally gives one ember, sometimes two. When it becomes too deep, burn in a new socket beside it, leaving a finger width of wood between the notches. On a thin board you can usually fit several sockets in a row.
Hand drill technique: position, pressure and rhythm
Technique is where most attempts are won or lost. The aim is a vertical spindle, steady downward pressure, fast palm movement and a return stroke that costs as little heat as possible.
Body position
- Place the board on dry ground on an ember pan, with a dry layer of bark or sticks under it if the ground is damp.
- Kneel on one knee and put the foot of the other leg on the board, close to the socket so that it cannot move. Some people kneel on both knees with a heavier board, or hold the board steady with a second person's foot.
- Keep your elbows slightly out and your shoulders relaxed. Your forearms should be roughly in line with the spindle so that your palms can press down and rub.
- Look at the spindle from the front and the side and make sure it is vertical.
Hands and pressure
Place your palms flat on opposite sides of the spindle, not gripping with the fingers. The pressure down comes from your shoulders and body weight; the spinning comes from rubbing your palms in opposite directions. Press firmly, but not so hard that the spindle stalls.

The stroke: run down, return fast
One stroke is a run from the top of the spindle to near the board, then a quick return to the top. The run makes the heat; the return is lost time, so keep it short and do not let the spindle leave the socket.
One stroke of the hand drill
 1Start high
Put your palms flat on the top part of the spindle, with the spindle seated in the socket. Start with light pressure.
 2Press and rub
Rub the palms in opposite directions while pressing down. As your hands slide down, keep the pressure even; the spindle should turn fast, not slowly.
 3Reach the bottom
Near the board your palms are low and the spindle is still turning. Do not stop rubbing the instant you reach the bottom: the last turns are the hottest.
 4Return fast
Bring your hands back to the top at once while the spindle stays standing in the socket. The shorter the return, the less heat you lose. Keep a little downward pressure so the spindle does not jump.
 5Keep it seated
Never let the spindle lift out of the socket between strokes. A lifted spindle cools the socket and loses the dust pile; if it pops out, reseat it gently and continue.
The floating or hand-over technique
Because the return is so costly, many people use a continuous rhythm in which the upper hand begins the next run while the lower hand is still finishing the last turns, so that the spindle hardly stops spinning. With practice, one palm slides down while the other starts back up in a smooth hand-over-hand motion, and pressure is never fully released. This takes time to learn; start with the simple run-and-return stroke and speed it up gradually.
Rhythm and breathing
- Warm-up: a few light strokes to dry and warm the socket.
- Build-up: as smoke appears, increase pressure and speed gradually.
- Full power: when thick smoke and dark dust fill the notch, keep going for several more strokes. Most beginners stop too early.
- Breathing: breathe out as you press, breathe in on the return. Holding your breath tires you quickly. Take a short rest between attempts so your arms and palms recover.
Press as hard as you can while still keeping the spindle turning fast. If it slows down, ease off a little; if it spins freely and makes no smoke, press harder.
| Phase | Smoke | Dust in the notch | Feel |
|---|---|---|---|
| Warm-up | None to a faint wisp | A few light brown grains | Smooth, light |
| Build-up | Steady thin smoke from the socket | Dark brown, starting to fill the notch | Even resistance |
| Full power | Thick smoke rolling out of the notch | Black, fine, heaping up | Hard work; the spindle bites |
| After stopping | Smoke keeps rising from the pile itself | Pile holds together, dark core | A coal has formed |
Building the ember and moving it to tinder
You have thick smoke and a notch full of dark dust. Now patience beats speed: many people lose a fresh ember in the first seconds by rushing. Prepare a dry tinder bundle before you start spinning: a nest about two fists in size with a hollow in the middle, made from dry grass, shredded inner bark or other natural tinder. Have kindling ready too, ideally a feather stick or two, and a prepared fire lay.
From dust to fire
 1Thick smoke, dark dust
Keep going for several strokes after thick smoke appears and the notch is full of black dust. This extra effort builds a pile big and hot enough to hold a coal.
 2Stop and let it settle
Take your hands off, lift the spindle away without knocking the board and leave the dust alone for 10–30 seconds. Gently fan it with your hand if you like.
 3Check for a coal
If the pile keeps smoking on its own after you have stopped, a coal has formed. Look for a small glowing core; do not poke it.
 4Slide it into the nest
Tilt the board away from the pile, not the pan away from the board, and slide the coal into the hollow of the tinder bundle. If it crumbles, it needed a few more seconds.
 5Fold and blow
Fold the tinder loosely around the coal, hold the bundle up with your back to the wind and blow long, gentle breaths. More air as the smoke thickens and turns white.
The moment it flames, put it under your prepared fire lay and add thin kindling. Do not leave this step to improvise. The fire lay picker suggests a lay for your weather, and the firewood calculator estimates how much wood to prepare.
Hand drill troubleshooting: smoke but no ember
Every symptom has a cause. Work through the table, then read the details.
| Symptom | Likely cause | Fix |
|---|---|---|
| Dark dust that falls apart and does not hold | Dust is not hot enough yet, or too little of it; the notch is too wide | Spin longer after the smoke appears; narrow the notch slightly; shield the board from wind. |
| Shiny, glazed hole and no dust | Surfaces polished by too much pressure, resin, moisture or a hard board | Scrape the shine off both surfaces, use a drier or softer board, restart with less pressure and more speed. |
| Spindle pops out of the socket | Spindle not vertical, tip too pointed, socket too shallow, loose grip | Check from two sides, round the tip, burn in a deeper socket, keep palms flat and pressure steady. |
| No smoke at all | Wood too hard or damp, too little pressure or speed | Use dryer, softer wood; press harder while keeping speed up; check that the spindle is dry. |
| Smoke but only coarse pale dust | Too much pressure, too little speed, or wood too soft | More speed, a bit less pressure; try a harder or drier board. |
| Blisters or sore palms | Too much friction on the skin, rough spindle, long sessions | Smooth the spindle, tape the hot spots, practise in short sessions, rest between attempts. |
| A coal forms but crumbles | It had no time to consolidate | Wait the full 10–30 seconds; move the board, not the coal. |
Dark dust that does not hold
This is the most common near miss: you see dark dust but it does not form a coal. Usually you stopped a few strokes too early, a gust cooled the pile or the notch is too wide. Spin longer after the first thick smoke, shield the board from wind and put dry bark under the ember pan.
Shiny, glazed hole
A glazed socket means the wood has been burnished instead of ground. Causes: too much pressure too early, resinous wood, a trace of lubricant or damp wood. Scrape both surfaces back to fresh wood. A pinch of fine sand in the socket can help break the glaze, but if the board is the problem, use a softer, drier one.
Protecting your hands: blisters are the real limit
For most beginners the limit is not strength but skin. The hand drill rubs your palms against a dry stem hundreds of times, and blisters form long before your technique is good. Gloves are not used, because you need to feel the spindle and they spoil the grip. Instead:
- Smooth the spindle. Shave leaf scars and rough spots, then rub the surface with a piece of leather, a smooth stone or coarse cloth.
- Tape hot spots. A strip of athletic or medical tape on the base of the fingers and the heel of the palm, where friction concentrates, helps a lot. Check the fit so it does not slip.
- Work in short sessions. A few minutes of focused attempts, then rest, then another try. Stop at the first hot spot rather than continuing into a blister.
- Keep your hands dry and warm. Cold, wet skin blisters faster.
- Treat blisters early. See blisters and splinters in our first aid guide, and keep a basic first aid kit with you.
How to learn the hand drill: a practice plan
Expect weeks of occasional practice, not a single afternoon. Many people do not get their first ember in the first sessions, and that is normal. Do not judge yourself by video clips of experts working with perfect, long-dry stalks.
A five-stage progression
- Stage 1: bow drill first Learn the bow drill until you get embers reliably. You will understand dust, notch and coal.
- Stage 2: burn-in practice Spin the hand drill on a prepared board with light pressure until you can burn a socket without the spindle popping out.
- Stage 3: smoke Work on rhythm and speed until you get thick smoke and dark dust regularly. Count how often you manage it out of five attempts.
- Stage 4: first ember Keep going after the smoke appears until a coal forms, and practise the transfer into a tinder bundle.
- Stage 5: your own materials Carve a spindle and board from stalks and wood you found yourself, in different weather. Keep a lighter in your pocket as a backup.
Preparing a good set before you go is half the battle. Collect and dry your stalks months ahead, and keep the kit in a dry bag with your bushcraft kit. Touch up your knife before carving, as described in field sharpening.
Hand drill fire in damp and wet conditions
Damp air is the hand drill's worst enemy. Wood absorbs moisture from the air, and with only short bursts of heat, your hands cannot drive it out. On a dry day a well-prepared kit may work in minutes; on a foggy autumn morning it may not work at all.
- Store the spindle and board dry, in a waterproof bag, and keep them close to your body in the cold.
- Warm the board and spindle with your hands or beside (not in) a fire before you start.
- Put dry bark or sticks under the board to keep ground moisture away.
- Shield the board from wind and rain, for example under a tarp, but keep ventilation.
- If conditions are wet, switch to a method that handles it better: a ferro rod with feather sticks, or the wet-weather fire guide.
For real wet weather, friction fire is the wrong tool. Practise it in good conditions and enjoy it as a skill.
Safety and fire rules
Fire bans and local rules
Rules about open fires differ widely between countries, regions and landowners. In many places, fires are banned in dry seasons or allowed only at designated fire rings. An ember is a fire: check restrictions and the current fire danger level before you practise. This guide is general information, not legal advice.
Knife and material safety
Carve away from your body and keep your free hand behind the blade. Use dead wood and dead stalks only; living plants and trees are protected in many places. Never use an unknown plant as a spindle, and avoid breathing smoke and dust from plants you cannot identify. For more on fire skills overall see our fire skills overview.
Hand drill fire in an emergency: be realistic
The hand drill is often presented as the ultimate primitive skill, and it deserves respect, but it is a poor emergency plan. It needs bone-dry material, time, energy and fine technique, all of which are scarce when you are cold, wet or hurt. Carry a lighter and a ferro rod in separate pockets and put your effort into staying warm: shelter, dry layers and getting found. See emergency signals and hypothermia and cold injuries.
Treated as a practice skill, the hand drill is a satisfying way to understand fire, and the lightest friction kit there is. Once it works, the fire plough and fire saw are the next friction methods to explore.
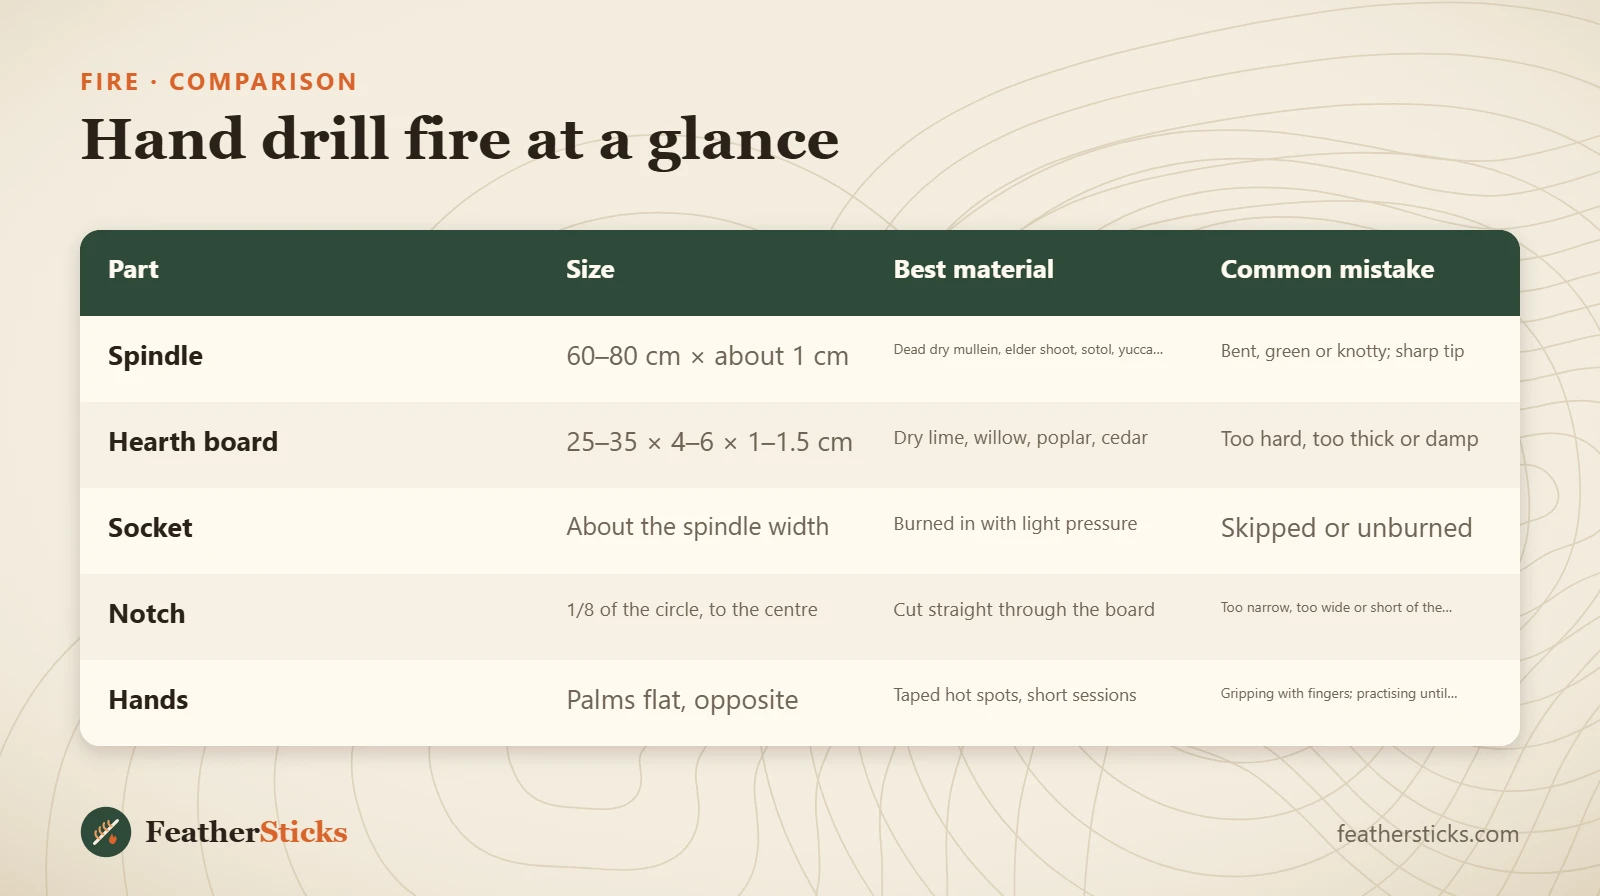
| Part | Size | Best material | Common mistake |
|---|---|---|---|
| Spindle | 60–80 cm × about 1 cm | Dead dry mullein, elder shoot, sotol, yucca, cane | Bent, green or knotty; sharp tip |
| Hearth board | 25–35 × 4–6 × 1–1.5 cm | Dry lime, willow, poplar, cedar | Too hard, too thick or damp |
| Socket | About the spindle width | Burned in with light pressure | Skipped or unburned |
| Notch | 1/8 of the circle, to the centre | Cut straight through the board | Too narrow, too wide or short of the centre |
| Hands | Palms flat, opposite | Taped hot spots, short sessions | Gripping with fingers; practising until blistered |
Common mistakes
- Starting with the hand drill instead of learning the bow drill first.
- Using green, bent or knotty stalks, or wood that is not fully dry.
- A sharp spindle tip or an unburned socket, so the spindle jumps out.
- Gripping the spindle with the fingers instead of pressing with flat palms.
- Stopping as soon as smoke appears instead of spinning several more strokes.
- Losing the socket on the return stroke, or returning slowly.
- Practising until the palms blister instead of resting.
What you need
- Fixed-blade bushcraft knife
- Dry spindle stalks (spare ones)
- Pre-cut dry hearth boards
- Dry tinder bundle in a waterproof bag
- Athletic tape for hot spots
- Lighter or ferro rod as backup
- Water to extinguish the fire
FAQ
How do you make fire with a hand drill?
Is the hand drill harder than the bow drill?
What is the best wood for a hand drill?
How long and thick should a hand drill spindle be?
Why does my hand drill smoke but make no ember?
Why does the hand drill spindle keep popping out?
How do I stop getting blisters from a hand drill?
Can you use a hand drill in wet weather?
How long does it take to learn hand drill fire?
Check yourself
Completed6 quick questions from this guide. Nothing is sent anywhere.
Related step-by-step guides
-
 1
-
 1
-
 1