Emergency Signals Outdoors: How to Call for Help and Get Found
The most effective emergency signal is a phone call: dial 112 (Europe and many other countries), 911 (US, Canada) or 999 (UK), say where you are and what happened, and stay reachable. When there is no signal, make yourself easy to find: stay put, move to open ground, blow three whistle blasts – or the Alpine distress signal of six per minute – flash a mirror or light, and lay out a large V on the ground for aircraft.
This guide covers what to tell the dispatcher, how to share your exact location, every classic distress signal step by step, and how to help searchers and helicopter crews reach you safely. It belongs in every bushcraft skill set – ideally learned long before you need it. Emergency numbers and rescue procedures vary by country: check them before you travel.
Step by step
-
1

STOP: stop, think, observe, plan
Stop moving, sit down, breathe. Think about what happened, look around, then make a calm plan before acting.
-
2

Call the emergency number
Dial 112 in Europe, 911 in North America or 999 in the UK. Say where you are, what happened and how many people need help.
-
3

Share your exact location
Read coordinates from your phone or GPS slowly, digit by digit, and name landmarks, trail numbers or signposts.
-
4

Stay put and be visible
Unless your spot is dangerous, stay where you are. Move to the nearest open area and spread out something bright.
-
5

Signal with sound and light
Blow three whistle blasts, or six per minute in the Alps, then listen. Use a light at night and a mirror in sunshine.
-
6

Signal to aircraft
Lay out a large V (help needed) or X (medical help) on open ground and raise both arms in a Y when a helicopter comes.
The first minutes: the STOP rule
Most outdoor emergencies get worse through hasty decisions: pushing on in the dark, taking a "shortcut" down a steep slope, splitting up the group. The STOP rule, taught by many search-and-rescue organisations, gives you a moment to think before you act:
STOP
- Stop moving. Sit down, drink something, eat a snack. Panic fades when you stop.
- What happened? Where was the last point you were sure of? Who knows where you are?
- Check injuries, weather, daylight left, water, clothing, phone battery and signal.
- Decide: call for help, stay put, build shelter, signal. Then act calmly, one step at a time.
Check the daylight you have left – the daylight calculator shows sunset for any date – and remember that cold, wet and wind are often a greater danger than the original problem. If you are lost rather than injured, try to work out your position with map and compass before you move anywhere.
Calling 112, 911 or 999: what to tell the dispatcher
If you have any mobile signal, a call is the fastest way to get help. 112 is the emergency number in all EU countries and works in many others, including the UK and Switzerland; from mobile phones it often works abroad as well. In the US and Canada the number is 911, in the UK also 999, in Australia 000. Some mountain regions have their own rescue numbers too – in Austria, for example, 140 reaches mountain rescue – but 112 is the safe choice across Europe. Emergency calls are free.
Even if your own network shows no coverage, try the call: many phones can reach the emergency number through another network. If the call fails, climb a little higher or move out of a deep valley and try again – a few metres can make the difference. A text message sometimes gets through when a call does not, but emergency text services in some countries require prior registration, so check before you travel.
Making the emergency call
 1Dial and stay calm
Dial the emergency number, wait for the answer and speak slowly and clearly. Give your name and the number you are calling from.
 2Answer the key questions
Where did it happen? What happened? How many people are hurt? What injuries? Then wait for questions – the dispatcher leads the conversation and ends the call, not you.
 3Give your coordinates
Read the coordinates from your phone or GPS digit by digit, say which format you use, and let the dispatcher repeat them back. Add landmarks, trail names and what you can see.
 4Stay reachable
Keep the phone switched on and the line free for call-backs. Save battery: dim the screen, close apps and keep the phone warm in an inside pocket.
How to share your location precisely
"Somewhere in the forest near the lake" costs rescuers hours. Your phone's GPS works without mobile signal, so a map app – ideally with offline maps downloaded before the trip – can show your coordinates anywhere with a view of the sky. Learn where your app displays them before you need it.
| Method | Example | Tip |
|---|---|---|
| Decimal coordinates (lat/long) | 50.1234° N, 8.5678° E | Say "north" and "east" and read each digit separately |
| Degrees, minutes, seconds | 50° 07′ 24″ N, 8° 34′ 04″ E | Say the format first – mixing formats causes large errors |
| Map grid reference | Grid reference from your topographic map | Common in the UK; name the map sheet |
| Landmarks and features | Trail sign, hut, bridge, summit, junction | Describe what you can see and the last known point |
| Route and time | "Two hours along trail 5 from the car park" | Useful if nothing else works |
The coordinates are an example. Check which format your phone shows and practise reading it out.
Also tell rescuers what you look like and what you have: jacket colour, tent or tarp colour, light, whistle. The better they can picture you, the faster they find you. Knowing the basics of map and compass navigation – grid references, reading the terrain – makes this much easier.
Satellite devices
Beyond mobile coverage, a personal locator beacon (PLB) or satellite messenger can send an alert with your position via satellite. Some newer smartphones offer satellite emergency messaging as well. Register such devices as required in your country, learn how the SOS function works and keep them where you can reach them with one hand.
Stay put or move? Why staying usually wins
Searchers start at your last known position and along your planned route – that is why you should always leave a trip plan with someone at home: route, planned return time and when to raise the alarm. Every kilometre you wander off increases the search area dramatically. A person who stays in one place and makes themselves visible is usually found much faster than one who keeps moving.
Stay or move?
Is your current spot dangerous (rockfall, rising water, avalanche, lightning)?
Yes → Move to the nearest safe spot, then stop again.No → Continue.Does someone know your route and when to raise the alarm, or have you already called for help?
Yes → Stay put, get visible and prepare to spend time waiting.No → Continue.Do you know exactly how to reach a trail, road or hut safely before dark?
Yes → Move carefully, leave a note or arrow showing your direction.No → Stay put, shelter, and signal.
While you wait, protect yourself from cold and wet: insulate yourself from the ground, get out of the wind, put on every layer and use an emergency bivvy or blanket (see bivouac and bivvy bag and debris shelter). Where it is safe and permitted, a small fire helps with warmth and morale – see fire starting. Ration nothing except energy: rest, drink, stay warm. Teach children to "hug a tree" – stay in one place and answer calls or whistle – as part of bushcraft with kids.

Waiting for rescue: staying warm, hydrated and findable
After the call, the hardest part begins: waiting. Depending on terrain, weather, daylight and whether a helicopter can fly, help may arrive within an hour or only the next morning. Plan for the longer case. The main threats while waiting are cold, wet and wind – even in summer, a still, injured person cools down fast on damp ground.
Staying warm while you wait (outside to inside)
- Lee side of a boulder, dense bushes, a tarp or bivvy bag; in deep snow a simple trench or snow shelter.
- Hat, dry spare layer, waterproof shell on top – follow the layering principle and put layers on before you start to shiver.
- Sit or lie on a pad, rucksack, rope or a thick bed of dry branches – the ground drains more heat than the air, which is why pad insulation matters.
- Eat and drink regularly in small amounts. Warm, sweet drinks help if you have a stove.
Wind makes waiting much colder: at 5 °C, a 20 km/h wind already feels like about 1 °C, and wet clothing makes it worse – the wind chill calculator shows the effect for your conditions. Watch each other for signs of hypothermia: shivering, clumsy hands, slurred speech and confusion. An injured person should be insulated first and never left lying directly on cold ground.
Drink even if you are not thirsty: cold air is dry, and dehydration makes you colder and less clear-headed. If your water runs low, the water needs calculator gives a rough daily figure, and water purification explains how to treat stream water – but do not leave a safe spot to fetch water in the dark. Keep some of your emergency food in reserve; energy-dense snacks from your trail food plan are ideal.
Stay findable the whole time
- Keep the signal kit on your body, not in the rucksack, so you can react within seconds when you hear an engine or voices.
- Signal at intervals – whistle rounds every few minutes, a light sweep at night – then listen. Continuous signalling exhausts you.
- Stay near your ground signal and bright gear. If you must move a short distance to shelter, mark the direction with an arrow.
- Answer every call: searchers work in lines and stop to listen. A whistle reply tells them where to go.
Whistle and light signals: 3 blasts and the Alpine distress signal
A whistle carries much further than your voice and costs almost no energy – you can keep going for hours. Three of anything – blasts, flashes, shouts, fires – is widely understood as a call for help. In the Alps and many other mountain regions, the Alpine distress signal is the recognised standard: six signals in one minute, then a minute's pause, repeated until you get an answer. The same rhythm works with a torch or headlamp at night.
The Alpine distress signal
 1Six signals in one minute
Give one signal about every 10 seconds – a long whistle blast, a flash of light, a wave of a bright cloth or a shout – six times in one minute.
 2One minute pause
Then pause for a full minute and listen or look for an answer. Repeat the pattern until someone replies.
 3The reply: three per minute
Rescuers or others who have seen or heard you answer with three signals per minute (about one every 20 seconds), then a minute's pause.
Sound and light signals at a glance
- Three blasts / flashes
- Widely understood call for help
- Alpine distress signal
- 6 signals per minute, 1 minute pause, repeat
- Answer (Alpine)
- 3 signals per minute, 1 minute pause
- SOS in Morse
- 3 short, 3 long, 3 short (· · · – – – · · ·)
- Best at night
- Headlamp or torch, strobe mode if available
Carry a pea-less plastic whistle on your rucksack strap or jacket zip – it works when wet and frozen. At night, a headlamp is visible over long distances in open terrain; switch to its brightest mode only for signalling to save battery, and carry spare batteries (see headlamps and camp lighting).
Signal mirror: aiming the flash
In sunshine, a signal mirror is one of the most powerful signals there is: a sunlight flash can be seen from aircraft and distant ridges far beyond the range of a whistle. A purpose-made mirror has a sighting hole; a phone screen, a mirror from a compass or a polished tin lid work too, with less precision. The trick is aiming – use your hand as a gun sight:
Aiming a signal mirror
 1Frame the target
Stretch one arm towards the aircraft, boat or ridge and make a V with two fingers so that the target sits between them.
 2Catch the light
Hold the mirror just below your eye and tilt it until the bright spot of reflected sunlight falls on your outstretched fingers.
 3Flash into the V
Tilt the mirror slightly so the spot moves up between your fingers – now the flash reaches the target. Rock the mirror gently to make it flicker.
 4Sweep the horizon
With no aircraft in sight, sweep the flash slowly along the horizon now and then. Once a pilot has clearly seen you, stop flashing directly at the cockpit.
Ground-to-air signals: V, X and body signals
From a helicopter or plane, a person in a forest is a tiny dot. Large, straight-lined shapes with strong contrast stand out because nature rarely makes straight lines. The international ground-to-air code (used in aviation search and rescue) includes a few simple symbols:
| Symbol | Meaning | How to build it |
|---|---|---|
| V | Require assistance | Logs, stones, branches or cloth on open ground |
| X | Require medical assistance | Same materials; use it for injuries |
| N | No / negative | Rarely needed |
| Y | Yes / affirmative | Rarely needed |
| ↑ (arrow) | Proceeding in this direction | If you have to leave the site |
Make each symbol at least about 2.5 m long – bigger is better – and as high-contrast as possible.
Building a ground signal
 1Find open ground
Move to the most open spot nearby: a clearing, meadow, gravel bar, snowfield or ridge top that is safe to reach. Under trees, nobody can see your signal from the air.
 2Big and straight
Lay out a V (or an X for medical help) at least about 2.5 m long, with straight, thick lines. Logs, stones, branches or a tarp torn into strips all work.
 3Maximise contrast
Dark on light, light on dark: logs or branches on snow or sand, bright cloth or peeled wood on dark ground. Scrape away leaves or snow to make the shape stand out.
 4Check the view from above
Imagine the pilot's view: the symbol should be clear of shadows and trees. Stay near it, and add a spread tarp or foil blanket as an extra marker.
Body signals to a helicopter
When a helicopter approaches, use the internationally known body signals: both arms raised in a Y means "Yes – we need help". One arm raised diagonally up and one down, like the slash of an N, means "No – we do not need help". Do not wave casually at every helicopter – in mountain areas, a friendly wave with both arms can be mistaken for a call for help.

Fire and smoke signals – only where it is safe
By day, a column of smoke can be seen from far away; at night, fire is visible from the air. Three fires in a triangle are a widely recognised distress signal. But a signal fire must never start a wildfire – in dry conditions or where fires are banned, a mirror, light and bright cloth are the better choice.

Safe signal fire checklist
- Only on bare mineral ground – sand, gravel, rock – away from trees, roots and dry grass
- Not during high fire danger or where fires are prohibited
- Prepare the fire, but light it when you hear or see an aircraft or searchers
- Keep green branches or damp moss ready to add white smoke on a dark background
- Keep it small, never leave it unattended, and have water or soil to put it out
Read campfire safety for the basics of fire placement and extinguishing, and keep a reliable ignition source in your emergency kit.
A small signalling kit that fits in a pocket
Signalling gear weighs very little and should live in the same pocket all the time, together with your first aid kit. The Kit Builder adds these items to any packing list, and the bushcraft kit list shows where they fit in the overall system. Plan realistic routes with the hiking time calculator so that daylight rarely becomes the emergency.
How far signals typically reach (relative, open terrain)
Understanding the weather helps you avoid many emergencies in the first place – see reading the weather. For more skills, visit all bushcraft skills.
Before you go: the trip plan that starts a search
Every signal in this guide works better when someone is already looking for you. That only happens if a person at home knows where you went and when to worry. A trip plan takes five minutes and is the single most effective piece of emergency equipment – it costs nothing and weighs nothing.
What to leave with your contact person
- Planned route with start point, key waypoints and any alternatives you might take
- Where the car is parked, with number plate, or which bus or train you are using
- Who is in the group, with phone numbers
- Planned return time and a firm alarm time, for example three hours later
- Colours of tent or tarp, jacket and rucksack
- What safety gear you carry: headlamp, bivvy bag, PLB, stove
- The local emergency number your contact should call
Agree clearly on what "alarm time" means: if you have not checked in by then, your contact calls the emergency number – not the next morning and not after trying your phone twenty times. Tell them what to say: your route, your planned camp, the number of people and your gear. Then stick to the plan. If you change route, send a short message while you still have signal; a search along the wrong valley wastes precious hours. If you realise you will be late but are safe, report in as soon as you can so no one starts a search for nothing.
Make your phone last
Your phone is a radio, a map, a torch and a GPS in one, and its battery is limited. Start every trip fully charged with a power bank. On the trail, use flight mode with GPS still active, switch off background apps and lower the screen brightness; in cold weather keep the phone in an inside pocket, because cold batteries can drop from half full to empty within minutes. Keep 20–30 % in reserve purely for an emergency call. Learn a few basics of navigation without a compass too, so a flat battery does not immediately become an emergency.
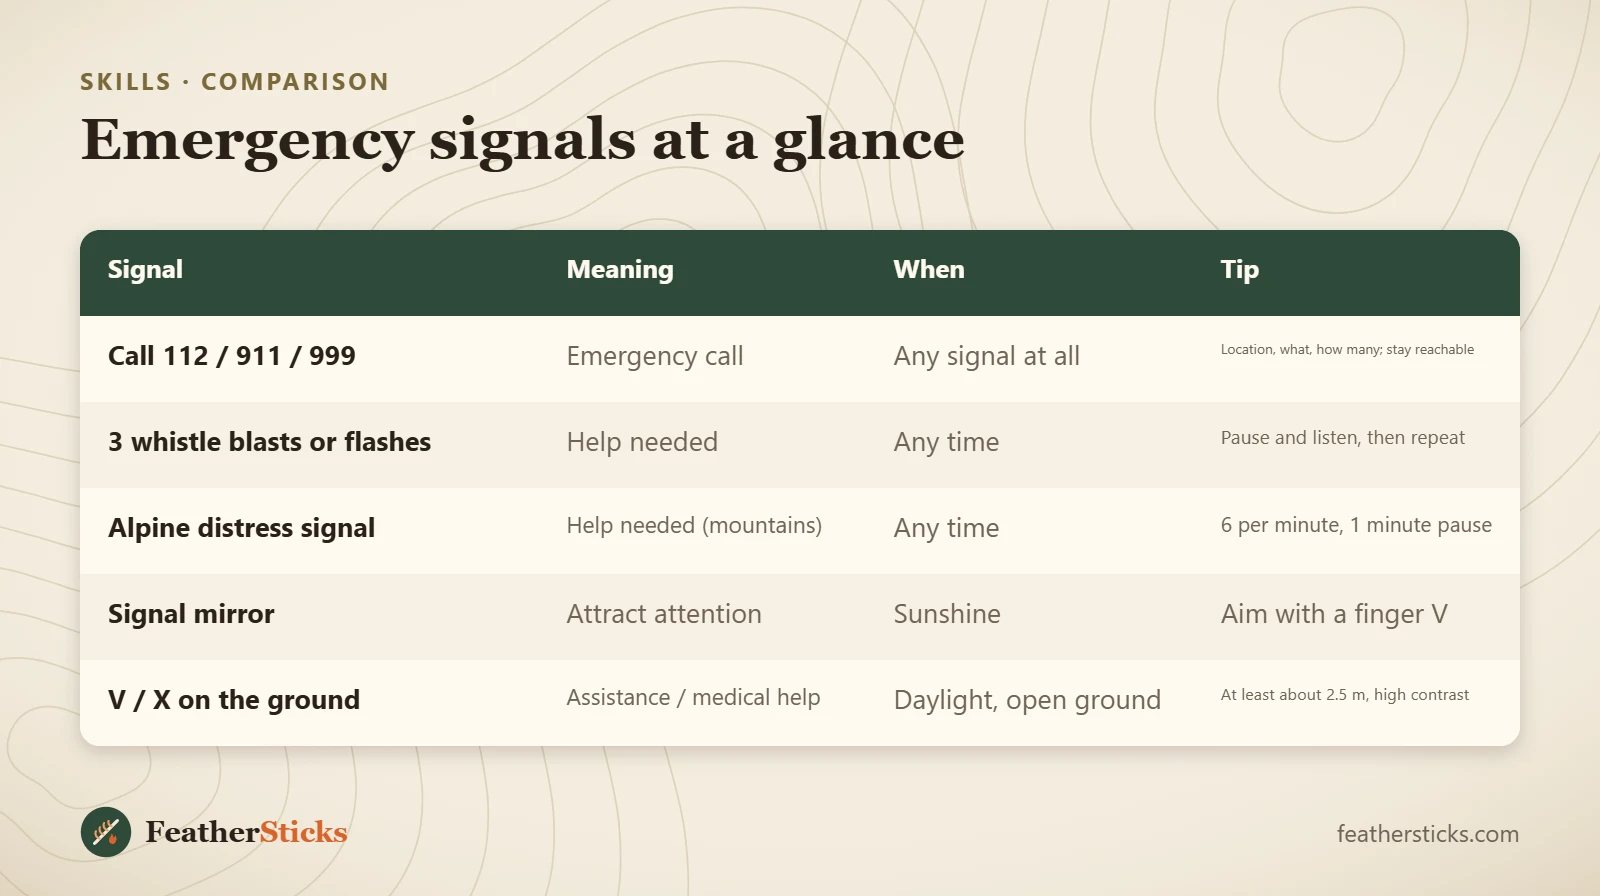
| Signal | Meaning | When | Tip |
|---|---|---|---|
| Call 112 / 911 / 999 | Emergency call | Any signal at all | Location, what, how many; stay reachable |
| 3 whistle blasts or flashes | Help needed | Any time | Pause and listen, then repeat |
| Alpine distress signal | Help needed (mountains) | Any time | 6 per minute, 1 minute pause |
| Signal mirror | Attract attention | Sunshine | Aim with a finger V |
| V / X on the ground | Assistance / medical help | Daylight, open ground | At least about 2.5 m, high contrast |
Common mistakes
- Walking on in panic instead of stopping, thinking and staying put.
- Not leaving a trip plan with anyone, so no one raises the alarm.
- Giving vague locations or mixing up coordinate formats.
- Hanging up before the dispatcher ends the call, or letting the battery run flat.
- Signalling under a dense canopy where no one can see you.
- Lighting a signal fire in dry conditions and starting a wildfire.
- Leaving tarps and foil blankets loose when a helicopter lands.
What you need
- Fully charged phone with offline maps and a power bank
- Pea-less plastic whistle on a lanyard or shoulder strap
- Headlamp with spare batteries
- Signal mirror with sighting hole
- Brightly coloured tarp, jacket or bandana
- Foil emergency blanket or bivvy bag
- Personal locator beacon or satellite messenger for remote areas
FAQ
What is the universal distress signal outdoors?
Does 112 work outside Europe?
What should I say when I call for help?
Should I stay put or walk out if I am lost?
How do you use a signal mirror?
What does a V or X on the ground mean?
How do I signal a rescue helicopter?
What should I do if someone does not come back from a hike?
How do I make my phone battery last in an emergency?
Do I have to pay for mountain rescue?
Check yourself
Completed6 quick questions from this guide. Nothing is sent anywhere.
Related step-by-step guides
-
 1
-
 1
-
 1