Going Solo: Solo Camping Safety and Tips for Hiking Alone
Solo camping safety comes down to one fact: when you are alone, nobody else will notice a problem, fetch help or stop a bad decision. So you build that safety net before you leave. Leave a written trip plan with a check-in time, pick conservative routes and camps, learn the core skills first, carry a charged phone with offline maps and a backup, and follow a simple STOP rule when things start to go wrong.
Done this way, hiking alone and wild camping alone are calm and deeply rewarding. This guide covers the plan, the kit and the mind: night fear, personal security, practical points for women going solo and whether to take a dog. It builds on planning a bushcraft trip and the foundations in bushcraft for beginners, and sits in the skills hub.
Step by step
-
1

Leave a plan and a check-in time
Write route, camp, return time and alarm time on one page. Give it to someone who knows exactly what to do if you do not check in.
-
2

Choose a conservative route
Pick terrain you know, with phone signal and bail-out paths to a road. Camp out of sight, away from dead trees and rising water.
-
3

Learn the core skills first
Navigation, first aid, fire and shelter should be routine before your first solo night, practised close to home.
-
4

Carry power, maps and a backup
Full phone, power bank, offline maps, a paper map and compass, a whistle and a headlamp. Far from signal, consider a satellite messenger or PLB.
-
5

Manage tool and fire risk
Work slowly, keep the first aid kit in reach, keep fires small with water ready, and skip tasks that need a second person.
-
6

Use the STOP rule
When unsure, lost or hurt: stop, think, observe, plan. Two things going wrong is your signal to turn back.
Why is going solo different?
The skills for a solo trip are the same as for a group trip: walk, navigate, make camp, cook, sleep, come home. What changes is the margin. In a group, someone else spots that you are getting cold, holds the map when you are tired, carries part of your load if you twist an ankle and goes for help if you cannot. Alone, all of that falls on you, and on the people you left at home.
Three things make solo trips different:
- Nobody to help. A sprained ankle that would be an inconvenience in a group can turn into a night out alone. A cut hand means first aid with one hand.
- Decisions alone. Nobody questions your plan. Tiredness, pride and the wish to reach the planned camp push decisions in one direction, and there is no second opinion to stop them.
- Nobody notices. The only alarm system is the one you set up before leaving: a person at home with your plan and a clear alarm time.
The good news: these risks are easy to reduce. Solo hikers who plan well tend to be more careful than groups, because they know there is no backup on the spot. The rest of this guide shows how.
Group trip vs solo trip
In a group
- Others notice cold, fatigue and mistakes
- Someone can go for help
- Shared load and shared decisions
- Heavy jobs done by two people
Alone
- You must notice your own warning signs
- Your contact at home is the alarm
- Lighter social load, more freedom
- Skip anything that needs two people
The trip plan and check-in: what your contact should do
The written trip plan is the most important piece of solo safety kit, and it weighs nothing. The full template is in trip planning; for a solo trip, every field matters even more because no group member can tell rescuers where you went.
What goes on a solo trip plan
Solo trip plan
- Your name, phone number, clothing and tent colour, medical conditions and medication
- Car and where it is parked, or how you travel to the start
- Route with a map screenshot or file, planned camp and bail-out points
- Start time, planned return and the turnaround time you set yourself
- Check-in times: when you will message, and where you expect signal
- Alarm time: when your contact calls the emergency number if they have heard nothing
- Emergency number for the area (112 in the EU) and what to tell the dispatcher
Check-in time and alarm time
Agree a check-in time, for example 18:00 on the first evening, and a final message when you are back. Then set an alarm time with a margin after your planned return, for example two hours, ideally with daylight left for a search. Check daylight with the daylight calculator and your walking time with the hiking time calculator.
Your contact needs clear instructions, not just the plan. A contact who “waits a bit longer to be sure” costs hours. Write the escalation down and talk it through.
From check-in to alarm: what your contact does
 1You check in on time
Send a short message at the agreed time, even if it is only “all fine, at camp”. If you know signal will be missing, say in advance when you expect to be reachable again.
 2Missed check-in: try, then wait
If the message does not come, your contact calls and texts you. A missed check-in alone is often just a dead zone, so they wait until the agreed alarm time – but not longer.
 3Alarm time passed: call 112
At the alarm time your contact calls the emergency number (112 in the EU, otherwise the local number) and reads out the plan: who, where, route, camp, clothing, last contact.
 4Search starts at your route
Rescuers begin at the planned route and the place of the last check-in. This only works if you stick to the plan or update your contact when it changes.
On many trips you will not have signal at camp. That is fine as long as your contact knows it. Plan check-ins at points with likely coverage, such as a hilltop or the car park, and keep the alarm time realistic rather than tight. A short note on signal is in emergency signals.
Choosing conservative routes and camps
Your first solo trips should be boring on paper: an area you know, a route you have walked in daylight, phone signal along most of it, and a road or village within reach. Adventure comes from being alone outside, not from difficult terrain.
Route rules for solo hiking
- Known ground first. Walk the route once by day, or pick a forest you know well, for the first overnight.
- Bail-outs every hour or two. Mark paths that lead quickly to a road. They are your plan B if weather or an injury changes things.
- Avoid solo-only hazards. Deep or fast river crossings, scrambling, steep scree and glaciers are much riskier without a partner. Choose a bridge or a different route.
- Short days. Plan less distance than you could do, and arrive at camp with at least an hour or two of daylight left.
- Weather limits. Decide at home what wind, rain and temperature you accept; thunderstorms and heat waves are a reason to postpone. See reading the weather and heat and sun outdoors.
Where to camp alone
A good solo camp is safe from nature and discreet from people. Look up before you unpack: dead branches and leaning dead trees are the classic danger, especially in wind. Stay out of dry stream beds and flood zones, keep at least 60 m from water for camp and toilet, and pick a spot out of sight from paths, car parks and roads.

Wild camping rules differ by country, region and landowner, and this is not legal advice. Check what is allowed for the exact place in wild camping rules, and choose an official site, a shelter or a campsite when in doubt. A small campsite is also a perfectly good place for a first solo night.
Solo camp check before you pitch
- No dead branches or dead trees within falling distance
- Not in a hollow, dry stream bed or on a flood plain
- At least 60 m from water, out of sight of paths and roads
- Flat, drained ground and a sheltered side from the wind
- A known way back to the path, even in the dark
- Camping allowed here, and fire only if allowed and safe
Which skills should you have before going solo?
Solo bushcraft is not the place to learn a skill for the first time. Every skill you need on the trip should already be routine, so you can do it tired, cold, in the rain and in the dark. Four skills matter most.
| Skill | Minimum standard | Where to learn it |
|---|---|---|
| Navigation | Follow a route on the map, know where you are at every junction, take a bearing, find your way back to a path | Map and compass |
| First aid | Stop bleeding, treat blisters and burns, recognise cold and heat problems early, make an emergency call | First aid kit and basics, a first aid course |
| Fire | Light a fire in damp conditions with a second ignition source, keep it small and put it out completely – or cook on a stove | Fire starting, fire safety |
| Shelter | Pitch your tent or tarp in wind and rain within minutes, sleep warm at the forecast low | Tarp setups, camp setup |
Also useful: reading the weather, basic knots, water treatment and knowing what hypothermia looks like in yourself. Cold creeps up on solo walkers, because nobody comments that your speech is slurred or that you have stopped shivering.
A step-by-step progression
From garden to remote solo trip
- Garden or backyardTest tent, sleeping bag, stove and lights at night.
- Local solo overnighterKnown woods, short walk, signal, one night.
- Longer route aloneNew area, more distance, still with bail-outs.
- Remote or multi-dayOnly after many calm trips; add satellite backup.
Group trips are a good training ground: take the navigator role, set up camp yourself and run your own first aid kit while others are still around. Your first night out can be the step before the first solo night.
Phone, battery, offline maps and satellite messengers
A phone is your map, torch, camera and emergency line in one, so its battery is safety kit. But a phone alone is a single point of failure. Build communications in layers, so that losing one layer does not leave you without a way to navigate or call for help.

Keep the phone alive
- Start at 100 percent and carry a power bank with a short cable. How much capacity you need is covered in power on the trail and worked out by the power bank calculator.
- Download offline maps for the whole area and a margin around it before you leave. More in navigation gear and apps.
- Flight mode while walking saves battery; switch it off at planned check-in points.
- Keep it warm. Cold drains batteries quickly. At night the phone goes in the sleeping bag or an inside pocket.
- Keep it dry in a pocket or a small dry bag, and do not use the phone as your only light – carry a headlamp.
Satellite messengers and PLBs
Where there is no mobile signal, a satellite device can send an alert with your position. Two types are common: satellite messengers, which can usually send check-in messages and an SOS, and personal locator beacons (PLBs), which only send a distress signal to rescue services. Some newer phones can also send emergency messages by satellite. Rules for registering beacons and the services available differ by country, so check what applies where you live and where you walk.
| Trip | Minimum | Worth adding |
|---|---|---|
| Local woods, good signal | Phone, power bank, offline map, whistle, headlamp | Paper map and compass |
| Large forest, patchy signal | All of the above plus paper map and compass | Check-in points with known signal |
| Remote area, no signal | All of the above | Satellite messenger or PLB, tested before the trip |
| Winter or mountains | All of the above, spare batteries kept warm | Satellite device; shorter routes |
Emergency signals when you are alone
If you are hurt or stuck, call first: 112 works across the EU and in many other countries, even on other networks; elsewhere use the local number. Say who you are, where you are (coordinates from the map app, the nearest landmark, the trail name), what happened and what help you need, and stay on the line.
Without signal, make yourself easy to find. Stay where you are if your contact will raise the alarm, move to open ground if it is safe, and signal: three whistle blasts, or the Alpine distress signal of six signals per minute followed by a minute’s pause. A whistle carries much further than a voice and does not tire you. At night, flash your headlamp in the same rhythm. The full set of methods, from mirrors to ground signals, is in emergency signals.
Solo signal kit at a glance
- Whistle
- On the shoulder strap, not deep in the pack
- Headlamp
- Charged, with a spare battery or power bank
- Phone
- Location shown in coordinates, 112 known
- Bright item
- Tent, jacket or bag for visibility from the air
- Satellite device
- In remote areas, SOS function tested
First aid alone: treating yourself
First aid on yourself is harder than on others: one hand may be injured, shock makes you clumsy, and pain distorts judgement. Pack the kit so you can open it with one hand, keep it at the top of the pack and learn its contents by touch. The first aid kit guide lists what to carry; a first aid course is the best preparation for any solo walker.
If you hurt yourself alone
- Stop and sit down Put the tool away, sit before you feel faint and take a few slow breaths.
- Deal with bleeding first Press firmly on the wound with a dressing and keep pressing, then apply a pressure bandage. Spurting or uncontrolled bleeding: call 112 immediately while you keep pressing.
- Keep warm Get on your sit pad or mat, put on a warm layer and hat. Being still on cold ground cools you fast.
- Decide: walk out or call Can you walk safely to the nearest road before dark? If not, or if you are unsure, call for help early rather than late.
- Tell your contact Message your contact with what happened and your plan, even if you are walking out on your own.
Do not try to walk out on an injury that gets worse with every step, and never push on alone with signs of hypothermia, heat illness or a head injury. Calling early is not a failure; a rescue in daylight is safer for everyone. Typical problems and their treatment – cuts, burns, blisters, ticks – are explained in the first aid guide and ticks and insects.
Knife, axe and fire when nobody is around
Most bushcraft injuries come from cutting tools, and most fire problems from fires that grew too big or were not put out. Alone, the same mistake has bigger consequences, so you lower the risk on purpose.
Cutting tools
- Slow down. Work seated or kneeling, with a stable stance, and cut away from your body and legs. Keep the knife safety basics like the blood circle in mind.
- Prefer the saw. A folding saw does most wood jobs with less risk than an axe. Leave the axe at home on short solo trips, or use it only for small, controlled tasks; see axe safety.
- Stop when tired or cold. Cold fingers and fatigue are when slips happen. Do wood work early, in daylight.
- First aid within reach. Kit open-ready next to your work area, not buried in the pack.
- Carry legally. Knife carry rules differ widely by country; see knife laws.
Fire
Light a fire only where it is allowed and safe, keep it small, and keep water or soil ready to put it out. Keep at least 5 m between fire and tent or hammock, and at least 3 m from a synthetic tarp. Never leave a fire burning while you sleep or walk away; drown it, stir it and check it with the back of your hand, as explained in fire safety. In dry weather or when in doubt, use a stove or eat cold.
| Task | Risk alone | Lower it by |
|---|---|---|
| Carving and whittling | Deep cut to hand or thigh | Cutting away from the body, seated, kit in reach |
| Splitting wood | Glancing axe or knife blow | Saw and thin wood, baton only small pieces, or skip |
| Felling or big branches | Falling wood, nobody to free you | Do not do it solo – use dead wood on the ground |
| Campfire | Escaping fire, burns | Small fire, water ready, 5 m from the tent, never unattended |
| Stove in the porch | Tipped pot, carbon monoxide | Cook outside the tent on stable ground |
Night fear and the mental side of being alone
Almost everyone feels uneasy on the first solo nights. That is normal: in the dark, the brain fills gaps with worst cases, and every crack of a twig sounds huge. In most European forests, the noises are deer, badgers, foxes, birds, falling branches and the wind. Knowing this helps; a routine helps more.
Handling a noise at night
 1Hear it, name it
A crack or rustle wakes you. Tell yourself what it most likely is: an animal, a branch, the wind. Many animals are loud and clumsy at night.
 2Light on, look
If you want to know, switch on your headlamp and look. Most animals move off. Seeing a deer once makes the next noise much less scary.
 3Warm, fed, calm
A warm drink, a snack and a hat make a body feel safe. Cold and hunger make anxiety worse.
 4Same routine every night
Same order of tasks each evening, headlamp and whistle in the same pocket, earplugs if you want. Familiar steps quieten the mind.
Tools for a calmer mind
- Arrive early. Set up in daylight so you know your surroundings before dark. Walking in the dark is a skill of its own: see night skills.
- Sit still at dusk. Fifteen minutes of quiet watching as light fades shows you which sounds belong to the place. The sit spot practice trains exactly this.
- Plan the night. Know where your light, water, toilet spot and whistle are. Read wildlife encounters if larger animals live in the area.
- Allow yourself to go home. If fear or discomfort stays high, walking out or calling a lift is a valid choice. Next time, camp closer to home.
Loneliness and boredom are part of solo trips too. Many people bring a small book, a notebook or a carving project; others enjoy the silence. Over time, most solo walkers find the night becomes the best part.
Personal security: staying discreet
Problems with other people are rare outdoors, but being alone makes discretion sensible. The goal is not to hide in fear; it is to not advertise where a solo camper sleeps.
- Camp out of sight from paths, roads and car parks, and pitch late enough not to attract attention, where local rules allow that.
- No live location in public. Share your live location only with your trusted contact. Post photos after you are home, without exact spots.
- Keep the plan private. Your trip plan belongs with your contact, not on the car dashboard for everyone to read.
- Say little about your plans to strangers. “We are camping further on” is an honest-enough answer that reveals nothing.
- Trust your gut. If a place or an encounter feels wrong, pack up and move. You do not need a reason or a polite excuse.
- Keep phone, keys and headlamp on your body or in the tent at night, so you can leave quickly.

Women going solo: practical, not fearful
Many women hike and camp alone, and the safety basics are the same for everyone: a trip plan, a check-in, a sensible camp and confidence in your own skills. Wildlife, weather and slips are far more relevant to a solo trip than any story you may have heard. A few practical points come up often in conversations with women who camp alone:
- Your instinct counts. If someone makes you uncomfortable, you do not owe them friendliness or information. Move on, change camp, or walk out.
- Discretion is a tool, not a rule. Some women choose to say “my friend is meeting me later”; others prefer simply not to share plans. Both are fine.
- Hygiene on the trail. Pack menstrual products and a dedicated opaque pack-out bag, and plan washing water. The details are in hygiene outdoors.
- Build confidence step by step. Women’s outdoor groups and courses are a good way to practise skills and find future trip partners – or to feel ready to go alone.
Personal safety devices and self-defence are personal choices; check what is legal to carry in your country. The best protection remains the same as for everyone: someone knows where you are, and you can get out.
A dog as a solo companion
A dog makes many people feel calmer at night: it hears things first, and its relaxed reaction to most noises is reassuring. It is also company on long evenings. But a dog adds responsibility, not only safety. You must carry its water and food, follow leash rules in breeding season and near livestock, protect it from heat, cold and ticks, and have a plan if the dog is injured far from the road.
A dog does not replace a trip plan or a check-in. Before a solo trip with a dog, read camping with dogs, and do a few short overnighters together first so both of you know the routine.
Taking a dog on a solo trip
Pros
- Company and a calmer night
- Early warning of animals and people
- More reason to keep a routine
Cons
- Extra water, food and gear
- Leash rules and wildlife issues
- An injured dog is hard to carry out alone
The STOP rule for bad decisions
Accidents on solo trips rarely come from one big mistake. They come from a chain: a late start, a shortcut, darkness, a slip. The STOP rule breaks the chain. Decide at home that when you feel lost, rushed, scared, cold or hurt, you stop – before the next decision.
STOP: four steps before the next decision
 1S – Stop
Stop walking. Sit down, drink and eat something. Panic and hurry fade when you stop moving.
 2T – Think
What happened? Where was the last point you were sure of? Who knows where you are, and when will they raise the alarm?
 3O – Observe
Check daylight left, phone battery and signal, water, food, warmth and any injury. Look at the map and the ground.
 4P – Plan
Choose one of three: stay and make camp, walk out by the safest known route, or call for help. Then act calmly, step by step.
Personal rules that stop the chain early
- Two things wrong, turn back. Late and tired, or wet and lost: two problems together are the signal to take the bail-out.
- The turnaround time is fixed. When it comes, you turn around, wherever you are.
- No new risks after dark. No route changes, river crossings or wood cutting in the dark.
- No two-person jobs. Felling, deep wading and scrambling wait for a trip with a partner.
- When in doubt, call. An early call that turns out to be unnecessary is better than a late one.
Push on, turn back or call?
Are you injured, very cold or feeling unwell?
Yes → Stop, warm up, treat. If it does not clearly improve, call for help.No → Go to the next question.Do you know exactly where you are?
Yes → Go to the next question.No → Use the STOP rule, go back to the last known point, or stay put and call.Is there enough daylight and energy to reach camp safely?
Yes → Continue, and check again at the next checkpoint.No → Take the bail-out or camp early, and tell your contact.
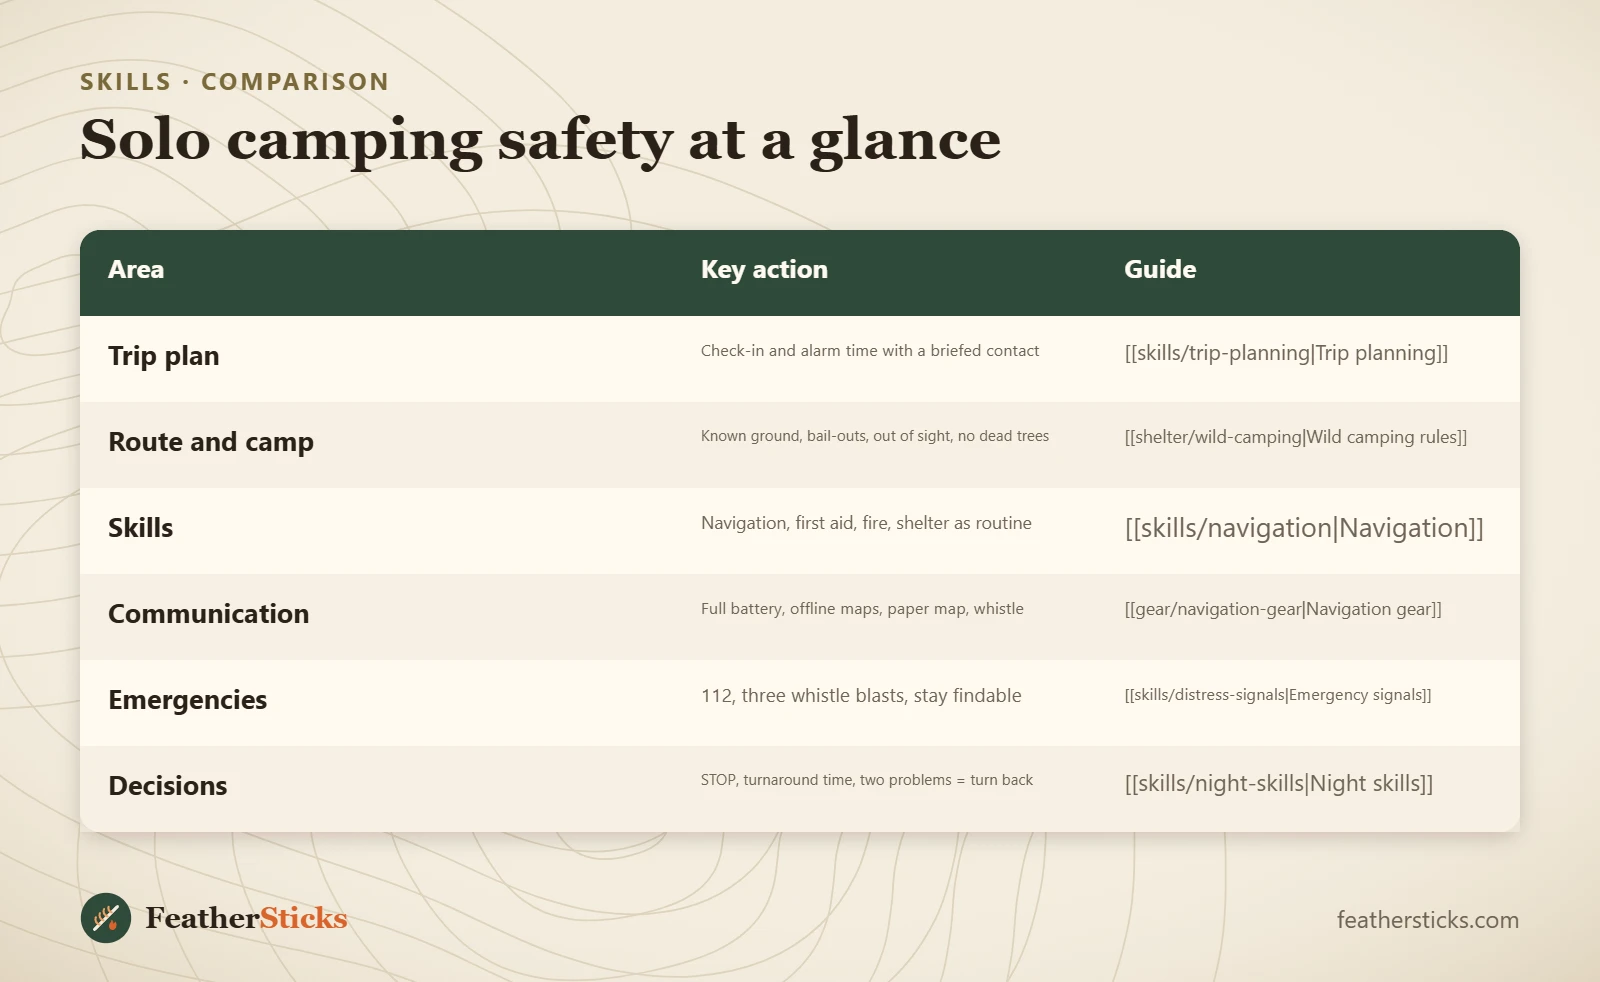
| Area | Key action | Guide |
|---|---|---|
| Trip plan | Check-in and alarm time with a briefed contact | [[skills/trip-planning|Trip planning]] |
| Route and camp | Known ground, bail-outs, out of sight, no dead trees | [[shelter/wild-camping|Wild camping rules]] |
| Skills | Navigation, first aid, fire, shelter as routine | [[skills/navigation|Navigation]] |
| Communication | Full battery, offline maps, paper map, whistle | [[gear/navigation-gear|Navigation gear]] |
| Emergencies | 112, three whistle blasts, stay findable | [[skills/distress-signals|Emergency signals]] |
| Decisions | STOP, turnaround time, two problems = turn back | [[skills/night-skills|Night skills]] |
Common mistakes
- Telling someone “I am going to the woods” without a route, a camp location, a return time or an alarm time.
- A contact who does not know what to do, or waits “a bit longer” after the alarm time.
- Choosing a new, remote area with no signal for the first solo trip.
- Relying on one phone with half a battery and no paper map.
- Felling trees, splitting with an axe or crossing a fast river alone.
- Sharing a live location publicly or posting the camp spot while still there.
- Pushing on after the turnaround time because the camp “must be close”.
What you need
- Written trip plan with a briefed contact
- Phone with offline maps, power bank and cable
- Paper map and compass
- Whistle on the shoulder strap and a headlamp
- First aid kit you can open with one hand
- Warm spare layer, hat and emergency foil blanket
- Satellite messenger or PLB for remote areas
Calculators for this topic
FAQ
Is it safe to camp alone in the woods?
What should I tell someone before hiking alone?
What do I do if my contact does not hear from me?
Do I need a satellite messenger or PLB for solo hiking?
How do I deal with fear at night when camping alone?
Is solo camping safe for women?
Should I take a dog when camping alone?
Check yourself
Completed6 quick questions from this guide. Nothing is sent anywhere.
Related step-by-step guides
-
 1
-
 1
-
 1