Your First Night Out: How to Plan a First Overnighter (Microadventure)
Your first night wild camping does not need a wilderness, a week off or expensive gear. It needs one mild, dry evening, a legal spot 20–60 minutes from home, a warm sleep system and a simple plan: walk out after work, sleep, be back by breakfast. That is a microadventure – and it is the bridge between reading about bushcraft and actually doing it.
This guide walks you through the whole first overnighter: where you may sleep legally, how to pick the spot and the weather window, the minimal kit with weights, a realistic timeline from front door to breakfast, what the night really feels like (noises, cold at 4 a.m., fear) and what to change next time. Everything else you need later is in the skills hub.
Step by step
-
1

Pick a legal spot close to home
Choose a place where sleeping out is allowed, 20–60 minutes from home or the car, on ground you already know by daylight.
-
2

Wait for a mild, dry night
Go when the forecast shows a dry night, light wind and a low of about 10 °C or warmer. If it looks doubtful, postpone – the woods will still be there.
-
3

Pack the sleep system first
Mat and a sleeping bag rated for the forecast low come first. Then shelter, headlamp, water, cold food, a warm layer, first aid and a charged phone.
-
4

Set up before dark
Arrive two hours before sunset. Check overhead, pitch the tarp low, lay out mat and bag and have the camp ready one hour before sunset.
-
5

Eat, get warm, sleep
Eat, change into dry layers and get into the bag warm. Keep lamp, water and shoes within reach. Rustling is normal; so is waking up a few times.
-
6

Pack up and leave no trace
Air the bag, pack, walk the site once for pegs and litter and leave. At home, write down three things to change next time.
What is a microadventure or overnighter?
A microadventure is a short, simple, local trip that still feels like an adventure. The classic form is the overnighter: you leave in the late afternoon or after work, walk a short distance, sleep outside for one night and are home again in time for breakfast or the office. No travel day, no route planning for a week, no big budget.
For a beginner this format has three big advantages:
- Low stakes. If you are cold, scared or soaked, home is less than an hour away. That knowledge alone makes most people sleep better.
- Little kit. One night in mild weather needs far less than a trekking tour. You can borrow or improvise most of it.
- Fast learning. One real night teaches you more about your sleeping bag, your mat and your nerves than ten evenings of reading reviews.
Where can you legally sleep outside?
This is the question that stops most first trips, so answer it first. The rules for sleeping outdoors vary enormously by country, region and land type. What follows is general orientation, not legal advice – always check the current local rules for the exact place you have in mind.
| Region | General situation | Good option for a first night |
|---|---|---|
| Scotland | Access rights include lightweight camping on most unenclosed land if you follow the Scottish Outdoor Access Code; some areas have seasonal byelaws | Small tent or bivvy well away from houses and roads, one night, no trace |
| Norway, Sweden, Finland | The right of public access allows a night or two on uncultivated land, away from houses, with care | A short walk from a trailhead; follow the national guidance on distances and fires |
| England, Wales, Northern Ireland | Generally only with the landowner’s permission; a few areas have their own arrangements | Ask a landowner or farmer, or use a small or “nearly wild” campsite |
| Germany, Austria, Switzerland | Rules differ by state or canton and are mostly restrictive in forests and protected areas | Designated trekking sites, private land with permission – see wild camping rules |
| USA, Canada | Dispersed camping is allowed on many public lands, but rules differ by agency, forest, park and province | Call the local ranger district or land office and ask about one-night dispersed camping |
Options that work almost everywhere
- Your own garden, balcony or a friend’s land – legal, zero travel, perfect for testing the kit.
- Private land with permission. Ask in person, say exactly where and when, promise no fire and an early start.
- Small campsites, designated nature pitches and host offers – simple bookable pitches in the woods, or private hosts who offer hikers a corner of a meadow for one night.
A tent-free night in a bivvy bag is treated differently from camping in some countries, but that is a grey area, not a loophole – and it never applies in national parks or nature reserves. For a first night, choose an option where you do not have to wonder whether someone will send you away at midnight.
How to choose the spot for your first night
The best first spot is boring on the map: close, familiar and easy to leave. Save the remote lake for night number five.

Five criteria that matter more than the view
- 20–60 minutes from home or the car. Far enough to feel away, close enough to walk out in the dark without drama. Estimate the walk with the hiking time calculator and add a margin for a full pack.
- Ground you know. Visit in daylight first, ideally on a walk the week before. You want to recognise the place and the path at dusk.
- Phone signal. Check it on your scouting walk at the exact spot, not on a coverage map. No signal is not forbidden, but it is one worry too many for a first night.
- A simple exit route. One clear path back that you could follow by headlamp. Basic map and compass skills help, but the first route should not need them.
- Water, or carry it. For one night it is easiest to carry 1.5–2 litres from home. If you plan to use a stream, you must treat the water.
The pitch itself
At the spot, the usual rules of choosing a camp site apply in miniature: level ground, slightly raised rather than in a hollow, no dead branches overhead, sheltered from the wind, not on a path or an obvious animal trail, and out of sight of houses and roads. Two trees 3–4 metres apart are handy for a tarp. Mark the spot on your phone map so you find it again at dusk.
Best season and weather window – and when to postpone
For a first try, be picky about the weather. You are not proving anything; you are collecting one good experience. In temperate climates that means late spring to early autumn, on a night that is forecast dry, with light wind and a low of about 10 °C or warmer. With an ordinary three-season sleeping bag and a decent mat, such a night is comfortable.
A few points beginners often get wrong:
- The low matters, not the afternoon high. A sunny 22 °C day can end in a 6 °C night under a clear sky. Look at the hourly forecast for 3–6 a.m.
- Clear nights are colder and wetter with dew than cloudy ones. A thin cloud cover is a blanket.
- Wind steals warmth. A light breeze keeps insects away; anything stronger makes tarp pitching and sleeping harder. The wind chill calculator shows how much colder it feels.
- The moon is irrelevant. A full moon is pretty and makes the woods brighter, a new moon gives more stars. Neither is needed and neither is a reason to wait.
- Daylight is your working time. Look up sunset and sunrise with the daylight calculator and plan backwards from sunset.
Midsummer nights are short and warm but bring mosquitoes and ticks; late summer and early autumn often give the best mix (the year in bushcraft). To understand what the sky is telling you on the walk in, read reading the weather.
| Forecast for the night | Decision | Why |
|---|---|---|
| Dry, light wind, low of 10 °C or warmer | Go | Comfortable with ordinary three-season kit |
| Dry, low of 5–9 °C | Only with a warmer bag and a good mat | The margin for mistakes shrinks |
| Showers possible | Go only if you have practised pitching your tarp or use a tent | Rain in the dark is the classic first-night spoiler |
| Steady rain, strong wind or gusts | Postpone | Wet kit, falling branches, no sleep |
| Thunderstorms forecast | Postpone | Lightning and falling trees are real dangers in woodland |
| Storm or fire-danger warnings, low below 5 °C | Postpone | Not a beginner’s night – see hypothermia |
The minimal kit that works
For one mild night you need surprisingly little, but the few things must do their job. The order of importance is clear: sleep system first, then shelter, light, water and food, a warm layer, first aid and a phone. Knives, axes, saws and fire kit can stay at home for this trip.

| Item | What matters | Typical weight |
|---|---|---|
| Sleeping mat | Insulates from the ground; foam or inflatable – see sleeping gear | 400–700 g |
| Sleeping bag | Comfort rating at or below the forecast low | 900–1,500 g |
| Tarp with lines and pegs (or bivvy bag) | About 3 × 3 m covers one person – see choosing a tarp | 600–900 g |
| Groundsheet | Keeps mat and bag off damp ground | 100–200 g |
| Headlamp + spare batteries | Hands free, a red or dim mode is kind to night vision – see headlamps | 80–120 g |
| Water, 1.5–2 litres | For the evening and the morning, see water containers | 1,500–2,000 g |
| Food: dinner, breakfast, snacks | Cold and simple, plus a snack for the night | 500–800 g |
| Warm layer, hat, dry socks | Insulated jacket or fleece, kept dry – see clothing | 500–800 g |
| First aid kit | Plasters, tick tool, personal medication – see first aid kit | 150–250 g |
| Phone + power bank | Fully charged; offline map of the area | 300–400 g |
| Backpack, 30–40 litres | Whatever you own that fits – see backpacks | 900–1,500 g |
| Small items | Sit pad, rubbish bag, toilet kit, lighter, whistle | 200–300 g |
Total roughly 6–9.5 kg. Weights are typical ranges for ordinary, affordable equipment, not targets.
You do not have to buy all of this – borrow a mat and a bag and use the daypack you own. The Kit Builder puts together a list for your season and trip length, and the full bushcraft kit list explains every item. Wear the sturdy shoes you already walk in – for 40 minutes on a known path nobody needs new boots.
Why the sleep system comes first
A cold night ruins the trip; a slightly leaky tarp usually does not. The sleep system has three parts that only work together, and the mat is the one beginners underestimate most. Your body weight squashes the sleeping bag’s filling flat underneath you, so the insulation below you comes almost entirely from the mat.

Not sure whether your bag and mat are enough for the forecast? The sleep system calculator gives an estimate. As a rule of thumb for a mild first night: a three-season bag, a mat with an R-value of about 2–3, a hat and one spare warm layer.
Which shelter for the first night?
Take what you have and have practised with. A small tent is the easiest and most reassuring on a campsite. A tarp is lighter and lets you see the woods – learn one simple pitch from our tarp shelter setups and check the size with the tarp size calculator. A bivvy bag needs no trees at all. If you already own a hammock, hammock camping works too, but it needs insulation underneath just like a ground sleeper needs a mat. The comparison table further down sums up the options; for the bigger question, read tent, tarp or hammock.
A realistic timeline from front door to breakfast
Beginners nearly always leave too late. The whole evening becomes relaxed if you plan backwards from sunset: find tonight’s sunset with the daylight calculator, work out the walk with the hiking time calculator, and add an hour of reserve.

The evening, counted back from sunset
- −3 h: leave homeFinal forecast check, send your plan to someone, fill the water bottles, go.
- −2 h: arriveLook at the spot calmly. Check overhead and the ground, decide where you sleep.
- −1 h: camp readyTarp up, mat and bag out, lamp and water placed. Now you can relax.
- Sunset: eat and wind downDinner, a short walk to find the toilet spot, change into dry layers.
- Dark: into the bagGet in warm. Listen to the woods for a while – it is the best part.
- Sunrise +1 h: goneAir the bag, eat, pack, check the site, walk home.
Setting up before dark
With two hours of light you have time to do things in the right order – the same order as in a full camp setup, just smaller. Shelter and bed first, comfort second.
Setting up a one-night camp in four moves
 1Look up and check the ground
Before you unpack, look into the crowns above the sleeping place. Dead trees and hanging branches are the real danger in woodland – if you see any, move on. Then clear cones, sticks and stones from a strip the length of your body.
 2Pitch the tarp low
Tie the ridgeline at about hip height (roughly 1 m) between two trees and peg the back edge to the ground, back to the wind. A low tarp is warmer and quieter. Two simple knots are enough; pre-tied lines from your cordage kit save time.
 3Mat down, bag on top
Groundsheet, then mat, then the sleeping bag – taken out of its stuff sack straight away so the filling can loft. A bag unpacked at bedtime is noticeably colder for the first hour.
 4Put the night things within reach
Headlamp, water bottle, shoes and phone go next to the head end, always in the same place. Do it now, in daylight: at 2 a.m. you will find them by touch.
What it should look like when you are done
- The tarp is taut, no sagging panels, the lowest edge towards the wind.
- Your whole mat is under the roof with a hand’s width to spare on all sides.
- The pack is closed, under the tarp or in a rubbish bag, with spare clothes in a dry bag inside.
- You have walked to your toilet spot once and back, so you know the way.
Food without fire – and when a fire is allowed at all
You do not need a fire or a stove for one night. Cold food is lighter, quicker, silent and legal everywhere. Bring more than you think: you will be hungrier than at home, and food is fuel for staying warm.
| Meal | Ideas | Tip |
|---|---|---|
| Dinner | Filled rolls or wraps, cold pasta or couscous salad from home, cheese, sausage, raw vegetables | Prepare it at home in a box – no cutting in the dark |
| Something warm | Tea, broth or hot chocolate from a vacuum flask filled at home | A hot drink before bed is worth its weight |
| Night snack | Nuts, chocolate, a cereal bar within reach of the sleeping bag | Eating something at 4 a.m. helps you warm up again |
| Breakfast | Muesli with milk powder, bread, fruit – or simply walk home to breakfast | Keep some of the flask for the morning |
How much water you need depends on the weather and the walk; the water calculator gives a figure, and 1.5–2 litres covers a mild evening and morning without cooking. For longer trips, the food planner and our guide to trail food planning help with quantities. Keep food packed and off the ground at night – see storing food at camp.
What about a campfire or stove?
Open fires are forbidden or restricted in and near forests in many countries, often for the whole dry season. Even where a fire is allowed, your first night has enough new things in it.
- Only light a fire where it is clearly permitted: an official fire site, or private land with the owner’s explicit consent, and never during a fire ban or a high fire-danger level. Read campfire safety and leave no trace first.
- A small stove is the better step two – but in some regions stoves count as open fire as well. Our overview of camp stoves explains the types. Where a fire is allowed, foil packets are an easy first hot meal.
- The flask is the beginner’s stove. Hot water from home gives you tea in the evening and in the morning with no flame at all; later, camp coffee is the natural next step.
The night itself: noises, cold at 4 a.m. and the toilet question
Here is the honest version: you will probably sleep worse than at home. Most people wake several times during their first night outside, lie awake for a while and still feel oddly rested and proud in the morning. Knowing what is normal takes away most of the worry.
Four moments almost every first night has
 1Something rustles
In still night air and dry leaves, a mouse or a hedgehog sounds like something large. Large animals are usually the quieter ones. Switch on the lamp if you like, look, and you will almost always see nothing or something small.
 2Cold in the small hours
The coldest time is just before dawn, often around 4 a.m. Do not lie there shivering: put on the warm layer and hat, eat the snack, tense and relax your muscles for a minute, and check that you are still fully on the mat.
 3You need the toilet
Go. A full bladder keeps you awake and costs warmth. Shoes on, lamp on, 20–30 steps away from where you sleep and away from water. For anything more than a pee, follow the cathole rules in toilet and hygiene outdoors.
 4You want to go home
Then go. You chose a spot with a known way out for exactly this reason. Pack calmly, walk by headlamp and try again another night – nobody keeps score.
What animals really do at night
Wild animals hear and smell you long before you notice them, and nearly all of them want one thing: distance. What you hear are mostly mice, birds, hedgehogs, deer moving through and, near villages, cats and foxes. A roe deer’s alarm bark sounds startlingly like a hoarse dog; curious foxes may come close to look for food and leave when you move.
Which larger animals live in your region, and how to behave around them, is covered in wildlife encounters – read the section for your country, because the advice for wild boar in Central Europe is not the advice for bears in North America. Two rules apply everywhere: do not sleep on an animal trail, and keep food sealed and away from your head. If you want to know who visited, look for prints in the morning with our animal tracking guide.
Cold from below, damp from above
If you get cold, the cause is nearly always one of four things: you slid off the mat, you went to bed already chilled, you are wearing damp clothes, or you have not eaten enough. Fix those before you blame the sleeping bag. Persistent shivering, clumsiness and confusion are warning signs of hypothermia – on a mild night this is unlikely, but if you cannot get warm, get up, move, and walk out.
Condensation and dew surprise everyone. On a clear, still night the outside of your sleeping bag, the tarp and the grass get wet without a drop of rain. Under a tarp it is much less than in the open; in a bivvy bag or small tent some moisture on the inside is normal. Keep your face outside the bag so your breath does not soak the filling, and air everything in the morning.
Fear and being alone: honest, practical coping
Feeling uneasy alone in the dark is not weakness; it is an old and sensible instinct. It fades with experience, not with arguments. So the method is to give the instinct as little to work with as possible and to raise the difficulty in small steps.
Tell someone the plan
The most effective single measure costs nothing: one person knows where you are and when you will be back.
The message you send before leaving
- Where exactly: map pin or coordinates of the sleeping spot and where the car is parked
- When you leave and when you will be back at the latest
- A fixed check-in: “I’ll text by 8 a.m.”
- What the other person should do if they hear nothing by an agreed time
- Who is with you, if anyone
If something does go wrong, a whistle and a charged phone are your tools; how to call for help effectively is explained in emergency signals.
Set a turn-back rule before you go
Decide at home, in daylight, under which conditions you will pack up – then it is not a defeat at 1 a.m., it is just the plan.
Stay or walk out?
Are you warm and dry, or can you become so within 15 minutes?
Yes → Stay. Add a layer, eat, check the mat.No → Pack and walk out while you still feel fine.Has the weather turned clearly worse than forecast (storm, thunder)?
Yes → Leave the trees and walk out by the known route.No → Stay. Tighten the tarp, keep kit dry.Is the fear still strong after 30 minutes of light, music or a phone call?
Yes → Go home. You have still learnt the route, the kit and the setup.No → Stay. It usually eases once you have named it.Has a person or situation made you feel unsafe?
Yes → Trust the feeling, pack and leave; call someone on the way.No → Stay.
Climb the ladder one rung at a time
You do not have to start alone in a forest. Each of these steps removes one unknown, and you can stay on any rung as long as you like.
Three rungs to the first solo overnight
 1Garden or balcony
Sleep ten metres from your own door, with the exact kit you plan to take. You test mat, bag and night noises with zero risk – and if the bag is too thin, you find out next to a warm bed.
 2Campsite
A small campsite adds a real walk-in, a new place and other people’s noises, but keeps toilets, water and company nearby. A fine place for the first night with a tarp or bivvy.
 3Trekking site or land with permission
Now you are on your own in the woods, but you know you are allowed to be there. That certainty is what lets you sleep. After that, the choice of places is yours – within the local rules.
Small things that help in the moment
- Light is allowed. Switch the headlamp on, look around, switch it off again. Seeing the same empty trees three times is boring, and boring is good.
- Something familiar. A podcast at low volume, a book, a message to a friend. This is not cheating.
- Stay warm and fed. Cold and hunger make every fear bigger.
- No alcohol as a sleep aid. It makes you colder, sleep worse and judge worse.
With a friend or with children
There is no rule that the first night has to be solo. Going with one other person halves the worry, lets you share a tarp and a flask and means help is at hand if someone twists an ankle. Agree beforehand that either of you may call it off. A dog can come along too, but read camping with dogs first. Going alone later is then a small step rather than a leap.
The first night with children
Children are often braver than adults – as long as they are warm, fed and not rushed. Start in the garden or on a campsite, keep the walk short, and let them carry their own headlamp and a small pack with their sleeping things and a cuddly toy.
- Warmth first. Children cool down faster and say so later. A proper mat, a bag that fits their length, hat and dry sleep clothes are not optional.
- Arrive early. Three hours of light instead of two: time to explore, build, eat and get used to the place before dark.
- Explain the night in advance. What will rustle, where the toilet spot is, that the lamp may stay on, that going home is always possible.
- One adult per small child sleeping right next to them; clear rules about staying in sight and about the stove or flask.
Ideas for activities, age-appropriate tasks and knife rules are in bushcraft with kids, and outdoor games for kids fill the evening.
Morning routine and leaving no trace
The morning is the reward: birdsong starts before the light, the air is cool, and you are already outside. Keep the routine short and the site cleaner than you found it.
The last half hour at camp
 1Air the sleeping bag
Turn the bag inside out or hang it over the ridgeline while you eat. Ten minutes of moving air removes much of the night’s moisture; the rest dries at home. Shake dew off the tarp before folding it.
 2Walk the site in lanes
When the pack is closed, walk the whole area slowly in lanes and look at the ground. Pegs, bits of cord, tissue and wrappers are what gets left behind. Take other people’s litter too if you can.
 3Write down three things
While it is fresh – at the spot or over breakfast – note what was cold, what was damp and what you carried without using. These three lines are your best kit advice.
Leave no trace, in short
- Nothing stays: all rubbish, food scraps and toilet paper go home in the rubbish bag.
- No cut branches, no trenches, no rearranged stones or logs.
- Fluff up flattened grass and scatter leaves over the sleeping place.
- Leave early and quietly – before walkers, hunters and foresters start their day.
At home, do the unglamorous part straight away: hang up the sleeping bag and tarp until they are completely dry, empty the pack, recharge the lamp and power bank, and check yourself for ticks.
What to note afterwards – and the next step up
Your notes turn one night into experience: Was I warm at 4 a.m.? Where was I damp? What did I not use, what did I miss? How long did the setup really take?
Then change one thing at a time. If you alter season, shelter and distance all at once and have a bad night, you will not know why.
| Step | What changes | What to learn first |
|---|---|---|
| Same trip, less kit | Leave out what you did not use | Pack with the Kit Builder |
| Tarp only, no tent | More contact with wind and weather | Tarp setups for wind and rain |
| Two nights | Water resupply, more food, damp kit on day two | Water treatment and meal planning |
| A legal fire or stove | Hot food, more responsibility | Fire safety, camp stoves |
| Colder season | Long nights, real cold | Winter camping and a warmer sleep system |
From here the whole site opens up: the shelter hub for better roofs, the gear hub for smarter packing and the beginner’s guide to bushcraft for the skills that make camp life easier.
Troubleshooting: cold, damp, sleepless, rain
Almost every problem of a first night has a simple cause. Find the symptom, apply the fix on the spot, and note the lasting solution for next time.
| Problem | Likely cause | Fix tonight | Next time |
|---|---|---|---|
| Cold from below | Slid off the mat, mat too thin | Get back on the mat; put the empty pack, jacket or sit pad under hips and shoulders | Warmer mat or foam mat underneath |
| Cold all over | Went to bed chilled, hungry or in damp clothes | Dry layers and hat on, eat, move for a minute, warm drink from the flask | Bag rated for the low; get in warm |
| Bag damp outside | Dew or condensation | Ignore it for one night; keep your face out of the bag | Sleep under the tarp, air the bag in the morning |
| Could not fall asleep | Adrenaline, unfamiliar noises, went to bed too early | Lamp on, look around, read or listen to something; accept resting instead of sleeping | Earplugs, a garden night, a friend |
| Rain starts | Forecast changed | Lower the tarp, move kit to the middle, put spare clothes in the dry bag | Practise a storm pitch; carry a bivvy bag |
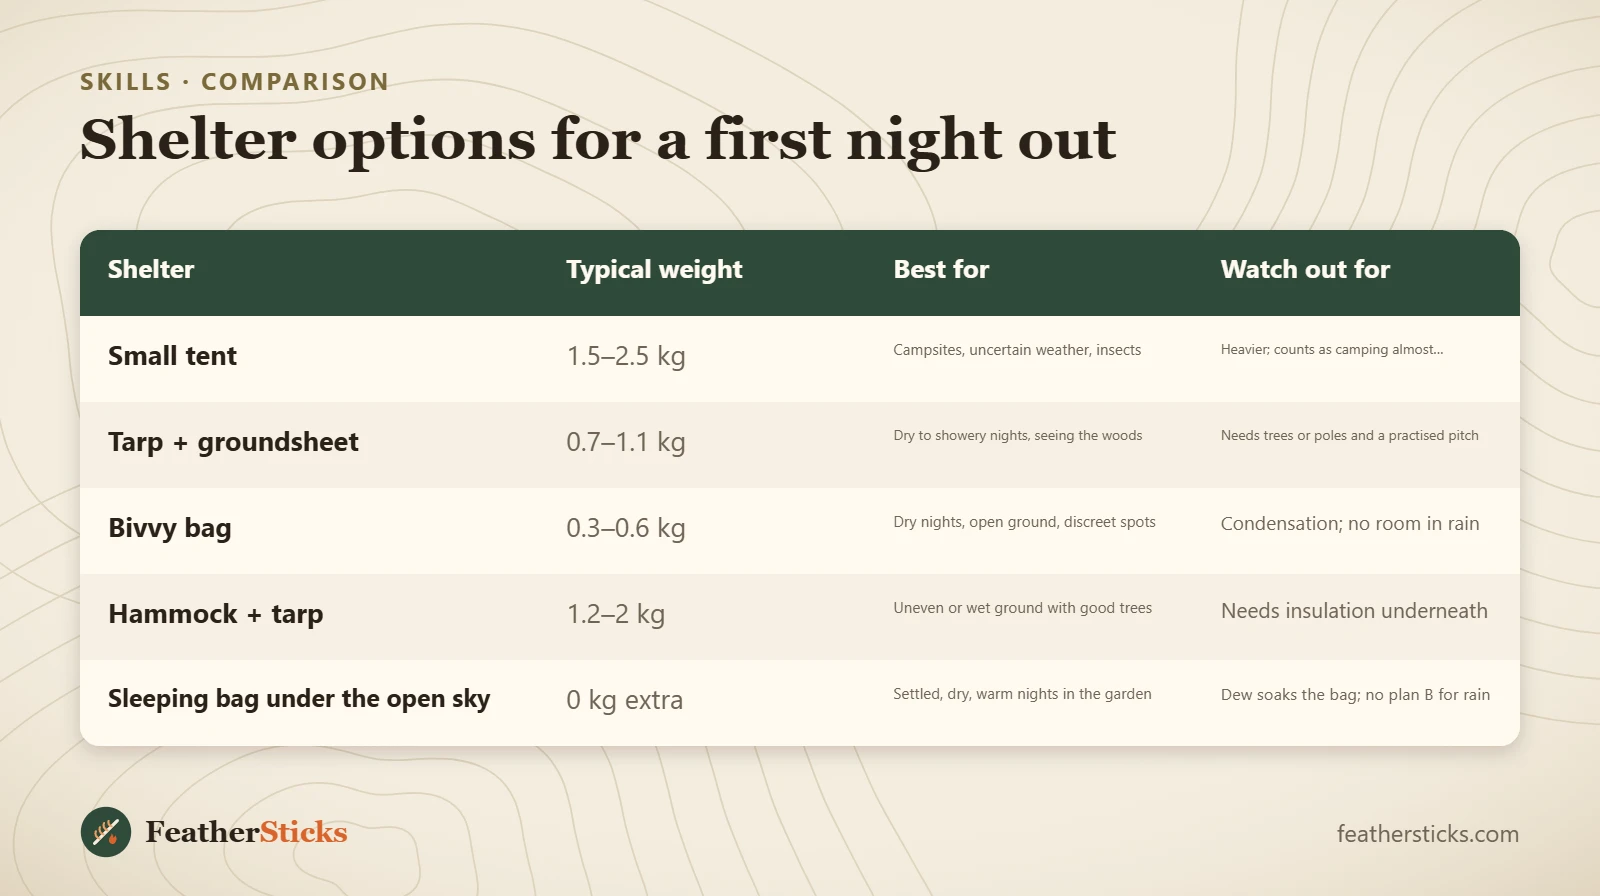
| Shelter | Typical weight | Best for | Watch out for |
|---|---|---|---|
| Small tent | 1.5–2.5 kg | Campsites, uncertain weather, insects | Heavier; counts as camping almost everywhere |
| Tarp + groundsheet | 0.7–1.1 kg | Dry to showery nights, seeing the woods | Needs trees or poles and a practised pitch |
| Bivvy bag | 0.3–0.6 kg | Dry nights, open ground, discreet spots | Condensation; no room in rain |
| Hammock + tarp | 1.2–2 kg | Uneven or wet ground with good trees | Needs insulation underneath |
| Sleeping bag under the open sky | 0 kg extra | Settled, dry, warm nights in the garden | Dew soaks the bag; no plan B for rain |
Common mistakes
- Leaving too late and pitching in the last light – plan to arrive two hours before sunset.
- Saving weight on the mat. The ground, not the air, is what makes most first nights cold.
- Picking a spectacular but far and unknown place instead of a boring one 20–60 minutes away.
- Not checking whether sleeping there is allowed, then lying awake listening for footsteps.
- Going to bed cold, hungry or in the damp clothes from the walk in.
- Telling nobody where you are, or having no turn-back rule and feeling trapped at 1 a.m.
What you need
- Sleeping mat (foam or inflatable, R-value about 2–3)
- Three-season sleeping bag with a comfort rating at or below the forecast low
- Tarp of about 3 × 3 m with lines and pegs, or a bivvy bag or small tent
- Groundsheet
- Headlamp with fresh batteries
- Water bottles for 1.5–2 litres and a vacuum flask
- Insulated jacket, hat and dry sleep socks in a dry bag
- First aid kit, charged phone, power bank, whistle and a rubbish bag
Calculators for this topic
FAQ
Is it safe to sleep alone in the woods for the first time?
Do I need a tent for my first night outside?
What temperature is too cold for a first overnighter?
How far from home should my first wild camp be?
What do I do if I get scared in the night?
Can I have a campfire on my first night?
Check yourself
Completed6 quick questions from this guide. Nothing is sent anywhere.
Related step-by-step guides
-
 1
-
 1
-
 1