Moving Safely at Night: Night Hiking Tips for Walking in the Dark
The best night hiking tips are simple: prepare the route by daylight, give your eyes time to adapt, keep your light low and dim, walk slower than you think you need to, and stop early if you are unsure. After dark, distances feel longer, ground is harder to read and cold and tiredness arrive sooner, so small mistakes grow quickly. With a few habits, however, a night walk can be calm, safe and memorable.
This guide explains how to walk in the dark: why things go wrong, preparation, light discipline, walking technique, navigation, wildlife, cold, finding the way back to camp, night toilet trips, fire, a night walk with children and what to do if you are lost. It is part of our bushcraft skills guides and builds on headlamps and camp lighting and map and compass navigation.
Step by step
-
1

Plan by day, tell someone
Walk or study the route in daylight, check sunset and twilight, set a turn-back time and tell someone where you are going.
-
2

Protect your night vision
Dark adaptation takes 20–30 minutes and white light undoes it. Use red or very low light and switch off to look around.
-
3

Keep the light low
Use a low or medium mode and aim the beam a few steps ahead. Never shine it into anyone's face.
-
4

Walk slowly and together
Shorten your stride, feel with your feet, keep a fixed order 2–3 m apart and count heads at every junction.
-
5

Navigate with big features
Follow handrails, aim for catching features and count paces between points you know.
-
6

If unsure, stop
Stop, stay, get warm and signal. A calm night in one place beats walking on into unknown ground.
Why is walking at night different? What goes wrong in the dark
Walking in the dark is not just walking by day with less light. Your brain gets far less information, and almost every error you make is a result of that. Knowing the typical failure points makes them easy to avoid.
- Distances and terrain are misjudged. Without shadows and colour, depth disappears. Steps look flatter than they are, a root looks like a shadow, and a gap in the trees looks like a clearing. A path that took an hour by day often takes noticeably longer after dark.
- Cold arrives early. Temperatures usually fall after sunset, you move more slowly and you stop more often. A walker who was comfortable at 5 pm can be cold by 9 pm.
- Fatigue builds up. Concentrating on every step is tiring, and tired people make poor decisions. They also skip the "stop and check" habit that prevents most navigation errors.
- Groups string out. The slow walker at the back loses the light of the person in front and walks alone in the dark.
The good news: none of these problems needs special equipment. They need preparation and discipline, which is what the rest of this guide covers. If you are new to sleeping outdoors, read it together with your first night out.
How do I prepare for a night walk? Route, timing and telling someone
Good night navigation starts in daylight. The safest first night walks are on a route you already know, in mild and dry weather, close to camp or home, with a clear end point. Save unfamiliar ground for daytime.
Walk the route by day first
If you can, walk the same route once in daylight. Note junctions, stream crossings, steep or rocky sections, fences and anything that looks different in the dark, such as fallen trees across the path. Write down or memorise two or three landmarks per junction. If the route is new to you, plan it on the map and mark the places where a wrong turn is easy.
Time it with sunset and twilight
Check the sunset and daylight calculator for your date and place, and the moon phase calculator to see whether the moon will light your way. After sunset there is still usable light during civil twilight, in central Europe roughly 30–50 minutes, but it fades quickly under trees. Decide in advance whether you want to be back in camp by the end of twilight or whether you plan to walk after it. Then add a margin: night walking is slower than the daytime figure from the hiking time calculator, so plan more time than you think you need and set a fixed turn-back time.
Tell someone
Tell a reliable person where you are going, who is with you, which route you will take, when you will be back and when they should start worrying. Agree what they should do if you do not report in. The trip planning guide shows a simple plan you can send.
Before you step into the dark
- Route known or walked by day; junctions and landmarks noted
- Sunset and end of twilight checked; turn-back time set
- Someone knows the route, the group and the return time
- Headlamp in a reachable pocket, spare batteries or a backup torch packed
- Red light mode tested and the lock-out sequence still known
- Warm layer, hat and gloves in the pack, even if the evening is mild
- Whistle, map and compass, phone charged and kept for emergencies
- Water, a snack and a small first aid kit
- Group order and signals agreed before you start

How do I improve night vision? Dark adaptation explained
You cannot improve your night vision by training, but you can stop destroying it. In the dark the pupil opens wide and the eye slowly becomes more sensitive to dim light. This process is called dark adaptation. A large part of it happens in the first minutes, but full adaptation takes around 20–30 minutes. One look into a bright white lamp, car headlights or a phone screen resets much of it, and you start again.
That is why the biggest night vision tip is a habit, not a gadget: avoid bright white light, and when you need light, use as little as possible.
Dark adaptation in four pictures
 1White light shrinks the pupil
Bright white light closes the pupil and undoes most of your adaptation. Even a short glance at a phone screen at full brightness costs you minutes.
 2Red light keeps eyes ready
Red light disturbs dark adaptation far less, so you can read a label, find a zip or check the group and still see the path afterwards. It shows little colour, so red map markings vanish under it.
 3Light off: give it time
Switch off and wait. After a few minutes you start to see the skyline and gaps between trunks, and after 20–30 minutes most of your adaptation is back. Moonlight or starlight is usually enough to walk on open paths.
 4Cover one eye
If you must use bright white light, close or cover one eye. It keeps its adaptation, and when the lamp goes out you can open it and see far better. The same trick works when headlights sweep over you.
Looking at things at night
- Look slightly beside a faint object rather than straight at it. The centre of the eye is less sensitive in the dark than the area around it, so dim objects often seem to appear when you glance past them.
- Use the skyline. Even on a dark night the sky is lighter than the trees, so the outline of the forest edge and gaps in the canopy are visible long after the ground has disappeared.
The practical trade-off: a lamp makes you see the next three steps, but darkness lets you see the whole landscape. Good night walkers switch between the two. For details on lamps, modes and runtimes, see headlamps and camp lighting.
How to use a headlamp when walking at night: modes, angle and spare batteries
Light discipline means using the least light that does the job and aiming it well. Our lighting guide gives the numbers; for night walking they translate into a simple rule.
| Situation | Light | Why |
|---|---|---|
| Chores at camp, packing, toilet | 10–50 lm or red | Keeps night vision, does not dazzle others |
| Clear path, in company | 100–200 lm, low or medium mode, beam a few steps ahead | Shows roots and steps without blinding you |
| Searching for a marker or junction | 300 lm or more, briefly | Reach to find signs and gaps, then back to low |
| Fog, drizzle or snowfall | Low mode, light held low | A bright beam reflects back from the droplets |
| Talking to someone | Beam down or red | White light in the face destroys night vision |
Values are practical guides, not norms. Lower modes also run far longer than the maximum.

Angle, height and the hand torch
A headlamp from eye level lights the ground at a steep angle, which removes shadows and flattens roots and stones. A light held low, at hip height, strikes the ground at a flatter angle and makes every bump cast a shadow. Many walkers use a headlamp on a low mode and carry a small hand torch for tricky ground. Tilt the lamp down until the bright centre of the beam lands a few steps ahead of you; keep it off other people's faces.
Modes and spares
- Know your lamp's buttons by feel, including red mode and the lock-out. Practise at home.
- Start in the lowest mode that works and raise it only for a moment.
- Carry a spare set of batteries, or a second small torch, in a pocket and not at the bottom of the pack. In frost, keep the lamp or the spare cells close to your body: cold batteries dim early, see the battery tips in the lighting guide.
- Decide before you leave who in a group carries which spare. One shared backup is not enough if the group splits.
How do I walk in the dark? Technique for feet, poles and balance
Most injuries at night are twisted ankles and falls, and most of them come from a stride that is too long and a weight that lands before the foot has found the ground. The fix is a different way of walking.
- Shorten your stride and keep your knees slightly bent, so your body can absorb surprises.
- Feel with your feet. Place the foot gently, sole flat, and shift your weight only when the ground feels stable. Sturdy, well-fitting boots with a rigid sole make this easier than soft trainers.
- Keep your head up now and then. Look at the ground ahead, then at the skyline, then back again.
- Use a pole or stick held ahead of you, or trekking poles. It gives you a third point of contact on slopes and warns you of steps, holes and puddles. A stick held in front of your body also protects your face from branches.
- Slow down on slopes, wet roots, wet rock, leaves and frost. These are the surfaces that slip.
- Stop to do other things. Do not eat, drink, read the map or fiddle with a zip while walking. Stop, do it, then walk on.
Plan generous time and check your real pace on the first walks; the hiking time calculator gives a daytime starting point.
Staying together as a group
The most common night problem in a group is not getting lost but getting separated. A simple system prevents it.
Group order and head counts
 1Fixed order
Decide the order before you leave: a confident navigator at the front, the slowest walker directly behind them, an experienced person at the back with a red or low light. Nobody overtakes without asking.
 22–3 m apart
Stay close enough to see the light ahead of you, but far enough not to step on the heels of the person in front. Keep the light of the person behind you in the corner of your eye.
 3Count at every junction
At every junction, gate or stream, the group stops and counts off aloud from front to back. Do the same after every break. The tail person says the last number.
 4Close the gap
If a gap opens, the leader stops and waits, and the tail calls "stop". Nobody walks on to catch up alone. If someone is missing, stay where you are and call or whistle, as in emergency signals.
With children or an inexperienced group, shorten the distances and give everyone a job: "leader", "tail" and "counter". A small light clipped to the back of each pack makes it easy to see who is in front. Walking in a line also allows the leader to call out roots and steps along the chain: "root", "step down", "puddle".
Noises and wildlife at night: what is out there?
The forest is not silent at night; it is simply active in a way you do not see by day. Most of what you hear are small animals, wind in the leaves, falling twigs and creaking branches. In central Europe you may also hear roe deer barking, foxes calling, owls, and wild boar rooting. All of them avoid people if they can.
- Stop and listen. Switch the lamp off and stand quietly for a minute. Most noises become obvious, and it is exactly what a sit spot trains by day.
- Do not shine light at animals to see what they are. Light dazzles them and disturbs their nighttime activity.
- Give wildlife space and a way out. A boar sow with young or a startled deer is the situation to avoid. Keep dogs close and on the lead, and avoid thick cover where an animal could be surprised.
Cold and layers: how to stay warm on a night walk
Even on a mild evening, the air cools quickly after sunset, and you cool even faster when you stand still, sit or wait for a slow group member. The classic mistake is to start the night walk in the clothes you wore in the afternoon.
- Dress for standing still, not for walking. Carry a warm mid-layer or insulated jacket, a hat and gloves, and put them on at the first stop, before you feel cold.
- Add the layer early, remove it early. Put on a layer when you stop, and take it off before you start sweating. Wet clothing cools you much faster, see clothing and the layering system.
- Protect your head, hands and feet. They lose heat and show cold first.
- Watch the whole group. Shivering, clumsiness, slurred speech and silence can be early signs of cooling. The hypothermia guide explains the stages and the first response.
How do I find my way back to camp in the dark?
More people lose their way on the last 100 m back to camp than on a long hike. Camp looks different in the dark and the trees all look alike. Set up your return before you need it.
- Choose a camp that is easy to find. Pitch near a clear feature such as a path, a stream or a forest edge, see camp setup.
- Mark the paths you will use. Reflective tape or reflective cord on guylines, a light-coloured cord between camp and the toilet spot, and reflective markers at junctions work well. They shine back when your lamp hits them.
- Glow sticks. A chemical glow stick is a simple, lightweight, generic marker. Use them only where they are really needed, hang them where they cannot fall, and take every one home. A used glow stick is litter.
- Take every marker back. Leave No Trace applies at night. Remove all tape, cord and sticks when you leave.

The night toilet trip: how to do it safely
The night toilet trip is the most common reason people walk alone in the dark, and the most common way to get briefly lost close to camp. A few habits make it routine.
- Choose and mark the spot in daylight, on a short, clear route. The distances and rules in the outdoor toilet and hygiene guide still apply, so do not go farther or closer than the daytime plan.
- Take a light, red if possible, and a shoes-on rule: no bare feet, no sandals.
- Tell the group, especially with children. Nobody leaves without someone knowing.
- Keep camp in sight and always check where your marker is before you start digging.
- Wash your hands and bury or pack out as you would by day.
Night toilet trip step by step
 1Marker at the tent
Fix a dim marker, such as a light-coloured cord or a glow stick that you will take back, to the tent door or the ridgeline. Put shoes and lamp by the door.
 2Follow the markers
Walk slowly with the lamp on red or low. Reflective markers at junctions shine back when your light touches them. Do not take a different way back.
 3Keep camp in sight
At the spot, switch off or shield your lamp for a moment and check that you can still see your camp marker. If you cannot, go back along your markers, not across country.
Fire at night: extra care in the dark
A fire is the natural centre of a camp at night, but darkness makes accidents more likely: trip hazards, hot sticks, children running and poor visibility of sparks.
- Prepare in daylight. Collect wood, build the fire ring and clear the area before dark. Finding wood in the dark is slow and risky.
- Keep the fire small and always supervised, and clear the ground within a good radius of anything that burns. See campfire safety.
- Never leave it burning unattended. Put it fully out before you sleep or leave. Pour water, stir the ashes and check that they are cold to the touch.
- Observe fire bans. In dry periods fires may be forbidden entirely, and rules differ by region.
A night walk with kids: an activity with rules
Children often love the dark when it is organised. A short night walk, in a safe place close to camp or home, can be one of the best moments of a family trip. It works best as a planned activity with clear rules, not as an improvised wander. See also bushcraft with kids.
- Keep it short and on a known route. 30–60 minutes on a wide path is plenty for a first walk. Younger children do better in the early evening, shortly after dusk.
- Agree the rules first: beam down, never in faces, no running, stay in line, stop when someone says "stop", and nobody leaves the group.
- Count heads often, at every junction and after every game.
- Warm clothes, a hat and a drink at the end make the walk a good memory.
What if I am lost in the dark? Stop, stay, shelter, signal
If you realise that you do not know where you are, the most important thing is what you do in the next minute. The temptation is to move faster, to find the way. Resist it: the longer you move without knowing where you are, the further you may drift from where people will look for you.
Lost at night: four steps
 1Stop and think
Stop walking. Breathe, sit down if you need to, drink and eat something. Switch off the lamp for a moment and listen. Decide calmly instead of rushing.
 2Check your last known point
Take out the map and compass. When did you last know exactly where you were? How long have you walked since, and in which direction? If you can walk back along a path you know, do so carefully, otherwise stay.
 3Stay and shelter
Choose a spot out of the wind, put on every dry layer, insulate yourself from the ground with your pack, pad or branches, and eat. See hypothermia, surviving an unplanned night and your first night out for sleeping out.
 4Signal
Blow three whistle blasts or flash your light, and then listen. Repeat every few minutes. Call 112 (or 911, 999 or the number for your country) if you have coverage. Details in emergency signals and getting found.
Push on or stop for the night?
Do you know exactly where you are, on a path you recognise?
Yes → Go to the next question.No → Stop. Check the map and your last known point. If unsure, stay.Is the whole group together, warm and able to walk?
Yes → Go to the next question.No → Stop. Count, warm up, eat and drink, and decide again in 10 minutes.Do you have enough light and spare batteries for the rest of the route?
Yes → Go to the next question.No → Stop at the next safe place. Walk on only at first light.Is the remaining route short, known and easy to navigate?
Yes → Push on slowly, with a turn-back time.No → Stop for the night. A calm night in one place is better than a risky walk.
Staying put has a second advantage: the people who know your plan will look along your route. If you told someone where you were going, as the trip planning guide describes, being found is a matter of time. Keep your phone for emergency calls only, switch it to power-saving mode and keep it warm.
Night in German forests: access, wildlife rest zones and hunting
In Germany, forests are generally open to walkers, with no time limit at night; the right to enter the forest applies in principle day and night, but the details differ in each federal state (Bundesland). This is general information, not legal advice. Check the rules of the state and of the specific area before you go.
- Stay on paths in nature reserves and protected areas. Some areas have signs or closures, in particular during the breeding and rearing time and in winter.
- Respect wildlife rest zones (Wildruhezonen) and similar signs. Dusk and night are the most active periods for wildlife, so a walker disturbs more at night than by day.
- Hunting at dusk and night. Many hunters use an elevated hide (Ansitz) at dusk and dawn, and in some areas at night. Stay on paths and tracks, be visible and audible, and keep dogs close. Do not walk beneath or close to a hunting hide. Mild reflective clothing or a small light helps hunters see that you are a person.
- Camping and fires have separate rules, see wild camping in Germany and campfire safety.
Night walk troubleshooting: symptoms and fixes
| Symptom | Likely cause | What to do |
|---|---|---|
| Lamp dims or dies | Cold battery, turbo mode, empty cells | Warm the battery on your body, use a lower mode, swap cells |
| Group string out | No fixed order, fast leader | Stop, count, restart with order and spacing |
| Someone missing | Left the group for the toilet or fell behind | Stay together, call and whistle, do not spread out |
| Feeling cold and shaky | Slow pace, wet clothes, no snack | Add layers, eat and drink, shelter from wind |
| Not sure where you are | Missed junction, no pace count | Stop, go back to last certain point or stay and signal |
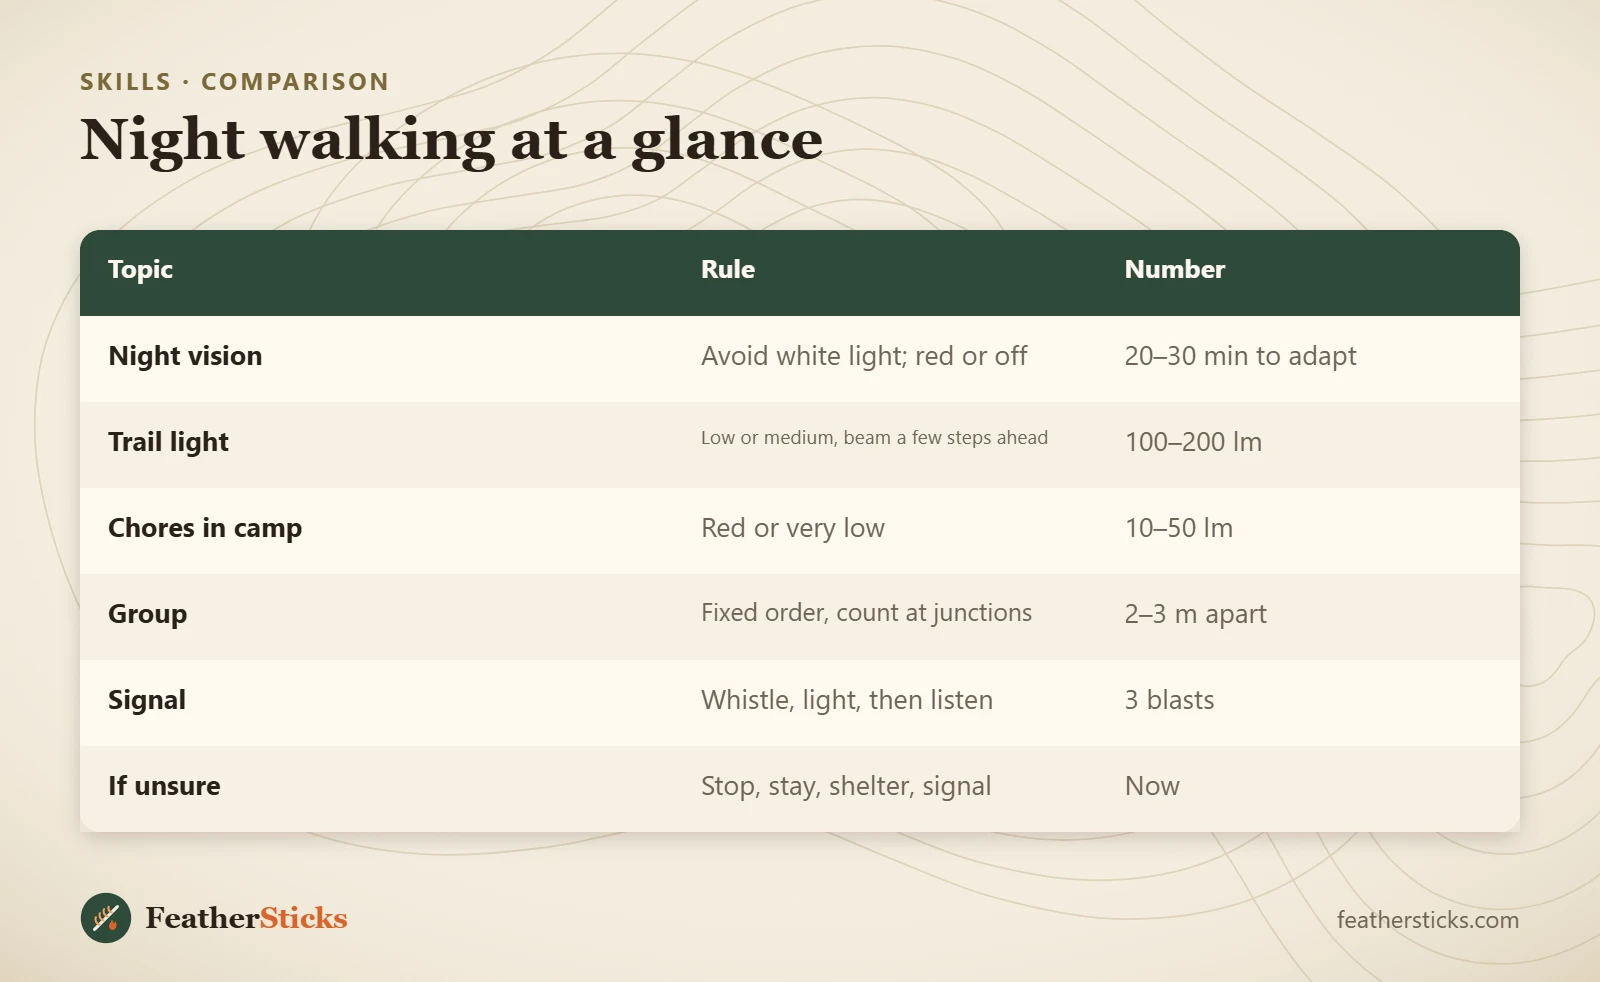
| Topic | Rule | Number |
|---|---|---|
| Night vision | Avoid white light; red or off | 20–30 min to adapt |
| Trail light | Low or medium, beam a few steps ahead | 100–200 lm |
| Chores in camp | Red or very low | 10–50 lm |
| Group | Fixed order, count at junctions | 2–3 m apart |
| Signal | Whistle, light, then listen | 3 blasts |
| If unsure | Stop, stay, shelter, signal | Now |
Common mistakes
- Using bright white light all the time and never letting your eyes adapt.
- Walking an unknown route at night for the first time, alone and late.
- Starting without a turn-back time or without telling anyone.
- Taking long strides and walking faster than the light allows.
- Letting the group string out, with no fixed order and no head count.
- Shining the lamp into people's faces or at animals.
- Going out in daytime clothes and getting cold at the first stop.
- Walking on when lost instead of stopping, staying and signalling.
What you need
- Headlamp with red mode and spare batteries
- Small backup torch
- Map, compass and a charged phone
- Whistle
- Warm layer, hat and gloves
- Reflective cord or tape for camp markers
- Trekking pole or stick
- Snack and a warm drink
Calculators for this topic
FAQ
How can I improve my night vision outdoors?
How long does it take to adjust to the dark?
Is it safe to hike at night?
What headlamp brightness do I need for night hiking?
How do I keep a group together at night?
What should I do if I get lost at night?
Can I walk in German forests at night?
How do I find camp again in the dark?
Check yourself
Completed6 quick questions from this guide. Nothing is sent anywhere.
Related step-by-step guides
-
 1
-
 1
-
 1