Stargazing While Camping: Constellations, the North Star and the Milky Way
Stargazing while camping needs no telescope: pick a dark spot away from town lights, choose a night without a bright moon, give your eyes 20–30 minutes in the dark with only red light, and start from the Plough (Big Dipper) – it leads you to the North Star and from there to the constellations of each season. Under a really dark sky you can also see the Milky Way, satellites gliding past and, in August and December, plenty of shooting stars.
This guide is written for the Northern Hemisphere with a Central European focus. It covers dark adaptation, light pollution, the moon, star hopping, planets, meteor showers, binoculars, phone photos, staying warm and safe at night and sky-watching with kids. It is astronomy, not astrology. Night sky skills fit naturally with navigation without a compass, moving safely in the dark and the rest of bushcraft basics.
Step by step
-
1

Pick a dark spot and night
Choose a place away from town glow with an open view, on a clear night when the moon is down or only a thin crescent.
-
2

Let your eyes adapt
Switch to dim red light and avoid screens. After 20–30 minutes in the dark you see far more stars.
-
3

Find the Plough and Polaris
Follow the two pointer stars at the end of the Plough's pan about five times their gap to reach Polaris, the North Star.
-
4

Hop to the season's stars
From known patterns, hop to the constellations of the season: Orion in winter, Arcturus in spring, the Summer Triangle in summer.
-
5

Watch for Milky Way and meteors
Lie back and scan slowly: the Milky Way, meteors, satellites gliding steadily and planets that do not twinkle.
-
6

Stay warm and safe
Lie on an insulating pad, wear more layers than you think, bring a hot drink and stay close to camp.
Why stargazing at camp is so rewarding
At home, street lights and illuminated windows wash out all but the brightest stars. At a forest camp, a lakeside or on a hill far from towns, the same sky can show thousands of stars, the pale band of the Milky Way and faint objects such as the Andromeda Galaxy with the naked eye. You are already outside and away from lights – all you need is patience and a little knowledge.
The night sky is also a practical skill: Polaris gives you north and the turning sky works as a rough clock. And like a sit spot by day, a session under the stars trains you to sit still and notice details – one of many observation skills in our bushcraft skills guides.
Dark adaptation: how long do your eyes need?
Your eyes need around 20–30 minutes in the dark to reach most of their night sensitivity. A large part happens in the first few minutes as the pupil opens wide; the rest is a slower chemical change in the retina. The same figure is used in our guides to night vision on night walks and red light on headlamps – the rule is the same whether you walk or watch the sky.
The catch: a single glance at bright white light – a headlamp, a phone screen at full brightness, car headlights – undoes much of that adaptation in seconds. Protecting your night vision is therefore the most important stargazing skill, and it costs nothing.
Protecting your night vision
 1White light shrinks the pupil
Bright white light closes the pupil and resets most of the adaptation. This is the moment most beginners lose their night vision without noticing.
 2Use red light on the lowest mode
Dim red light disturbs dark adaptation far less. Use the lowest red setting that lets you see your feet or a star chart, point it down and never into other people's faces.
 3Wait 20–30 minutes
Put the lamp away and sit or lie comfortably. Over the next 20–30 minutes more and more faint stars appear. Use the time to find the bright patterns first, so you are ready when the faint ones show up.
 4Look slightly to the side
For faint objects such as a star cluster or a galaxy, look a little beside them rather than straight at them ("averted vision"). The edge of the retina is more sensitive in the dark, so the object often pops into view.
Two more tricks help. If you must use bright light for a moment – to deal with kit or a cut finger – close one eye; it keeps most of its adaptation. And around the campfire your eyes never fully adapt, so walk a little way from the fire (on a known path) or let it burn down before you look up.
Light pollution: how to find a dark spot
Light pollution is the glow of artificial light scattered in the air. From a distance a town shows up as a light dome – a pale, orange or white glow over the horizon that hides faint stars in that direction. The bigger the town and the closer you are, the higher the dome reaches.
You do not need the darkest place in the country to enjoy the sky – you need the darkest place that is practical and safe for your trip. Useful rules:
- Distance from towns: the further from larger towns and cities, the better. Light pollution maps (available online and in apps) show the pattern for your region at a glance.
- Use the terrain: a hill, a ridge or a forest edge between you and the nearest town blocks the low part of the light dome.
- Look away from the glow: if one horizon is bright, face the other way.
- Open view: a clearing, meadow, lakeshore or hilltop gives you more sky than a dense forest.

Astronomers rate sky darkness with the Bortle scale from 1 (pristine) to 9 (inner city). You do not need the number: if you can see the Milky Way clearly overhead in summer, your sky is good. Some regions have been officially recognised as dark-sky parks or reserves, where outdoor lighting is managed to protect the night – they are excellent destinations, but check the local rules for camping there.
Wherever you go, camping rules come first. Wild camping is restricted or banned in many countries and regions; see wild camping rules and choose a legal spot. A good stargazing site and a good camp site share many qualities – flat, sheltered from wind, away from dead trees – so the criteria in choosing a camp site apply. Rules differ by country and region – this is no legal advice.
Moon phases and timing: when is the sky darkest?
The moon is the biggest natural light polluter. A full moon brightens the whole sky so much that the Milky Way and most faint stars disappear. For deep-sky viewing, plan your trip in the week around new moon, or use the hours when the moon is below the horizon. The moon phase calculator shows the next new moon and which nights of the coming weeks stay dark.

| Phase | Moon in the sky | Dark sky for stargazing |
|---|---|---|
| New moon | Rises and sets with the sun – not visible | All night – the best time |
| Waxing crescent | Low in the west after sunset, sets in the evening | Most of the night after it sets |
| First quarter (right half lit) | High in the evening, sets around midnight | After midnight |
| Full moon | Rises around sunset, up all night | Hardly any – good for moon-watching and night walks |
| Last quarter (left half lit) | Rises around midnight | Evening until moonrise |
Times are approximate and shift with season. The same pattern is used for direction-finding in the natural navigation guide.
Twilight: when does it get properly dark?
After sunset the sky darkens in stages. During civil twilight – in Central Europe roughly 30–50 minutes after sunset – the brightest planets and stars appear. Full darkness comes only at the end of astronomical twilight, when the sun is about 18° below the horizon; outside the summer months that is typically around one and a half to two hours after sunset. Around midsummer, in most of Germany and everything further north, the sun never sinks that far and the northern sky stays faintly bright all night. The daylight calculator gives sunset and twilight times for your place and date, so you can plan when to settle down.
The weather decides the rest. A clear sky after a cold front often brings the best transparency; hazy, humid high-pressure days can be clear but milky. High thin cloud dims the stars long before you notice it – our guide to reading clouds helps you judge an evening sky.
How to find the North Star from the Plough
Every night-sky session in the Northern Hemisphere should start with the Plough (Big Dipper in North America): seven bright stars forming a pan with a curved handle. In Central Europe it never sets, so you can find it on any clear night of the year – high in the sky on spring evenings, low over the northern horizon on autumn evenings.
From the Plough you find the North Star, Polaris, with the pointer method. It is the same method used in our guide to navigating by the stars:
Star hopping from the Plough
 1Find the Plough
Face roughly north and look for the seven bright stars: four form the pan, three the handle. Depending on season and hour it stands high, low or on its side – the shape stays the same.
 2Pointers to Polaris
Take the two stars at the end of the pan, away from the handle (Merak and Dubhe). Follow their line in the direction the pan opens, about five times their gap. The first moderately bright star on its own is Polaris.
 3Across to Cassiopeia
Continue past Polaris to the far side: the W-shaped Cassiopeia lies opposite the Plough. When one is low, the other is high – so you always have at least one of them.
 4Arc to Arcturus
In spring, follow the curve of the Plough's handle away from the pan to a bright orange star: Arcturus. Continue the curve further down to the bluish-white Spica – "arc to Arcturus, speed on to Spica".
Common surprise: Polaris is not the brightest star in the sky – it is only moderately bright. A brilliant "star" low in the east, south or west is far more likely a planet or Sirius. The check is easy: the pointer line and the far side of Cassiopeia both lead to the same star, and over half an hour Polaris stays put while every other star moves.
Once you have Polaris, drop an imaginary vertical line to the horizon: that point is true north, accurate to about one degree. Its height above the horizon roughly equals your latitude – around 50° in central Germany, a little more than halfway from the horizon to the point overhead. Line it up with a tree on the skyline; it helps in the morning and backs up map and compass navigation if your compass fails.
Constellations for beginners: what to look for each season
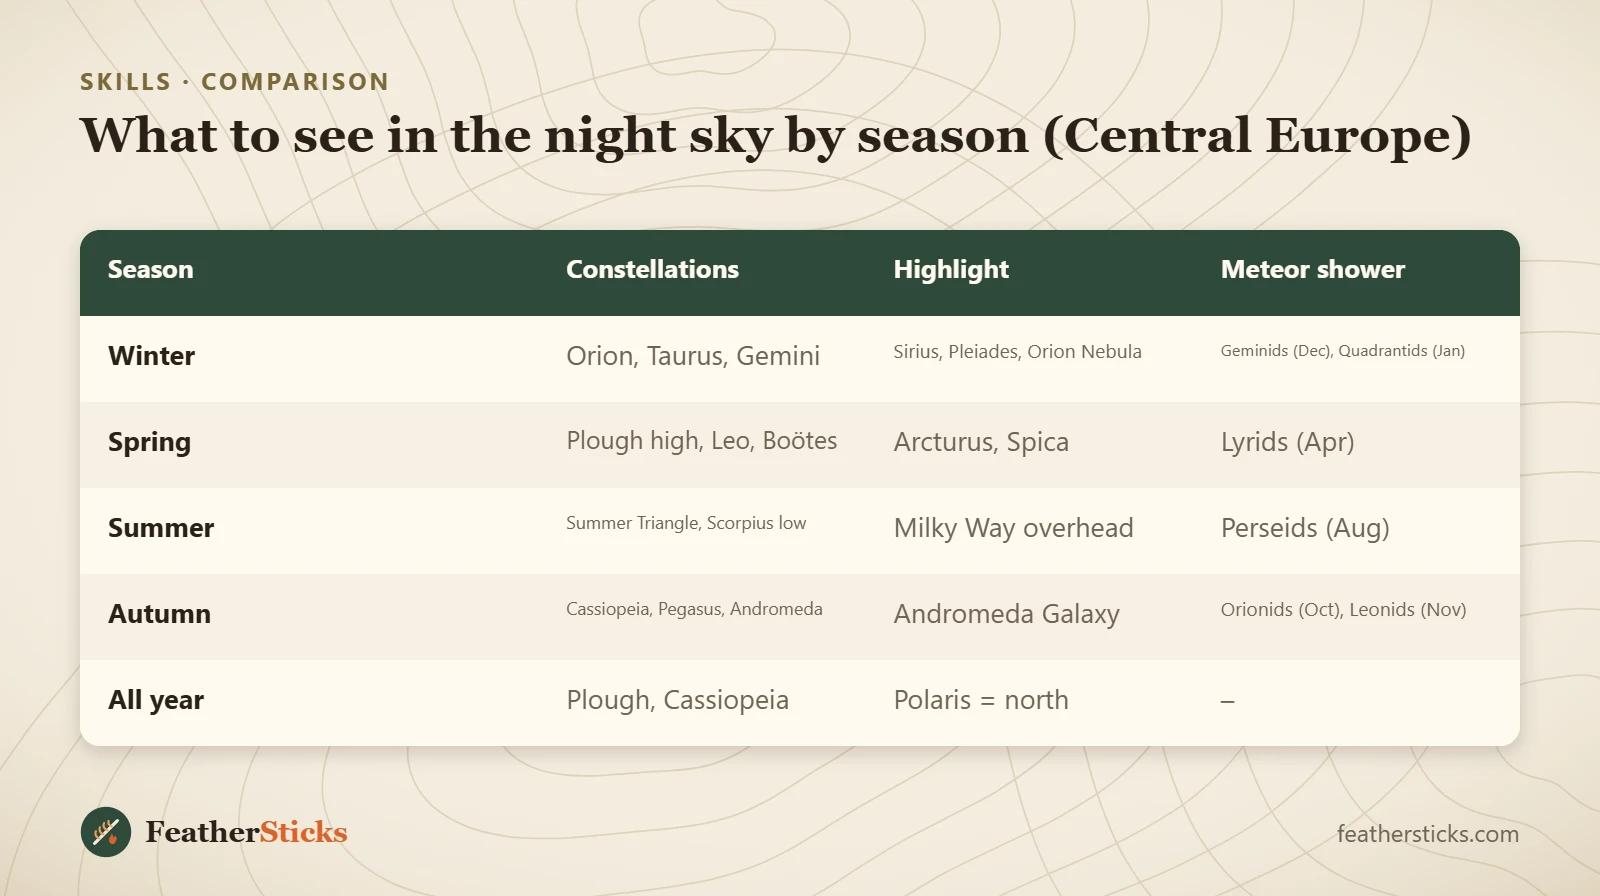
Because the Earth orbits the sun, the evening sky changes through the year. Stars rise about four minutes earlier each night – roughly two hours per month – so a constellation that is high at midnight in one month stands high at 22:00 a month later. The table and drawing show the main constellations for beginners in the evening sky of Central Europe, looking south (east is on your left).

| Season | Highlights | How to find them | Extra for binoculars |
|---|---|---|---|
| Winter (Dec–Feb) | Orion, Sirius, Taurus with Aldebaran, Gemini, Capella | Orion's belt: three stars in a row; down-left to Sirius, up-right to Aldebaran | Orion Nebula below the belt; the Pleiades |
| Spring (Mar–May) | Plough high overhead, Leo, Arcturus, Spica | Arc of the Plough's handle to Arcturus, on to Spica | Beehive cluster between Leo and Gemini |
| Summer (Jun–Aug) | Summer Triangle (Vega, Deneb, Altair), Milky Way, Scorpius low in the south | Three bright stars high in the east to overhead | Star fields along the Milky Way |
| Autumn (Sep–Nov) | Cassiopeia high, Pegasus square, Andromeda | Big square of four stars; Andromeda chain off one corner | Andromeda Galaxy as a faint oval smudge |
| All year | Plough, Cassiopeia, Polaris | Circle around Polaris, never set in Central Europe | Mizar and Alcor in the Plough's handle |
Times refer to standard time; under summer time everything happens about an hour later on the clock.
Winter: Orion, the easiest constellation
Look south on a winter evening for three equally bright stars in a short, straight row – Orion's belt – framed by four bright stars: reddish Betelgeuse at the top left and bluish-white Rigel at the bottom right. Follow the belt down to the left and you reach Sirius, the brightest star of the night sky, which often flickers in colour when it is low. Follow the belt up to the right and you reach orange Aldebaran and, beyond it, the tight little group of the Pleiades.
Summer: the Summer Triangle
On summer evenings, three bright stars dominate the eastern sky and later stand almost overhead: Vega (the brightest, highest), Deneb and Altair. Together they form the large Summer Triangle, and the Milky Way runs straight through it. It stays visible in the evening well into autumn.
Autumn and spring
In autumn, Cassiopeia's W stands high overhead, and south of it the great square of Pegasus marks the way to the Andromeda Galaxy – from the corner of the square, follow the chain of Andromeda's stars two steps, then turn towards Cassiopeia and look for a faint oval glow. In spring, the Plough stands high, its handle curving down to Arcturus. A planisphere (rotating star wheel) set to your date and time shows what is up; bushcraft through the seasons helps you plan clothing for each time of year.
Planets vs stars: why stars twinkle
One of the first questions at camp is "Is that a star or a planet?" A few clues usually settle it:

| Object | What you see | Movement |
|---|---|---|
| Star | Point of light that twinkles, especially low over the horizon | Moves slowly with the whole sky |
| Planet | Steady light, often brighter than nearby stars, close to the sun's path | Moves with the sky; shifts against the stars over weeks |
| Satellite | Steady, even dot, may fade out suddenly | Glides smoothly across the sky in a few minutes |
| Aircraft | Blinking red/white or coloured lights, sometimes audible | Steady flight, often along routes |
Stars twinkle because their light comes from a single point and is bent back and forth by turbulent layers of air. Planets are close enough to show a tiny disc, which averages out the turbulence, so they shine more steadily. Very low over the horizon even planets can flicker. Planets also always stay near the ecliptic, the sun's path across the sky, which runs through the zodiac constellations. Venus is the brightest – it appears as the "evening star" in the west after sunset or as the "morning star" in the east before dawn, never in the middle of the night. Jupiter is the next brightest. Where each planet stands changes from year to year; a star chart or an astronomy yearbook tells you.
How to see the Milky Way when camping
The Milky Way is the edge-on view of our own galaxy: a faint, cloudy band of countless distant stars stretching across the sky. To see it well you need three things together: a dark site without nearby light domes, no moon, and fully adapted eyes. If any one is missing, the band fades or vanishes.
- Best season: late spring to early autumn. On summer and early autumn evenings the bright part runs from the north-east through the Summer Triangle high overhead down to the south, where its brightest regions sit low over the horizon.
- Winter Milky Way: fainter, running through Cassiopeia and past Orion. Visible from good dark sites.
A useful test: if you can see the Milky Way at all from camp, your site is dark. If it is obvious, you have found an excellent sky – note the place for future trips.
Meteor showers and satellites: what moves in the night sky
Shooting stars are meteors – tiny particles burning up high in the atmosphere. You can see a few on almost any dark night, but during a meteor shower the Earth passes through a stream of debris and the rate rises. The meteors of one shower all seem to come from one point in the sky, the radiant, which gives the shower its name.
| Shower | Peak (approx.) | Notes |
|---|---|---|
| Quadrantids | Early January | Short, sharp peak; cold nights |
| Lyrids | Around late April | Moderate shower |
| Perseids | Around 12–13 August | The classic summer shower; warm nights, good for camping |
| Orionids | Around late October | Moderate; best after midnight |
| Leonids | Mid-November | Usually modest |
| Geminids | Around 13–14 December | One of the strongest showers; very cold nights |
Exact dates and rates vary from year to year and depend strongly on the moon. Activity often starts days before and lasts days after the peak.
How to watch a meteor shower
Lie on your back on a pad, wrapped up warm, with as much open sky as possible. You do not need to look at the radiant – meteors appear all over the sky, and those 40–60° away from the radiant often show longer trails. Rates are usually higher after midnight, when your side of the Earth faces into the stream. Give it at least half an hour; binoculars are no help here.
Satellites and the space station
A steady dot gliding smoothly across the sky in a few minutes, without blinking, is a satellite reflecting sunlight. They are easiest to see in the first one or two hours after dusk and before dawn, when you are in darkness but the satellite high above is still sunlit – which is why they sometimes fade out mid-sky. The space station is the brightest; apps list its passes for your location. In recent years you may also see chains of newly launched satellites moving one behind the other like a string of pearls.
Using the stars for time and direction
The whole sky turns around Polaris once in a little less than 24 hours – about 15° per hour, anticlockwise when you face north. That makes the stars both a compass and a rough clock:
- Direction: Polaris marks north within about a degree. Orion's belt rises almost due east and sets almost due west. Any star rising is in the east, any star setting in the west. Details in navigation by the stars.
- Time: note where the Plough stands when you go to bed (for example "pan straight above Polaris"). Three hours later it will have turned about 45°. A fist at arm's length covers roughly 10° of sky.
These methods are rough. For practical navigation by night, use them with care and follow the advice for navigating in the dark – stargazing and walking are two different activities.
Binoculars for stargazing: basics without the hype
You do not need a telescope to enjoy the night sky at camp. Ordinary binoculars show many times more stars than your eyes, reveal craters on the moon, the moons of Jupiter, star clusters and the Andromeda Galaxy. The two numbers on binoculars mean magnification × front lens diameter in millimetres: 8×42 magnifies eight times with 42 mm lenses.
| Type | Pros | Cons |
|---|---|---|
| 8×42 / 8×32 (hiking binoculars) | Light, easy to hold steady, already in many packs | Show less faint detail than larger lenses |
| 7×50 / 10×50 (classic astronomy sizes) | Large lenses gather much light; bright, wide view | Heavier; 10× shakes when hand-held |
| 12× and more | More detail on the moon and planets | Need a tripod or rest; heavy for backpacking |
How to use them: find your target with the naked eye first, then raise the binoculars without taking your eyes off it. Brace your elbows on your chest or knees, lean against a tree, or lie back with your elbows on the ground. Focus on a bright star until it becomes the smallest possible point. Good first targets: the moon near half phase, the Pleiades, the Orion Nebula and the Andromeda Galaxy.
Never point binoculars at the sun or anywhere near it, and keep children well away from doing so – it can cause permanent eye damage in an instant. Wait until the sun has fully set before scanning the western sky for Venus or a thin moon.
Photographing the night sky with a phone
Many modern phones can photograph bright stars and even the Milky Way – if you keep them absolutely still for a long exposure. The principle is the same for every model: the longer the sensor collects light without moving, the more stars appear.
Night sky photo with a phone
 1Steady support
Put the phone on a small tripod, or prop it on a rock, a pack or a log. Holding it by hand only works for the moon and the brightest stars. Aim at a dark part of the sky with a tree or skyline at the bottom.
 2Night mode or manual
Use the phone's night mode, or a manual/pro mode with a long exposure – typically around 10–30 seconds on a tripod. Set focus to far or infinity, and turn the screen brightness down to keep your night vision.
 3Timer: hands off
Use the self-timer (3–10 seconds) or a remote so touching the screen does not shake the picture. Do not move or shine any light while the exposure runs.
 4Check and adjust
Look at the result on a dimmed screen. Stars drawn as short streaks mean the exposure was too long; a dark, empty picture needs a longer exposure or a darker site. Include the horizon to give the picture scale.
Long exposures and cold nights drain batteries fast. Keep the phone in an inside pocket between shots and carry a small power bank – our guide to power on the trail covers batteries in the cold. Wipe dew off the lens. Remember that the screen glow ruins your own night vision: take a few pictures, then put the phone away and just look.
Staying warm on cold, clear nights
Clear nights are cold nights. Without a cloud blanket, the ground and your body radiate heat straight into space, and temperatures can drop sharply after sunset – frost on a clear autumn or spring night is common even when the day was mild. Stargazing makes it worse: you sit or lie still for an hour or more. Plan for the temperature you will have at midnight, not at dinner.
Stargazing warmth, from top to bottom
- A warm hat makes a big difference when you lie looking up.
- A puffy jacket or extra fleece over your hiking layers – see the layering system.
- Lie in your sleeping bag or wrap it around you; dew will dampen it, so dry it next day.
- The ground steals heat fastest – use a pad with a good R-value, or two.
A flask of hot tea or a fresh camp coffee helps too, as do dry socks and gloves thin enough to turn the pages of a star chart. If you watch from inside your sleeping bag, dew and frost will settle on the outer fabric; air it in the morning and follow the sleeping bag care tips so it keeps its loft. Wind makes everything colder – the wind chill calculator shows how much – so pick a sheltered spot.
Watch for persistent shivering and clumsy fingers, and go back to the tent in good time. Signs and first aid are in our hypothermia guide; for winter trips also read winter camping.
Safety at night: rules for stargazing outdoors
Stargazing itself is safe, but darkness changes the risks around it: trips and falls on the way to a viewpoint, getting disoriented close to camp, and getting cold.
Night sky safety checklist
- Scout your viewing spot and the path to it in daylight
- Stay within sight or earshot of camp, or tell someone where you are
- Carry a headlamp with red and white mode and a spare battery
- Keep away from cliff edges, steep banks, open water and roads
- Know your way back: note a landmark or mark the path
- Bring a whistle and a charged phone (emergency number 112 in the EU)
- Let the campfire burn down safely or keep it attended – never leave it to go stargazing
- Respect wildlife rest zones, hunting areas and local rules
If the session takes you away from camp, the advice in moving safely at night applies in full: walk slowly on known paths, use white light when you move and red light when you stop. If you do lose your way, stop, stay warm and signal rather than wandering on – see an unplanned night outdoors for what to do.
A campfire and stargazing do not mix well: the light kills your night vision, and an unattended fire is a hazard. Let it burn down to safe embers and keep the usual distances from tents and tarps, as described in campfire safety. In dry periods, fire bans may apply – check local rules.
Sky-watching with kids
Children love the night sky, especially on their first nights outdoors. Make it short, warm and full of small successes:
- Start at dusk: younger children are tired late at night. The first stars and planets appear in twilight, and the moon is a perfect first target.
- One shape per night: find the Plough together and let them trace it with a finger. Different cultures see a pan, a wagon or a bear.
- Games: who sees the first star? Count satellites or meteors in ten minutes. Spot the colour difference between orange Arcturus or Betelgeuse and bluish Vega or Rigel.
- Red light for everyone: give each child a small headlamp with red mode and agree on the rule "no white light at the viewing spot".
- Warm and comfortable: a pad, a sleeping bag and a hot drink keep them happy; cold children lose interest fast.
More ideas for outdoor activities with children are in nature games for kids and night games with lights, and the guide to a first night outdoors helps you plan the whole trip. Keep children close in the dark and agree on a meeting point before you switch the lights off.
| Season | Constellations | Highlight | Meteor shower |
|---|---|---|---|
| Winter | Orion, Taurus, Gemini | Sirius, Pleiades, Orion Nebula | Geminids (Dec), Quadrantids (Jan) |
| Spring | Plough high, Leo, Boötes | Arcturus, Spica | Lyrids (Apr) |
| Summer | Summer Triangle, Scorpius low | Milky Way overhead | Perseids (Aug) |
| Autumn | Cassiopeia, Pegasus, Andromeda | Andromeda Galaxy | Orionids (Oct), Leonids (Nov) |
| All year | Plough, Cassiopeia | Polaris = north | – |
Common mistakes
- Checking a bright phone screen every few minutes and never reaching full dark adaptation.
- Planning a Milky Way night around full moon.
- Looking straight at the town glow instead of facing the darkest horizon.
- Expecting Polaris to be the brightest star and mistaking a planet for it.
- Wandering away from camp in the dark without knowing the way back.
- Pointing binoculars near the sun at sunset.
What you need
Calculators for this topic
FAQ
How long does it take for eyes to adjust to the dark for stargazing?
How do I find the North Star?
What is the best time of month for stargazing?
Can you see the Milky Way in Germany?
When are the best meteor showers?
Check yourself
Completed6 quick questions from this guide. Nothing is sent anywhere.
Related step-by-step guides
-
 1
-
 1
-
 1