Stuck Outside Overnight? How to Survive an Unplanned Night Outdoors
If you are stuck outside overnight, the safest plan is usually to stop while there is still light, call for help if anyone is hurt or in danger, and then spend the night as warm and dry as possible: get off the cold ground, out of wind and rain, put on every layer, wrap up in a bivvy bag or foil blanket, and stay findable. An unplanned night is uncomfortable, but for a healthy, dressed person it is rarely the real danger – walking on in the dark, getting wet and getting cold are.
This guide walks you through the decision to stop, the STOP rule, when to call 112, the priorities of an emergency bivouac, what belongs in a day-pack emergency kit, improvised insulation and shelter, fire, sleep, hypothermia signs, morale, and the morning: walk out or wait. It builds on bushcraft basics and works best if you have read it before you need it.
Step by step
-
1

Decide to stop before dark
If you cannot reach a road or hut with about an hour of light to spare, stop and prepare the night while you can still see.
-
2

STOP: stop, think, observe, plan
Stop moving, sit down, breathe. Think about what happened, look around, then make a calm plan before acting.
-
3

Emergency? Call 112 first
If someone is hurt, very cold or in danger, call 112, 911 or 999. Otherwise send your position and plan to your contact.
-
4

Get off the ground and out of the wind
Choose a sheltered, safe spot and sit on your pack, rope, spare clothes or a thick heap of dry leaves.
-
5

Every layer on, then wrap up
Put on hat and all layers before you get cold, then get into a bivvy bag or foil blanket with your face free.
-
6

Morning: walk out or wait
Wait for full daylight. Walk out only if you know the way; if unsure or hurt, stay put and signal.
Stop before dark: the decision that prevents most trouble
Most unplanned nights start with a reasonable hope: the car park is "just over the next ridge", the trail "must be close". Pushing on into the dark on unknown ground is where people twist ankles, walk off a path, lose the route completely or get soaked crossing a stream they cannot see. A cold night in one place is almost always better than an injury in the dark. Our guide to walking safely at night explains why the dark changes everything – depth perception, pace, navigation and morale.
The rule of thumb across our guides: decide while there is still about an hour of daylight left. That hour is your working time to choose a spot, gather leaves or boughs, put on layers, send a message and eat. Check sunset before you leave with the daylight calculator and plan realistic walking times with the hiking time calculator; in a forest or a deep valley, useful light fades well before the official sunset.
Pushing on in the dark
- Higher risk of slips, falls and twisted ankles
- Easy to lose the path and drift away from where searchers will look
- Sweating while walking, then cooling fast when you stop
- Headlamp battery used up for walking instead of signalling
Stopping with light left
- Time to pick a safe, sheltered spot and gather insulation
- You stay near your planned route and last known point
- Layers go on while you are still warm and dry
- Battery and energy saved for the night and the morning
There are exceptions. If you are on a marked trail you know well, have a working headlamp, the weather is calm and the way out is short and easy, carefully walking on can be reasonable. If you are on steep, exposed or unknown ground, in fog, or already tired and cold, stop. When in doubt, stop.
The first minutes: the STOP rule
Realising you will not make it out before dark – or that you are lost in the woods at night – triggers a strong urge to hurry. The STOP rule, taught by many search-and-rescue organisations and explained in our emergency signals guide, gives you a moment to think before you act:
STOP
- Stop moving. Sit down, drink something, eat a snack. Panic fades when you stop.
- What happened? Where was the last point you were sure of? Who knows where you are?
- Check injuries, weather, daylight left, water, clothing, phone battery and signal.
- Decide: call for help, stay put, build shelter, signal. Then act calmly, one step at a time.
Write the plan down or say it out loud, especially in a group: "We stay here, Anna sends our position, Ben gathers leaves, we eat at seven." A spoken plan stops people from wandering off on their own ideas, and it turns a frightening situation into a list of small jobs.
Real emergency? Call for help before anything else
An unplanned night and an emergency are not the same thing. If you are uninjured, dressed for the weather and simply ran out of daylight, you can usually manage the night yourself and walk out in the morning. But some situations need professional help now – and the earlier you call, the more daylight rescuers have.
Emergency call or uncomfortable night?
Is anyone injured, ill, confused, very drowsy or shivering uncontrollably?
Yes → Call 112 (Europe), 911 (US/Canada) or 999 (UK) now.No → Continue.Are you in a dangerous place (cliff edge, rising water, avalanche terrain, storm) that you cannot leave safely?
Yes → Call the emergency number now.No → Continue.Are you wet, without warm layers or shelter, in cold, wind or rain?
Yes → Call for help early – this can turn serious within hours.No → Stay put, message your contact and prepare the night.
When you call, say where you are, what happened and how many people need help, then let the dispatcher lead. Read coordinates from your phone digit by digit; many smartphones also send their position automatically during an emergency call, but always give it verbally too. The distress signals guide covers the call, location formats, whistle, light and ground signals step by step.
If it is not an emergency, still send a short message to your contact person while you have signal: you are safe, you are staying put, here is your position, and when you will check in next. That message can prevent a search in the dark – or start one at the right place if things get worse. Then protect the battery: flight mode between check-ins, screen dim, phone warm in an inside pocket, and keep the rule-of-thumb reserve of 20–30 % for calls (see power banks and phone battery).
Emergency bivouac priorities: what matters most tonight
The word bivouac originally meant exactly this: an improvised night in the open. Comfort is not the goal; staying warm, dry and findable is. The order below works in most conditions, from a mild summer night to a cold autumn rain:
The five priorities
- 1. Insulation from the groundCold, damp ground draws heat out of your body faster than the air does. Sit or lie on anything that traps air.
- 2. Wind and rain protectionWind and wet clothing multiply heat loss. Use the lee of rocks, trunks or dense young trees, a bivvy bag or a tarp.
- 3. WarmthAll layers on before you get cold, hat on, food and drink, and a bivvy bag or foil blanket around you.
- 4. SignallingPhone, whistle and light within reach. Stay near your route and where searchers would look.
- 5. WaterDrink regularly in small amounts; do not leave a safe spot in the dark to look for water.
Food matters, but it is not on the list for a reason: a healthy person goes one night without a meal easily. Food is useful mainly as fuel for warmth – a snack before you settle down and another when you wake up cold. Water is lower than insulation and shelter because a single night without much to drink is unpleasant, whereas a night on wet ground in the wind can become dangerous. In summer heat or after a hard day, move water up the list.

The day-pack emergency kit that turns a crisis into a cold night
Whether an unplanned night is an adventure or an emergency depends largely on a few small items you carry on every day hike, even in summer. None of them is heavy; together they fit in a small dry bag. The Kit Builder adds them to any packing list, and a belt kit keeps the most important ones on your body even if you lose your pack.

| Item | Why it matters | Notes |
|---|---|---|
| Emergency bivvy bag or foil blanket | Blocks wind and rain, keeps body heat in | A bivvy bag is far more effective than a flat blanket; see bivvy bags |
| Headlamp + spare batteries | Work, signal and move safely in the dark | Red mode saves night vision; see headlamps |
| Extra warm layer and hat | You cool down fast once you stop | Synthetic or wool insulation stays warmer when damp; see clothing layers |
| Fire kit | Warmth and morale in a real emergency, where safe | Lighter plus backup in a dry bag; see your fire kit |
| Whistle | Signals much further than your voice | Pea-less plastic, on the shoulder strap |
| Phone + power bank | Emergency call, position, contact | Offline maps downloaded; keep 20–30 % reserve |
| First aid kit | Blisters, cuts, sprains, warmth | Contents per first aid kit guide |
| Snack and water | Fuel for heat, clear thinking | Energy-dense food you would not eat otherwise |
A sit pad or a small piece of foam is a cheap upgrade that solves the hardest problem – the cold ground – instantly. In cold seasons add gloves, a second hat and a thermos with a warm drink. A small tarp or poncho doubles as rain protection and a quick shelter. An emergency bivvy bag weighs little more than 100 g and belongs in every day pack; a flat foil blanket is lighter still but tears easily and leaves gaps where the wind gets in.
Choosing a spot for the night
You do not need the perfect spot, but you do need a safe one. Spend ten minutes of your remaining light looking around within a short distance of your route – moving far away makes you harder to find. The same principles as in choosing a camp site apply, with safety first and comfort second.

Good spot checklist
- No dead trees or hanging branches above you – look up before you sit down
- Not in a hollow, gully or dry stream bed: cold air and water collect there
- Out of the wind: lee side of a rock, fallen trunk, bank or dense young trees
- Not on an exposed ridge or summit, and away from cliff edges and steep drops
- Away from avalanche slopes and rockfall in the mountains
- Ideally near a path, clearing or open ground where you can be seen and heard
In a thunderstorm, leave ridges and isolated trees and follow the guidance on lightning in our weather guide. Near water, stay well above the bank – streams can rise quickly after rain upstream. If you are with a group, stay together in one place; splitting up to "look for the way" is one of the classic mistakes.
Improvised insulation: packs, rope and leaves
Insulation from the ground is the single most important thing you can do. Your clothing compresses where you sit and lie, so the ground pulls heat out exactly there. Anything that traps air between you and the earth helps: your empty rucksack, a coiled rope, spare clothes, a sit pad, map case, and – best of all, if available – a thick heap of dry natural material.
Building an insulated seat
 1Clear the spot
In the lee of a rock or fallen trunk, clear away stones, cones and sticks so you can sit or lie evenly. Check above you for dead branches.
 2Use your gear first
Empty the pack and sit on it, or lay out pad, rope and spare clothes under your hips and back. Keep everything you need – phone, lamp, whistle, food – in your pockets.
 3Heap dry leaves or boughs
Pile 40–50 cm of loose dry leaves, grass or dead conifer boughs. A loose heap packs down to roughly half when you sit on it, so make it bigger than looks necessary.
 4Sit high, knees up
Sit on top with your knees pulled up and arms close to your body. A compact posture exposes less surface to the cold air.
Sitting upright on a pack with knees drawn up is often warmer than lying down, because less of your body touches the ground. If you want to lie down, you need insulation under your whole body; our guide to the debris bed shows how a log frame keeps a leaf mattress in place. Use dead, fallen material wherever possible – cutting green branches damages trees and is not permitted in many places, so reserve it for a real emergency.
Wet leaves still insulate better than bare ground, but dry material from under conifers, the lee of logs or the top of a deep pile is much warmer. In snow, never sit directly on snow: build your seat from your pack, boughs and rope, and see snow shelters for deeper winter strategies.
A quick shelter from what you have
With only an hour of light, you will not build an elaborate shelter – and you should not try. A debris hut is very warm but realistically takes 2–4 hours for one person (see debris shelter). Your goal tonight is simpler: block the wind, shed the rain and keep your insulation dry, using what you carry and what lies around.
Quick shelter options
 1Bivvy bag or foil blanket
Get into the emergency bivvy bag sitting on your insulation, pulled up to your chin. A foil blanket works best wrapped tightly and tucked under you so the wind cannot lift it.
 2Low tarp, back to the wind
Pitch a tarp or poncho low as a lean-to, the closed side to the wind, so you sit in its lee. Low and small is warmer than high and wide; see tarp shelters.
 3Boughs against a trunk
Without a tarp, lean dead boughs and sticks against a fallen trunk or rock to build a windbreak, and stuff the gaps with leaves.
 4Keep the face free
Never close a bivvy bag over your mouth and nose. Your breath carries moisture that would soak the inside, and you need fresh air.
Emergency bivvy bag
- Closed on all sides – wind cannot get in
- You can sit or lie inside with your insulation
- More robust than a flat foil blanket
- Condensation builds up inside on cold nights
Flat foil blanket
- Very light and tiny when packed
- Useful as a wrap, ground marker or emergency signal
- Tears easily and flaps open in the wind
- Needs tucking in and something to hold it closed
Condensation inside a bivvy bag is normal: by morning the inner surface may be damp. It is still far warmer than no shell at all. The bivouac guide explains how to reduce it and how bivvy bags and tarps work together on planned nights.
Fire: only if safe and allowed – or in a real emergency
A fire can feel like the obvious answer to a cold night, but it is not your first priority, and it brings its own risks. Insulation, wind protection and layers keep you warm all night without fuel; a fire needs constant feeding, dry wood gathered in daylight and someone awake to watch it. Open fires are also banned in many forests and at many times of the year. Rules differ by country and region – this is not legal advice.
If someone is getting dangerously cold and help is far away, warmth can matter more than the rules – but even then only where a fire cannot spread. Follow the basics in campfire safety:
Before you light an emergency fire
- Not during high fire danger, drought or strong wind
- On bare mineral ground – sand, gravel, rock – cleared of leaves and needles
- No overhanging branches, roots or peat beneath
- At least 5 m from tents and bivvy bags and at least 3 m from synthetic tarps
- Gather all wood before dark; keep the fire small
- Water or soil ready to put it out; never leave it unattended
- Put it out completely before you leave – cold to the touch
A reliable ignition source in a dry bag – lighter, storm matches, ferro rod and some tinder – is part of your fire kit, so you have the option when it is safe. Without one, do not waste your last daylight trying to make fire by friction (the realistic options are in improvised fire); spend it on insulation.
Getting through the night: sleeping, staying warm, staying alert
A common myth says you must not fall asleep in the cold. For a healthy, insulated, dry person, sleep is fine and helps you keep a clear head the next day; cold will wake you long before it becomes dangerous. Expect short sleeps and frequent waking – that is normal on an unplanned night. What matters is noticing unusual drowsiness: someone who is confused, slurring and hard to wake is showing signs of hypothermia, not tiredness.
A routine for the night
 1Eat and drink
Before settling down, eat a snack and drink. Keep food in your pocket so you can eat when you wake up cold – digestion produces heat.
 2Shivering? Tense and move
When you start to shiver, tense your leg and arm muscles for a few seconds, wriggle toes and fingers, and eat something. Do not walk around in the dark to warm up.
 3Check each other
Watch for the "umbles": stumbles, mumbles, fumbles, grumbles. Confusion, strong drowsiness or shivering that stops while still cold means call 112.
 4Phone warm, check in on time
Keep the phone in an inside pocket in flight mode and switch it on at the agreed check-in times to send a short update.
In a group, sit close together under shared tarps or blankets – body heat is a resource. Put the coldest or youngest person in the middle and on the best insulation. Children should be told clearly to stay in the group and answer calls; see bushcraft with kids.
Recognising hypothermia
Hypothermia starts quietly. Early signs are shivering, cold pale skin, clumsy hands and a person who goes quiet or irritable. Wind makes it worse: at 5 °C, a 20 km/h wind already feels like about 1 °C – the wind chill calculator shows your conditions. The full first-aid steps are in hypothermia: signs and first aid.
| Sign | What it means | What to do |
|---|---|---|
| Shivering, cold hands, alert | Body is defending its warmth | More insulation, wind protection, food and a sweet drink |
| Clumsy hands, stumbling, irritable | Cooling is getting serious | Shelter, insulate, wrap up together; consider calling for help |
| Confusion, slurred speech, very drowsy | Possible moderate hypothermia | Call 112 / 911 / 999 now; insulate and wrap gently |
| Shivering stops while still cold, barely responsive | Life-threatening | Emergency call at once; handle gently, keep lying flat and insulated |
Drink regularly even if you are not thirsty: cold air is dry. If you must use stream water, treat it if you can (see water purification) – but do not leave your spot in the dark to find water. Do not eat snow to quench thirst; it costs body heat. Alcohol does not warm you – it makes you lose heat faster.
Keeping morale up in the dark
Darkness, cold and uncertainty make every problem seem bigger. Morale is not a luxury; people who stay calm make better decisions about when to call, when to move and when to wait. A few simple habits help:
- Turn the night into tasks. Improve the leaf bed, re-tuck the blanket, check on each other, eat at set times. Small jobs keep panic away.
- Plan the morning. Look at the map with the headlamp on red, agree the route out or the decision to wait. Knowing the plan makes the night shorter.
- Name the noises. Forests are noisy at night – deer, owls, foxes, falling twigs. Animals avoid people; our guide to wildlife encounters explains what you are likely to hear.
- Look up. On a clear night, the sky is worth watching; stars and the night sky can turn a long hour into something memorable – and clear skies also mean colder nights, so stay wrapped up.
- Talk and laugh. In a group, take turns telling stories. Alone, talk to yourself, hum, count breaths. Self-talk is a recognised calming tool.
Remind yourself that the night ends. Sunrise comes at a known time – the daylight calculator tells you when – and every hour you stay put, warm and dry is an hour well spent.
In the morning: navigate out or wait to be found?
Wait for full daylight before moving: the first grey light is still too dim to see roots, holes and the path. Eat, drink, warm up by moving your arms and legs, pack everything and look carefully around. Then decide:
Walk out or stay?
Has anyone called for help, or does someone know your route and alarm time?
Yes → Unless you know the way out exactly, stay, get visible and signal – searchers start at your planned route.No → Continue.Is anyone injured, very cold or exhausted?
Yes → Stay and call for help; do not split the group.No → Continue.Do you know where you are and how to reach a trail, road or hut safely?
Yes → Walk out carefully, message your contact, and leave an arrow or note showing your direction.No → Stay put, move to the nearest open area and signal.
If you walk out, use your map and compass and the phone's GPS position to fix where you are, then aim for a big, unmistakable "handrail" – a road, a large stream, a power line, a forest track – rather than a small target. Without a compass, the basics of natural navigation help you hold a rough direction. Check in with your contact as soon as you have signal.
If you stay, make yourself easy to see: move to the nearest clearing, spread out the bright bivvy bag or foil blanket, and use whistle blasts in threes. Details of whistle, mirror and ground signals are in emergency signals.
What to tell your contact – before, during and after
An unplanned night is far less dangerous when someone at home knows your plan. That is the job of the trip plan: your route, your planned return, and a firm alarm time after which your contact calls the emergency number. When you go alone, it matters even more – see solo safety.
Messages to your contact person
- Before: route, start point, vehicle, group, gear, planned return and alarm time
- During: "We are safe, not injured, staying here tonight" – plus your coordinates
- During: what you have (bivvy bag, layers, food, water) and your battery level
- During: when you will check in next, and what your contact should do if you do not
- If things get worse: call 112 yourself first, then update your contact
- After: as soon as you are out, call off the alarm so no one starts a search
Agree in advance what "overdue" means. If your contact hears nothing by the alarm time, they should call the emergency number and give your route, vehicle, number of people, clothing colours and gear – not wait until the next afternoon. A short, calm message during the night ("safe, staying put, next update 7:00") lets them hold back without worrying, and it gives rescuers a precise starting point if needed. For more bushcraft skills, see all skills guides.
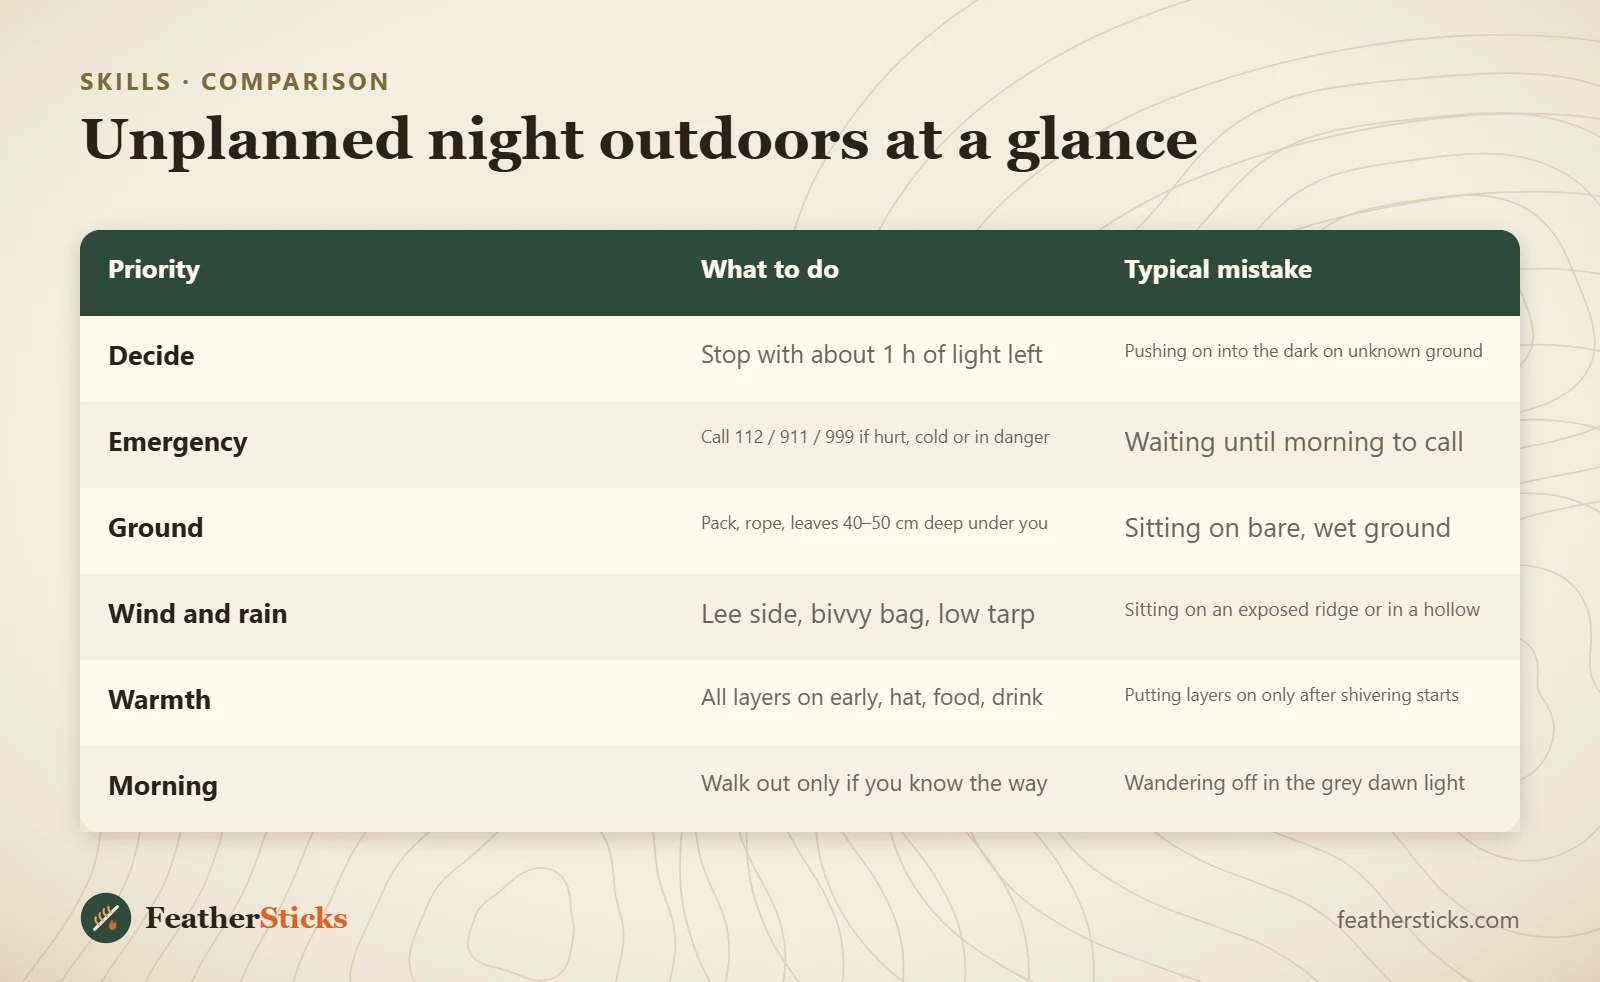
| Priority | What to do | Typical mistake |
|---|---|---|
| Decide | Stop with about 1 h of light left | Pushing on into the dark on unknown ground |
| Emergency | Call 112 / 911 / 999 if hurt, cold or in danger | Waiting until morning to call |
| Ground | Pack, rope, leaves 40–50 cm deep under you | Sitting on bare, wet ground |
| Wind and rain | Lee side, bivvy bag, low tarp | Sitting on an exposed ridge or in a hollow |
| Warmth | All layers on early, hat, food, drink | Putting layers on only after shivering starts |
| Morning | Walk out only if you know the way | Wandering off in the grey dawn light |
Common mistakes
- Pushing on in the dark instead of stopping while there is still light.
- Not telling anyone the route or alarm time, so no one knows where to look.
- Sitting or lying on bare ground and trusting clothing alone to insulate.
- Waiting until morning to call for help when someone is injured or confused.
- Using a fire, stove or candle inside a bivvy bag or closed shelter.
- Letting the phone battery run flat by using it as a torch and map all evening.
- Splitting up the group to look for the way.
What you need
- Emergency bivvy bag or foil blanket
- Headlamp with spare batteries
- Extra warm layer, hat and gloves
- Charged phone with offline maps and a power bank
- Whistle on the shoulder strap
- Fire kit in a dry bag (lighter plus backup)
- First aid kit, snack and water
- Sit pad or small piece of foam
FAQ
What should I do if I am stuck outside overnight?
Should I keep walking if I get lost in the woods at night?
Is it dangerous to fall asleep in the cold?
How do I stay warm without a sleeping bag?
What should be in a day-pack emergency kit?
Is an emergency blanket enough for a night outside?
Should I make a fire if I am stuck outside overnight?
When should I walk out in the morning and when should I wait?
Check yourself
Completed6 quick questions from this guide. Nothing is sent anywhere.
Related step-by-step guides
-
 1
-
 1
-
 1