Bivouac & Bivvy Bag: How to Sleep Out Light, Dry and Discreet
A bivvy bag (short for bivouac sack) is a waterproof, usually breathable cover that goes over your sleeping bag and pad. With it you can sleep almost anywhere flat — no poles, no pegs, a footprint the size of your body. That makes the bivouac the lightest and most discreet way to spend a night outdoors, and a perfect partner for a small tarp.
This guide explains the types of bivvy bag, when a bivvy beats a tarp or tent (and when it does not), how to choose a spot and set up, how to manage condensation, how to combine the bivvy with a tarp and what to do when it rains. It ends with the legal side: in many countries, including Germany, a bivouac is treated differently from camping — but not everywhere, and never in national parks. For all other shelters, see the shelter hub.
Step by step
-
1

Check the local rules
Bivouacking is regulated differently by country and region. Stay out of national parks and nature reserves and check the local rules before you go.
-
2

Find flat, slightly raised ground
Choose level ground a little higher than its surroundings, away from hollows, dead trees and water courses.
-
3

Lay out groundsheet, pad, bivvy
Clear cones and sticks, spread a groundsheet, slide the pad into the bivvy and let the sleeping bag loft — before it gets dark.
-
4

Get in and keep your face out
Breathe through the hood opening, not into the bag, and leave a vent open to reduce condensation.
-
5

Rig a low tarp if rain threatens
String a ridgeline at about hip height and pitch a low A-frame tarp over the bivvy, windward edge down.
-
6

Pack up and leave no trace
Leave early, take everything with you, fluff up flattened vegetation and dry a wet bivvy at the next chance.
What is a bivvy bag and what is a bivouac?
Originally, a bivouac is an improvised, often unplanned night in the open — a climber on a ledge, a hiker overtaken by darkness. Today the word also means a deliberately simple night outside with minimal kit and no tent. The bivvy bag is the key piece: a body-shaped shell that protects your sleeping bag from dew, wind, splashes and light rain, and adds some warmth by stopping draughts.
Most bivvy bags have a waterproof, tough floor (often called a bathtub floor) and a waterproof-breathable top fabric that lets part of the moisture from your body escape. They differ mainly in how the head end is built.

| Type | Material | Strengths | Weaknesses | Use |
|---|---|---|---|---|
| Emergency bivvy | Foil or plastic, not breathable | Very light, cheap, small | Heavy condensation, fragile | First aid kit and emergencies |
| Breathable bivvy | Waterproof-breathable top, tough floor | Light, versatile, discreet | Fabric lies on your face in rain | Most trips, with or without tarp |
| Hooped bivvy | Like breathable, plus a short pole | Space for the face, better in rain | Heavier, needs a peg or two | Solo trips without tarp, exposed spots |
| Bivvy with mesh hood | Water-resistant top, insect net | Airy, keeps insects out | Less rain protection | Summer, under a tarp |
A breathable bivvy is the best all-rounder. An emergency bivvy belongs in every first aid kit as a backup, but is a poor choice for planned nights because it soaks your sleeping bag from the inside. Our sleeping gear guide explains how bag, pad and bivvy work together as one sleep system.
Bivvy vs tarp vs tent: which one when?
None of the three is "best" — each shines in different conditions. The bivvy gives the smallest footprint and the most direct contact with the night; the tarp gives a dry roof and room to cook and pack; the tent gives full enclosure against rain, wind and insects. The wider decision, including hammocks, is laid out in tent vs tarp vs hammock.

Bivvy bag
- Smallest footprint: fits on any flat patch the size of your body
- Fast: set up in minutes, packs away in seconds
- Discreet and close to nature — you see the sky
- No space for gear, cooking or getting dressed in rain
- Condensation in cold, humid weather
Tent
- Full protection from rain, wind and insects
- Room for gear, cooking in the vestibule, getting changed
- More comfortable over several rainy days
- Heavier and bulkier; needs a bigger flat pitch
- Much more visible — often treated as camping by law
The tarp plus bivvy combination sits in between and is a favourite in bushcraft: the tarp gives you a dry roof for cooking and packing, the bivvy protects your sleeping bag from splash, blown-in rain and dew. See tarp shelter setups and our guide to choosing a tarp. If you prefer to sleep off the ground, a hammock is the other lightweight option.
Choosing a spot for your bivouac
Because a bivvy lies directly on the ground, the ground matters more than with any other shelter. Look for level ground that is slightly higher than its surroundings: rain runs off instead of pooling under you, and on still nights cold air flows past you into the hollows below. The general rules for a safe camp are in how to choose a camp site.

A good bivvy spot
- Level, or head slightly uphill; no roots or stones under hips and shoulders
- Slightly raised, not in a hollow, ditch or dry stream bed
- No dead trees or broken branches overhead (look up!)
- Sheltered from the wind by bushes, rocks or terrain
- Not on a path or game trail, not directly next to water
- Not in a national park, nature reserve or on private land without permission
In a thunderstorm, a bivvy offers no protection at all: avoid summits, ridges, lone trees and open fields when storms are forecast, and choose a tent or a hut instead. Check the forecast before you go and keep an eye on the sky.
How to set up a bivvy bag
Setting up a bivvy takes minutes — but a few details decide whether you sleep well. Do it while there is still light, especially on your first night out.
Setting up a bivvy step by step
 1Clear the ground
Sweep away cones, sticks and stones with your hand. Lie down briefly to feel for bumps and to check the slope — your head goes uphill.
 2Groundsheet down
A thin groundsheet about the length of the bivvy protects the floor from sharp objects and keeps dirt out. Tuck the edges under so rain cannot run onto it and collect under you.
 3Pad inside the bivvy
Slide the sleeping pad into the bivvy rather than under it: it cannot slip away in the night, and the bivvy floor is protected. Check first that your bivvy is wide enough for pad and bag together.
 4Let the bag loft
Shake the sleeping bag and put it in early so the insulation can fill with air. Keep the stuff sack with a head torch, water and tomorrow's socks next to your head.
Keep your pack close — under the head end of the tarp, beside you with a pack cover, or as a pillow base with soft clothing on top. Water, head torch and a warm layer should be within reach without getting out. On cool nights, the bivvy adds a little warmth; calculate your sleep system for the expected night low with the sleeping bag and R-value calculator.
Condensation in a bivvy bag: why it happens and what helps
Condensation is the biggest complaint about bivvy bags. Your body releases moisture all night, through the skin and with every breath. A breathable fabric lets part of this vapour out — but only when the outside of the fabric is warm enough. On cold, clear, still and humid nights, the outer fabric cools below the dew point, and the moisture condenses on the inside of the shell, or freezes as frost.

Managing condensation
 1Moisture is normal
Every body releases water overnight. The goal is not zero condensation but keeping it out of your sleeping bag's insulation.
 2Breath outside, hood open
Keep your mouth and nose outside the bag and leave the hood open as far as the weather allows. Breathing into a zipped-up bivvy soaks it within hours.
 3Cold, still, humid nights
On these nights expect droplets or frost on the inside. A tarp overhead keeps the shell a little warmer and reduces it; a synthetic sleeping bag copes better with damp than down.
 4Air it in the morning
Turn the bivvy inside out or hang it over a line or branch in the sun and wind while you have breakfast. Pack it dry whenever possible.
| Symptom | Likely cause | Fix |
|---|---|---|
| Bag damp at the foot end | Cold outer fabric, bag touching the shell | Tarp overhead, do not overfill the bivvy, air it out |
| Wet around the head | Breathing into the bivvy | Face out, hood open, breathe outside |
| Frost inside the shell | Clear, cold night below freezing | Shake it out before it melts; vent more, tarp overhead |
| Whole bag damp after several nights | Moisture builds up, no drying | Dry the bag in sun and wind at every chance; consider a synthetic bag |
| Soaked inside with an emergency bivvy | Non-breathable material | Use breathable bivvies for planned nights |
Bivvy and tarp: the classic bushcraft combination
A small tarp over a bivvy gives you the best of both: a dry place to cook, pack and get dressed, and a sleeping spot that stays dry even when rain blows in. Because the bivvy protects against splash, the tarp can be pitched lower and smaller than without it. Plan size and pitch with the tarp planner.
A low A-frame tarp over a bivvy
 1Ridgeline at about hip height
Tie a ridgeline between two trees about 4–5 m apart, at roughly hip height for a low, storm-proof pitch. A bowline and a trucker's hitch keep it tight and easy to untie.
 2Drape the tarp low
Hang the tarp over the ridgeline as an A-frame. The lower the edges, the less rain blows in — but leave enough air to limit condensation.
 3Windward edge down
Stake the side facing the wind right down to the ground and keep the other side a little higher for airflow. Tension evenly so the fabric does not flap.
 4Bivvy underneath
Lay the bivvy along the centre, with your head at the more sheltered end. Even with blown-in rain or drips, the bivvy keeps your sleeping bag dry.
Where there are no trees, trekking poles can hold the ridge. On open ground, a low pitch facing away from the wind is more important than a large tarp. More pitches, from lean-to to diamond, are in our tarp shelter guide; the right knots for tarps make setting up quicker.
Bivouacking in the rain: strategy
A good bivvy keeps light and moderate rain out for a night, but it is not a tent: getting in and out, packing and cooking in steady rain without a roof is hard work. Decide before the rain arrives.
Rain forecast: bivvy, tarp or something else?
Is a thunderstorm forecast?
Yes → Do not bivouac in the open. Choose a tent or hut and stay off summits, ridges and lone trees.No → Continue.Is steady rain expected for many hours?
Yes → Take a tarp for the bivvy or choose a tent — you will need a dry space for gear and cooking.No → Continue.Showers or a wet night only?
Yes → A hooped or breathable bivvy is enough; a small tarp makes it much more comfortable.No → Dry night: bivvy alone, enjoy the stars.
When the rain comes
 1Close the hood to a vent
Zip the hood down to a small opening, turned away from the wind. Close it completely only in heavy rain, and open it again as soon as the shower passes.
 2Spare layers in a dry bag
Keep your dry clothes in a dry bag inside the bivvy or in the pack under a cover. Wet boots stay outside under the pack or the tarp.
 3Pack the wet bivvy separately
In the morning, pack the wet bivvy in an outer pocket or its own stuff sack, away from the sleeping bag, and dry it at the next chance.
If you get your sleeping bag wet in a cold night, the situation can become serious quickly. Keep a dry warm layer in reserve, know how to recognise the early signs of hypothermia, and have a bail-out plan — a car, a hut or a shorter route home. Our guide to fire in wet weather helps where fires are permitted.
Bivouacking in cold weather and in insect season
The bivvy bag is a year-round tool, but the two ends of the season ask different things of it. In the cold, the challenges are ground chill, frost inside the shell and a sleeping bag that slowly gets damp. In summer, the problem is midges, mosquitoes and ticks — and a shell that is too warm to close.
How warm does a bivvy bag keep you?
A bivvy stops draughts and adds a thin layer of still air, so it helps a little — but only a little. The site's sleeping bag calculator counts a bivvy or open bivouac as roughly +1 °C, the same as a tarp, while a closed tent counts as about +3 °C. Plan your sleeping bag as if you slept in the open, and let the bivvy be a reserve, not a substitute for insulation. Wind matters far more: on an exposed spot, a breeze can cost you several degrees, which you can estimate with the wind chill calculator.
Bivouac below freezing
Below 0 °C the ground becomes the main heat thief. Use a pad of at least R 5 for ground around −5 to −10 °C — for example a closed-cell foam pad under an insulated air pad, as explained in the winter sleep system section. Expect frost on the inside of the shell on clear nights; shake it out before it melts. Over several frosty nights, down bags lose loft as moisture accumulates, which is why many winter bivouackers prefer synthetic bags or a vapour barrier liner. If deep snow is available and you have practised, a snow shelter is warmer than any bivvy on the surface. Our guide to layered clothing explains which dry layer to sleep in.
| Season / night low | Pad | Bivvy and extras | Watch out for |
|---|---|---|---|
| Summer, above 10 °C | R 2 foam or light air pad | Mesh-hood bivvy or bivvy left open | Insects, ticks, dew |
| Spring / autumn, 0–10 °C | R 3–4 | Breathable bivvy, small tarp | Condensation, cold air in hollows |
| Frost, 0 to −10 °C | R 5 (stacked pads) | Breathable or hooped bivvy, tarp, synthetic or treated bag | Frost inside the shell, wet down |
| Deep winter, below −10 °C | R 6+ | Only with experience; consider a tent or snow shelter | Hypothermia, frozen water, long nights |
Midges, mosquitoes and ticks
A standard bivvy with the hood open is an invitation to insects. In midge and mosquito season, a bivvy with a mesh insect net over the face opening, or a separate head net, makes the difference between sleep and misery. Avoid still, damp spots near standing water, and choose a site with a light breeze — see insects and camp sites. Ticks crawl up from grass and leaf litter: check your body the next morning and remove any tick promptly, as described in the first aid guide. Keep food in a closed bag away from your head and hang or store it as described in food storage outdoors, so mice and foxes are not tempted to investigate your bivvy at night.
The unplanned bivouac: caught out by darkness or weather
The original meaning of bivouac is the night you did not plan: you got lost, an ankle gave way, or the light ran out before the car park. What matters then is staying warm and dry and being found if necessary — not comfort. An emergency bivvy bag weighs little more than 100 g and belongs in every day pack for exactly this moment.
Unplanned night: what to do
- Stop early Decide to stop while there is still about an hour of light. Check sunset times before you go with the daylight calculator. Walking on in the dark on unknown ground causes more injuries than a cold night.
- Tell someone If you have signal, call or message someone with your position. If someone is injured or you cannot get out, call the emergency number (112 in Europe) — the distress signals guide covers whistle, light and ground signals.
- Get off the ground and out of the wind Sit or lie on your pack, a rope, spruce branches or a pile of dry leaves. Find the lee of a rock, a fallen trunk or dense young trees. Put on every layer you have before you get cold.
- Get into the emergency bag Climb into the emergency bivvy with your feet on the pack. Keep your head covered. Condensation will build up — it is the price for staying out of the wind.
- Improve if you can With time and material, pile leaves into a simple debris shelter or lean branches against a log in the style of a lean-to. Eat and drink something; keep a head torch with spare batteries in reach.
Your first bivouac: plan, packing list and weight
The best first bivouac is boring: a dry, mild night with a stable forecast (see reading the weather), a known spot within an hour of the car or home, and a bail-out option. Arrive with at least an hour of daylight, lay out your bed first, then cook and eat. Following a simple routine — bed, water, food, then light — is the heart of good camp setup, and it matters even more with a bivvy because you have no vestibule to sort things in later.
Water is easy to underestimate when you camp away from taps: for a summer overnight with dinner and breakfast, around 3–4 litres per person is realistic; the water calculator refines it for temperature and effort. If you plan to refill from streams, bring a way to filter water. Plan cold or simple hot meals — see meal planning for the outdoors.
| Item | Typical weight | Notes |
|---|---|---|
| Breathable bivvy bag | 300–600 g | Hooped models heavier |
| Emergency bivvy (backup) | 100–250 g | Foil or plastic, for emergencies |
| Sleeping pad | 300–700 g | Foam or insulated air pad |
| Three-season sleeping bag | 800–1,500 g | Down lighter, synthetic more damp-tolerant |
| Small tarp, ridgeline, pegs | 400–800 g | Optional, strongly recommended if rain is possible |
| Groundsheet | 80–200 g | Thin sheet the length of the bivvy |
That puts a complete bivvy-and-tarp sleep system at roughly 2–3.5 kg, often less than a two-person tent plus pads and bags. It fits in a 30–45 litre pack — see choosing a backpack — together with the rest of the essentials on our bushcraft kit list. You can assemble and weigh your own list in the Kit Builder. Good footwear matters too: after a night in dew, dry socks for the morning are a small luxury worth carrying.
Is bivouacking legal? Bivouac vs camping
In many countries, the law distinguishes between camping (with a tent, often for several nights) and a bivouac (a single night without a tent). But the details vary widely, and a bivvy bag is not automatically a legal free pass.
- Germany: overnight stays in the forest and in open country are regulated by the forest and nature conservation laws of the 16 federal states. Whether a bivouac without a tent is allowed, tolerated or forbidden differs from state to state and is often a grey area. National parks and nature reserves are off-limits. Our guide to wild camping in Germany explains the situation in detail.
- Scotland: access rights generally include wild camping when done responsibly, following the Scottish Outdoor Access Code, with local restrictions.
- Scandinavia: the right of public access (allemansrätten and similar) usually allows a night outside, with conditions such as distance from houses.
- Elsewhere: in England and Wales, and in many other places, you generally need the landowner's permission. Always check local rules.
Wherever you sleep out, the same etiquette applies: arrive late and leave early, stay one night only, keep away from paths, houses and wildlife, no fire where it is not explicitly allowed (see fire safety), and take all rubbish with you. A bivouac done well leaves no trace. For more on responsible outdoor skills, see our bushcraft basics, and for cold-season nights, winter camping.
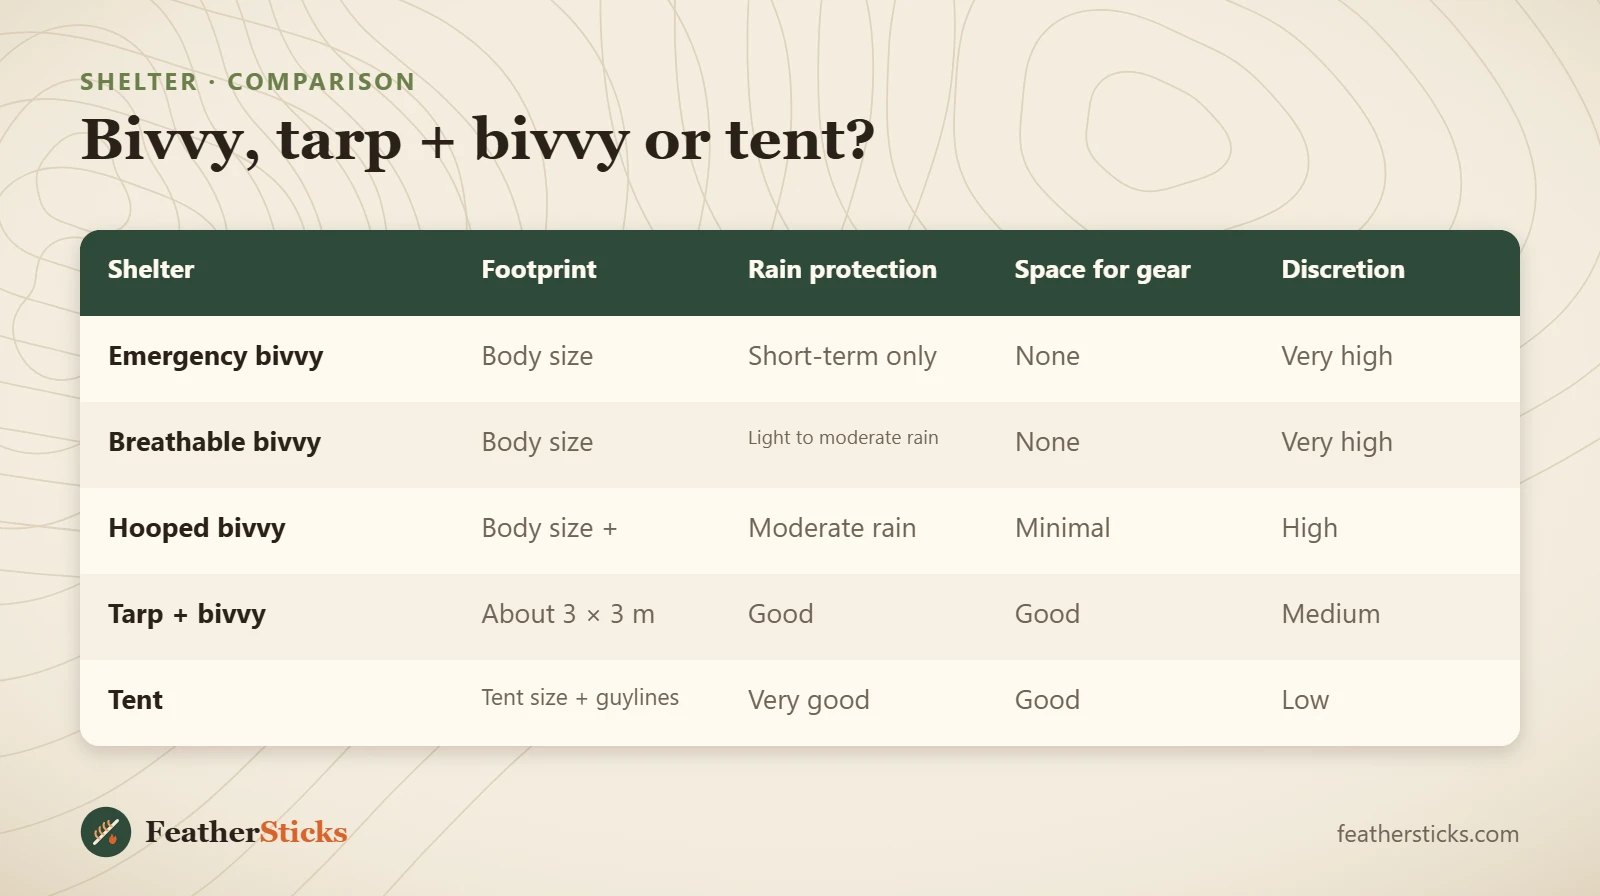
| Shelter | Footprint | Rain protection | Space for gear | Discretion |
|---|---|---|---|---|
| Emergency bivvy | Body size | Short-term only | None | Very high |
| Breathable bivvy | Body size | Light to moderate rain | None | Very high |
| Hooped bivvy | Body size + | Moderate rain | Minimal | High |
| Tarp + bivvy | About 3 × 3 m | Good | Good | Medium |
| Tent | Tent size + guylines | Very good | Good | Low |
Common mistakes
- Breathing into a zipped-up bivvy and soaking the sleeping bag.
- Using a non-breathable emergency bag for planned nights.
- Pitching in a hollow where rain and cold air collect.
- Setting up in the dark without checking for dead branches overhead.
- Relying on a bivvy alone when steady rain or thunderstorms are forecast.
- Packing the wet bivvy together with the sleeping bag and never drying it.
- Assuming a bivouac is always legal — and bivouacking in national parks or nature reserves.
What you need
- Breathable bivvy bag (hooped for trips without a tarp)
- Sleeping pad that fits inside the bivvy
- Sleeping bag suited to the night low (synthetic copes better with damp)
- Thin groundsheet
- Small tarp, ridgeline, guylines and pegs
- Dry bag for spare clothes
- Head torch, water bottle and a warm layer within reach
FAQ
What is a bivvy bag used for?
Is a bivvy bag better than a tent?
How do I stop condensation in a bivvy bag?
Can you use a bivvy bag in the rain?
Should the sleeping pad go inside or under the bivvy?
Is bivouacking legal in Germany?
How much warmer does a bivvy bag make you?
Can you bivouac in winter?
What should I do if I have to bivouac unplanned?
Check yourself
Completed6 quick questions from this guide. Nothing is sent anywhere.
Related step-by-step guides
-
 1
-
 1
-
 1