Hiking Boots & Foot Care: Fit, Lacing, Socks and Blister Prevention
Hiking boots and foot care decide whether a bushcraft trip is a pleasure or a limp back to the car. The short answer: choose footwear for your terrain and load, fit it in the afternoon with your own hiking socks, leave about a thumb's width in front of your toes, lace so the heel stays locked, and treat every hot spot the moment you feel it. Dry feet and socks every evening, and your feet will carry you for days.
This guide covers boots vs trail shoes, fit tests, lacing techniques such as the heel lock and window lacing, breaking in, waterproof vs breathable, socks and liners, drying boots at camp, blister care and trench foot. It belongs to our bushcraft gear guides and works hand in hand with bushcraft clothing and the first aid kit.
Step by step
-
1

Choose shoe or boot for the terrain
Trail shoes for dry paths and light packs, mid boots as all-rounders, sturdy leather boots for rough ground and heavy loads.
-
2

Fit late in the day with your socks
Feet swell during the day. Try boots on in the afternoon, wearing the socks you will hike in.
-
3

Lace to lock the heel
Snug over the instep, a heel lock at the top: the heel stays back and the toes stay free on descents.
-
4

Break new boots in gradually
Wear them indoors, then on short walks, then on a day hike before any multi-day trip.
-
5

Stop at the first hot spot
Warmth or rubbing is a blister starting. Stop, dry the skin and tape it smoothly straight away.
-
6

Dry feet and socks every evening
Air your feet, change into dry socks and camp shoes, and open the boots so they can dry overnight.
Hiking boots or trail shoes: which footwear for bushcraft?
There is no single best bushcraft footwear – there is the right footwear for the ground, the load and the season. Three questions decide it: How rough and wet is the terrain? How heavy is your pack? And how cold will it be?
- Trail shoes are light, flexible and dry fast. On forest tracks and well-trodden paths with a day pack they are comfortable and reduce fatigue, because every gram on the foot costs more energy than the same gram on your back. They give little ankle protection and let in water, mud and ticks.
- Mid boots (ankle height) are the classic all-rounder for bushcraft: some ankle support, more protection from roots and stones, a stiffer sole under a moderate pack and a collar that keeps out forest litter.
- Sturdy leather boots with a high shaft and a stiff sole are best for heavy loads, off-trail terrain, scree, snow and cold. They take longer to break in and weigh more, but protect well and last for years if cared for and resoled.

| Type | Weight | Support | Drying | Best use |
|---|---|---|---|---|
| Trail shoe (non-membrane) | Very light | Low | Fast | Dry paths, summer, day pack |
| Trail shoe with membrane | Light | Low | Slow once wet inside | Wet grass, cool shoulder seasons |
| Mid boot | Medium | Medium | Medium | All-round bushcraft, moderate packs |
| Leather boot, high cut | Heavy | High | Slow | Heavy loads, rough ground, cold and snow |
| Camp shoe / sandal | Very light | None | Fast | Evenings at camp, airing feet |
Ankle support also depends on lacing and on your own strength and balance – a high shaft is not a substitute for careful footwork.
Which footwear for which trip?
Heavy pack, off-trail ground, scree, snow or frost?
Yes → Sturdy high-cut leather boot with a stiff sole – broken in over several weeks.No → A lighter shoe or boot will do; go on to the next question.Dry paths, summer weather and only a day pack?
Yes → Non-membrane trail shoe: light, cool and quick to dry.No → You need more protection; go on to the next question.Wet grass, mud or a cool shoulder season with a moderate pack?
Yes → Mid boot with a membrane or well-waxed leather, plus gaiters.No → A mid boot without special features is the safe all-rounder.Will you stay mostly in one camp and walk only short distances?
Yes → Comfort comes first – wear what fits well and add closed camp shoes.No → Covering distance with a full pack: favour support and a stiffer sole.
If you mostly camp in one spot and walk short distances, comfort in camp matters more than performance on long days. If you cover real distance with a full pack – see what your load weighs with the Kit Builder – support and a stiffer sole become more important. A good backpack fit and good footwear work together: a heavy, badly carried pack punishes the feet first.
How should hiking boots fit? The fit tests
Fit matters more than any feature. A cheap boot that fits beats an expensive one that does not. Feet swell during the day and on long walks, so try boots on in the afternoon or evening, wearing the socks (and liners, if you use them) you will hike in. Fit the larger of your two feet.
What a good fit feels like
- Length: about a thumb's width (roughly 1–1.5 cm) between the longest toe and the front of the boot.
- Heel: held firmly in the heel cup; it lifts only slightly when you walk.
- Width: no pressure on the sides of the forefoot or the little toe; toes can wiggle freely.
- Instep: snug but without pressure points when laced.
Four fit tests in the shop
 1Stand on the insole
Take the insole out and stand on it with your full weight. There should be about a thumb's width in front of the longest toe, and the foot must not hang over the sides.
 2One finger behind the heel
Put the boot on unlaced and slide your foot forward until the toes touch the front. One finger should fit behind the heel – two fingers means too long, none means too short.
 3Laced: little heel lift
Lace up properly and walk around, including on stairs. The heel may rise a few millimetres in a new, stiff boot, but it must not slide up and down.
 4Downhill: toes stay free
Walk down a ramp or stairs and stop hard. If your toes hit the front, the boot is too short or the lacing too loose – typical causes of black toenails on long descents.
Insoles make a difference too. If your arch is high or low, a supportive aftermarket insole can improve comfort – bring it to the fitting. People with persistent foot problems, diabetes or poor circulation should get advice from a podiatrist or doctor before choosing new boots.
Before you buy: the fitting checklist
- Go in the afternoon or evening, when your feet are at their largest
- Bring your own hiking socks – and liners, if you use them
- Bring your own insoles or orthotics and fit the boot with them
- Try on both boots and choose the size for the larger foot
- Do all four fit tests: insole, finger behind the heel, heel lift when laced, downhill stop
- Walk for several minutes, including stairs or a ramp – not just two steps on carpet
- Check the return conditions, then wear the boots indoors for a few evenings first
Lacing techniques: heel lock and window lacing
Lacing turns a good fit into a secure one. Most boots have eyelets over the forefoot and hooks at the ankle, so you can use different tension in different zones. Lace the forefoot firmly but not tight, and use the top hooks to hold the heel back. Re-lace during the day: before a long descent, tighten the top; on flat ground or a long climb, loosen it a little. On long descents, trekking poles also take some load off the knees.
Heel lock (surgeon's lock, "lace lock")
The heel lock is the most useful lacing trick for hiking. It keeps the heel in the heel cup and stops the foot sliding forward downhill, which protects the toes and reduces heel blisters.
Tying a heel lock
 1Lace to the second-last eyelet
Criss-cross as usual up to the second-last eyelet or hook on each side. Keep the tension even over the forefoot.
 2Straight up on the same side
Take each end straight up on the same side into the top eyelet, from the outside, and leave a small loop between the two eyelets.
 3Cross and thread
Cross the ends over the tongue and thread each one through the loop on the opposite side.
 4Pull down, then tie
Pull the ends downwards and outwards – the loops close and clamp the ankle area. Then tie a normal bow or a double knot so it does not open in undergrowth.
Window lacing for pressure points
If one spot on the top of your foot hurts – a high instep, a bony bump or a tendon – skip one crossing over that spot: run the laces straight up the sides for one eyelet and continue criss-crossing above. The pressure over the painful area disappears without loosening the rest of the boot.

Other simple adjustments: for a wide forefoot, leave the lowest crossing slightly looser; for toe pressure, start lacing one eyelet higher; for a heel that lifts, add the heel lock.
Which lacing for which problem?
- Heel lifts or rubs
- Heel lock at the top two eyelets
- Toes hit the front downhill
- Tighten the top hooks and add a heel lock before the descent
- Pressure on top of the foot
- Window lacing: skip one crossing over the sore spot
- Wide forefoot, numb toes
- Leave the lowest crossing looser
- Pressure on the toes
- Start lacing one eyelet higher
- Long climb or flat ground
- Loosen the top a little
- Frost
- Lace a little looser than in summer so blood can flow
- Deep mud
- Lace firmly with a heel lock so the boot stays on
How long does it take to break in hiking boots?
Modern synthetic boots and trail shoes need little breaking in – a few short walks are usually enough to check the fit. Stiff leather boots need longer: plan several weeks of gradual use before a multi-day trip. The leather and the sole flex where your foot bends, and you find out where pressure points are while you are still close to home.
- Indoors: wear the boots at home for a few evenings. Unused boots can often still be returned – check the shop's conditions.
- Short walks: an hour on mixed ground, then longer walks with a light pack.
- Day hike: a full day with the load you will carry. Only then take them on a long trip.
Never set off on a long trip in brand-new boots. If a spot keeps pressing after breaking in, try window lacing, a different insole or ask a shoemaker to stretch the leather locally.
From the box to a multi-day trip
- IndoorsA few evenings at home, while the boots can still be returned.
- Short walksAbout an hour on mixed ground.
- Longer walksLight pack, some up and down.
- Day hikeA full day with the load you will really carry.
- Multi-day tripOnly when the day hike was free of hot spots.
What to check while breaking boots in
Use every stage as a test, not just as wearing time. After each walk, take the boots off and look at your feet: red patches show where a blister would form on a longer day. Note whether the problem appears uphill (usually the heel), downhill (usually the toes) or all the time (usually width or the instep), because each has a different fix – lacing, sock thickness or insole. Try the socks you plan to wear and the lacing you will use on descents. If the same spot is still red after several walks and after you have changed lacing and socks, the boot does not match your foot, and more walking is unlikely to fix it.
Waterproof or breathable: do you need a membrane?
Waterproof-breathable membranes keep water out on wet grass, in puddles and in snow, and they keep feet warmer in cold, wet seasons. But no membrane breathes as well as an open mesh shoe, and once water gets in over the top – in a stream, deep mud or long rain running down your legs – a membrane boot dries very slowly.
Membrane vs non-membrane footwear
With membrane
- Dry feet on wet grass and in short puddles
- Warmer in cold, wet and snowy conditions
- Sweaty feet in summer
- Very slow to dry once soaked inside
- Membrane can wear out at flex points over time
Without membrane
- Breathes well, cooler feet in warm weather
- Water drains and dries quickly after a soaking
- Wet feet on dewy mornings
- Colder in winter and wet shoulder seasons
- Works well with wool socks that stay warm when damp
A practical rule for Central and Northern Europe: membrane or well-waxed leather boots from autumn to spring, breathable shoes in dry summer weather. Gaiters keep water, snow, mud and ticks out of the boot top and extend the range of any boot. Waxed leather is water-resistant, breathes and tolerates the occasional spark from the campfire far better than synthetic uppers; re-wax it regularly with a product suitable for your boots.
Socks and liners: the other half of the boot
Socks cushion, manage moisture and reduce friction. Wool and wool-blend hiking socks are the standard: they stay warm when damp, smell less and cushion well. Synthetic socks dry faster. Avoid cotton socks for anything more than a short walk – they hold sweat against the skin, lose their cushioning and encourage blisters.
- Thickness: choose the sock with the boot. Swapping thin summer socks for thick winter socks can make a boot a size too small.
- Liners: a thin synthetic or merino liner under the hiking sock moves friction between the two sock layers instead of onto your skin. Many blister-prone walkers swear by this system; try it on day walks first.
- Fit: socks must fit without wrinkles; a fold under the foot is a blister in the making. Pull them up smoothly and check again after the first hour.
- Quantity: one spare pair per day, as in the bushcraft kit list, plus one dry pair reserved only for sleeping.
Change socks at lunch on long, sweaty days. In camp, dry socks under the tarp in a breeze or inside your jacket overnight, as explained in the clothing care section.
Spare hiking socks by trip length (plus one dry pair only for sleeping)
How to prevent and treat blisters when hiking
Blisters are caused by friction plus moisture plus heat. Prevention works on all three: a good fit, correct lacing, the right socks, dry skin and short breaks with shoes off on long days. The most important rule: stop at the first hot spot. A warm, rubbing or stinging patch takes about five minutes to treat; a torn blister can end the trip.
Hot spot and blister care, step by step
 1Stop at once
At the first warmth or rubbing, stop, sit down and take off boot and sock. Do not walk "just to the next junction".
 2Clean and dry the skin
Wipe the area clean and let it dry completely – tape does not stick to damp, sweaty skin.
 3Tape it smoothly
Apply tape or a blister plaster flat over the hot spot with rounded corners and no wrinkles. Check the sock for folds and the boot for grit before you put it back on.
 4Blister: keep it intact
Leave an intact blister closed – the roof protects the wound. Pad around it with a ring of padding or cover it with a hydrocolloid blister plaster.
If a blister has already torn, keep the skin flap in place, clean the area gently, and cover it with a sterile dressing or hydrocolloid plaster. Watch it over the following days. Get medical help if redness spreads, the area becomes hot, swollen or oozes pus, or you develop a fever – these can be signs of infection. People with diabetes or reduced sensation in their feet should have any foot wound checked early. Everything you need for this is listed in the blister section of our first aid guide.
| What you notice | Likely cause | What to do |
|---|---|---|
| Heel rubs, blister at the back | Heel lifts in the boot | Heel lock lacing, tape the heel, check boot length |
| Toes hit the front on descents | Boot too short or lacing too loose | Tighten the top, heel lock; longer boot next time |
| Pressure on top of the foot | Lacing too tight over the instep | Window lacing over the spot |
| Numb or tingling toes | Forefoot laced too tight or boot too narrow | Loosen the lower lacing, thinner sock |
| Pain under the ball of the foot | Little cushioning, long hard ground | Thicker sock or cushioned insole, rest breaks |
| Wrinkled, white, sore skin | Feet wet for hours | Dry the feet, change socks, air them at every break |
Persistent pain, swelling or pain that gets worse with every step can mean more than a pressure point – rest and get it checked.
Drying boots and caring for your feet at camp
The evening routine matters as much as the walk. As soon as camp is set up – see the camp setup guide – take off your boots, wash or wipe your feet, dry them thoroughly (especially between the toes) and let them air. Put on dry socks and camp shoes: light, closed shoes or sandals that let your feet breathe and your boots dry. Closed toes are safer around the fire and on rough ground.
How to dry boots without damaging them
- Open the laces wide, pull the tongue forward and take the insoles out – they dry separately and much faster.
- Stuff the boots with a dry cloth or paper if you have it, and swap it when it is wet.
- Stand the boots upside down on sticks or under the tarp in a breeze – on well-drained ground, not in a hollow where dew and cold air collect (see choosing a camp site).
- Near a fire, keep them at a distance where your hand feels only pleasant warmth – about an arm's length at the side, never right next to the flames. Heat dries out leather until it cracks and can soften glued soles.

The evening foot routine, in order
- Boots off first. As soon as the shelter is up, take off boots and socks – before cooking, not after.
- Wash or wipe, then dry. Dry thoroughly, especially between the toes, and let the feet air for a few minutes.
- Inspect. Look for red patches, hot spots and blisters and treat them now; check ankles and the backs of the knees for ticks.
- Dry socks and camp shoes. Put on a dry pair and closed camp shoes; hang the day's socks in a breeze under the tarp.
- Open the boots. Laces wide, tongue forward, insoles out; stand them where air moves, at a safe distance from the fire.
- Sleep socks at bedtime. Change into the pair reserved for sleeping, and in frost take the boots into the tent in a bag.
In frost, wet boots freeze solid overnight. Put them in a bag and keep them inside the tent or, in a stuff sack, at the foot of your sleeping bag. At home, clean boots, dry them slowly at room temperature and re-wax leather. Follow the campfire safety rules whenever clothing or boots are near a fire.
Stream crossings, bogs, ticks and snow: footwear in tricky conditions
Most footwear advice assumes a dry forest path. Bushcraft trips often include wet meadows, bogs in the UK uplands, muddy clay tracks in German forests, small streams, tick-rich grass in early summer and frozen ground in winter. Each needs a slightly different approach.
Crossing streams: boots on or off?
For a shallow, slow crossing on a stony bed, many walkers change into closed camp shoes and keep the boots dry – which is one more reason to pack shoes rather than flip-flops. Crossing barefoot is a bad idea: sharp stones, glass and cold water make you unsteady. In doubt, keep your boots on and accept wet feet; dry socks at camp fix that. Before any crossing, undo the hip belt and sternum strap of your pack so you can get out of it if you fall, face upstream, move one foot at a time and use a stick as a third leg.
Bogs, mud and wet grass
On waterlogged ground, water comes in over the top of any boot sooner or later. Gaiters delay it, a high leather boot with a gusseted tongue delays it further. In very wet regions many walkers deliberately choose non-membrane shoes and wool socks: the feet get wet but drain and warm up again while walking. What matters is the evening – dry socks, dry feet and time to air them, as described in the camp section above. Deep mud can suck a loosely laced boot off the foot; lace firmly and use the heel lock.
Ticks: shoes, socks and gaiters
Ticks wait on grass and low vegetation and usually reach the body at the feet and ankles. Closed shoes, long trousers tucked into the socks or gaiters, and light-coloured socks (ticks are easier to spot on them) help. Check feet, ankles and the backs of your knees at breaks and every evening, and remove ticks promptly as shown in the tick section of our first aid guide.
Winter boots and snow
In frost, warmth comes from three things: room in the boot (tight boots cut circulation), insulation under the foot and dry socks. For snow and temperatures well below freezing, insulated winter boots with a thick sole or a larger boot with an extra insole and a thick wool sock work better than a tightly laced summer boot. Carry a spare pair of warm socks just for the evening, keep boot liners or insoles in the sleeping bag overnight, and lace a little looser than in summer. If you plan to build a snow shelter or spend hours standing around camp, insulated footwear is essential, not a luxury.
Cold, wet feet: trench foot and frostbite awareness
Feet that stay wet and cold for a long time are at risk even well above freezing. Trench foot (immersion foot, a non-freezing cold injury) develops when feet are wet and cool for many hours or days – in waterlogged boots, on long rainy trips or in winter camping with damp socks. Early signs are cold, numb, pale or blotchy skin, tingling, swelling and pain on rewarming.
On very wet trips, accept wet feet during the day (breathable shoes, wool socks) but guarantee dry, warm feet every night.
Trench foot and frostbite: two different cold injuries
Trench foot
- Non-freezing: possible well above 0 °C
- Cause: feet wet and cool for many hours or days
- Signs: cold, numb, pale or blotchy skin, tingling, swelling
- Painful when the feet warm up again
- Prevention: dry socks every night, air the feet at breaks, loosen tight lacing
Frostbite
- Freezing injury: frost, made much worse by wind
- Early stage (frostnip): pale or white, numb skin that is still soft
- Deeper frostbite: hard, white or grey-blue skin, later blisters
- Do not rub, and do not rewarm if it could freeze again
- Prevention: room in the boot, insulation under the foot, dry socks
In both cases the first steps are the same: get out of the wet and the wind, take off wet socks, dry the feet gently and put on dry insulation. Get medical help if the warning signs in the box above remain, and for any suspected frostbite. How to recognise frostnip and frostbite early is covered in the winter camping guide.
How long do hiking boots last? Care, resoling and when to replace them
There is no fixed lifespan in years or kilometres: it depends on the construction, your weight and load, the ground and above all on care. Light trail shoes with foam midsoles wear out fastest; stitched or well-made leather boots can be resoled several times and last for many years. Instead of counting, look for the signs below after every season.
| Sign | What it means | Action |
|---|---|---|
| Tread worn smooth, especially at heel and toe | Less grip on wet roots, slopes and mud | Resole (if possible) or replace |
| Deep creases or cracks in the midsole foam | Cushioning and stability are fading | Replace trail shoes; for boots ask a cobbler |
| Sole separating from the upper | Glue failure, often after heat or age | Repair early; field fix with tape or cord |
| Leather dry, pale or cracking at the flex | Missing care, drying too hot | Clean, condition and wax; cracks are hard to reverse |
| Membrane boot suddenly wet inside | Membrane worn at flex points or seams | Check for holes; use as a dry-weather boot or replace |
| Heel counter soft, heel slips despite lacing | Structure worn out | Replace – no lacing fixes a collapsed heel |
Basic boot care at home
- Clean: brush off dried mud and rinse with lukewarm water; mud draws moisture out of leather and dries it out.
- Dry slowly: insoles out, paper inside, at room temperature – never on the heater, in the sun behind glass or by the stove.
- Condition and waterproof: leather with a wax or cream suitable for the boot (check whether it has a membrane), fabric boots with a spray-on impregnation. Work it into seams and the welt.
- Store: dry, cool and dark, laces loose, not squashed at the bottom of a box.
Field repairs
A broken lace ends a walk quickly – carry a spare, or a length of cord that doubles as a lace; the knots guide shows secure bends for joining a broken lace. A loose sole can be held for a day with strong tape wrapped around the forefoot or with cord tied between the lugs. For stitching a torn upper, a sturdy needle and waxed thread from the repair kit on the full kit checklist do the job until you get home.
Foot care on the trail: small habits that make the difference
- Trim toenails straight across a few days before a trip – long nails hit the boot on descents.
- Take shoes off at longer breaks so the feet cool down and dry. Check for hot spots while you are at it.
- Keep grit out: shake out boots and socks when you feel a stone; gaiters help on sandy and gravel paths.
- Adjust lacing before long climbs and descents rather than walking in pain.
- Plan realistic distances: tired feet are clumsy feet. The hiking time calculator shows how long a route really takes with your pack, and the navigation guide helps you choose paths over unnecessary rough ground.
- Night and poor light: twisted ankles happen most often late in the day when you are tired and the light is fading. Walk slower, take shorter steps and use a headlamp held low or a hand torch to show roots and holes.
- Weather changes: a dry morning can become a wet afternoon – reading the weather tells you when to switch from shoes to gaiters or waxed boots before the grass gets soaked.
Footwear for children
Children's feet grow fast, so check the fit before every season with the insole test – a thumb's width in front of the toes applies to them too. Hand-me-down boots are fine if the sole and heel are not worn to the shape of the previous owner's feet. Children rarely say "hot spot"; ask them at every break and look at their feet at lunch. The bushcraft with kids guide has more on keeping children warm, dry and motivated.
Beginners can start with boots they already own, as bushcraft for beginners explains – invest once you know your terrain and your feet.
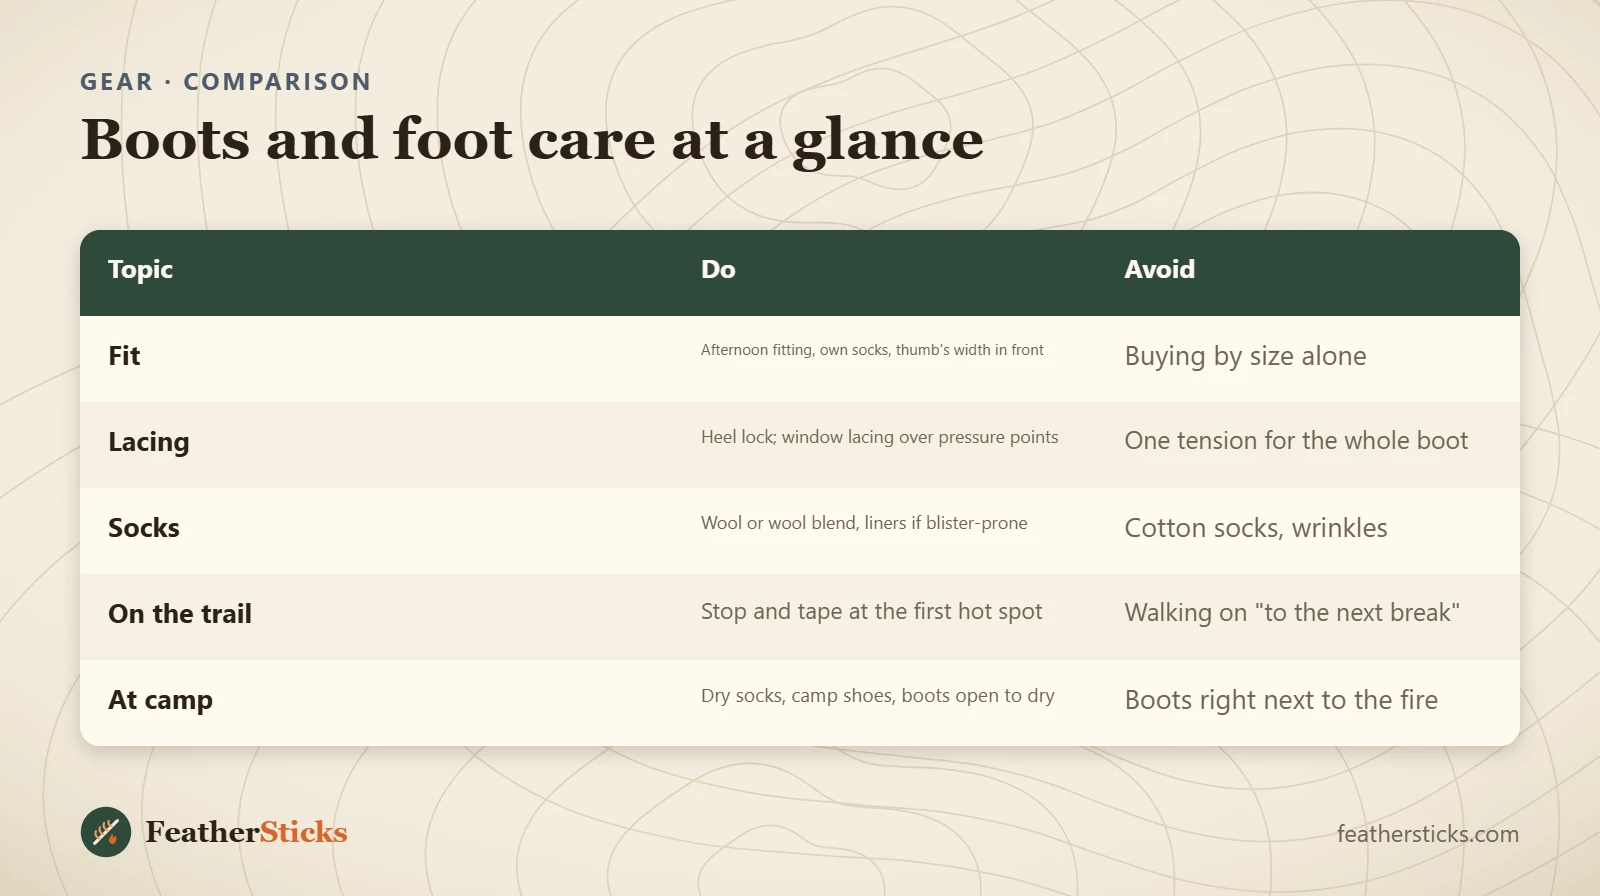
| Topic | Do | Avoid |
|---|---|---|
| Fit | Afternoon fitting, own socks, thumb's width in front | Buying by size alone |
| Lacing | Heel lock; window lacing over pressure points | One tension for the whole boot |
| Socks | Wool or wool blend, liners if blister-prone | Cotton socks, wrinkles |
| On the trail | Stop and tape at the first hot spot | Walking on "to the next break" |
| At camp | Dry socks, camp shoes, boots open to dry | Boots right next to the fire |
Common mistakes
- Starting a long trip in brand-new, unbroken boots.
- Buying boots in the morning with thin socks – they are too tight by afternoon.
- Ignoring a hot spot until it becomes an open blister.
- Wearing cotton socks or socks that wrinkle under the foot.
- Drying boots right next to the fire until the leather cracks.
- Sleeping in the damp socks worn during the day.
- Lacing loosely at the top before long descents.
What you need
- Well-fitting boots or trail shoes, broken in
- Wool or wool-blend hiking socks (1 spare pair per day)
- Thin liner socks (optional)
- Blister plasters, tape and small scissors
- Light camp shoes or sandals
- Gaiters for wet, snowy or tick-rich terrain
- Leather wax or care product for the boots
FAQ
How much room should be in front of my toes in hiking boots?
Are trail shoes or hiking boots better for bushcraft?
How do I stop my heel from slipping in my boots?
Should I pop a blister when hiking?
How long does it take to break in leather hiking boots?
Do I need waterproof hiking boots?
How long do hiking boots last?
Should I take my boots off to cross a stream?
What footwear is best for winter bushcraft?
How do I dry wet boots at camp?
Should I buy hiking boots a size bigger?
How many pairs of socks do I need for a hiking trip?
Check yourself
Completed6 quick questions from this guide. Nothing is sent anywhere.
Related step-by-step guides
-
 1
-
 1
-
 1