Winter Hiking in Snow: Moving Safely on Foot and Snowshoes
Winter hiking in snow is slower, colder and more tiring than a summer walk, and the day is far shorter. Done well, it is also quiet, bright and beautiful. The essentials are simple: plan a shorter route and turn back in time, move without sweating, choose footwear, gaiters and traction for the conditions, and use snowshoes when the snow gets deep. Stay off avalanche slopes and unknown ice, and never rely on old tracks to find your way home.
This guide covers walking in deep snow and snowshoeing for beginners step by step, plus breaking trail as a group, navigation when the paths vanish and the safety rules that matter most in winter. It builds on our bushcraft basics and the other outdoor skills; if you want to stay out overnight, continue with winter camping.
Step by step
-
1

Plan a shorter day
Check sunset and plan a route that finishes well before dark. Snow slows you down a lot, so allow far more time than in summer.
-
2

Layer to stay dry
Start slightly cool, open zips before you sweat and put on an insulated jacket at every stop.
-
3

Fit gaiters and traction
Wear warm boots with gaiters against deep snow, and microspikes on icy paths and hard-packed snow.
-
4

Snowshoe in deep snow
In knee-deep snow, put on snowshoes and use poles with snow baskets. Walk relaxed with slightly wider steps.
-
5

Avoid avalanche slopes and ice
Stay away from steep open slopes, gullies, cornices and frozen lakes unless you are trained, equipped and certain.
-
6

Turn around on time
Set a fixed turnaround time before you start and keep it, whatever the summit or the view ahead promises.
What makes walking in snow different?
On a summer path, a wrong turn or a late finish is an inconvenience. In snow the margins shrink: you walk slower, the light goes earlier, your body burns more energy to stay warm, and a twisted ankle can quickly turn into a cold emergency. Four things change:
- Speed: every step in soft snow sinks and has to be lifted out again. Even on a trodden path you are slower, and breaking trail in deep fresh snow is exhausting.
- Time: in mid-winter the day in Central Europe lasts only around 8 hours, so there is little buffer for delays.
- Moisture and cold: sweat soaks your layers on the climb and chills you when you stop. Snow gets into boots and gloves.
- Orientation and hazards: paths, waymarks and edges disappear under snow; slopes can avalanche, cornices break and ice can be thinner than it looks.
None of this requires heroics. It requires a plan made at home, the right kit on your feet and a habit of deciding early — about layers, about the route and about turning back.
A winter walk in five phases
- PlanSunset, forecast, avalanche bulletin, route and turnaround time.
- Start coolInsulation off before you set off; vent early.
- AdaptGaiters, microspikes or snowshoes as the snow changes.
- NavigateMap, compass and GPS — not old tracks.
- Turn backAt the set time, with daylight and energy to spare.
Planning a winter hike: shorter days, slower going
Start with the light. Around the winter solstice, Germany gets only about 7.5 to 8.5 hours of daylight, and the further north you go, the shorter it gets. The daylight calculator gives you sunrise, sunset and twilight for your location and date. Plan to be back at the car, the hut or your camp at least an hour before sunset; the afternoon light fades fast in a forest, and a head torch with spare batteries should be in your pack anyway, as described in moving safely at night.
Then estimate your time realistically. The hiking time calculator has a "snow" terrain setting that multiplies walking time by 1.8 compared with an ordinary trail, so a route that takes 3 hours in summer becomes a little over 5 hours. Treat that as a starting point, not a promise: deep untracked snow, breaking trail, a heavy pack or a group with children can be slower still, while a firm, well-trodden winter path can be quicker. For navigation by pace counting, the pace calculator adds a snow factor too, because your steps get shorter.
| Condition | Effect | What to do |
|---|---|---|
| Trodden winter path, firm snow | Somewhat slower than summer | Microspikes if icy; normal boots and gaiters |
| Ankle- to shin-deep fresh snow | Clearly slower, more tiring | Gaiters; poles with snow baskets; shorter route |
| Knee-deep or deeper snow | Very slow on foot, exhausting | Snowshoes; take turns breaking trail |
| Icy tracks, refrozen slush | Slow and risky without traction | Microspikes; short steps; avoid slopes |
| Wind, snowfall, poor visibility | Slower, navigation harder | Shorter route, earlier turnaround, map and compass |
Use the hiking time calculator (snow setting) as a baseline and add a generous margin.
Check the forecast for temperature, wind and new snow, and use the wind chill calculator to see how cold the wind will feel on exposed skin. Our guides to reading the weather and planning a trip help you build a Plan B: a shorter loop or an earlier exit you can take without discussion. Leave your route and expected return time with someone at home.
Clothing for winter hiking: stay warm without sweating
Moving through snow is hard work, and hard work makes you sweat. Sweat-soaked layers lose much of their insulation, and when you stop for a break the moisture chills you within minutes. The trick is to stay slightly cool while moving and to add warmth the moment you stop. Our clothing guide explains fabrics and layering in detail; here is how it works on a winter walk.
Winter walking layers (outermost first)
- For breaks and emergencies only. Keep it at the top of the pack and put it on at every stop.
- Wind and snow protection. Front zips and pit zips let moisture out. See rain gear.
- Fleece or wool, worn while moving only when it is very cold or windy.
- Merino or synthetic, never cotton. Wicks sweat away from the skin.
In practice: start walking slightly cold — within ten minutes you will be warm. Before a climb, open the front zip, take off your hat or swap thick gloves for thin ones, and slow down a little. The moment your back feels damp, you are already too warm. At every stop, even a short one, pull the insulated jacket on over everything before you feel cold. Warming up again later costs far more energy than staying warm.
Hands, head and the small things
Carry two pairs of gloves (thin ones for walking and handling the map, warm mittens for stops), a warm hat and a neck gaiter or buff. Spare gloves and a dry pair of socks in a waterproof bag are worth their weight. Eat and drink little and often: cold air is dry, and your body needs fuel to stay warm. Warm drinks from a flask help both — see staying hydrated and plan snacks with the trail food planner. Batteries drain fast in the cold, so keep your phone and spare batteries in an inside pocket, as explained in power in the outdoors.
Boots, gaiters and microspikes: footwear for snow and ice
Your feet carry the trip. In snow they need three things: warmth, dryness and grip. Warmth comes from room in the boot, insulation under the foot and dry socks — a tightly laced summer boot cuts circulation and gets cold fast. For snow and frost, sturdy waterproof or well-waxed leather boots with space for a thick wool sock, or insulated winter boots, work best. The footwear guide covers boot types and winter fitting in detail.
Gaiters keep the snow out
Gaiters close the gap between boot and trousers. Without them, snow packs into the boot top, melts and soaks your socks within an hour of walking in fresh snow. Knee-high gaiters with a strap under the instep and a hook on the laces are the standard for winter walking. Put them on at the start, before your boots fill with snow, not at the first deep drift.
Fitting gaiters and microspikes
 1Gaiters first
Close the gaiter around your lower leg, fasten the hook on the lowest lace and tighten the strap under the instep. The top should sit just below the knee and close snugly.
 2Microspikes: toe first, then heel
Stand on a firm spot, pull the rubber harness over the toe of the boot first, then stretch it back over the heel. Do it with gloves on at home once, so you know how it works when your fingers are cold.
 3Check the fit
The chains and spikes should sit centred under the sole, with the harness tight around toe and heel. If the spikes slip to the side, the size is wrong or the harness is worn.
 4Walk flat-footed
On ice, set your whole sole down with each step so all spikes bite, keep your steps short and your knees slightly bent. Take the spikes off on bare rock or tarmac to protect them and your ankles.
Microspikes, crampons and when you need which
Microspikes (also called traction devices or chain spikes) are rubber harnesses with short spikes and chains. They are made for icy forest tracks, hard-packed winter paths and gentle slopes, and fit almost any walking boot. Crampons have longer, rigid points and are mountaineering equipment for steep snow and ice. They need compatible boots, training and usually an ice axe — if you think you need crampons, you are on terrain that this guide does not cover. On flat, icy forest roads, walking poles with carbide tips help, but they do not replace traction on your boots.
| Conditions | Footwear | Add |
|---|---|---|
| Light snow on paths | Waterproof walking boots, wool socks | Low gaiters |
| Fresh snow up to the shin | Warm, sturdy boots with room for thick socks | Knee-high gaiters, poles |
| Icy tracks, hard-packed snow | Sturdy boots | Microspikes, poles with carbide tips |
| Knee-deep snow | Warm boots that fit the snowshoe binding | Snowshoes, gaiters, poles with snow baskets |
| Steep snow or ice slopes | Mountaineering boots | Crampons, ice axe and training — beyond this guide |
Snowshoeing for beginners: types, technique and poles
Once snow reaches your knees, walking becomes wading. Snowshoes spread your weight over a larger area so you sink much less, and they turn an exhausting slog into a steady walk. Snowshoeing for beginners is easy to learn — if you can walk, you can snowshoe — but a few techniques make it safer and less tiring.
Which snowshoes?
Modern snowshoes have a plastic or aluminium frame with decking, a binding that holds your boot, and a pivot so the shoe stays on the snow while your heel lifts. Simple, often larger models suit flat forest and rolling terrain. All-terrain or mountain models are narrower and add a stronger crampon under the ball of the foot, side rails that grip on traverses and a heel riser for climbs. Choose the size by your total weight including pack, as given in the manufacturer's sizing table: larger shoes float better in powder, smaller ones are easier on firm snow and in dense forest. Renting a pair for your first trips is a good way to find out what suits you.

Snowshoe walking technique
 1Strap in snugly
Place the ball of your foot over the pivot, so your toe can move through the opening as you step. Tighten the straps until the boot does not slide, but not so hard that your toes go numb.
 2Walk almost normally
Lift the shoe just enough to clear the snow, swing it forward and set it down flat. Walk with your feet slightly wider apart than usual, so the shoes do not step on each other. Keep the rhythm relaxed.
 3Uphill: short steps
On a climb, take short steps, kick the toe into the snow so the crampon bites, and flip up the heel riser on steady gradients. Zig-zag on steeper sections rather than going straight up.
 4Downhill: heels first
Keep your knees bent and your weight slightly back, set the heel down first and plant the poles ahead of you. Take small steps; if it gets too steep to feel safe, turn back or find a gentler line.
Poles with snow baskets
Two trekking poles make snowshoeing much easier: they help you balance, push up climbs, and help you get up after a fall. Fit large snow baskets so the poles do not sink to the grip, and lengthen them a little on soft snow. In deep snow, take your hands out of the straps — if a pole gets stuck or you fall, the strap can twist your wrist or shoulder.
Traversing and falling
When you cross a gentle slope, press the uphill edge of the shoe into the snow so it does not slide sideways, and stamp a small platform with each step. Avoid traversing steep slopes altogether (see the avalanche section below). If you fall in deep snow, do not struggle: roll onto your side, bring the shoes below you and parallel, cross the poles flat on the snow as a platform and push yourself up. Practise once in a safe spot with friends — it is easier than it sounds and good to know before you need it.
On foot with gaiters
- Fine on trodden paths and in shallow snow
- Simple, light, nothing to carry
- Quickly exhausting in knee-deep snow
- Microspikes add grip on ice
On snowshoes
- Floats in deep, soft snow
- Much less tiring off-trail
- Clumsy on ice, rock and steep ground
- Extra weight on the pack when not in use
Breaking trail in deep snow and rotating in a group
The person in front does the hardest work: compacting fresh snow so the others can follow in the track. In deep powder that can take several times the effort of walking behind. Groups that rotate the lead often move faster and arrive less tired than groups where the strongest person breaks trail all day.
Rotating the lead
 1Leader breaks trail
The leader sets a steady, short-stepped pace that everyone can follow. The others step exactly into the existing prints, which saves a lot of energy.
 2Step aside
When the leader starts to tire, they step to the side of the track and let the group pass, without stopping the others.
 3Rejoin at the back
The old leader joins at the end of the line and recovers in the trodden track. As a rule of thumb, change every 10–15 minutes in deep snow, or sooner if the leader slows down.
Keep the group together and walk at the pace of the slowest person — put them second, behind the leader, where the track is already partly broken. Agree on regular short stops for food, drinks and a layer check, and on who carries the map. Children and less experienced walkers should never break trail in deep snow for long; our guide to bushcraft with children has more on keeping young walkers warm and motivated.
Navigation in snow: when paths and tracks vanish
Snow changes a familiar landscape completely. Paths disappear, waymarks on trees and stones are hidden under snow, and fresh snowfall or wind can fill your own outward track within an hour. Never plan to "follow our tracks back": they may be gone, or they may belong to someone heading somewhere else.

Carry a map and compass and know how to use them — our guide to map and compass navigation covers taking a bearing and following it. A phone or GPS with offline maps is a great help, but cold drains batteries quickly: keep the device in an inside pocket and carry a power bank, as explained in navigation gear. Tick off features as you pass them (stream crossings, forest edges, junctions) so you always know where you are.
Whiteout and poor visibility
In a whiteout, snow and cloud merge into one grey-white surface: you lose the horizon, can no longer judge slopes or distances, and may walk off an edge you cannot see. If visibility drops, slow down, stay close together and navigate by bearing from one nearby feature to the next. In open terrain, a whiteout is a reason to turn back or wait in shelter rather than push on. Natural clues such as sun and wind direction help in clear weather, but not in a whiteout.
Navigation checklist for snow
- Route planned on the map, with a shorter alternative and escape routes
- Map in a waterproof case, compass, phone with offline map and a charged power bank
- Phone and spare batteries kept warm in an inside pocket
- Known turnaround time and expected return time left with someone at home
- Head torch with spare batteries, even on a short day walk
Avalanche terrain: stay away unless you are trained
This site does not teach avalanche safety, and this guide is for forests, valleys and gentle hills. Avalanches are a real hazard as soon as you walk on or below steep, open snow slopes — and they can also release from above you, even if you are on flat ground at the bottom. Assessing snow stability needs specific training, current information and rescue equipment (transceiver, probe and shovel) that everyone in the group can use.

Without that training, the rule is simple: stay out of avalanche terrain. In practice that means:
- Avoid open slopes of about 30° and steeper — the angle commonly given as the threshold for slab avalanches — and do not walk below them in the runout zone.
- Avoid gullies and bowls, where snow collects and where an avalanche would bury you deeply.
- Stay well back from ridge edges: cornices, overhanging lips of wind-blown snow, can break much further back than you expect.
- Check the official avalanche bulletin for the region before any trip into hilly or mountain terrain, even if you plan to stay low, and turn back if your route turns out to cross steep open slopes.
Frozen lakes and rivers: do not cross unless you are certain
A frozen lake looks like an easy shortcut, and a snow-covered stream can be invisible. Ice thickness varies with currents, springs, inflows, reeds and snow cover, which insulates the ice and hides weak spots; rivers and streams are especially unpredictable. A fall through the ice in winter is life-threatening within minutes.

The safe default is to go around. Only walk on ice that local authorities have officially opened, or where you know for certain from reliable local information that it is safe — never on rivers, near inflows or outflows, in reeds or on dark, wet or slushy patches. Cross snow-covered streams only on bridges or where you can see solid ground. More on water and ice in winter is in water in winter and, for streams in general, crossing rivers safely.
Cold injuries on the trail: prevent, recognise, act
Long breaks in wind, wet gloves, tight boots and exhaustion are the classic causes of cold injuries on winter walks. Check each other's faces in cold wind: white, waxy, numb patches on the nose, cheeks or ears are frostnip, which you often cannot feel yourself. Rewarm them with a warm hand, out of the wind — never rub the skin, and never with snow. Hard, wooden-feeling skin is frostbite and needs medical help.
Hypothermia starts with persistent shivering, clumsy hands, stumbling and poor decisions. Stop at once, get out of the wind, put on every dry layer, sit on a pad and drink something warm and sweet if the person is fully alert. Do not push on to the planned destination. Our guide to hypothermia explains the stages and first aid; for a kit list see the first aid kit.
| Sign | Possible cause | First steps |
|---|---|---|
| White, numb patches on face or fingers | Frostnip | Body heat, out of the wind; no rubbing |
| Hard, wooden, white or grey skin | Frostbite | Protect from cold and pressure; get medical help (112) |
| Strong shivering, fumbling, stumbling | Mild hypothermia | Stop, shelter, dry layers, pad, warm sweet drinks if alert |
| Confusion, drowsiness, shivering stops | Severe hypothermia | Call 112 at once; handle gently, insulate, keep lying down |
General first aid information, not a substitute for a first aid course.
When things go wrong: emergencies in snow
The best emergency is the one you avoid by turning back early. If something does happen — an injury, exhaustion, lost orientation or nightfall — the priorities are the same as everywhere: stay calm, get the group out of the wind and off the snow, put on all insulation and call for help in good time.
- Stop and protect Gather the group, put on insulated jackets and sit on pads or packs, never directly on snow.
- Call 112 In Europe, call 112 with your location (GPS coordinates, map reference or nearest landmark). In cold, keep the phone warm between calls.
- Signal Use a whistle, head torch or bright clothing to attract attention; see distress signals.
- Prepare to wait Build a windbreak, share warmth and keep drinking. If you cannot get out before dark, read surviving an unplanned night; in deep snow, a simple snow shelter can help.
Your first winter walks: start small
Start on well-known paths close to home, in forest or valley terrain with no steep slopes. Try a few hours on a trodden winter trail before you set out across untracked snow, and test snowshoes on a short loop before planning a full day on them. Pack the essentials from the bushcraft kit list in a comfortable pack, and read about the whole season in bushcraft through the seasons. Winter also is the best time for reading animal tracks — a good reason to walk slowly and look closely. When short walks feel easy, an overnight trip with winter camping and water from snow is the next step.
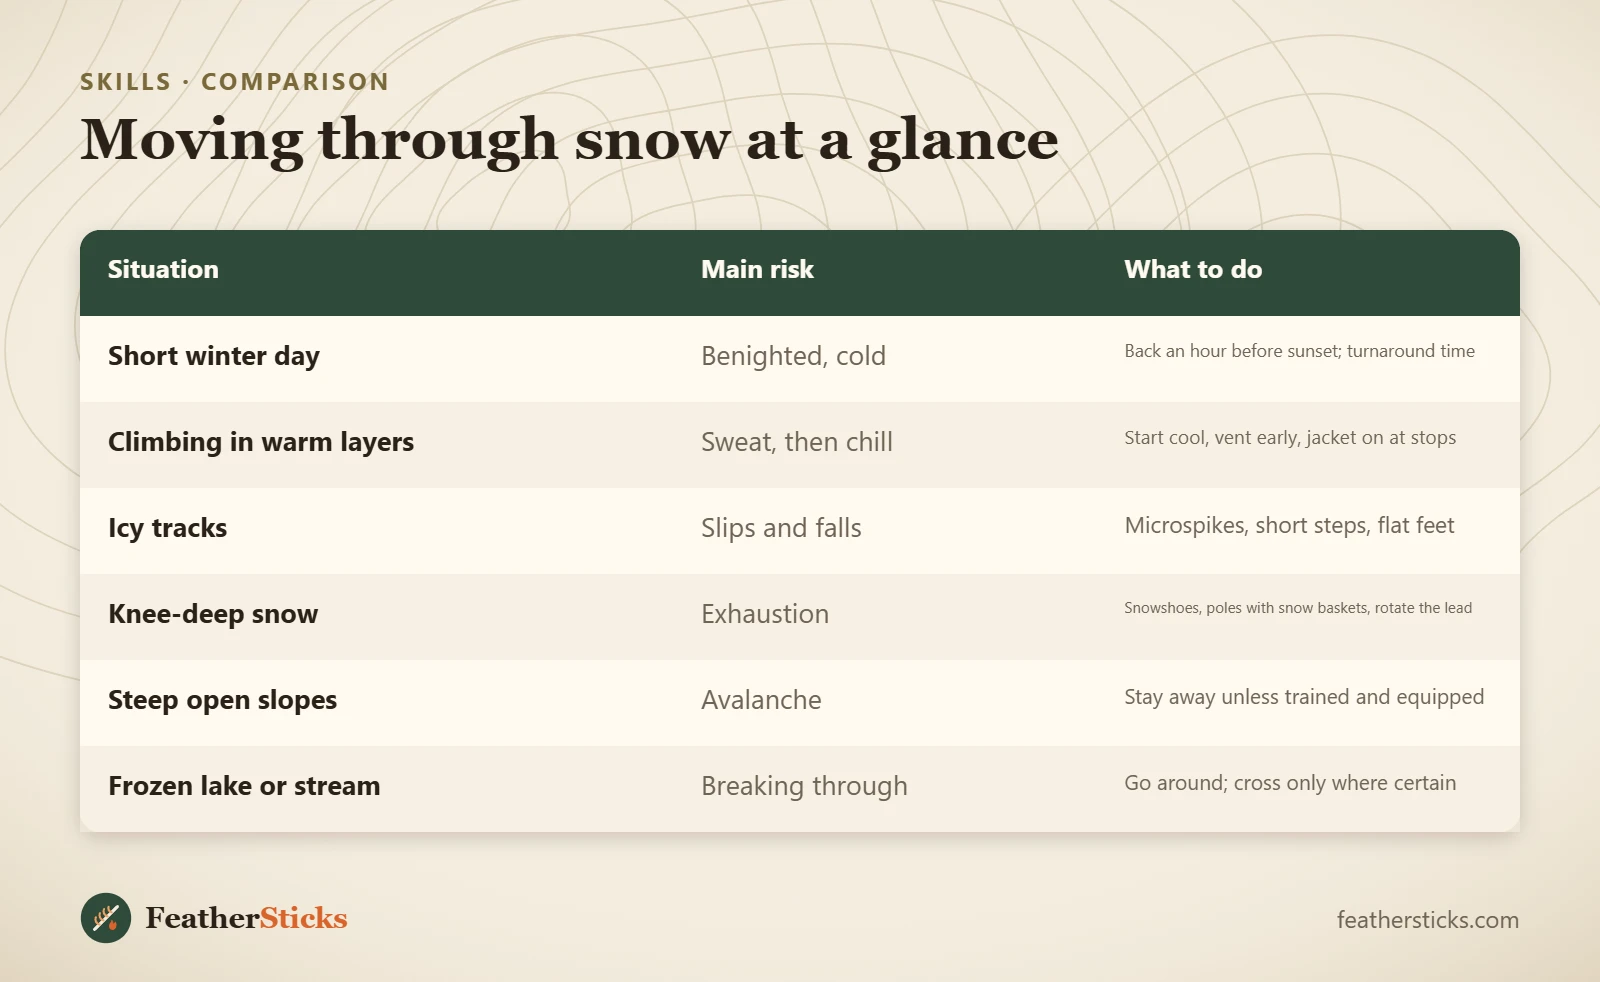
| Situation | Main risk | What to do |
|---|---|---|
| Short winter day | Benighted, cold | Back an hour before sunset; turnaround time |
| Climbing in warm layers | Sweat, then chill | Start cool, vent early, jacket on at stops |
| Icy tracks | Slips and falls | Microspikes, short steps, flat feet |
| Knee-deep snow | Exhaustion | Snowshoes, poles with snow baskets, rotate the lead |
| Steep open slopes | Avalanche | Stay away unless trained and equipped |
| Frozen lake or stream | Breaking through | Go around; cross only where certain |
Common mistakes
- Planning a summer-length route for a winter day.
- Walking in the insulated jacket and soaking every layer with sweat.
- Waiting until the boots are full of snow before putting on gaiters.
- Relying on your own or others' tracks to find the way back.
- Crossing a frozen lake or snow-covered stream to save time.
- Walking below steep slopes or close to cornices without avalanche training.
- Ignoring the turnaround time because the destination seems close.
What you need
- Base, mid and shell layers plus an insulated jacket
- Warm boots with room for wool socks; spare socks and gloves
- Knee-high gaiters
- Microspikes for icy paths
- Snowshoes for deep snow; trekking poles with snow baskets
- Map, compass, phone with offline map, power bank
- Head torch, flask with a warm drink, snacks, first aid kit, sit pad
FAQ
How much slower is hiking in snow?
When do I need snowshoes instead of boots?
Is snowshoeing hard for beginners?
What is the difference between microspikes and crampons?
How do I know if a slope can avalanche?
Is it safe to walk across a frozen lake?
What should I wear for winter hiking?
Check yourself
Completed6 quick questions from this guide. Nothing is sent anywhere.
Related step-by-step guides
-
 1
-
 1
-
 1