Compass, GPS & Map Apps: What to Carry and How to Combine Them
The best compass for hiking is a liquid-filled baseplate compass with a ruler, a rotating bezel and, ideally, an adjustable declination scale – paired with a paper map in a waterproof case and a phone or GPS device with offline maps. Each tool covers the weak spots of the others: the paper map and compass never run out of power, the electronics give you a position in seconds.
This guide is about the kit, not the technique: which scale, which compass type, which features, how to check a compass, GPS vs phone for hiking, how to prepare an offline map app, how to save power and how to practise with all of it. How to read a map and walk a bearing is covered in map and compass navigation. The wider gear picture is in the gear guides, and the basics are in bushcraft basics.
Step by step
-
1

Assume the phone can fail
Battery, cold, water and missing signal each end a phone's navigation. Plan a second system that needs no power.
-
2

Carry the paper map in a case
A 1:25,000 map of your area in a waterproof case, folded so the route window is visible.
-
3

Choose a baseplate compass
Liquid-filled, with ruler and romer scales; declination adjustment is a bonus. Button compasses are emergency backups only.
-
4

Check the compass
Small bubble, red end north, no deflection near metal. Test it at home and again after any trip in a loaded pack.
-
5

Prepare phone or GPS
Download offline maps, test them in flight mode, load the route and start with a full battery and a power bank.
-
6

Cross-check all three
Map, compass and electronics should agree. When they do not, stop and find out why before you walk on.
Why carry more than a phone? Battery, cold, water and signal
A smartphone with a good map app is the most convenient navigation tool ever made: it shows your position as a dot on a map, follows a planned route and fits in a pocket. The problem is not what it does when it works, but how many ordinary things stop it from working. Four of them matter on almost every trip.
| Weak spot | What happens | Counter-measure |
|---|---|---|
| Battery | A bright screen, constant position updates and a weak signal drain the battery far faster than normal use; a long day of navigating with the screen on can empty it | Flight mode, screen off while walking, power bank, battery saver |
| Cold | Lithium-ion batteries deliver less in the cold and may shut the phone down while still showing some charge | Keep it in an inside pocket close to the body; see the battery notes for headlamps |
| Water | Rain and wet fingers trigger false touches; water-resistant is not the same as waterproof; a dropped phone can crack | Zip bag or drybag, a rugged case, a paper map as the main system on wet days |
| Signal | Online maps stop loading without mobile data; valleys and forests often have none, even though satellite positioning still works | Offline maps downloaded at home, tested in flight mode |
| Glare and gloves | Screens are hard to read in bright sun and often do not react to thick gloves | Shade the screen, use touch-compatible gloves, keep key information on paper |
The practical answer is two independent systems, one of which needs no power: paper map and compass. The electronics become a fast second opinion rather than a single point of failure. Satellite positioning needs no mobile signal, only a view of the sky, so an offline map app works where an online one does not. The phone stays in the kit, but you can answer "what if this device is dead in an hour?" without hoping. The technique is in the navigation skills guide; this article covers the equipment.
Paper maps: scales, what they show and waterproof cases
A paper map has two strengths an app cannot match: it shows the whole area at a glance in a fixed, known scale, and it never needs charging. For walking and bushcraft the scale decides how much detail you get. The reading skills – contours, grid, symbols – are taught in map reading basics; here the focus is on which map to buy.
| Scale | 1 cm on the map = | 1 km = | What it typically shows | Best for |
|---|---|---|---|---|
| 1:25,000 | 250 m | 4 cm | Small paths, tracks, field and forest boundaries, single buildings, small streams, contour lines often every 5–10 m | Hiking, bushcraft, off-trail navigation, small targets |
| 1:50,000 | 500 m | 2 cm | Main paths and roads, larger forest blocks, villages, contour lines often every 10–20 m; many small tracks are left out | Long routes, overview, cycling |
| 1:100,000 | 1 km | 1 cm | Roads, settlements, main valleys and ridges | Trip planning and getting to the trailhead, not for walking |

Which scale to buy
For navigating in forests, where features are small and close together, 1:25,000 is the best choice. Hiking maps from regional clubs or the national mapping agency are usually based on the same data, with marked trails added. A 1:50,000 map is a good second sheet for a long route and for seeing where the escape routes lie. Check the edition year: contours change slowly, but forest tracks, clearings and trail markings do not.
If you print your own map sections, print at 100 % and measure the scale bar with a ruler: a map shrunk to fit the page has a different scale than the one printed on it. Check the data licence too.
Waterproof map cases
Paper dies in the rain, so it needs protection. The usual options are a clear map case with a roll-top or zip, a map printed on waterproof paper, or a sturdy zip bag. The case should be big enough to show the route window without unfolding the whole sheet, and should have a cord so the wind cannot take it.
- Fold the map so that your route section is on top and you can scroll to the next section without opening the case.
- Write on the case, not the map: bearings, expected times and paces can be added with a pencil or a marker that wipes off.
- Keep it at hand: a lid pocket or a hip belt pocket is better than the bottom of the pack. A map you have to unpack in the rain is a map you will not read.
- Have a spare: a second copy of the key section in a zip bag, in a different place in the pack, covers loss and soaking.
Which compass for hiking? Baseplate, mirror, lensatic and button compasses compared
All compasses show magnetic north, but they differ in how well you can work with a map, how precisely you can aim and how much they weigh. The table compares the four types you will meet. The short answer to "what is the best compass for hiking": a baseplate compass (also called a map compass or orienteering compass) – it is made for exactly the combination of map and terrain that hikers use.
| Type | Strengths | Limits | Map work | Use it for |
|---|---|---|---|---|
| Baseplate | Transparent plate with a straight edge, ruler and romer scales, rotating bezel, liquid-filled capsule; light and quick to learn | Aiming at distant objects is less precise than with a mirror | Excellent | Hiking, bushcraft, orienteering – the default choice |
| Mirror (sighting) | A baseplate with a hinged mirror lid and a sight: more precise bearings to far landmarks, can read the dial while aiming; the mirror can also flash a signal | More parts, slightly heavier, the lid can snag; more care needed | Excellent | Open terrain, triangulation, users who take many bearings |
| Lensatic (military style) | A sighting wire and a rear sight with a small lens; sturdy case; very fast to aim at a point in the distance | No transparent ruler plate, so it is awkward for taking bearings from a map; usually a card dial; heavier | Limited | Rough work in the field, aiming at objects; fine as a second compass |
| Button / pocket | Tiny, cheap, light; fits on a zip or a lanyard | Small dial, slow needle, no scale to speak of; easily thrown off by metal | None | Emergency back-up for a rough direction only |

A compass in a watch, whistle, knife or phone is in the same category as a button compass: fine for a rough direction, not for a map bearing. Metal cases and electronics deflect the needle, and a phone sensor needs calibration and fails with the battery.
A sensible set-up
One good baseplate compass on a lanyard or in a chest pocket – not at the bottom of the pack – is enough for almost everything. A cheap spare on longer trips lets you cross-check a suspicious reading. Baseplate compasses typically weigh about 30–60 g.
Compass features that matter: declination, needle, scales, clinometer, luminous marks
Beyond the basic type, a few features separate a good compass from a merely adequate one. Most are useful, none is essential, and you should not pay for ones you will not use.
Declination adjustment
With an adjustable compass you set the local declination once, and the dial then gives map bearings without mental arithmetic – a real advantage, because adding when you should subtract is easy to miss. Check the setting before each trip and look up the current value; it changes slowly. By-hand correction is in the declination section.
Global needle
A needle is balanced for the slope of the earth's magnetic field in one region; elsewhere it can tilt and drag. A "global" needle works in all zones, which matters only if you travel far.
Romer scales and rulers
The ruler edges and the little corner scales, called romers, let you measure distance and read a grid reference to about 100 m without any other tools. Check that the scales match the map scales you actually use (1:25,000 and 1:50,000 are the common ones), and that the plate is long enough, around 10 cm, to draw a line between two points on the map.
Clinometer
A clinometer measures slope angle, handy for judging steepness. It is not a substitute for training: assessing snow slopes and avalanche terrain needs a proper course and rescue equipment, which this article does not teach.
Luminous markings
Glowing marks make a compass readable in the dark. Two principles exist in general terms: marks that store light and glow for a while afterwards, and marks with a permanent self-powered glow that lasts for years. The first kind need charging by light and fade during the night; the second kind do not. Either way, a headlamp in red mode is gentler on your eyes when you read the dial; see red light and night vision.
How to check a compass: bubble, polarity and interference
A compass can be wrong without looking wrong. Checking it takes five minutes and should be done at home, after buying, after a flight and whenever the compass has been near something magnetic. The four checks below are simple and need no tools.
Four quick checks for any compass
 1Look at the bubble
A tiny bubble in the capsule is normal and does not matter. A large one can drag on the needle. Cold, low air pressure and altitude change can make it grow; warming the compass usually shrinks it again.
 2Hold flat and let it settle
Hold the compass level, away from metal. The needle should swing and come to rest within a few seconds, not stick or wobble. If it drags to one side, the compass is tilted or the needle is damaged.
 3Check the polarity
The red end must point to north. Compare with a second compass or with a known north direction, for example a long straight line on your map. If the red end points south, the needle has been reversed; do not trust it.
 4Test for interference
Slowly bring a phone, a knife or a steel buckle closer. If the needle moves, you now know how far to keep them away. Take bearings with those items out of reach.
Keep phones and knives away while you take a bearing
Anything with iron, steel or a magnet can pull the needle: a phone and its magnetic case, headphones, a pocket knife or fixed-blade knife, a steel belt buckle, trekking pole tips, a car, a fence or an overhead power line. The error comes without warning, and a few degrees is enough to put you far from your target after a kilometre. As a rule of thumb, hold the compass at arm's length from your body, with phone and knife in a pocket or on the other side of the body, and well away from vehicles and power lines.
Polarity reversal
Strong magnets – a speaker, a magnetic clasp on a bag or phone case, an electric motor – can reverse the magnetism of the needle, so that the "red" end points south. You then walk 180° in the wrong direction while everything on the compass looks perfectly normal. Store compasses away from such items, and if you suspect a reversal, replace the compass or have it checked, instead of trying to correct it in the field.
GPS vs phone for hiking: which is better?
Neither replaces a map and compass, and neither is the clear winner. A dedicated handheld GPS device is built for the outdoors; a smartphone is already in your pocket and does many other things. The right choice depends on the trip, and the typical figures below are rules of thumb that vary a lot between devices.
| Criterion | Handheld GPS device | Smartphone with a map app |
|---|---|---|
| Battery life, navigating | About 15–30 h continuous on a set of batteries or one charge | About 6–10 h with the screen on; a day or more with flight mode and the screen mostly off |
| Power source | Often swappable cells, so you can carry spares | Built-in battery, recharged from a power bank |
| Cold | Lithium cells keep working in frost; buttons work with gloves | May shut down in the cold; touch screens react poorly to thick gloves |
| Water and knocks | Built to be rugged and water-resistant | Water-resistant at best; fragile when dropped, so a case and bag help |
| Weight and extras | An extra device, about 150–250 g, no other functions | Already carried, doubles as camera, torch and emergency phone |
Which one should you carry?
For marked day trails a phone with offline maps and a power bank is usually enough, with paper map and compass in the pack. For multi-day, winter or remote trips a handheld GPS has real advantages: battery life, spare cells and controls that work with gloves. Many walkers carry both, with the phone in flight mode as emergency phone and backup map.

Satellite messengers and SOS devices
Beyond mobile coverage, there are devices that talk to satellites. In general terms there are three kinds: personal locator beacons, which send a distress signal with your position when activated; two-way satellite messengers, which also let you send and receive short messages and often include an SOS button; and smartphones with satellite emergency messaging, where available. They usually need registration, and some need a subscription. Learn how the SOS function works, test it where the manufacturer allows, and carry it where you can reach it with one hand.
Such a device is a safety net, not a navigation tool and not a reason to take bigger risks. It does not tell you the way, it only helps rescuers find you. How to signal for help, share your location and wait for rescue is covered in emergency signals and getting found; for Europe, the emergency number is 112.
Offline map apps: how to prepare maps, tracks and waypoints
An offline map app is only as good as your preparation. The work happens at home, on Wi-Fi, a day or two before you leave; once you are in the forest it is too late. Look for an app that shows a topographic map with contour lines, shows your position without mobile data, lets you download whole regions, imports and exports tracks and offers the coordinate format you need. Avoid apps that insist on a connection to show your position.
Preparing an offline map in four steps
 1Download the area at home
On Wi-Fi, download the whole route plus a generous margin around it, including the escape routes and the nearest villages. Maps for a large area need storage, so check that there is room.
 2Test it in flight mode
Switch the phone to flight mode and check that the map loads, you can pan and zoom, and your position appears. If something is missing, you can still fix it at home.
 3Set waypoints
Mark the car park, the planned camp, water sources and escape routes as waypoints. When you are tired or the light is bad, you can navigate to a named point instead of working it out.
 4Record a track
Start track recording at the trailhead. The line it draws is your breadcrumb trail, and a back-track function can lead you out the way you came when visibility drops.
Before you leave the Wi-Fi
- Offline map for the whole area plus a margin, tested in flight mode
- Planned route imported as a track; waypoints for camp, water and exits
- Coordinate format and map datum set to match your paper map
- Backup: the paper map section in a zip bag
Saving tracks
A track is the sequence of positions your device records. It lets you retrace your steps, see where you left the route and compare plan and reality. Shorter recording intervals draw a finer line but use more power; choose a longer interval on multi-day trips. Export routes and tracks in a common track format so another device can open them if the first fails.
Do not follow a planned line blindly. Forest tracks change and apps assume the path exists; match what you see with the paper map, and trust the terrain over the screen.
Coordinate formats and map datum in general terms
The same point on earth can be written in several ways, and a device and a map can use different ones. Most apps let you switch the format; choose the one that matches your paper map and your emergency plan, and practise reading it aloud.
| Format | Example | Notes |
|---|---|---|
| Decimal degrees | 50.1234° N, 10.5678° E | Easy to type and read; the default in many apps |
| Degrees and decimal minutes | 50° 07.404′ N, 10° 34.068′ E | Common on handheld GPS devices and in sailing and aviation |
| Grid reference (UTM or national grid) | Zone, easting, northing in metres | Matches the grid on many topographic maps and is easy to measure with a romer scale |
Two details prevent errors. First, the datum: the reference system the coordinates refer to. Your map states it in the margin, and most apps and devices use a global system by default; a mismatch can shift your position noticeably, so check the margin of the map. Second, always state the format and the hemisphere or zone when you read coordinates to someone else. In an emergency read them digit by digit and let the other person repeat them; the details are in how to share your location precisely. How the grid on a paper map works is explained in the grid references section.
Power management: power bank, cold batteries and flight mode
On a navigation trip, power is a resource like water: you plan it before you go (the power bank calculator helps) and ration it on the way. The goal is not to switch the phone off for good but to make the charge last until you really need it. Keep a reserve of about 20–30 % for an emergency call, as recommended in emergency signals and getting found.
Four habits that make the battery last
 1Flight mode
On most phones satellite positioning keeps working in flight mode, while the radio that searches for a signal is switched off. This saves a lot of power in areas with weak coverage. Check once at home that your phone behaves this way.
 2Screen off while walking
The screen is the biggest consumer. Switch it on at junctions and checkpoints, not continuously, and lower the brightness. Close apps you do not need.
 3Inside pocket
Keep the phone, the power bank and spare cells close to your body. A battery that looks empty in the cold often recovers when warmed up. The same applies to the headlamp batteries; see batteries in the cold.
 4Power bank and short cable
Carry a power bank with a short cable in a zip bag. Charge the phone at the midday break or at night, with the phone and bank in the sleeping bag in cold weather.
Rules of thumb: you can use roughly 60–70 % of a power bank's printed capacity because of conversion losses, so plan with that. Charge at a break or in the evening, not at 5 %, and charge lithium-ion batteries only above freezing, as with headlamps. A battery that seems dead in the cold often works again after 10–20 minutes on the body.
Altimeter, barometer and watch features in brief
A barometric altimeter in a watch or GPS device converts air pressure into height. It is smoother than satellite altitude, but pressure also changes with the weather, so the reading drifts: recalibrate at a known height such as a map spot height or a hut. A steady pressure fall over several hours often signals changing weather; see reading the weather. A watch compass is a rough guide only. A plain watch is still useful for timing legs; see the hiking time calculator.
Practice drills: combine map, compass and app
Equipment you have never used in anger is a hope, not a system. These drills train the three tools together and show you where each one lets you down. Start on familiar ground in good weather, then add difficulty. Use the pace count calculator and the hiking time calculator to set the numbers.
The triple-check drill
 1Plan the leg on the map
Choose a clear target 300 m away, take the bearing from the map (for example 50°) and write down the expected paces. At 64 paces per 100 m on flat ground that is about 190 paces.
 2Walk it with the compass
Leave the phone in the pocket with the screen off. Walk the bearing, using landmarks and counting paces. Do not look at the phone.
 3Only now check the phone
At the end of the leg, switch the phone on and look at your position. Where are you relative to the target?
 4Compare and note the miss
Measure the difference and think about where it came from: declination, pace count, a detour, interference. Write it down and fix it on the next leg.
Two more drills are worth adding. In the phone-off hour you navigate a known route with map and compass only. In the plausibility check you guess your position from slope, sun and terrain before you look at the app (see navigation without a compass). A short dusk leg with a headlamp in red mode trains reading the compass in poor light; see moving safely at night. Once you are comfortable, vary the conditions with the seasons: fog, rain and snow change what works – see the seasons guide for what each one demands. If you work from a camp, the same drills are a good use of an afternoon at a base camp: walk a loop on a bearing and return on the back bearing.
What to carry: navigation kit by trip type
The kit grows with the risk. A short walk on a signposted trail does not need what a winter trek does, but the principle stays the same: one system without power and one electronic system, plus a way to keep both dry and charged.
| Trip | Paper map | Compass | Phone / device | Power and extras |
|---|---|---|---|---|
| Day walk on marked trails | Hiking map of the area | Baseplate compass in a pocket | Phone with offline map | Full battery, small power bank |
| Off-trail forest day or bushcraft day | 1:25,000 in a case | Baseplate compass on a lanyard | Phone with offline map, route and waypoints | Power bank, whistle, pencil |
| One to two nights out | 1:25,000 plus 1:50,000 overview | Baseplate, spare compass in the pack | Phone, flight mode | Power bank, headlamp with spare cells, first aid kit |
| Multi-day or remote trip | Full set in cases, spare section | Mirror or baseplate, plus a spare | Handheld GPS and phone | Spare cells, power bank, satellite messenger or beacon |
| Winter, fog or low visibility | Map in a case in an inside pocket | Baseplate with luminous marks | Handheld GPS with gloves-friendly buttons | Lithium cells, warm storage, check wind chill and clothing |
Weigh the pieces together: map, compass and pencil are well below a few hundred grams, a power bank is typically 150–300 g, a handheld GPS around 150–250 g. Put them in a lid pocket of the backpack so they are in reach, and add them to your bushcraft kit list or to the packing list from the Kit Builder. For the plan of the trip itself – turnaround times, escape routes and who knows where you are – see planning a bushcraft trip. If you stay out overnight, the rules in wild camping also apply.
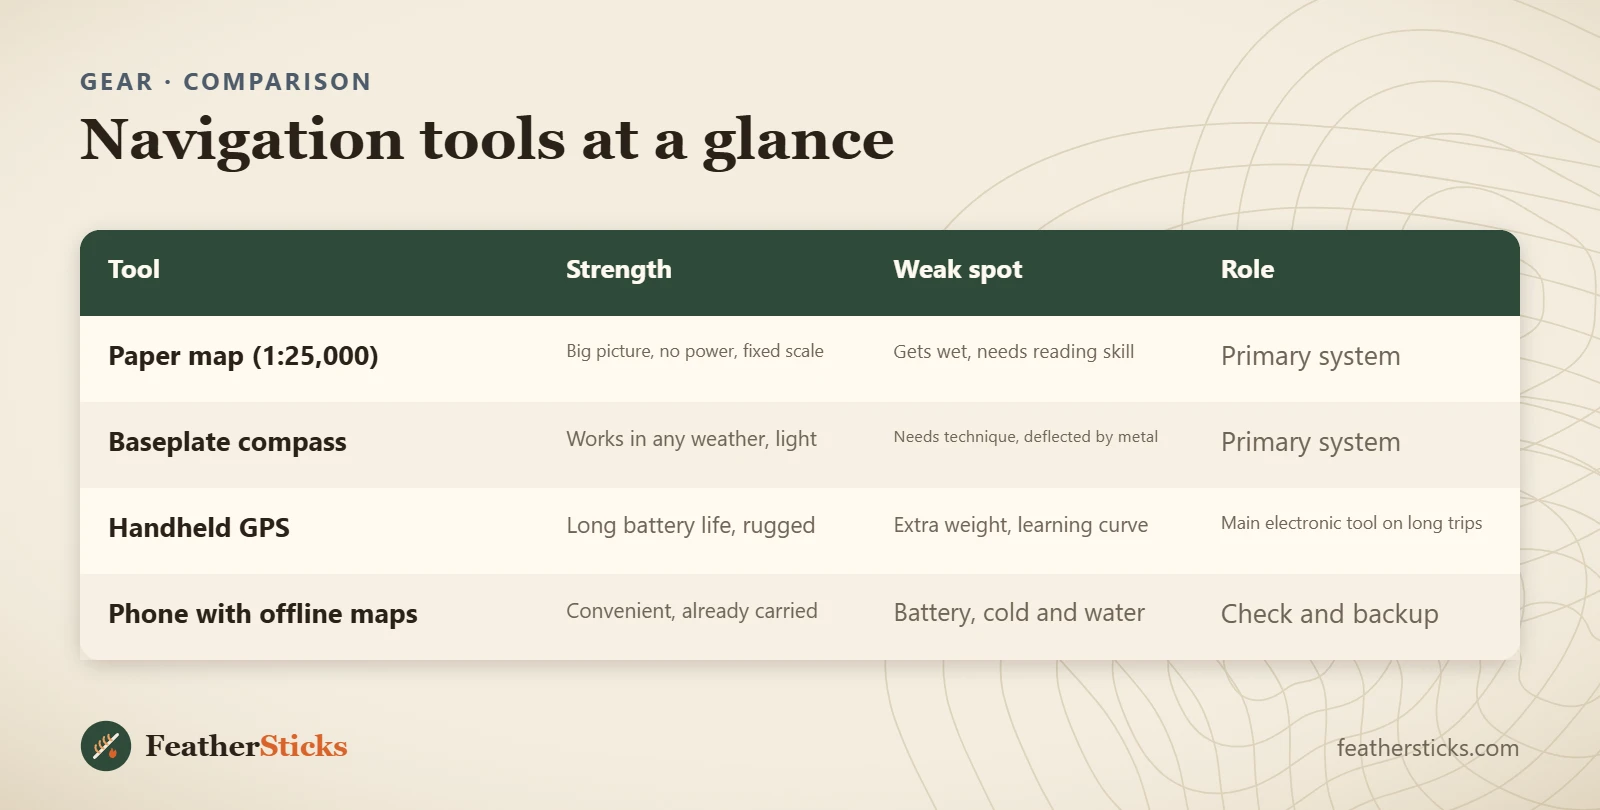
| Tool | Strength | Weak spot | Role |
|---|---|---|---|
| Paper map (1:25,000) | Big picture, no power, fixed scale | Gets wet, needs reading skill | Primary system |
| Baseplate compass | Works in any weather, light | Needs technique, deflected by metal | Primary system |
| Handheld GPS | Long battery life, rugged | Extra weight, learning curve | Main electronic tool on long trips |
| Phone with offline maps | Convenient, already carried | Battery, cold and water | Check and backup |
Common mistakes
- Relying on a phone alone, without a paper map and compass, and without a power bank.
- Downloading offline maps in the car park and finding out in the forest that the area is incomplete or the format is wrong.
- Taking a bearing with a phone, knife or steel buckle next to the compass.
- Carrying the compass at the bottom of the pack and never using it until it matters.
- Trusting the screen over the terrain when the two disagree, instead of stopping to find out why.
- Storing the compass next to a magnet, speaker or magnetic phone case, so that the polarity reverses.
- Using a button compass or a watch compass for a map bearing.
What you need
- Baseplate compass on a lanyard
- Topographic map 1:25,000 in a waterproof case
- Phone with offline maps and a protective case
- Power bank and short cable in a zip bag
- Handheld GPS with spare cells (for long or remote trips)
- Pencil, notebook and a small ruler
- Whistle and headlamp with spare cells
Calculators for this topic
FAQ
What is the best compass for hiking?
Is a phone enough for hiking, or do I need a GPS?
What is an offline map app and how do I prepare it?
How long does a phone battery last when navigating?
How can I tell if my compass is broken?
Does a phone work as a compass?
Do I need a satellite messenger or a personal locator beacon?
What map scale is best for hiking?
Check yourself
Completed6 quick questions from this guide. Nothing is sent anywhere.
Related step-by-step guides
-
 1
-
 1
-
 1