Headlamps & Camp Lighting: Lumens, Batteries, Red Light and Night Navigation
To choose a headlamp for camping and bushcraft, look beyond the maximum lumens: what matters is a useful low mode, a realistic runtime, a beam that suits the task, a red light and batteries that work in the cold. Around camp 10–50 lumens are enough; on a trail 100–200; only for route finding do you need 300 or more, in short bursts. Add a diffused light for the shelter, spare batteries and a few habits, and darkness stops being a problem.
This guide explains lumens, beam and runtime, lithium vs NiMH vs Li-ion in the cold, red light and night vision, camp lantern setups, walking and navigating at night, light etiquette and Leave No Trace, and candles and fire as light. It is part of our bushcraft gear guides; the headlamp and spare batteries are on every bushcraft kit list.
Step by step
-
1

Match the mode to the task
Use 10–50 lumens in camp, 100–200 on the trail and 300 or more only briefly for finding the route.
-
2

Pick batteries for the cold
Lithium AA cells work best in frost. Keep NiMH and Li-ion batteries warm in an inner pocket.
-
3

Use red light in camp
Red light keeps your night vision and does not dazzle others. Switch to white only when you need detail.
-
4

Set up a soft camp light
Hang a lantern high under the tarp or strap the headlamp to a water bottle for glare-free light.
-
5

Carry spares and lock the lamp
Pack a spare set of batteries in a bag and lock the switch so the lamp cannot turn on in the pack.
-
6

Walk with the beam low
At night use a low mode, point the beam at the path a few steps ahead and stop often to look around.
How many lumens does a headlamp need? Lumens, beam and runtime
Lumens measure the total amount of light a lamp emits – not how far it reaches or how long it lasts. A higher number on the packaging usually describes a turbo mode that runs for a few minutes before the lamp steps down to protect the battery and the LED. For real use, three other values matter more:
- Beam distance: how far the light reaches. Under the ANSI/PLATO FL 1 standard used on many packages, it is the distance at which the light falls to 0.25 lux, roughly full-moon brightness.
- Runtime: under the same standard, the time until output drops to 10 % of the initial value. A lamp may be much dimmer long before that, so look for a regulated mode or a runtime graph.
- Beam pattern: a narrow spot throws far; a wide flood lights the area around you evenly. Many headlamps combine both.
| Task | Brightness (guide) | Beam | Why |
|---|---|---|---|
| Reading, cooking, sorting kit | 10–50 lm | Flood | Enough detail without glare or reflection |
| Moving around camp | 10–50 lm or red | Flood | Keeps night vision, disturbs no one |
| Walking on a clear path | 100–200 lm | Mixed | Shows roots and steps a few metres ahead |
| Route finding, off trail | 300+ lm, briefly | Spot | Reach to find markers, gaps and landmarks |
| Emergency signalling | Any, flashing | Spot | Visible from far away; see signalling |
Values are practical guides, not norms. Lower modes run far longer – the brightest mode is rarely the most useful one.
How many lumens do I need?
Is the lamp mainly for camp chores – cooking, reading, sorting kit?
Yes → 10–50 lm with a wide flood beam, or red light. More only dazzles.No → Go on to the next question.Will you walk on clear paths after dark?
Yes → 100–200 lm with a mixed beam, aimed a few steps ahead.No → The camp level is enough – put the weight into spare batteries instead.Do you expect off-trail ground, or will you have to find markers and junctions?
Yes → 300 lm or more with a spot beam – in short bursts, then back to low.No → You do not need a higher maximum; choose by low mode and runtime.Fog, drizzle or snowfall?
Yes → Less, not more: low mode and the light held low – a bright beam reflects back at you.No → Use the level from the questions above.

For bushcraft, a headlamp with at least three steady white levels, a red mode, a lock-out function and a regulated low mode is more useful than an extreme maximum. Hands-free light is the key advantage: you can cook, carve, split kindling or deal with a first aid situation with both hands. A small hand torch is a good backup and useful for night walking, as shown below.
Headlamp batteries in the cold: lithium, NiMH or Li-ion?
Cold slows the chemistry in every battery, so it delivers less power and the lamp dims or steps down early. The type makes a big difference:
| Type | In the cold | Weight | Rechargeable | Notes |
|---|---|---|---|---|
| Lithium primary AA/AAA (1.5 V) | Very good | Lightest | No | Long shelf life, first choice for frost and emergencies |
| NiMH, low self-discharge (1.2 V) | Fair – keep warm | Medium | Yes | Economical, good for regular use above freezing |
| Li-ion (built-in or 18650 cell) | Fair – keep warm | Light for the capacity | Yes (USB) | Most lamps with high output; charge only above 0 °C |
| Alkaline AA/AAA | Poor | Medium | No | Weak in cold and under high load; can leak when stored |
Check your lamp's manual: not every headlamp accepts 1.2 V NiMH or lithium primaries in every mode, and many manufacturers advise against charging Li-ion batteries below freezing.
Many modern headlamps use a built-in rechargeable Li-ion battery, some a "hybrid" system that also takes AAA cells – useful when you cannot recharge. For trips of several days, work out what you need: the lamp's runtime in your usual mode times the hours of darkness you use it. In autumn and winter, the nights are long; the sunset and daylight calculator shows how many hours you will need light. A small power bank (sized with the power bank calculator) or a spare set of lithium cells covers the rest – the Kit Builder includes both a headlamp and spare batteries.
Built-in rechargeable or replaceable cells?
USB rechargeable (Li-ion)
- Used in most high-output headlamps
- Recharges from a power bank – no used cells to carry out
- Keep it warm in frost and charge it only above 0 °C
- When it is empty, the lamp is out until you have recharged it
- Best for regular use and trips of 3–5 days with a power bank
Replaceable AA/AAA cells
- Swapped in seconds, even in the dark
- Lithium primaries: very good in frost and the lightest option
- NiMH is economical above freezing; alkaline is weak in the cold
- Spares need their own bag, and used cells go home with you
- Best for frost, emergencies and trips without any way to recharge
Battery care on the trip
 1Spares in their own bag
Keep spare cells in a small zip bag or their original packaging. Never carry them loose with keys or coins – metal can short-circuit them, and damaged Li-ion cells can overheat.
 2Cold: inner pocket
In frost, carry the lamp or its battery in an inside pocket close to the body. A cold battery that seems empty often works again once warmed up.
 3At night: in the sleeping bag
Put the headlamp and spare batteries into the sleeping bag or its stuff sack at night so they are warm and easy to find in the dark.
 4Lock the switch
Use the lock-out mode, or turn the battery cap a quarter turn open, before packing. A lamp that switches on in the pack arrives with flat batteries – and some can get hot.
How long does a headlamp last? Planning light for a trip
How long a headlamp lasts depends almost entirely on the mode you use, not on the lamp. The same lamp can run for a whole weekend on its low setting and be empty after one evening on high. So instead of asking "how many hours does it last?", ask two questions: how many hours of light will I actually use, and how long does my lamp run in that mode (see the runtime chart in the manual)?
The first number follows the season. You need a headlamp from the end of civil twilight – in central Europe roughly 30–50 minutes after sunset – until you are in the sleeping bag, and again in the morning if you get up before light. The daylight calculator gives you sunset, the end of twilight and the length of the night for any date and place.
| Season | Night length (approx.) | Typical lamp use per evening | Planning hint |
|---|---|---|---|
| Midsummer (June) | 7–8 h | 0–1 h | One charge or set of cells covers several nights |
| Spring and autumn (March, September) | about 12 h | 2–3 h | Full lamp plus one spare set for a weekend |
| Late autumn (October, November) | 13–15 h | 3–4 h | Spares for every 2–3 nights; cook before dark |
| Midwinter (December, January) | 15–16 h | 4–5 h | Lithium cells or a power bank, kept warm |
Approximate values for southern England, Germany or the northern US. Further north the winter nights are longer (Scotland and southern Scandinavia 17 h and more). Check your date and place with the daylight calculator.
A simple battery calculation
Multiply the hours of use per evening by the number of nights, divide by the runtime of the mode you use most, and add a margin. In frost, plan for noticeably less runtime than the chart says – a margin of 30–50 % is sensible. Example: 3 hours per evening, 3 nights, a mode that runs 10 hours on one charge = 9 hours needed, plus margin = one full lamp and one spare set of cells or a small power bank. For a first autumn overnight, start with a full lamp plus a spare set; after a few trips you will know your own consumption.
Hours of headlamp light for a three-night trip (around 50–52° N, before the cold margin)
Recharging in the field: power banks and solar
- Power bank: the most reliable way to recharge a USB headlamp and a phone on trips of 3–5 days. Keep it warm in an inner pocket and in the sleeping bag at night; cold power banks deliver less.
- Solar panels: useful on open ground in summer, much less so under a forest canopy or in the short, grey days of a central European winter. Treat solar as a bonus, not your only source.
- Charging in the cold: many manufacturers advise against charging Li-ion cells below 0 °C. Charge inside the sleeping bag or wait until the battery is warm.
- Phone as a light: fine for a moment, but the phone is your navigation and emergency device – do not drain it as a torch.
On a winter camping trip, light planning is as important as the sleep system: you may spend 15 hours in the dark, and most camp work – cooking over the fire, melting snow, repairing kit – happens under the lamp.
Red light and night vision: why red mode matters
Your eyes need time to adapt to darkness – full night vision takes around 20–30 minutes. A single glance into bright white light resets much of it. Red light affects the eye's dark adaptation far less, so you can see what you are doing close up and still see the path, the stars and the treeline when you switch off.
- Camp chores: red is enough for finding kit, pouring water or going to the latrine.
- Groups: red does not dazzle others and keeps a calm atmosphere around the fire.
- Wildlife and insects: dim red light is less disturbing to many animals, and many insects are less drawn to it than to bright white light.
- Limits: red light shows little colour and contrast. Red markings on a map almost disappear under it – read maps in low white light.

Light etiquette in camp
Everyone who has been dazzled by a headlamp knows the rule: when you look at someone, look at their chest, not their face – or switch to red. Tilt the lamp down, use the lowest useful mode and switch it off at the fire; firelight is enough for conversation. In shared camps, keep lights dim after dark and avoid shining into other people's shelters.
Camp lighting: lanterns, bottle lamps and placement
A headlamp is directional: it lights exactly where you look and casts hard shadows everywhere else. For cooking, sorting kit or sitting under a tarp, a diffused light is far more pleasant. Options:
- LED lantern: light, safe and bright enough on its low mode. Hang it high from the ridgeline of the tarp – light from above casts fewer shadows and does not dazzle.
- Headlamp as a lantern: many headlamps can be turned into a lantern with a diffuser cap or the water bottle trick below.
- Fairy lights or a light string: very light, even illumination under a large tarp, and a marker to find camp in the dark.
Turn a headlamp into a lantern
 1Fill a bottle with water
Use a translucent or milky water bottle, filled with water. A white bottle or a drop of milk in clear water spreads the light even better.
 2Strap on, LED facing in
Put the headband around the bottle with the LED pointing into the water, or place the lamp under the bottle facing up. Use a low mode – the bottle spreads the light.
 3Soft glow, no glare
Stand the bottle in the tent or hang it under the tarp. The whole shelter is lit softly, without the glare of a direct beam.
Placement matters: hang the camp light above head height and slightly to the side of where you work, so your head and hands do not cast shadows on the task. Mark guylines with reflective cord or a light-coloured cord so nobody trips over them in the dark – the camp setup guide explains how to lay out the camp zones.
Light through the evening
- Before sunsetCook, collect wood and lay the fire while you can still see. Hang the lantern; headlamp into its fixed pocket.
- TwilightHeadlamp on your head, still off – after sunset you have about half an hour of usable light.
- Dark: camp workLantern or bottle lamp high under the tarp; headlamp on low or red for chores.
- At the fireLamps off – firelight is enough for talking.
- BedtimeLock the switch. Lamp and spare batteries go into the sleeping bag or its stuff sack.
Walking and navigating at night with a headlamp
Walking in the dark is slower and more tiring than by day, and it is easier to miss a junction or misjudge distance. The best night navigation starts in daylight: know when it gets dark, plan the last part of the route, and note bearings and "handrails" such as streams, paths and field edges.
Night walking step by step
 1Check sunset, turn back in time
Check sunset and the end of twilight with the daylight calculator and plan your return with the hiking time calculator – night walking is slower.
 2Note bearing and handrails
While it is still light, take a bearing, note the features you will follow and how far away they are. Reading the map in the dark is harder, see map and compass navigation.
 3Torch at hip height
Light held low at the hip strikes the ground at a flat angle: roots, stones and holes cast long shadows and stand out. A headlamp from eye level flattens the terrain.
 4Light off, look around
Stop now and then, switch off and wait. After some minutes your eyes adapt, the skyline and gaps in the trees appear, and you may see further than with the lamp on.
- Use a low mode on the path and aim the beam a few steps ahead. Bright light shrinks your world to the beam and makes the surroundings look even darker.
- Count paces between features – the pace count calculator adjusts for night and terrain.
- Stop to read the map with low white light; walk and read at the same time only on easy paths.
- Turn the lamp to high only briefly when you search for a path, a marker or a gap in the trees.
- In fog, drizzle or snowfall, a bright beam reflects back from the droplets and blinds you. Switch to a low mode and hold the light low; reading the weather in the afternoon tells you whether to expect it.
- Watch your footing: most night-walk injuries are twisted ankles on roots and stones. Walk slower, shorten your stride and wear supportive, well-fitted boots.
- If you are unsure where you are, stop. A night in a safe place with warm clothing is better than walking further into unknown ground. A flashing light and a whistle are strong emergency signals.
Without a compass, the moon and stars can help with rough directions, as explained in navigation without a compass. But for safety, carry a real light: a phone torch drains the battery you may need for an emergency call.
Before you walk into the dark
- Sunset and the end of twilight checked for today's date and place
- Turn-back time set – night walking is slower than the daytime figure
- Bearing, handrails and distances noted while it was still light
- Headlamp on your head or in a pocket you can reach, not at the bottom of the pack
- Spare batteries or a backup torch in a pocket
- Map and compass to hand; phone charged and kept for navigation and emergency calls
- Whistle and a warm layer packed in case you have to stop for the night
- Something light-coloured or reflective if the route includes a road
Light pollution and Leave No Trace
Artificial light at night changes the behaviour of many animals – insects, bats, birds and mammals. In the forest, you are a guest in their active time. Leave No Trace applies to light too:
Low-impact lighting in camp
- Use the lowest mode that does the job, and red where possible
- Switch lights off when you do not need them, especially at the fire
- Shield camp lights downwards and away from open areas and water
- Do not shine into trees, burrows or at animals to "see what is there"
- Keep night walks to paths and avoid disturbing wildlife
- Take every battery home – never leave or bury used cells
A dim camp also makes you a better observer: with your eyes adapted, you hear and see far more of the night forest.
Campfire and candles as light: cosy, but safe
The campfire is the traditional light of bushcraft, and a small, well-kept fire is enough to cook, talk and see the faces around you. Candle lanterns give a warm, calm light and a little warmth. But every flame is a fire risk and burns oxygen, and fuel-burning lamps produce carbon monoxide (CO), an odourless, invisible gas.

Firelight is also a reason to lay the fire well before dark: collecting wood, tinder and kindling in the dark with a headlamp is slow and uses a lot of battery. The guide to fire starting shows how to prepare a fire so that it lights at the first attempt, and choosing a camp site explains where a fire is safe. On rainy evenings, prepare dry tinder and split wood while there is still daylight – lighting a fire in the rain by headlamp is twice as hard. Collect a small stock of fatwood or feather sticks in advance and the fire is lit in minutes, even in the dark.
Headlamp problems in the field and how to fix them
Most headlamp failures on a trip have simple causes – cold, moisture, contacts or a mode you did not mean to select. Before you write the lamp off, work through the list below. A lamp that dies at 10 pm in November is a real problem, so it pays to know the fixes.
| Problem | Likely cause | What to do |
|---|---|---|
| Lamp dims or steps down after a few minutes | Turbo mode with thermal or battery protection; cold battery | Use a lower, regulated mode; warm the battery in an inner pocket |
| Lamp does not switch on | Lock-out active, battery empty or cap not fully closed | Check the lock-out sequence in the manual; close the cap; swap cells |
| Flickering light | Dirty or damp contacts, loose battery | Dry and clean the contacts with a cloth; a small pad of paper can wedge a loose cell |
| Water or fog inside | Seal not seated, cap opened in the rain | Open it indoors or in the shelter, dry it, check the O-ring; do not open it in the rain |
| Battery "empty" in frost | Cold, not discharged | Warm it on the body for 10–20 minutes before you replace it |
| Headband slips or bounces | Loose band, heavy battery pack | Tighten the band; use the top strap if there is one; wear it over a thin hat |
Water resistance: what IPX ratings mean
Many headlamps state a water rating under the IP code (IEC 60529). IPX4 means protection against splashing water from any direction – enough for rain. IPX7 means a lamp survives temporary immersion (up to 1 m for 30 minutes under test conditions), and IPX8 continuous immersion under conditions the manufacturer specifies. For bushcraft in a rainy climate, IPX4 is the minimum; a higher rating helps if you often collect water from streams at night or paddle. In long rain, the batteries matter as much as the housing: keep spares in a zip bag inside the pack's rain protection.
Walking on roads and at hunting time
Short sections along roads or forest tracks are often the most dangerous part of a night walk. Wear something light-coloured or reflective, keep the lamp on so drivers see you, and walk facing oncoming traffic where there is no footpath. During driven hunts in autumn and winter, stay on marked paths and respect signs and closures; a light and bright clothing help others see you at dusk.
Which headlamp is best for bushcraft? A checklist
Without naming brands, a good bushcraft headlamp has:
- a low, regulated mode for long runtime and at least one mid mode for walking;
- a red light that you can switch on without passing through bright white;
- a lock-out function against accidental switching;
- simple controls you can use with gloves and in the dark;
- a battery type that suits your season – lithium primaries or a hybrid system for frost;
- water resistance for rain (look for an IPX rating) and a comfortable, washable headband;
- a weight that you will actually carry – for most trips a light lamp plus spare batteries beats a heavy, very bright one.
A bushcraft headlamp at a glance
- White modes
- At least three steady levels; the low one regulated
- Camp level
- 10–50 lm, flood beam
- Trail level
- 100–200 lm
- Maximum
- 300 lm or more is enough – used only briefly
- Red light
- Reachable without passing through white
- Lock-out
- Electronic lock, or a battery cap you can open a quarter turn
- Water rating
- IPX4 as a minimum; IPX7 if you are often at the water
- Power
- Lithium primaries or a hybrid system for frost
- Controls
- Usable with gloves and in the dark
Before every trip: a two-minute lamp check
Most lamp failures are found at home, if you look. Switch the lamp on and run through every mode, including red and the lock-out, so you still know the button sequence. Charge it fully or fit fresh cells – a lamp left in a drawer for months may have discharged. Open the battery compartment once: contacts clean and dry, O-ring seated, no leaked cells. Pack the spares in a zip bag, test the backup torch as well, and lock the switch before the lamp goes into the lid pocket.
Pack a second, small light as a backup on longer trips or in winter. And as with all gear, start with what you have – the bushcraft for beginners guide shows how.
Where to carry the lamp – and lights for hammocks, bivvies and children
Keep the headlamp in the same place every time – the lid pocket of the pack by day, a hook on the ridgeline or the sleeping bag at night – so you can find it blind. In a hammock, a small loop on the ridgeline or a pocket on the side holds the lamp within reach; in a bivvy bag, keep it in the bag with you, because it will be cold and wet outside by morning.
For bushcraft with kids, give every child their own simple lamp with a low and a red mode and a band that fits. Children love lights, so agree on rules: beam down, no shining into faces, and lamps off at the fire. A small light clipped to the back of the pack helps you count heads on a dusk walk.
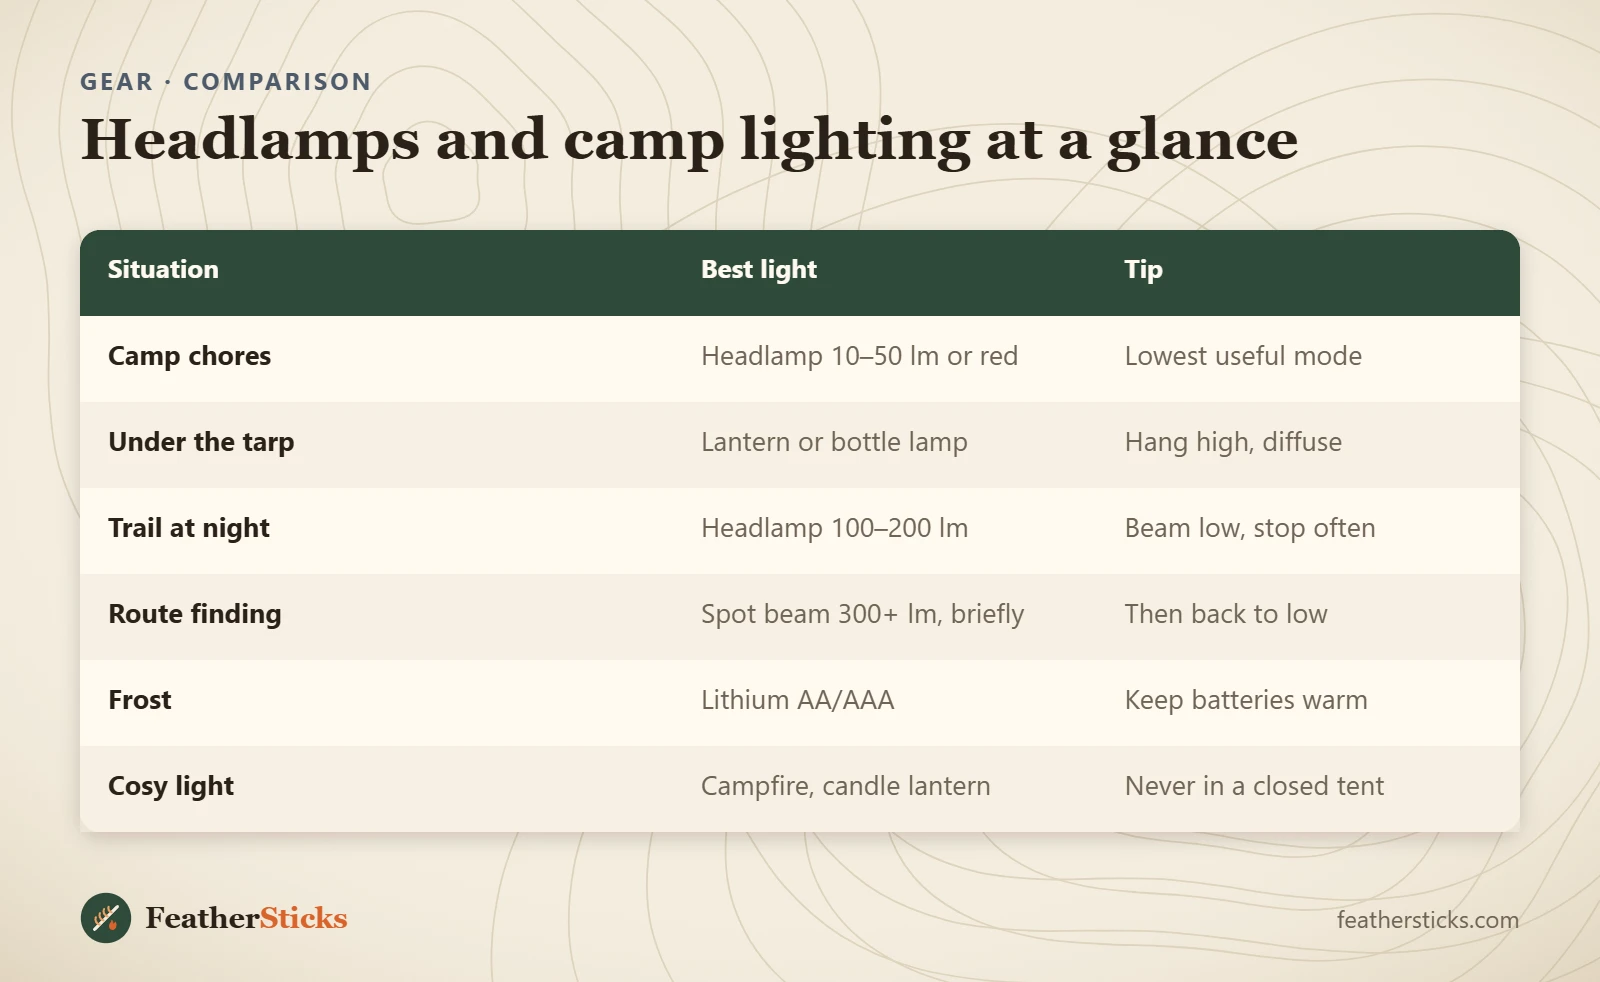
| Situation | Best light | Tip |
|---|---|---|
| Camp chores | Headlamp 10–50 lm or red | Lowest useful mode |
| Under the tarp | Lantern or bottle lamp | Hang high, diffuse |
| Trail at night | Headlamp 100–200 lm | Beam low, stop often |
| Route finding | Spot beam 300+ lm, briefly | Then back to low |
| Frost | Lithium AA/AAA | Keep batteries warm |
| Cosy light | Campfire, candle lantern | Never in a closed tent |
Common mistakes
- Judging a headlamp only by its maximum lumens.
- Relying on alkaline batteries in frost.
- Carrying spare batteries loose with keys and coins.
- Shining a headlamp into other people's faces.
- Using a candle or gas lamp inside a closed tent.
- Packing the lamp without locking the switch.
- Starting a walk late without checking when it gets dark.
What you need
- Headlamp with low, mid, high and red modes plus lock-out
- Spare batteries (lithium for frost) or a small power bank
- Small backup torch
- LED lantern or diffuser for camp
- Zip bag for batteries
- Reflective or light-coloured guylines
- Candle lantern (optional, outdoors only)
Calculators for this topic
FAQ
How many lumens do I need for camping?
Which batteries are best for a headlamp in winter?
Why do headlamps have a red light?
How long does it take for eyes to adjust to the dark?
How do I make a lantern from a headlamp?
Is it safe to use a candle in a tent?
How long does a headlamp battery last?
Can I charge a headlamp with a solar panel or in the cold?
What IPX rating should a camping headlamp have?
Should I use a headlamp or a torch for walking at night?
What is the difference between lumens and lux?
How do I stop my headlamp from turning on in my pack?
Check yourself
Completed6 quick questions from this guide. Nothing is sent anywhere.
Related step-by-step guides
-
 1
-
 1
-
 1