Hobo Stove & Camp Stoves: Build One, Run It, Choose the Right Type
A hobo stove is the simplest bushcraft stove there is: a metal can with air holes at the bottom, a feed door in the side and a pot on top, burning nothing but dry twigs. It boils half a litre of water with a double handful of finger-thick sticks, weighs next to nothing and costs nothing to build. Its limits are just as clear: it is slow to start in the wet, it soots your pot, and almost everywhere it counts as an open fire.
This guide shows how to make a hobo stove step by step, how to feed and run any twig stove without smoke, and how it compares with a wood-gas stove, an alcohol burner, a gas canister stove and solid-fuel tablets – including fire bans, carbon monoxide and fuel transport. It belongs to the outdoor cooking hub, next to bushcraft cookware and campfire cooking, and builds on the bushcraft basics.
Step by step
-
1

Check the fire rules, pick the stove
A twig stove usually counts as an open fire. Check local rules and the fire danger level; where fires are banned, take gas or eat cold.
-
2

Build it: holes, door, exhaust
Punch air holes near the base of a clean tin, cut a feed door, add exhaust holes below the rim. Wear gloves and file every edge.
-
3

Level bare ground, block the wind
Set the stove on rock or bare soil, cleared one metre around, with water within reach. Put a windscreen or your pack on the windward side.
-
4

Prepare dry fuel first
Collect dead twigs that snap with a crack. Break them to 8–10 cm and sort them into tinder, pencil-thin and finger-thick piles.
-
5

Light it, feed little and often
Light the tinder through the door, wait for steady flames, then put the pot on. Add two or three twigs at a time before the flames drop.
-
6

Burn down, douse, cool, pack
Stop feeding, let the fuel burn to ash, douse and stir until it is cold to the touch. Pack the cooled stove in its own bag.
What is a hobo stove – and which camp stove types are there?
All camp stoves do the same job – put controlled heat under a pot – but they differ in fuel, weight, speed and in how much attention they need. Six types cover almost everything you will meet in bushcraft and hiking. Three burn wood you collect on the spot, three burn fuel you carry.

| Stove type | Typical weight | Fuel | Boil time for 0.5 L | Wind and cold | Soot and noise |
|---|---|---|---|---|---|
| Tin-can hobo stove | approx. 80–150 g | Dry twigs, cones, bark | approx. 5–10 min once burning well | Wind helps the draught but steals heat; works in frost | Heavy soot, quiet crackle |
| Folding twig stove | approx. 150–500 g | Dry twigs; often takes a spirit burner too | approx. 5–10 min | More stable; panels act as a windbreak | Heavy soot, quiet |
| Wood-gas stove | approx. 200–500 g | Dry twigs, pellets | approx. 4–8 min | Sensitive to gusts; works in frost | Less smoke when hot, still sooty |
| Alcohol (spirit) burner | approx. 20–120 g plus stand | Denatured alcohol (methylated spirits) | approx. 6–10 min | Needs a windscreen; sluggish when very cold | Almost no soot, silent |
| Gas canister stove | approx. 25–100 g plus canister | Butane / isobutane / propane mix | approx. 2–4 min | Hates wind; plain butane fails near 0 °C | No soot; an audible hiss or roar |
| Solid-fuel tablets | approx. 30–90 g plus tablets | Fuel tablets | approx. 7–12 min | Needs a windscreen; lights in the cold | Sticky residue, smell, silent |
Rough guide values for calm conditions with a lid on the pot. Real times vary with wind, water temperature, pot shape and fuel quality.
Tin-can hobo stove
The original: a food tin or paint-free metal can turned into a small chimney. It is the cheapest bushcraft stove (one reason it appears in our budget gear guide) and a good workshop project, because building one teaches you how air and fire work together. A can stove is bulky for its capacity and rusts through after a season or two of regular use – and then you simply make the next one.
Folding twig stove
The same principle in stainless steel or titanium panels that slot together and pack flat, about the size of a postcard. Folding stoves are more stable, have proper pot supports and last for years. Many accept a spirit burner in the middle, which gives you a second fuel for wet days or fire-restricted areas.
Wood-gas stove
A double-walled cylinder. Air drawn through the gap between the walls is preheated and injected at the top of the fire chamber, where it burns the smoke. Once hot, a wood-gas stove burns cleaner and squeezes more heat out of the same twigs. It is a batch burner: you fill it, light it from the top and top it up carefully, because a big cold load chokes it.
Alcohol or spirit burner
A small metal cup with a ring of jets. No moving parts, no noise, nothing to fail. The fuel is cheap and sold in supermarkets and hardware shops in most countries. The price is speed: alcohol holds roughly half the energy of gas per gram, the flame is weak in wind and it is nearly invisible in daylight.
Gas canister stove
The fastest and most controllable option: open the valve, light, cook, close the valve. A burner that screws onto the canister can weigh less than a chocolate bar. Weak points are wind, cold, the cost of fuel and half-empty canisters that pile up at home.
Solid-fuel tablets
A folding metal stand and a white tablet you light with a match. Tiny, cheap and stable in storage for years, which makes it a classic backup in emergency kits. Tablets burn at one speed, smell unpleasant, leave a sticky film on the pot and should never be used in an enclosed space.
Twig stoves (hobo, folding, wood-gas)
- Fuel is free and found on site
- Fuel weight in the pack: none
- Needs dry wood and constant feeding
- Soot on the pot, smoke in your clothes
- Usually counts as an open fire
Fuel stoves (alcohol, gas, tablets)
- Fuel must be bought and carried
- Works in rain and above the tree line
- Lights in seconds, little attention needed
- Clean pots (gas, alcohol)
- Often treated more leniently in fire rules – not always
How does a hobo stove work?
A hobo stove is a short chimney. The fire heats the air inside the can, hot air rises and leaves at the top, and that pulls fresh air in through the holes near the base. This draught – the chimney effect – feeds the fire from below, exactly where the embers sit. The walls keep the heat together and point it at the bottom of the pot instead of letting it radiate away in all directions, which is why a hobo stove boils water with a fraction of the wood an open fire needs.
Three openings decide whether the stove burns well: air in at the bottom, fuel in through the feed door, and exhaust out below the rim. If any of the three is too small, the stove smokes. The exhaust is the one beginners forget: a pot sitting flat on the rim closes the chimney like a lid, and the fire suffocates within a minute.

Wood-gas stove vs hobo stove: what is the difference?
Smoke is unburnt fuel. In a simple can, part of it escapes past the pot and ends up as soot. A wood-gas stove gives that smoke a second chance: preheated secondary air enters through a ring of small jets near the top and ignites the gases above the fuel. You can see it as a ring of small flames pointing inwards. The effect only works when the stove is hot and the fuel is dry; a damp, overfilled wood-gas stove smokes like any other.
The same understanding helps with every wood fire you build, from a Swedish torch – which is also a chimney – to the classic fire lays.
How to make a hobo stove from a tin can
The classic size is a large food tin about 10 cm across and 12 cm tall. It suits a mug or a pot of up to about one litre. A wider can, such as a catering tin of 15 cm, carries a bigger pot but needs more wood. Choose a plain steel tin with a clean, unpainted outside if you can, and build the stove at home with proper tools rather than in the woods.
Tools and materials
- Empty steel food tin, about 10 cm wide and 12 cm tall, washed, label and glue removed
- Sturdy work gloves and eye protection
- Marker pen and a ruler
- Large nail or centre punch and a hammer – or a drill with an 8–10 mm metal bit
- A round log or piece of timber that fits inside the tin as an anvil
- Tin snips for the feed door
- Flat file or coarse sandpaper for deburring
- Optional: two steel tent pegs or lengths of stiff wire as a grate for small mugs
Building a tin-can hobo stove
 1Clean the tin and mark the cuts
Remove the label and glue and check the open rim for sharp slivers. Mark a feed door of about 5 × 4 cm with its lower edge 2 cm above the base, a ring of air holes near the base and a ring of exhaust holes below the rim.
 2Punch the air holes
Slide the tin over a round log so the wall cannot collapse. Punch 8–10 holes around the base and widen each to 8–10 mm. Typical error: holes that are too few or too small – the stove then smoulders instead of burning.
 3Cut the feed door
Punch a starter hole in each corner of the marked door, then join them with tin snips. Cut slowly and keep the hand that holds the tin gloved: the offcut and the fresh edge are razor sharp.
 4Add exhaust holes and pegs
Punch 6–8 holes of about 10 mm, 1.5 cm below the rim, so hot gases can escape when a pot sits on top. For a mug narrower than the tin, push two steel tent pegs through four extra holes as a grate.
 5Deburr every edge
File the door, the rim and the inside of every hole until you can run a gloved finger over them without snagging. This is the step that prevents cuts every time you pack and unpack the stove.
 6First burn outdoors, without a pot
Burn the stove empty once, outside and away from people. Linings, paint and glue residues burn off with acrid smoke. Only cook on it after this first burn, when the metal has turned dull and grey-blue.
Hobo stove dimensions at a glance
- Tin
- approx. 10 cm diameter, 12 cm tall (larger for pots over 1 L)
- Air holes
- 8–10 holes of 8–10 mm, in a ring just above the base
- Feed door
- approx. 5 × 4 cm, lower edge 2 cm above the base
- Exhaust holes
- 6–8 holes of about 10 mm, 1.5 cm below the rim
- Fuel length
- twigs broken to 8–10 cm
- Pot
- sits on the rim; small mugs on two steel pegs
What it should look like
A finished stove stands without rocking, has no edge that catches on a cloth dragged over it, and lets you see daylight through the air holes from the door side. Hold it up and look through the door: you should see the opposite wall, not a tangle of bent metal. If the tin flexes when you press on the rim, the door is too large; the wall between door and rim carries the pot.
Common design variants
- Inverted can: open end down, door cut from the open edge, holes punched in the closed top. Easier to cut, and the closed top works as a small hotplate – but flames never touch the pot, so it is slower.
- Grate inside: a disc of steel mesh or a few wires 2–3 cm above the base lifts the fuel off the ash and improves the draught on long cooking sessions.
- Nested burner: a spirit burner or a solid-fuel tablet placed inside the can turns it into a windscreen and pot stand for wet days.
Looking after your snips, file and punch is covered in knife and axe care; the same rust-prevention rules apply to a steel stove.
Fuel preparation: what burns best in a twig stove?
A twig stove has a tiny fire chamber, so fuel quality matters far more than in a campfire. Wet or thick wood that an open fire would dry out and eventually burn simply puts a hobo stove out. Prepare all the fuel for one cooking session before you strike a match – once the pot is on, you will not have time to go looking for sticks.
Collect dead wood that is still attached to trees or caught in branches, not wood lying on damp ground. The test is simple: a dry twig snaps with a clear crack, a damp one bends and tears. Break everything to 8–10 cm so it fits through the door and lies flat in the can, and sort it by thickness.
| Fuel | How it burns | Use it for |
|---|---|---|
| Birch bark, dry grass, wood shavings | Lights at once, burns out in seconds | Tinder at the door – see natural tinder |
| Fatwood splinters | Hot, long, sooty flame even when damp | Starting in wet weather |
| Pencil-thin dead twigs (spruce, pine, birch) | Catches fast, burns fast | Building the fire and reviving it |
| Finger-thick dead twigs (beech, oak, hazel) | Slower, hotter, leaves embers | The main cooking fuel |
| Dry cones | Burn hot with a lot of flame and some sparks | A quick boost; add one at a time |
| Split pieces from thicker dry branches | Clean, steady heat – the inside is dry even after rain | Longer cooking and wet days |
| Green, wet or rotten wood | Smokes, hisses, cools the stove | Not at all |
How much wood do you need?
As a rule of thumb, a double handful of finger-thick twigs boils half a litre of water, and a full meal with a hot drink takes about a small carrier bag of mixed twigs. Collect twice what you think you need. The firewood calculator splits a cooking fire into tinder, kindling and fuel, and the boiling point and fuel calculator estimates fuel for gas and wood at your altitude.
Fuel in wet weather
After days of rain, the dry wood is inside: split wrist-thick dead branches with a knife and baton and use the pale, dry core – the technique is described in batoning wood, and a small folding saw cuts the pieces to length. A few feather sticks carved from that core replace the tinder. More tricks are in fire in wet weather. Carrying a small bag of dry twigs from the last camp is not cheating; it is planning.
Stable base and windscreen: where to set up a camp stove
Most stove accidents are not explosions but spills: a pot of boiling water tips off a wobbly stove onto a hand, a foot or a sleeping bag. The base matters more than the stove. Look for a flat rock, a patch of bare mineral soil or firm sand. Scrape away leaves, needles and dry grass for one metre around a twig stove, down to soil that does not burn. Never set a wood-burning stove on peat, deep forest duff, roots or dry grass: the hot base can start a ground fire that smoulders unseen for hours.
On a wooden table or decking, put a flat stone or a metal tray under any stove; a hobo stove will scorch a ring into the wood. Keep one litre of water and your gloves beside the stove before you light it, and place the kitchen downwind of your shelter – see camp zones.
Wind
Wind is the biggest thief of heat. A light breeze can double the boiling time of a gas or alcohol stove, because the flame is blown out from under the pot. A twig stove is more tolerant – moving air fans it – but it burns through fuel faster and throws sparks. Turn a hobo stove so the feed door faces across the wind, not straight into it, and set a windscreen, your pack or a log on the windward side.

Alcohol burners and solid-fuel stoves are the opposite case: they work best with a screen all the way round, standing 2–3 cm away from the pot so that air can still get in at the bottom and exhaust can leave at the top.
Feeding and running a twig stove without smoke
Running a hobo stove well is a small skill of its own. The fire chamber holds only a few minutes of fuel, so the stove wants a little wood often rather than a lot at once. The aim is a steady, bright flame whose tips just touch the bottom of the pot.
Lighting and running a hobo stove
 1Load it loosely
Put tinder at the bottom by the door and fill the can about two thirds with pencil-thin twigs, criss-crossed so air can pass. Do not pack it tight: a twig stove burns air as much as wood.
 2Light through the door
Hold a match or lighter to the tinder at the feed door, or drop sparks from a ferro rod onto fine shavings or a piece of char cloth. Keep your face out of the line above the can.
 3Wait for steady flames, then pot on
Give the fire one or two minutes until flames rise out of the top. Only then set the pot on, with the lid on. A pot put on too early cools the young fire and makes it smoke.
 4Feed before the flames drop
Push two or three finger-thick twigs through the door at a time, roughly every minute. Feed while there are still flames; reviving a bed of embers costs more time than keeping the fire going.
 5Read the smoke
A bright flame and thin, almost invisible smoke mean the stove is running well. Thick grey smoke means too much fuel or too little air: stop feeding, lift the twigs with a stick and let the fire recover.
| Symptom | Likely cause | Fix |
|---|---|---|
| Thick smoke, no flame | Overloaded can, damp wood or blocked air holes | Remove some twigs, clear ash from the holes, add thin dry twigs and blow gently at the door |
| Fire dies when the pot goes on | No exhaust path under the pot | Add or widen the holes below the rim, or lift the pot on two steel pegs |
| Flames shoot out of the door | Wind blowing into the exhaust side or pot too large | Turn the stove, use a windscreen, choose a narrower pot |
| Burns down every two minutes | Fuel too thin | Switch to finger-thick twigs once the fire is established |
| Stove wobbles or sinks | Soft or uneven ground | Move it onto a flat rock or a pair of green sticks laid side by side |
| Water will not boil | No lid, wind, flames not reaching the pot | Lid on, shield the wind, feed more often for a taller flame |
Topping up a wood-gas stove
A wood-gas stove is loaded differently: fill the chamber to just below the upper air jets, with the thickest pieces at the bottom, and light it on top with tinder and a few thin twigs. The fire burns downwards through the load. When the flames shrink, add a small handful of thin, dry pieces – never a full load onto embers, which produces a cloud of smoke until it ignites.
A short practice drill
Before relying on a twig stove on a trip, boil half a litre of cold water with it in the garden or at a legal fire site and time it. Then repeat with twigs you collected after rain. The second run shows you honestly how much time and fuel preparation the stove needs in bad conditions – and whether you want a backup fuel in the pack.
Cooking on a hobo stove: what works and what does not
A twig stove is at its best when it boils water: tea, coffee, dehydrated meals, noodles, couscous and porridge. It delivers strong heat to a small area, which suits tall, narrow pots and mugs. A pot of 0.75–1 L with a lid is the natural partner for a 10 cm can; which material tolerates flames best is explained in cookware materials.
Simmering is harder, because the only heat control is how often you feed. Three tricks help: let the fire burn down to embers and add single thin twigs; lift the pot onto steel pegs for more distance; or take the pot off, wrap it in a jacket and let rice or lentils finish cooking in their own heat. Frying works with a small pan and attention, but fat spatters onto the flames, so keep the pan small and the fire low.
Habits that make stove cooking easier
- Lid on, always – it saves fuel and keeps ash out
- Fill the pot no more than three quarters, so nothing boils over onto the fire
- Have water, food, spoon and a pot grip ready before lighting
- Lift the pot with a gripper or gloves, never with a sleeve pulled over your hand
- Take the pot off before stirring thick food – a hobo stove is top-heavy
- Keep children and dogs a full step away; see fire rules for kids
For meal ideas that suit a single small pot, see the one-pot camping meals and the planning advice in cook or no-cook. If you treat drinking water by heat, the rules and times are in boiling water.
Alcohol stove, gas stove and solid fuel: how to use them safely
The fuel stoves are easier to run than a twig stove, but each has its own typical accident. Knowing it is most of the protection.
Alcohol (spirit) burner
Alcohol burns with a pale blue flame that is nearly invisible in sunlight. The classic accident is refilling a burner that still burns or is still hot: the flame jumps into the stream of fuel and to the bottle. The rule is absolute – refill only when the burner is cold enough to hold in your hand.
Using a spirit burner
 1Fill the cold burner
Set the burner on level ground and fill it no more than two thirds. Wipe up spills and let any fuel on the outside evaporate before you light it.
 2Close the bottle, light from the side
Screw the fuel bottle shut and put it well away from the stove. Light the burner from the side with a long match or lighter, hand low – never lean over it.
 3Stand, screen and pot
Place the pot stand and a windscreen 2–3 cm from the pot. The flame is almost invisible: hold a hand well above the burner to feel for heat before you assume it has gone out.
 4Snuff it, let it cool
Put the flame out by sliding the snuffer lid over the burner, not by blowing. Wait until the burner is cold before refilling or packing it.
A burner filled two thirds typically burns long enough to boil water for one meal and a drink. In frost, alcohol vaporises poorly: warm the fuel bottle in a jacket pocket and prime the burner with a few drops in the rim or on a priming pan. A spirit stove with an integrated windscreen and pot is one of the most forgiving cook sets for beginners.
Gas canister stove
Screw the burner onto the canister by hand until it is snug – never with force, and never near a flame. Listen and smell for leaks, unfold the pot supports fully, then open the valve slightly and light. Stoves that sit on top of the canister are tall and tippy; choose a wide, low pot, or a remote-canister stove with a hose for larger pots. In cold weather a canister loses pressure as it cools: plain butane stops vaporising around freezing point, winter blends with isobutane and propane keep going well below that. Keeping the canister in your sleeping bag or jacket before cooking helps; warming it with a flame is dangerous. Stoves in winter goes into detail.
Solid-fuel tablets
Unfold the stove on bare ground, light one tablet and set a small pot or mug on top. One standard tablet heats roughly a mug of water; a second tablet is usually needed to reach a rolling boil in wind or cold. Do not breathe the smoke, do not let food touch tablet or residue, and wash your hands after handling tablets. Blow a tablet out to save the rest for later; it relights.
| Fuel | Amount | Notes |
|---|---|---|
| Gas | approx. 6–10 g | Less with a heat-exchanger pot, more in wind |
| Alcohol | approx. 15–25 ml | Depends strongly on burner and windscreen |
| Solid fuel | approx. one standard tablet | Often 1.5–2 tablets in wind or cold |
| Dry twigs | a double handful | More if damp or thinner than a pencil |
Guide values for planning, not test results. Use the fuel calculator for your own trip and carry a reserve.
Wood-gas stove vs alcohol stove vs gas: which stove for which trip?
There is no best stove, only a best stove for a given trip. Three questions settle most cases: Is an open flame allowed? How cold and windy will it be? And do you want to cook, or just boil water?
Which stove should you take?
Is there a fire ban, a high fire danger level or no dry wood (above the tree line, long rain)?
Yes → Leave the twig stove at home. Take gas where it is permitted – or plan cold food.No → A hobo, folding or wood-gas stove is an option.Do you need speed and fine control – several people, real cooking, short breaks?
Yes → Gas canister stove.No → Alcohol or wood is fine and lighter on short trips.Is it well below freezing?
Yes → Wood, a winter gas blend with a warm canister, or a liquid-fuel stove; allow extra fuel for melting snow.No → Any stove type works.Is the trip longer than about a week without resupply?
Yes → A twig stove saves the most carried weight – with a small spirit burner as backup.No → Carry the fuel; the convenience outweighs the grams.
| Trip | First choice | Backup | Why |
|---|---|---|---|
| Day hike with a hot drink | Gas or spirit burner | – | Fast, clean, nothing to collect |
| Bushcraft overnighter at a legal fire site | Hobo or folding twig stove | A few fuel tablets | Free fuel, a small fire to tend, less trace than a campfire |
| Summer trek in dry forest | Gas (if permitted) | Cold food | Twig stoves are usually banned exactly when it is dry |
| Long trek with reliable woodland | Folding twig stove with spirit burner | Small bottle of alcohol | Lowest carried fuel weight over many days |
| Winter camp | Wood-gas or folding twig stove; gas with winter blend | Solid fuel | Wood burns at any temperature; see fuel for melting snow |
| Emergency kit, car, canoe barrel | Solid-fuel stove | Lighter and matches | Stores for years, weighs almost nothing |
Attention needed while cooking (relative)
Weight is easy to compare for your own setup: add stove, fuel for the trip and pot in the Kit Builder, or work from the bushcraft kit list. How much food – and therefore how many boils – you need per day comes out of the food and calorie planner.
Fire bans: is a hobo stove an open fire?
In practice, yes. A hobo stove, folding twig stove or wood-gas stove burns solid fuel with an open flame, produces sparks and embers and leaves hot ash. Authorities and landowners almost everywhere treat it like a small campfire. Where open fires are forbidden – in most forests without a designated fire site, in nature reserves, during fire bans – a twig stove is forbidden too.
Gas stoves are often treated differently because they have a shut-off valve and no embers. But "often" is not "always", and the rules vary by country, region, season and landowner:
- UK: in England and Wales any fire or stove needs the landowner's permission outside designated sites; the Scottish Outdoor Access Code asks you to use a stove rather than an open fire and to light nothing at all in dry conditions, in woodland or on peat.
- USA and Canada: staged fire restrictions commonly still allow pressurised gas or liquid-fuel stoves with a shut-off valve while banning wood, charcoal and frequently alcohol and solid-fuel stoves. The exact wording is set by each forest, park or province.
- Scandinavia: seasonal and weather-related fire bans apply. Norway, for example, has a general ban on open fires in and near forest from 15 April to 15 September. Whether camp stoves are exempt depends on the current local order.
- Germany and Central Europe: state forest laws generally prohibit fire in and near forests; how gas stoves are classed differs – see fire rules when wild camping in Germany.
Before each trip, check the current fire danger rating and any active ban for the exact area, and ask the landowner, ranger or forestry office when in doubt. This article is general information, not legal advice. Background on danger levels and fire rings is in fire bans and danger levels.
A twig stove is still the lower-impact option where fires are allowed: it needs a fraction of the wood, leaves no fire scar when it stands on a stone or a fire pan, and its handful of ash is easy to douse and scatter. The principles are the same as in campfire safety and leave no trace.
Carbon monoxide and burns: never run a stove in a closed tent
Every stove that burns fuel produces carbon monoxide (CO) – wood, gas, alcohol and solid fuel alike. CO has no smell and no colour. In a closed tent, a vestibule with the door zipped, a snow shelter, a van or a hut without ventilation it can reach dangerous levels within minutes, and the first symptoms – headache, dizziness, nausea, drowsiness – are easy to mistake for tiredness. People die this way every year, often while trying to warm a tent with a stove. A hot tent with a stove jack is a different system with its own safety rules.

Burns and scalds
The second common stove injury is a scald from a tipped pot. Sit or kneel beside the stove rather than standing over it, keep the pot handle turned away from where people walk, and never pass a full pot over someone's legs. Cool a burn immediately with clean, cool water for about 20 minutes and cover it with a sterile dressing – your first aid kit should hold burn dressings whenever a stove is in the pack. Loose synthetic sleeves melt onto skin; roll them up or wear wool or cotton near the flame, as described in clothing and fire safety.
Fuel handling and transport safety
Fuel is the most hazardous thing in most rucksacks. A few habits keep it boring.
| Fuel | Container | Rules |
|---|---|---|
| Gas canister | Original canister with valve cap | Keep out of sun and hot cars; unscrew the burner for transport; never pierce or burn; dispose of empties as local rules require |
| Alcohol | Purpose-made fuel bottle with a tight, child-resistant cap, clearly labelled | Never in a drinks bottle; upright and outside the food bag; fill burners away from flames |
| Solid-fuel tablets | Original blister or an airtight bag | Keep away from food; wash hands after handling; store dry |
| Wood | A cloth or mesh bag for dry twigs | Carry only a starter supply; do not move firewood over long distances, to avoid spreading pests |
- Pack fuel low and outside the food: in a side pocket or at the bottom of the pack, so that a leak runs away from sleeping bag and food.
- Check seals before every trip: the O-ring on a gas burner and the washer in a fuel-bottle cap harden with age. A drop of soapy water at the connection shows leaks as bubbles.
- Flying: gas canisters and liquid fuel are not allowed in checked or cabin baggage. Buy fuel at your destination and ask the airline about carrying an emptied, aired stove.
- Half-empty canisters: weigh them at home and write the remaining grams on the side; the empty weight is printed on most canisters.
- Children: denatured alcohol and fuel tablets are poisonous if swallowed. Store them out of reach at home and in camp.
Shutting down, cleaning soot and looking after your stove
A wood stove is not finished when the food is ready. Ash that still glows inside a can has started more than one forest fire after the cook walked away.
Shutting down a twig stove
- Stop feeding early Add the last twigs when the water is close to boiling, so the fuel is used up by the time you are done.
- Let it burn to ash Leave the stove standing until no flame and no glow are visible through the door.
- Douse and stir Tip the ash onto bare soil, pour water over it and stir with a stick until nothing hisses.
- Touch test Hold the back of your hand over the ash, then touch it: it must be cold. Only then scatter it thinly or bury it shallowly, as local rules allow.
- Cool and pack Let the stove cool until you can hold it, knock out loose soot and pack it in its own bag.
How do you clean soot off a pot and stove?
You do not have to. Soot on the outside of a pot is harmless and even helps it absorb heat; the only problem is that it rubs off on everything else. Wipe the worst off with a handful of grass or damp leaves while the pot is still slightly warm, and keep pot and stove in separate cloth bags. At home, warm soapy water and a scouring pad remove soot; the tarry brown film from resinous softwood comes off with a paste of wood ash and water or with washing soda. A thin smear of liquid soap rubbed on the outside of the pot before a trip makes the soot wash off far more easily afterwards. More on field washing-up is in cleaning cookware.
Care and service life
- Tin-can stoves rust after the first burn has removed the coating. Dry the stove before packing; when the wall around the door becomes thin and flaky, recycle it and build a new one.
- Folding stoves warp slightly with heat – normal for thin stainless steel and titanium. Assemble the panels the same way round each time so they keep fitting.
- Spirit burners need a rubber seal in the screw lid if they are to carry leftover fuel; replace it when it hardens. Never close a hot burner with a sealed lid.
- Gas burners want a clean jet and an intact O-ring. Shake out dirt, never poke the jet with wire thicker than the cleaning needle supplied.
With the stove sorted, the rest of the camp kitchen – storage, hygiene and what to cook – continues in storing food at camp and in the bannock and campfire bread guide, whose pan version works on any of these stoves.
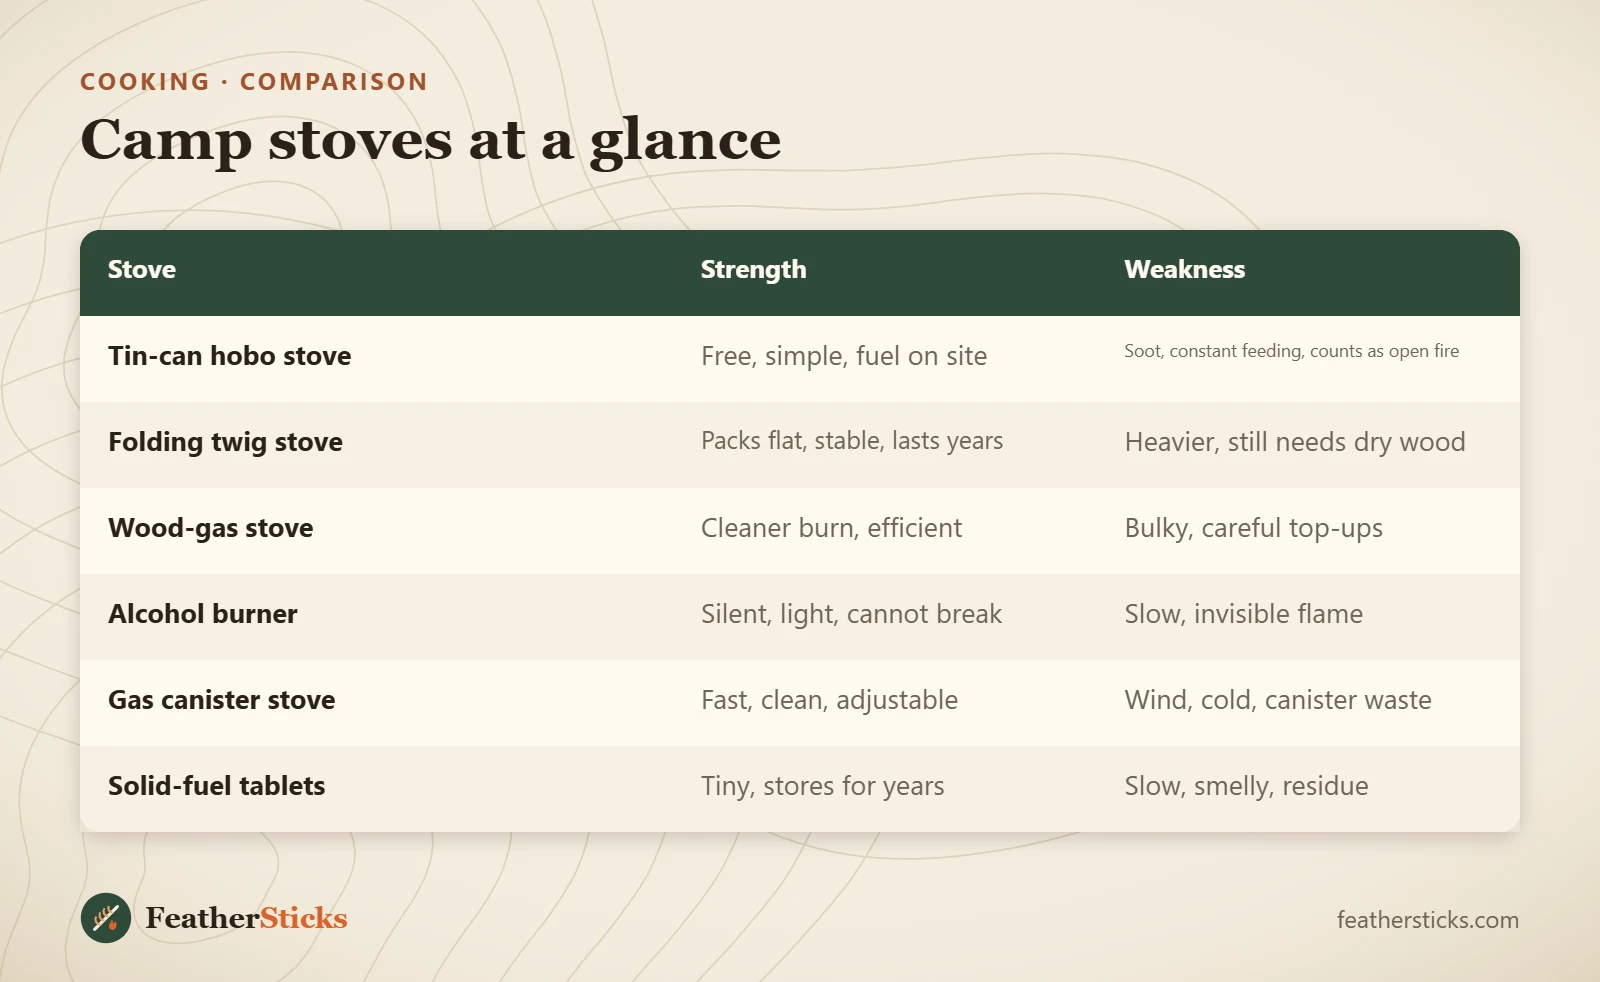
| Stove | Strength | Weakness |
|---|---|---|
| Tin-can hobo stove | Free, simple, fuel on site | Soot, constant feeding, counts as open fire |
| Folding twig stove | Packs flat, stable, lasts years | Heavier, still needs dry wood |
| Wood-gas stove | Cleaner burn, efficient | Bulky, careful top-ups |
| Alcohol burner | Silent, light, cannot break | Slow, invisible flame |
| Gas canister stove | Fast, clean, adjustable | Wind, cold, canister waste |
| Solid-fuel tablets | Tiny, stores for years | Slow, smelly, residue |
Common mistakes
- Using a twig stove during a fire ban because "it is only a stove".
- Forgetting exhaust holes, so the pot smothers the fire.
- Leaving cut edges sharp instead of filing them smooth.
- Stuffing the can full of wood – it smokes instead of burning.
- Setting the stove on dry grass, peat or forest duff.
- Wrapping a windscreen tightly around a gas canister.
- Refilling an alcohol burner that is still hot or burning.
- Cooking in a closed tent or vestibule.
What you need
- Hobo stove (home-made tin can or folding twig stove)
- Pot of 0.75–1 L with lid, plus pot grip
- Leather or work gloves
- Lighter, matches and a ferro rod as backup
- Foldable windscreen
- One litre of water for dousing
- Cloth bags for stove and pot
- Backup fuel: small spirit burner or a few fuel tablets
Calculators for this topic
FAQ
How do you make a hobo stove?
Is a hobo stove allowed during a fire ban?
What is the difference between a hobo stove and a wood-gas stove?
Which is better: alcohol stove or gas stove?
How long does a hobo stove take to boil water?
Can I use a camp stove inside my tent when it rains?
What can I burn in a hobo stove?
How do I stop my pot getting black on a wood stove?
Check yourself
Completed6 quick questions from this guide. Nothing is sent anywhere.
Related step-by-step guides
-
 1
-
 1
-
 1