Swedish Torch: How to Make a Swedish Fire Log (Log Candle)
A Swedish torch (also called a Swedish fire log, log candle or Swedish log stove) is a single upright log, cut or split lengthwise into segments, that burns from the inside out. The gaps between the segments act as a chimney, so one dry log gives you a compact, hot, long-burning fire with a flat top to cook on. You do not need a chainsaw: split the log into quarters with an axe, wire them back together with finger-wide gaps and light it at the top.
This guide shows how to make a Swedish torch with hand tools, which wood and log sizes work, how long it burns, how to light and cook on it, and how to protect the ground underneath. It builds on fire starting basics and our bushcraft for beginners guide.
Step by step
-
1

Choose a dry log
Pick a seasoned, straight-grained softwood log, 20–30 cm thick and 30–50 cm long, with few knots.
-
2

Saw both ends square
Cut both ends flat and at right angles, so the log stands without rocking and a pot sits level on top.
-
3

Split it into quarters
Set the axe on the centre and drive it through with a wooden baton. Split the halves again into four quarters.
-
4

Wire it back together
Stand the quarters in their original order with gaps of 1–2 cm and bind them with steel wire around the lower third.
-
5

Set it on a fire-safe base
Place the torch on bare mineral soil or a stone slab with 3 m clear around it, water within reach, and put tinder in the top.
-
6

Light it at the top
Light the tinder in the centre. After 10–15 minutes the fire has eaten into the gaps and burns down on its own.
What is a Swedish torch and why does it work?
A Swedish torch is a fire built inside a log instead of on the ground. The log stands on end and is divided lengthwise into four to eight segments, either by saw cuts that stop above the base or by splitting it completely and binding the pieces back together. Tinder and kindling go into the middle at the top. Once they burn, the fire works its way down the gaps and the inner faces of the segments begin to glow.
The reason it burns so well is the chimney effect. Hot gases rise through the central channel and leave at the top. That upward flow pulls fresh air in through the side gaps lower down, exactly where the wood is burning. The segments face each other at close range and heat one another, so very little warmth is lost sideways at first. The log is fuel, firebox and chimney in one piece.

This design has practical consequences that make the Swedish fire log more than a party trick:
- It is raised off the ground. The fire starts at the top of the log, well above snow, mud or wet soil. That makes it a classic winter fire and a useful addition to the methods in our wet weather fire guide.
- It has a flat top. A pot or pan sits directly on the log, so it doubles as a one-burner stove, much like the wood-burning options in hobo stoves and camp stoves.
- It needs no tending for a long time. You do not feed it; the log is the fuel supply. That is the opposite of most fire lays, which need wood added every few minutes.
- It is compact. The footprint is the diameter of one log, which is useful where space is limited.
The name is usually traced back to soldiers in the 17th century who are said to have used standing logs for heat, light and cooking. Whatever the true origin, the principle is old and simple; you will also meet the names Swedish candle, Canadian candle and log stove.
Four ways to build a Swedish fire log
There is not one Swedish torch but a family of builds. All of them create vertical air channels in or between pieces of wood. They differ in the tools you need and in how long the torch stays in one piece.

Split and wired quarters
This is the hand-tool method and the main path of this guide. You split a log into four pieces with an axe or by batoning, shave off the innermost edge of each piece to open a channel, and wire the pieces back together. It needs nothing but a saw, an axe and a length of wire, the gap width is entirely under your control, and because the split faces are rough and fibrous they catch fire more readily than smooth sawn faces.
Sawn cuts with an uncut base
The best-known version: two to four lengthwise cuts through the centre of the log, stopping 10–15 cm above the ground, give four to eight segments held together by the uncut base. With a chainsaw this takes a couple of minutes, which is why ready-made torches are cut this way. With a hand saw it is possible but slow, because you are sawing along the grain, which crosscut teeth are not designed for. If you want to try it, use a short log of soft, dry spruce and a bow saw with a sharp blade, and expect real work. A chainsaw kerf is wide, a hand-saw kerf is narrow, so hand-sawn torches often need the kerfs opened a little with a wedge or a second parallel cut.
Drilled "rocket" log
Here the chimney is a hole. A vertical bore of about 2.5–3 cm runs from the centre of the top down to a point 5–10 cm above the base, and a horizontal bore from the side meets it there. Air enters at the side, flame leaves at the top. A hand auger does this in a few minutes of steady turning. The drilled log is neat, stable and safe to carry, but it is the slowest to light and its narrow bore can choke on ash, so the wood has to be really dry.
Bundle of thin logs
If you have no thick log at all, stand five to eight arm-thick pieces (6–10 cm) of equal length upright in a tight ring and bind them with wire. The spaces between the round pieces are the air channels. This is the most accessible version in the field, where dead standing poles are easy to find and a 30 cm trunk is not. It burns faster and falls apart sooner than a solid log.
| Variant | Tools | Strengths | Weaknesses |
|---|---|---|---|
| Split and wired quarters | Saw, axe or knife and baton, steel wire | No power tools, adjustable gaps, lights easily | Needs wire; falls apart when the wire area burns through |
| Sawn cuts, uncut base | Chainsaw, or bow saw with patience | One piece, stable, quick with a chainsaw | Ripping by hand is slow; narrow kerfs light poorly |
| Drilled rocket log | Auger 2.5–3 cm, saw | Very stable, tidy, controlled flame | Slow to light, bore can clog, needs very dry wood |
| Bundle of thin logs | Saw, steel wire | Works with thin dead wood found on site | Shorter burn, less stable top for a pot |
Which variant should I build?
Do you have a dry log at least 20 cm thick?
Yes → Go to the next question.No → Build a bundle from five to eight arm-thick pieces.Do you have an axe, or a sturdy knife and a baton?
Yes → Split it into quarters and wire them: the standard hand-tool torch.No → Go to the next question.Do you have a hand auger?
Yes → Drill a rocket log.No → Saw the log into two or three short rounds and use them as fuel for a normal fire instead.
Which wood is best for a Swedish torch?
Two things decide whether a torch burns or sulks: dryness and species. Dryness matters more. In a normal campfire you can compensate for damp fuel by feeding thin dry sticks; a Swedish torch has only itself to burn. A log that is still wet inside will smoke, hiss and go out as soon as the kindling is used up.
How dry is dry enough?
Use seasoned wood: split or sawn firewood that has been stored under cover with air around it for a good year or more, or dead standing wood that has dried on the stump. Signs of a dry log:
- It feels light for its size and has drying cracks radiating from the centre of the end grain.
- Two pieces knocked together give a clear, ringing sound, not a dull thud.
- Bark is loose or comes away easily.
- A freshly split face feels dry and warm against the back of your hand, not cool and damp.
Freshly felled wood is unsuitable however good the species. A log that has lain on the forest floor is usually soaked on the underside and often already rotting; soft, spongy or crumbly wood will only smoulder.
Softwood or hardwood?
Softwoods such as spruce and pine are the standard choice. They split cleanly, catch quickly because of their resin and burn with a bright, tall flame. The price is sparks and a shorter burn. Birch is a good middle course: it lights well, burns evenly with little sparking, and its bark is excellent tinder. Dense hardwoods such as beech, oak and ash give the longest burn and the best embers for cooking, but they are hard to split, slow to light and unforgiving if not perfectly dry. For a first torch, choose spruce, pine or birch.
| Wood | Lighting | Burn | Notes |
|---|---|---|---|
| Spruce | Easy | Bright, fairly short | Splits well; throws sparks, so keep a wider safety margin |
| Pine | Easy | Bright, sooty | Resinous; soots pots heavily. Resin-rich pieces are fatwood |
| Birch | Easy to medium | Even, medium length | Few sparks; bark helps lighting. Good all-rounder |
| Larch, Douglas fir | Medium | Hot, medium length | Sparks strongly; twisted grain can be hard to split |
| Beech, ash | Harder | Long, good embers | Must be very dry; best for cooking once it is going |
| Oak | Hard | Very long, slow | Heavy to split; often smoulders rather than flames |
| Poplar, willow | Medium | Short, weak | Light wood with little heat; acceptable only if fully dry |
General tendencies. Dryness matters more than species.
The shape of the log matters as well. Look for a straight piece without big knots or forks: knots stop a split dead and twisted grain makes the quarters spiral. Where you may collect or cut wood depends on the land and the country; on private and public forest land you generally need permission. Our article on wild camping rules in Germany gives an idea of how strict such rules can be.
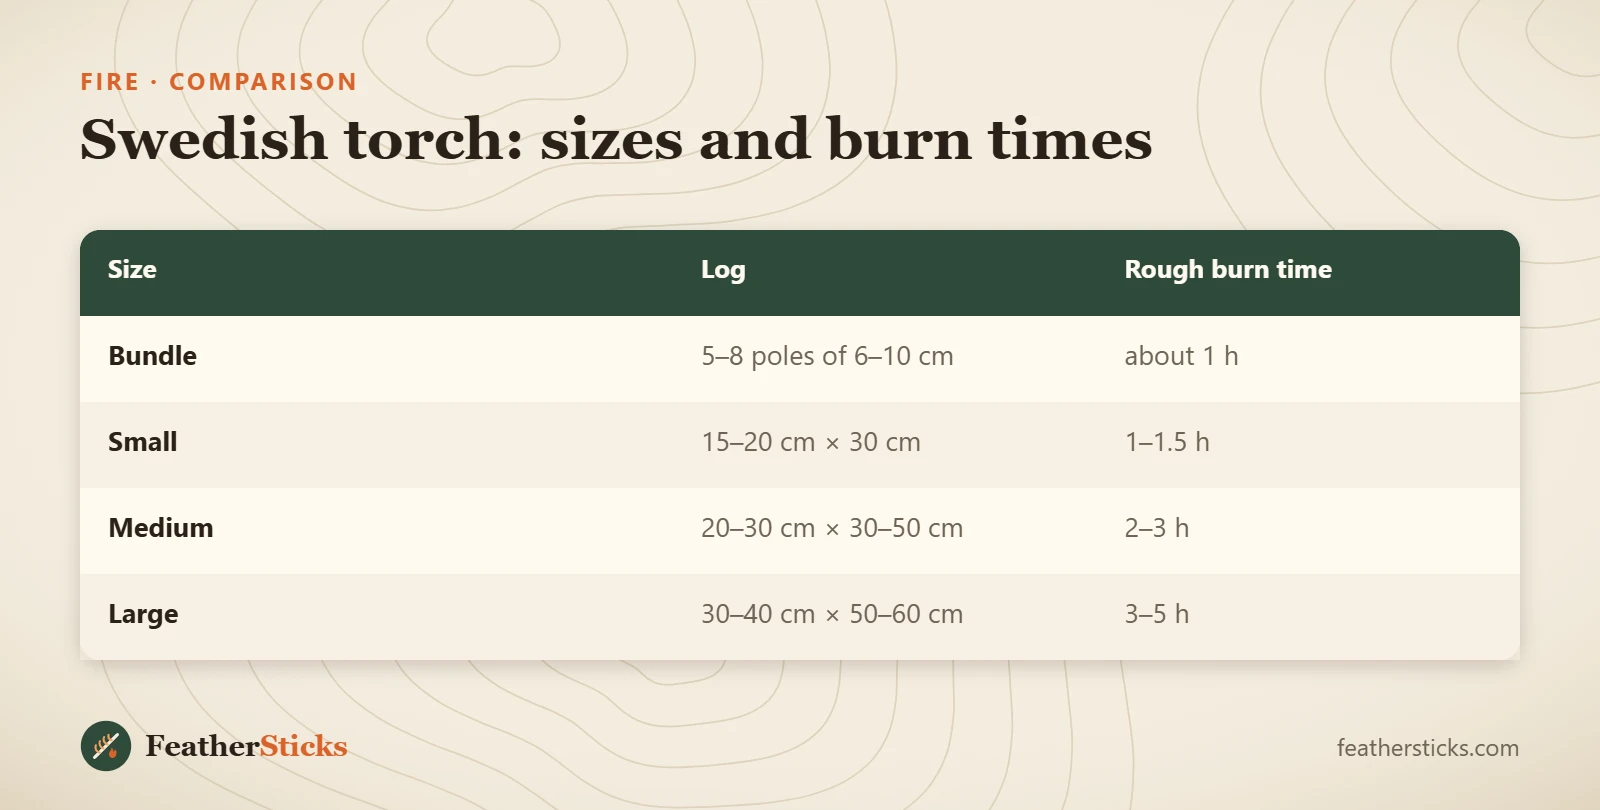
Log sizes and burn times: how long does a Swedish torch burn?
A Swedish torch burns for roughly one to five hours. The main factor is the amount of wood, so thickness counts for more than height. Species, dryness, gap width and wind shift the result considerably, which is why the figures below are rough guides and not promises.

| Size | Diameter | Height | Rough burn time | Use |
|---|---|---|---|---|
| Small | 15–20 cm | about 30 cm | 1–1.5 h | Boiling water, one quick meal, day trip |
| Medium | 20–30 cm | 30–50 cm | 2–3 h | Cooking for two to four, an evening by the fire |
| Large | 30–40 cm | 50–60 cm | 3–5 h | Garden and group use; heavy, awkward to split by hand |
| Bundle of 5–8 poles | 6–10 cm each | 30–40 cm | about 1 h | Improvised in the field from thin dead wood |
Guide values for dry softwood in light wind. Hardwood burns longer, wind and wide gaps shorten the burn.
What changes the burn time?
- Diameter: doubling the diameter roughly quadruples the amount of wood. A thick, short log outlasts a thin, tall one.
- Height: more height adds fuel but also raises the centre of gravity. Keep the height to no more than about twice the diameter.
- Gap width: gaps of 1–2 cm are the sweet spot. Narrower gaps starve the fire of air and it smoulders; much wider gaps let it roar and burn out quickly.
- Number of segments: four segments burn longest and stay stable; six or eight light faster and give a more even cooking flame, but the thin segments burn through sooner.
- Wind: a steady breeze works like bellows. The windward side burns away first and the torch may lean or collapse early.
The three phases of the burn
Whatever the size, a torch goes through three phases. Knowing them tells you when to cook.
Phases of a burning Swedish torch
- Lighting phaseFirst 10–15 minutes: the kindling burns, the inner faces char. Some smoke is normal.
- Flame phaseTall flames out of the top, glowing gaps. Strong, uneven heat: good for boiling water.
- Ember phaseThe core glows, flames are low and steady. The best time for frying and simmering.
- CollapseSegments burn through and fall apart. Take the pot off in time, then let it burn down or put it out.
If you need heat for a whole evening and night, a torch is not the most economical choice; a long fire or a well-fed log cabin fire uses wood more flexibly. The firewood calculator estimates how much fuel a conventional fire needs, and the fire lay picker suggests a structure for your purpose.
How to make a Swedish torch with hand tools
You need a folding or bow saw, an axe or a robust fixed-blade knife with a baton, and about one metre of steel binding wire per torch. Work on firm, level ground, wear sturdy shoes and keep bystanders, children in particular, at least two arm lengths plus the tool length away.
Prepare the log
Saw the log to length: 30–50 cm for a log of 20–30 cm diameter. Both ends must be flat and at right angles to the trunk. The bottom decides whether the torch stands, the top whether your pot sits level. Start the cut with a few light pulling strokes, then use the full length of the blade without forcing it. If the log rocks when you stand it up, turn it over; one end is often better than the other, and the better one goes down.
Split it into quarters
Do not swing an axe freely at a log standing on the ground. The controlled way is to set the edge on the mark and drive it through with a wooden baton, the same principle as batoning a knife. The tool cannot glance off, and the split starts exactly where you want it.
Splitting a log into four quarters
 1Mark a cross
Mark two lines at right angles through the pith on the top face, avoiding knots where you can. If a drying crack already runs through the centre, use it as your first line.
 2First split, wedge if needed
Set the axe on the first line and strike the poll with a wooden baton, never with a second axe or a hammer. If the axe jams, drive a wooden wedge into the opened crack beside it.
 3Halves into quarters
Stand each half on its end, or lay it flat side down, and split it along the second line. You now have four quarters. Lay them out in the order they came from the log.
 4Open the chimney
Shave the sharp inner edge off each quarter, so that the four pieces leave a channel 2–3 cm wide in the middle. Keep the shavings: they are your kindling.
A log of 20–30 cm is at the upper limit of what a knife can split; an axe or a hatchet with wooden wedges is the right tool here. Carve two or three wedges from hardwood offcuts before you start. Thick logs rarely split in one go: follow the crack downwards with a wedge and work patiently. A clean, sharp edge makes all of this safer; see knife and axe care.
Bind the quarters
Wiring the quarters back together
 1Stand them in order
Stand the four quarters upright in the order they had in the trunk, bark outside, with gaps of 1–2 cm. Small twigs pushed into the gaps near the bottom hold the distance while you work.
 2Wire around the lower third
Pass steel wire twice around the lower third and twist the ends together until the pieces no longer move. Wire survives the heat; natural or synthetic cord would burn or melt through. The lower it sits, the longer it holds.
 3Check the stand
Press down on the top and try to rock the torch. It must stand firmly and the centre channel must be open from top to bottom. A torch that is taller than about twice its diameter tips too easily: shorten it.
What it should look like: four pieces with their bark outside, a cross of daylight visible through the gaps when you look from above, a centre hole about two fingers wide, and a wire that does not slip when you lift the torch by one segment.
Without wire
If you have no wire, there are two workable substitutes. Dig a shallow pit 8–10 cm deep into mineral soil, stand the quarters in it and pack earth firmly around the base. Or stand the quarters on the ground and wedge three or four fist-sized stones around the foot. Both hold the pieces only at the bottom, which is where they need to be held. Green withies or bark strips as binding are a nice exercise in lashings, but they must sit right at the base and still char through eventually.
The drilled log and the bundle
For a rocket log, drill the vertical hole first, exactly in the centre and parallel to the grain, and mark the depth on the auger with a strip of tape so that you stop 5–10 cm above the base. Then drill the side hole to meet it. Blow or shake the shavings out; they are good kindling. For a bundle, saw five to eight poles to exactly the same length, stand them in a ring around one centre pole, bind them with two wires, one in the lower third and one near the middle, and then pull the centre pole out a little or replace it with kindling.
How to light a Swedish torch
A Swedish torch is lit at the top. The kindling fire in the centre drops embers into the channel, the inner faces catch, and the fire travels downwards. Lighting from below seems logical but usually fails: the gap at the bottom is cramped, flames have nothing above them to heat except their own smoke path, and the kindling is hard to reach when it needs help.
Prepare more kindling than you think you need. The shavings from trimming the inner edges, a few pencil-thin splints, a feather stick or two and a reliable tinder such as birch bark or a few fatwood splinters are ideal. A natural firelighter of wood wool and wax is a legitimate shortcut. A ferro rod works if your tinder is fine enough; a long match or a lighter is easier because the tinder sits in a hollow. Never use petrol, spirit or other liquid accelerants: vapour collects in the channel and can flash.
Lighting the torch from the top
 1Fill the centre
Push tinder and thin splints into the top of the centre channel and into the upper ends of the gaps. Let a few splints stand a little proud of the top so they are easy to light. Do not pack the channel solid; air must still pass.
 2Light it at the top
Light the tinder from the side the wind comes from. Keep your face and sleeves back: the flame will stand up straight out of the channel within seconds.
 3Feed for 10–15 minutes
Keep adding small splints into the centre until the inner faces of the segments are black and begin to glow on their own. This takes about 10–15 minutes with dry softwood. Smoke during this time is normal.
 4Glowing core
When the gaps glow orange and air is visibly drawn in at the sides, the torch feeds itself. From now on it needs no more kindling, only supervision.
| After about | What you should see | If not |
|---|---|---|
| 1 minute | Tinder and splints burn with a steady flame in the top | Add finer, drier tinder; shield from wind |
| 5 minutes | Inner faces at the top are charred black | Feed more splints; check that the channel is open |
| 10–15 minutes | Gaps glow in the upper third, flame stands by itself | Widen the gaps slightly at the top with a stick; keep feeding |
| 30 minutes | Glow has moved down, steady flame, little smoke | Wood is probably damp: use the log as ordinary fuel on a normal fire |
Times are rough guides for dry softwood.
A small trick for damp conditions: build a tiny fire of splints on top of the torch, across the gaps, in the manner of a miniature log cabin. Its embers fall into the channel and dry the inner faces first. A piece of char cloth or a glowing ember from an existing fire dropped into kindling in the channel works on the same principle.
Cooking on a Swedish torch
The flat top turns a Swedish torch into a single-burner stove. It concentrates heat on a small area, which suits one pot or one pan: boiling water, soups and stews, frying eggs, bacon or pancakes, brewing coffee. It is less suited to grilling on a wide grate or to anything that needs gentle, even bottom heat for a long time.
Leave the draught open
A pot placed flat on the log closes the chimney, and the fire chokes within a minute or two. Put three small stones, three green stick sections or three large nails on the top first, so that the pot stands 1–2 cm above the wood and the flame can escape sideways. With six or eight segments, the gaps at the rim often provide enough outlet on their own; with four tight segments, spacers are a must.
Cooking safely on the torch
 1Pot on three spacers
Set three flat stones or green stick sections on the top and stand the pot on them. Check that it sits level and does not wobble before you fill it. Use dry stones only: wet or porous river stones can crack in the heat.
 2Take the pot off in time
As the segments burn through above the wire they start to lean. As soon as the top is no longer level or a segment moves, lift the pot off with a pot grip or a glove and continue on the embers or on a stand.
 3Put it out completely
When you are finished, pour water over the remains, stir the embers apart and pour again until nothing hisses. Feel with the back of your hand: the ash must be cold to the touch.
| Task | Best phase | Tips |
|---|---|---|
| Boiling water | Flame phase | Use a lid. See boiling water for safe treatment times |
| Coffee, tea, soup | Flame to ember phase | A pot with a bail handle is easy to lift off quickly |
| Frying in a pan | Ember phase | Heavy pans hold the heat evenly; turn the handle away from the wind |
| One-pot stews | Ember phase | Stir often: the heat is concentrated in the centre |
| Sausages or bread on a stick | Ember phase | Hold beside the flame, not in it. See bannock and campfire bread |
| Dutch oven | Not ideal | Too heavy for a burning log; use coals as in Dutch oven cooking |
Keep the load modest. A full pot of several litres on a log that is burning away underneath is a scalding accident waiting to happen. A pot of about one to two litres on a medium torch is a sensible limit; anything heavier belongs on a tripod, a grate or the ground. Softwood, pine especially, soots cookware heavily; a thin film of soap on the outside of the pot before cooking makes it easier to clean. Our guides to campfire cooking and bushcraft cookware cover pot choice and heat control in depth, and the boiling point and fuel calculator helps to plan boil times at altitude.
Safety and ground protection
A Swedish torch looks tidy and contained, and that is exactly why it is underestimated. It is an open fire like any other, with three particular risks: it can tip over, it falls apart at the end and scatters embers, and it burns down into the ground beneath it.
What goes underneath
The base of the torch eventually becomes a bed of embers that sits in one spot for hours. On forest floor, that heat travels into the layer of needles, roots and humus and can smoulder underground unnoticed, reappearing metres away and hours later. Peat soils are especially dangerous. Stand the torch only on bare mineral soil (sand, gravel, clay), on a large flat stone, on a paving slab or in a fire bowl. On a lawn, a slab on a few bricks protects the grass; on snow, a platform of green or damp logs keeps the torch from sinking and tilting as the snow melts.

Before you light it
- Fire allowed here today? Check local rules and the current fire danger level
- Base: mineral soil, stone slab or fire bowl; never duff, peat or dry grass
- 3 m radius cleared of leaves, dry grass and gear; nothing overhanging
- Torch stands level and firm; height no more than about twice the diameter
- At least 10 litres of water, or water plus a spade and sand, within reach
- Wind light and steady; no torch in gusty or strong wind
- Tents, tarps and synthetic clothing well out of spark range
- Someone stays with the fire from lighting until it is cold
While it burns
- Do not move a burning torch. The segments are held by a wire and a charring base; lifting or kicking it can make it fall apart in your hands.
- Stand on the windward side. Softwood spits sparks; synthetic jackets and sleeping bags get holes quickly. See bushcraft clothing for fabrics that tolerate sparks better.
- Expect the collapse. When the segments have burned thin above the wire they fall outwards. Keep the 3 m zone free of people sitting on the ground, especially children. Our guide to bushcraft with kids has rules for fire with children.
- Never use it in a tent or enclosed shelter or under a low tarp: carbon monoxide is odourless and deadly.
- Have a first aid kit at hand and know how to cool a burn; see first aid kit.
Putting it out and leaving no trace
A torch that is left to burn down still leaves a core of embers and a wire. Push the remains together, drown them with water, stir and repeat until the ash is cold to the back of your hand. Earth alone insulates embers and keeps them alive; water is the reliable method. Take the wire with you once it has cooled: it does not rot. Scatter cold ash thinly or pack it out, as the site rules require. The full routine is in campfire safety and Leave No Trace.
Fire bans and the law: where is a Swedish torch allowed?
Legally, a Swedish torch is an open fire. The fact that it stands in one neat piece does not make it a stove or a barbecue in the eyes of most regulations. Wherever campfires are forbidden, a Swedish torch is forbidden too.
The rules vary widely by country, region and season, so treat the following as orientation, not as legal advice:
- Germany, Austria, Switzerland: fire in and near forests is tightly restricted by regional forest laws, usually limited to official fire sites or requiring the owner's permission, and prohibited at higher fire danger levels.
- Scandinavia: the right of public access is generous, but it does not override fire bans, which are common in dry summers and are announced locally. Fire on bare rock is also discouraged because it cracks the rock.
- United Kingdom: in England and Wales you need the landowner's permission; in Scotland the access code allows small fires only where they do no damage and asks you to use a stove instead in forests, on peat and in dry periods.
- USA and Canada: rules are set by the managing agency of each area; seasonal fire restrictions and total bans are frequent, and some areas require a permit or a metal fire pan.
In practice: ask the landowner or the managing authority, check the current fire danger rating on the day, and if in doubt do without. In your own garden a torch in a fire bowl is usually the least problematic setting, though local by-laws on smoke and open fires may still apply. On a trip, a camp stove is often the legal alternative when open fires are banned, but in the strictest bans even that is not allowed.
Troubleshooting: why does my Swedish torch not burn?
Almost every failed torch comes down to damp wood, too little air or too little kindling. Work through the symptoms before you give up on the log.
| Symptom | Likely cause | Fix |
|---|---|---|
| Kindling burns, log does not catch | Too little kindling or damp inner faces | Feed splints for a full 10–15 minutes; add fatwood or a firelighter |
| Thick smoke, hissing, moisture at the end grain | Wood is not seasoned | Stop. Use the pieces as fuel on a normal fire once it has good coals |
| Flame dies when feeding stops | Gaps too narrow, channel blocked | Open the gaps to 1–2 cm with a wedge or stick; clear the channel |
| Burns fiercely and is gone in an hour | Gaps too wide, strong wind, thin log | Push the segments closer; shelter from wind; use a thicker log next time |
| Burns on one side only | Wind from one direction | Turn the unburnt side to the wind before lighting; add a low windbreak upwind |
| Fire goes out under the pot | Pot closes the chimney | Lift the pot on three spacers of 1–2 cm |
| Torch leans or wobbles | Uneven base or soft ground | Do not correct it while burning with a pot on top; remove the pot, steady it with stones |
| Falls apart early | Wire too high or too loose | Bind in the lower third next time; push the pieces together and let them burn as a small fire |
A torch that refuses to burn is not wasted. Cut the wire, split the quarters further and build a conventional fire from them; with the surface area increased, even slightly damp wood will burn on a good bed of coals. The techniques are in fire lays and in the wet-weather guide linked above.
When a Swedish torch makes sense, and when it does not
The Swedish torch is a specialist. Used for the right job it is hard to beat; used for the wrong one it wastes a good log.
Swedish torch: strengths and limits
Strengths
- Burns off the ground: works on snow and wet soil
- Flat top for one pot or pan without a grate
- No feeding for an hour or more
- Small footprint, contained flame
- Bright light and a clear focal point for a camp
Limits
- Needs a thick, truly dry log and tools to prepare it
- Heat goes mostly upwards: poor for warming people
- Can tip, and collapses at the end
- Hard to put out halfway and reuse
- Counts as open fire: banned wherever fires are banned
In winter and on snow
This is where the design shines (more in fire in snow and deep cold). A normal fire on deep snow melts its way down and drowns in its own meltwater; a torch on a platform of two or three logs burns well above it. Prepare the torch at home or at the car, carry it in, and you have a cooking fire within a quarter of an hour of arriving. Remember that the heat radiates poorly sideways: for warmth, you still need insulation, wind protection and the routines described in winter camping.
In a base camp, a torch makes a good kitchen fire beside the main fire. Place it downwind of sleeping places and away from guy lines; see choosing a camp site. After dark, a headlamp still beats firelight for knife work (see moving safely at night). For more techniques, from spark to coals, browse all fire skills.
| Size | Log | Rough burn time |
|---|---|---|
| Bundle | 5–8 poles of 6–10 cm | about 1 h |
| Small | 15–20 cm × 30 cm | 1–1.5 h |
| Medium | 20–30 cm × 30–50 cm | 2–3 h |
| Large | 30–40 cm × 50–60 cm | 3–5 h |
Common mistakes
- Using fresh or damp wood: a torch cannot dry itself the way a fed campfire can.
- Gaps too narrow or a blocked centre channel, so the fire starves of air.
- Binding with cord, or placing the wire too high, so the torch falls apart early.
- Lighting from below, or giving up after two minutes instead of feeding kindling for 10–15 minutes.
- Setting a pot flat on the top and choking the chimney.
- Standing the torch on forest floor, roots, peat or dry grass.
- Making it too tall and narrow, or loading it with a heavy pot.
What you need
- Dry softwood or birch log, 20–30 cm thick
- Folding saw or bow saw
- Axe or hatchet, wooden baton and wedges
- Steel binding wire, about 1 m per torch, and pliers
- Tinder, feather sticks or a natural firelighter
- Long matches or lighter, ferro rod as backup
- Pot grip or leather gloves
- Water container of at least 10 litres, small spade
Calculators for this topic
FAQ
How do you make a Swedish torch without a chainsaw?
How long does a Swedish torch burn?
What is the best wood for a Swedish fire log?
Do you light a Swedish torch from the top or the bottom?
Can you cook on a Swedish torch?
Is a Swedish torch allowed during a fire ban?
How do you put out a Swedish torch?
Why does my Swedish torch keep going out?
Check yourself
Completed6 quick questions from this guide. Nothing is sent anywhere.
Related step-by-step guides
-
 1
-
 1
-
 1