DIY Fire Starters: Homemade Recipes with Wax, Cotton and Bark
A DIY fire starter is a small, homemade burner that keeps a flame going for several minutes, long enough to dry out and ignite your kindling. The classics are cotton balls with petroleum jelly, cotton pads or cord dipped in wax, egg-carton cups filled with sawdust and wax, wax-dipped pine cones and waxed strips of birch bark. All of them are cheap, light and easy to make at the kitchen table or in the garden.
A starter does not replace dry kindling or skill: it bridges the gap between a short tinder flame and thicker wood. This guide gives every recipe step by step, compares burn time, spark-catching and weight, puts safe wax melting up front, and covers storage, wet weather, the environmental trade-offs and the usual mistakes. The basics of building a fire are in fire starting basics and in our bushcraft guide for beginners.
Step by step
-
1

Pick a base and a recipe
Choose cotton, cardboard with shavings, a pine cone or bark. Plant-based and natural bases come first; plastic and synthetic pads stay out.
-
2

Melt wax in a water bath
Put wax in a can, stand the can in a pot of hot water on low heat, and never put it over a naked flame. Keep a lid within reach.
-
3

Dip, pour or work it in
Dip pads and cord with tongs, pour wax over shavings in a carton, or knead petroleum jelly into cotton. Let the excess drain off.
-
4

Let it set and cut it apart
Leave the pieces on baking paper for about 10–20 minutes until hard, then cut or break them into single-fire portions.
-
5

Store sealed and labelled
Keep starters in a closed tin or zip bag, labelled, away from food, children, sun and hot cars.
-
6

Light it under the kindling
Open the fibres, light one corner with a match or a ferro rod spark, and lean thin kindling over it with a gap for air.
What does a fire starter do, and what does it not do?
Every fire is a ladder: a tiny flame lights fine tinder, tinder lights thin kindling, kindling lights thicker wood (see fire lays). The weak step is the first one. A match flame lasts seconds, and in that time the kindling has to dry, give off gas and ignite. With dry, finely split wood that works. With damp or thick material it does not, and the flame dies before the wood catches.
A fire starter, also called a fire extender or firelighter, is a flame with a long burn time. It takes the place of the short tinder flame and keeps burning for minutes, so the heat has time to dry the kindling above it. Wax or petroleum jelly provides the long burn, and a fibre (cotton, cardboard, wood, bark) acts as a wick that holds the fuel in place. In the glossary this is called a fire extender.

What a starter does not do
- It does not replace dry kindling. A starter under wet sticks only boils the water out of them. You still need pencil-thin dry wood, which you can make with feather sticks or by splitting.
- It does not replace skill. A starter cannot fix a fire lay with no air gap or one built on soaked ground.
- It is not an accelerant. Starters are slow, controlled burners. Petrol, lighter fluid, alcohol gels or spirits poured on a fire can flash back and cause severe burns; do not use them to start a fire, ever.
Think of a starter as insurance: on a dry summer evening you will not need one, on a cold, wet night it can save half an hour. Our guide to fire in wet weather shows where the time goes.
Which homemade fire starter is best? A comparison
There is no single best starter. Cotton with petroleum jelly takes a ferro rod spark best; wax starters burn longest and shrug off damp; bark and fatwood cost nothing and are natural. The table compares the recipes in this guide. All burn times and weights are rough rules of thumb for a typical piece: they change with size, the amount of wax, wind and temperature, so test your own.
| Starter | Burn time (rough) | Takes a ferro rod spark? | Weight (typical) | Water resistance |
|---|---|---|---|---|
| Cotton ball or pad with petroleum jelly | About 2–5 min | Yes, once you pull the fibres open | 2–3 g | Good; the grease repels water, fluff dries quickly |
| Wax-dipped cotton pad or cord | About 3–6 min | Only if you fray the fibres; the wax coat resists a spark | 4–6 g | Very good while the wax coat is intact |
| Egg-carton cup with shavings and wax | About 5–10 min | Poorly; light it with a match or lighter | 15–30 g | Good; the cardboard edge can swell |
| Wax-dipped pine cone | About 5–10 min | Poorly; needs a flame | 20–40 g | Good once coated, bulky |
| Waxed birch bark strip | About 2–4 min | Curls and shavings take a spark; the waxed part needs a flame | 1–3 g | Very good |
| Fatwood shavings or sliver | About 3–6 min for a thumb-sized sliver | Yes, scrapings take a spark well | 3–5 g | Excellent, resin repels water |
Rough relative ranges, not measurements. Compare them with the tinder comparison, where jelly cotton and fatwood are also the longest burners.

Safety first: how to melt wax safely
Making fire starters is a fire-related craft, and the one risky step is melting wax. Wax is a fuel. It melts at moderate temperatures (typical candle waxes roughly 50–65 °C, which is below the boiling point of water), but overheated wax gives off vapour that can ignite, and burning wax spreads and sticks to skin. These rules keep the job boring, which is how it should be.

Wax-melting safety rules
- Melt wax only in a water bath (double boiler): a can inside a pot of hot water, on low heat
- Never put wax over a naked flame or directly on a hot plate or stove ring
- Keep a pot lid within reach, and know that a lid is how you put out a wax fire
- Never use water on burning wax: it spreads the fire; smother it with the lid and switch off the heat
- Never leave melting wax unattended, not even for a minute
- Work outdoors or in a well-ventilated space; do not breathe in the vapour
- Use a can and pot reserved for wax; do not use them for food again
- Use tongs and oven gloves; hot wax on skin sticks and burns
- Children only with an adult who does the melting; keep pets away
- Let the pot cool before you move it; never pour leftover wax down the drain
Choosing the wax
Leftover candle stubs, paraffin, soy wax and beeswax all work. Paraffin is a petroleum product; beeswax and soy wax are not and are a better choice for the environment, though the burn is the same for practical purposes. Take out the wicks and any metal bases, and do not use candles with plastic or glitter parts. Old candle stubs are an almost free source.
Set-up for the water bath
Fill a pot with about 3–5 cm of water, stand a clean steel can in it and add the broken wax. The water must not reach the can's rim. Heat gently. A small gas stove or a hobo stove is fine outdoors, as long as it stands firmly on level, non-flammable ground (see camp stoves). An electric hob at home also works if the pot sits firmly. Fire rules and safe distances are covered in campfire safety.
Melting takes roughly 10–20 minutes depending on the amount. Stir with a stick you do not mind losing. When the wax is clear and liquid, take the pot off the heat and work straight away; wax that cools in the can becomes a skin, and you only need to reheat it briefly.
Melting wax step by step
 1Collect and break up the wax
Break old candle stubs into small pieces and take out the wicks. Small pieces melt evenly and quickly, so the wax spends less time hot.
 2Can in a pot of water
Stand the can in the pot, add water around it (not inside), and heat on low. The water, not a flame, heats the wax. This is the double boiler principle.
 3Melted and calm
Stir until the wax is a clear liquid. If it smokes, the heat is far too high: switch it off and let it cool. Lift the can with a cloth or gloves.
 4If it ignites
Slide the lid over the can to smother the flame and turn off the heat. Water on burning wax makes it spatter and spread. Keep a bottle of water well away from the work area for drinking only.
Cotton balls and Vaseline: the classic fire starter
The cotton ball and Vaseline fire starter (petroleum jelly, sold generically as petroleum jelly in most countries) is popular because it needs no heat at all. The jelly soaks into the cotton and acts as the fuel; the fibres stay a wick. Pulled open, the cotton takes a single spark from a ferro rod, and the jelly then keeps the flame going for a few minutes. It is also the easiest recipe to carry.
What you need
- Cotton balls or round cotton pads, 100 % cotton (synthetic fibre melts and does not burn well; check the pack)
- A tub of petroleum jelly
- A small tin or a zip bag, plus disposable gloves if you dislike greasy hands
How to make them
Cotton and petroleum jelly in three moves
 1A small dab per ball
Scoop about a thumbnail-sized amount of jelly for each cotton ball or pad. More is not better: too much grease smothers the fibres and burns smokily.
 2Work it in
Knead the jelly into the cotton with your fingers until it is spread evenly through the centre. The outer fibres should stay mostly dry; a ball that drips is too greasy.
 3Fluff before lighting
At the fire, pull the ball apart so that dry white fibres stick out. A compressed, greasy ball only smoulders. An opened one catches a spark and then burns on the jelly.
Why it works, and where it falls short
Cotton burns easily but quickly; petroleum jelly burns slowly but is hard to light on its own. Together they combine easy ignition and a long burn. Cotton balls stay light and pack flat. The downsides are a greasy residue in your kit, a petroleum-based fuel and the smell of smoke. Jelly also softens in heat: a tin in a hot car or in the sun can turn into a mess. Packing the balls in a zip bag inside a tin solves that.
Prepare a handful (a rule of thumb for a night out is four to six) for your kit list. Cotton pads rubbed with petroleum jelly are also described in the ferro rod tinder section.
Wax fire starters: pads, cord, pine cones and bark
Wax fire starters use melted wax as the fuel. They are cleaner to handle than jelly, waterproof, and the wax can come from candle stubs, which makes them nearly free. All of them follow the same pattern: melt the wax in a water bath as described above, coat the base, let the excess run off, and let it set on baking paper. Set the pieces so they do not touch, or you will have to break them apart.
Wax-dipped cotton pads or cotton cord
Hold a pad with tongs and dip it into the wax until it is soaked through, which takes a few seconds. Lift it out, let it drain for a moment over the can and lay it on baking paper. Cotton cord, jute twine or cotton string works the same way: cut pieces about 5–8 cm long, dip, drain, set. Both burn like small candles.
The coating makes them weather-proof but also harder to light from a spark: a thick coat blocks a ferro rod spark. Fray the end of the cord or tear a little fluff from the edge of the pad with a fingernail, and the exposed fibres will catch. With a match or lighter they light at any edge.
Lighting any starter: from placement to flame
 1Bare soil or a stone
Place the starter on mineral soil or a flat stone in your fire pit, never on dry grass or leaves. Keep the fire at least 5 m from tents and hammocks and 3 m from synthetic tarps.
 2Kindling above it
Lean thin dry kindling around and over the starter in a small teepee, with a gap on the windward side for air. The flame must reach the kindling, not be buried by it.
 3Light it
Light a corner with a match or lighter, or scrape a ferro rod so the sparks land on opened fibres. Hold the rod close and pull it back instead of pushing the pad away.
 4Let it burn
Do not poke or blow hard. The starter burns for minutes and the kindling dries and catches. Add the next thicker sticks only when the thin ones burn on their own.
Wax-dipped pine cones
Dry pine cones collected from the ground (not from living trees) are natural fuel with plenty of gaps for wax. Tie a short piece of cotton cord around the top as a wick, hold the cone by the cord with tongs, and dip it into the wax or spoon wax over it. Let it drain, then repeat once more for a thicker coat. A cone burns long but is bulky: it suits a base camp or car camping more than a backpack. Collect only fallen cones where allowed.
Waxed birch bark strips
Birch bark is already a good natural tinder because of its oils (see tree identification to recognise birch). Strips of about 8–10 cm, dipped or brushed with wax, burn longer and shrug off rain. Use only bark that has already come off: loose, curling outer bark on a dead branch or log, never peeled from a living tree, which damages it and is not allowed in many places. The curls from the strip take a spark; the waxed surface needs a flame.
Egg carton fire starters with sawdust and wax
The egg carton fire starter is the best way to use up sawdust, wood shavings and candle ends. Each carton cup becomes a small, long-burning block: the wood filling soaks up wax and burns like a thick wick. A 6-cup half carton makes six starters, and each burns for roughly 5–10 minutes, the longest of the recipes in this guide. They are too bulky for a hip pocket, but ideal for a fireplace at home, a base camp or a car-camping fire box.
Egg carton starters in four steps
 1Use a paper carton
Take an ordinary pressed-paper or cardboard egg carton. Foam and plastic cartons melt and give off fumes: leave them out.
 2Fill with dry shavings
Fill each cup loosely with dry sawdust or fine wood shavings. Use only untreated wood: no chipboard, MDF, plywood, painted or pressure-treated wood.
 3Pour the wax
Pour melted wax slowly into each cup until the filling is soaked but not swimming. Pour from a can with a spout, standing the carton on baking paper or a tray.
 4Cut apart when set
Wait until the wax is hard, then cut the cups apart with scissors. One cup is one fire. Light the cardboard edge.
Variations
- Shavings from your own carving: the leftovers from whittling or from a pocket knife session make perfect filling.
Light the cardboard edge with a match or lighter. A ferro rod does not light these well, because there are no loose fibres on the surface; scrape a little cardboard fluff off the edge first or use a fatwood scraping on top. Break a cup in half for a smaller starter if the fire lay is small. In damp conditions place one cup under the kindling and a second in reserve.
Natural options: fatwood shavings, birch bark and char cloth
If you want to avoid petroleum products, wax or plastic, the best fire starters are the ones you do not need to make. They need practice, but they are free, and a bag of them weighs next to nothing.
Fatwood: the natural fire starter
Fatwood (German Kienholz) is pine wood saturated with resin. It lights easily, burns for several minutes in a thumb-sized sliver and repels water. Shave it with a knife into fine curls or scrape dust from it with the spine of the blade; the dust catches a ferro rod spark directly. Thin splinters under the kindling work like a wax starter. The article on fatwood explains where to find it, how to recognise it and how to harvest it responsibly: it forms slowly and living trees must never be wounded for it.
Birch bark and feather sticks
Thin, papery birch bark lights even when damp thanks to its natural oils. Roll a few strips loosely and place them under the kindling. A feather stick of dry softwood is the classic woodcraft answer: the curls catch fire quickly, and the stick burns long enough to light thicker pieces. Neither costs anything, but both need a sharp knife and a little practice.
Char cloth and tinder fungus
For a spark-catcher rather than a long burner, char cloth is an easy home project that turns a single weak spark into an ember, and tinder fungus does a similar job when prepared. They catch the spark; a wax or fatwood starter then keeps the flame going. A common, light fire kit combines both: char cloth to catch, a starter to burn.
Storing and carrying fire starters
Store and carry a starter like the flammable material it is.
- Sealed container: a tin with a tight lid or a zip bag, ideally both. Jelly cotton goes in a zip bag inside a tin so grease cannot reach the rest of your kit.
- Labelled: write "fire starters, flammable" on the lid or tape a label. In a shared house or camp nobody should mistake it for sweets, soap or candles.
- Away from food: never in the food bag or cooking kit. Petroleum jelly and wax smell and taste, and the fumes can taint food.
- Away from heat: not in sunlight, on a dashboard, near a stove, in a hot car or next to a gas canister. Wax softens and jelly leaks.
- Out of reach of children and pets: store the tin at the top of the pack or shelf, not on a low shelf.
Transport and travel
Carry starters in a pack, not in your pockets, and keep wax ones from touching hot surfaces. Rules for transporting flammable items on aircraft, ferries and public transport vary by country and carrier, and they may treat starters like lighters or matches. Check with the carrier, and do not assume that a tin of wax cubes is allowed. This is general information, not legal advice. For car trips, keep the tin in the shade and not in the boot on a hot day.
How many to carry depends on the trip. As a rule of thumb: one or two per planned fire, plus two spare in wet or cold weather. Use the firewood calculator to estimate how many fires and how much wood you will need, and the Kit Builder to fit the fire kit into the packing list.
How to use a fire starter: lighting, wet weather and snow
Placement decides whether a starter works: the flame must reach the kindling, and air must reach the flame. Build the lay first, and only then light the starter.
Match, lighter or ferro rod
- Match or lighter: works with every starter. Hold the flame to a corner for a few seconds until the wax or jelly takes over.
- Ferro rod: works best with opened jelly cotton, frayed cord and fatwood scrapings. Coated wax pads and cartons do not catch from sparks; add a pinch of fine tinder on top, or use the flame from a lighter. See how to use a ferro rod.
Placement under the kindling
Put the starter in the centre of the base, on bare mineral soil, a stone or a platform of sticks. Lean the thinnest sticks around it with the tips together, like a teepee, and leave a gap for air on the windward side. Do not stack heavy wood on top yet: the starter flame should spread upwards. If kindling is a little damp, split it thinner and lay the driest pieces closest to the flame. Pick a fire lay with the fire lay picker.
In wet weather and snow
In rain a starter earns its place. Shield the lay under a tarp or your body, light the starter and keep adding thin split wood from the inside of dry dead branches, not wet outer layers. Use two starters side by side under a bigger lay, or a second one when the first dies. A fire extender only helps if the wood above it can dry: split it finely. In snow and cold build a base of sticks or bark so the starter does not melt into the snow, and keep the starter warm in an inside pocket, because cold wax is hard and cold jelly is stiff; see fire in snow and cold.
| Problem | Likely cause | Fix |
|---|---|---|
| Starter burns out, kindling does not catch | Kindling too thick or too damp; flame too small | Split thinner, use two starters, lay driest sticks nearest the flame |
| Ferro rod sparks will not light it | Wax coat or compressed fibres | Fray the fibres, add fatwood dust, or light with a match |
| Jelly cotton only smoulders and smokes | Too much jelly or the ball is compressed | Use less jelly, pull the ball open before lighting |
| Black, sooty smoke | Too much wax or jelly; wax on the base | Use thinner coats; let the excess drain |
| Starters soft or leaking in the tin | Stored warm | Keep cool; pack in zip bag inside a tin |
| Fire dies after the starter is gone | Too few sticks ready | Collect more kindling before lighting, step up wood size slowly |
Environmental notes: petroleum, plastic and what to leave behind
A few habits keep the impact of starters low.
- Prefer natural options where they work. Fatwood, fallen birch bark and feather sticks avoid petroleum products altogether. Use petroleum jelly and paraffin as a backup, not as your only plan.
- Choose plant or animal waxes such as soy wax and beeswax over paraffin if you can.
- No plastic: no plastic or foam cartons, synthetic cotton pads, coated paper or candle holders in the recipe. They melt, smell and leave fragments.
- Pack out the residue: burn starters completely, scrape drips and leftover wax out of the fireplace, and carry empty packaging home. Let the fire burn down and clear the ashes as described in Leave No Trace fire rules.
- Collect restrained: only fallen cones and loose bark, and nothing in nature reserves. Rules differ by country and region; no legal advice.
Open fires are banned or restricted in many places at times of high fire risk, including near forests and in dry seasons. Check local rules and the current fire danger level first; see the seasons for when conditions turn risky.
Common mistakes and how to practise
Most failures with homemade starters are not about the recipe. They are about using a starter as a substitute for preparation. Practise at home or at a legal fireplace with a bucket of water or sand beside you.
A simple practice plan
- Session one: make six jelly cotton balls and light them one by one with a lighter. Time each burn with a watch to learn what "a few minutes" means for your size.
- Session two: the same with a ferro rod. How many strikes does an opened ball need? Aim for five or fewer.
- Then: light a small fire with a starter and finely split wood, then with a starter and slightly damp sticks, and see where the limit is.
Children enjoy this, but an adult melts the wax and lights the starter; see bushcraft with kids. The rest of the fire skills are collected in the fire hub. If you cook over your fire, a ready starter also helps at the campfire grill, and a reliable fire matters at a base camp.
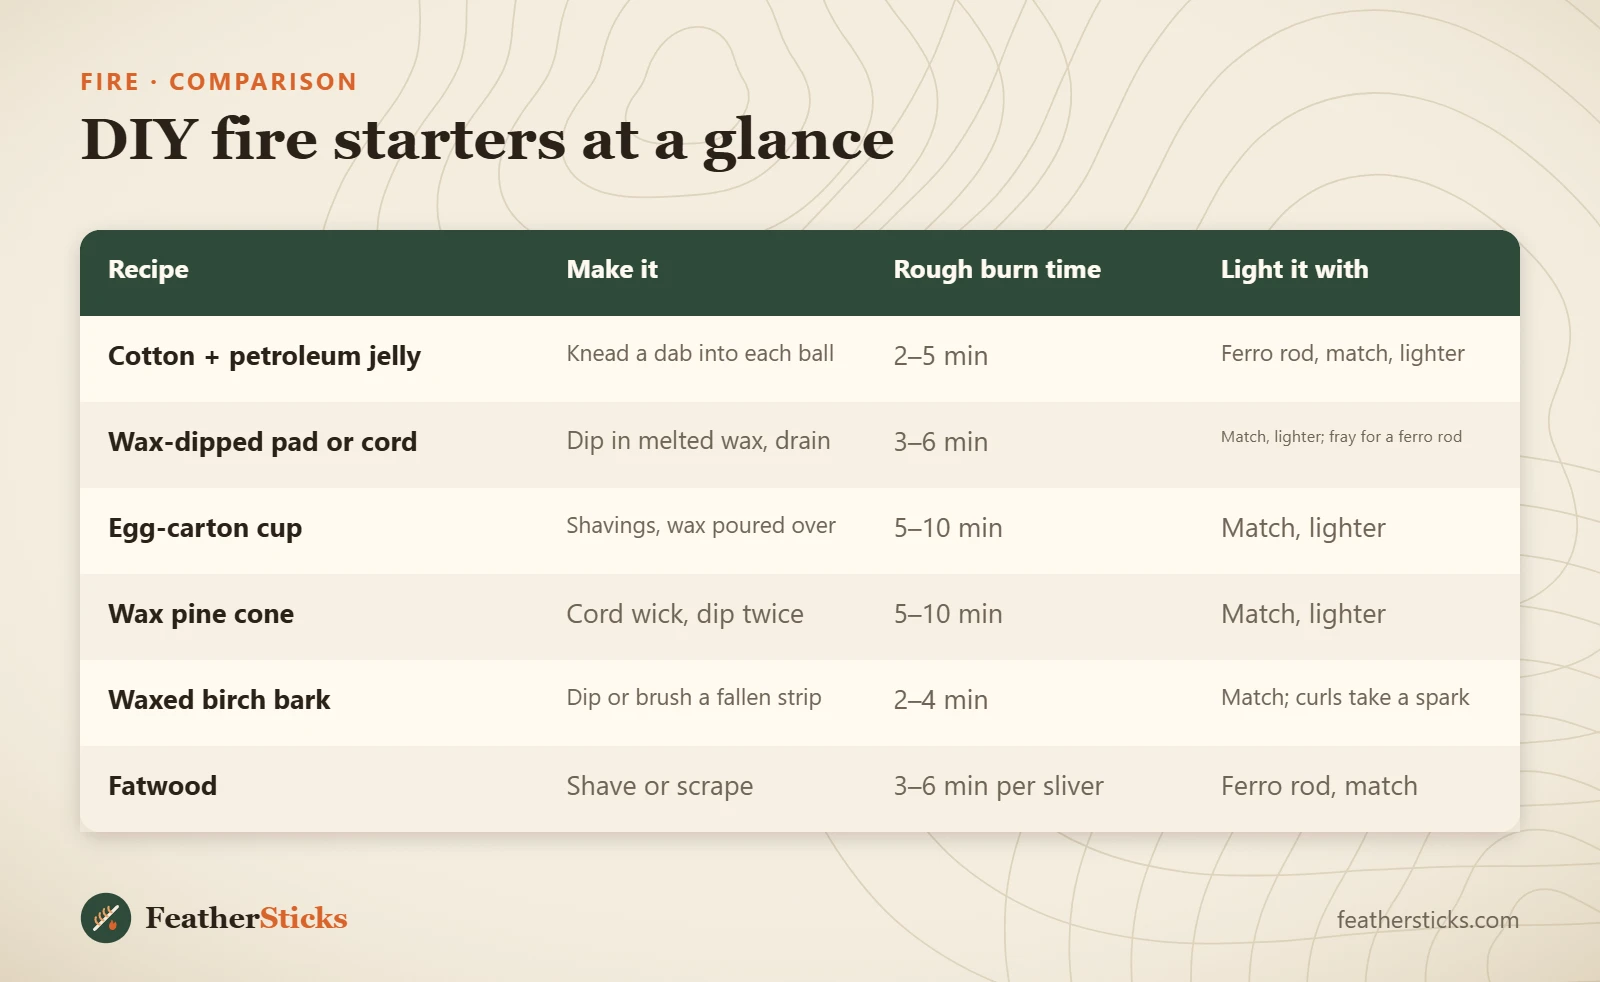
| Recipe | Make it | Rough burn time | Light it with |
|---|---|---|---|
| Cotton + petroleum jelly | Knead a dab into each ball | 2–5 min | Ferro rod, match, lighter |
| Wax-dipped pad or cord | Dip in melted wax, drain | 3–6 min | Match, lighter; fray for a ferro rod |
| Egg-carton cup | Shavings, wax poured over | 5–10 min | Match, lighter |
| Wax pine cone | Cord wick, dip twice | 5–10 min | Match, lighter |
| Waxed birch bark | Dip or brush a fallen strip | 2–4 min | Match; curls take a spark |
| Fatwood | Shave or scrape | 3–6 min per sliver | Ferro rod, match |
Common mistakes
- Heating wax directly over a flame or in a tin on the stove instead of in a water bath.
- Reaching for water when wax burns, instead of putting a lid on it.
- Using too much petroleum jelly, which smothers the cotton and makes thick black smoke.
- Striking a ferro rod at a compressed, coated starter instead of fraying the fibres first.
- Using foam or plastic egg cartons, synthetic cotton pads or treated wood shavings.
- Treating the starter as a replacement for dry kindling and wet sticks that will not dry.
- Storing starters warm, unsealed or unlabelled next to food or a stove.
What you need
- Candle stubs or beeswax, or petroleum jelly
- Old can and pot reserved for wax
- Tongs and oven gloves
- 100 % cotton pads or balls, cotton cord
- Paper egg cartons and untreated wood shavings
- Baking paper for setting
- Sealed tin or zip bags and a label
- Match, lighter and ferro rod for lighting
FAQ
How do you make a DIY fire starter?
Do cotton balls and Vaseline really work as a fire starter?
What is the safest way to melt wax for fire starters?
How long does a homemade fire starter burn?
Can you light a wax fire starter with a ferro rod?
How should I store fire starters?
What are natural alternatives to wax and petroleum jelly?
Are fire starters allowed in fire-ban areas?
Check yourself
Completed6 quick questions from this guide. Nothing is sent anywhere.
Related step-by-step guides
-
 1
-
 1
-
 1