Grilling over a Campfire: Coals, Grates, Heat Zones & Times
How to grill over a campfire comes down to one rule: grill over glowing coals, not over flames. Burn hardwood for 30–45 minutes, rake the coals into a deep pile and a thin layer, set a stable grate 10–15 cm above them, and you have a barbecue with a hot side and a gentle side.
This guide covers the coal bed and heat zones, every grate option from a folding campfire grill grate to a green-wood raft, a step-by-step routine from fire to plate, starting times for steak, chicken, fish, vegetables and cheese, safe core temperatures, flare-ups, cleaning the grate and leaving no trace. It builds on campfire cooking basics and the wider cooking hub.
Step by step
-
1

Burn down to coals
Burn hardwood for 30–45 minutes until the flames sink and the coals glow red under a grey ash coat.
-
2

Rake heat zones
Pile coals 8–10 cm deep on one side, spread a thin layer in the middle and leave the far side almost bare.
-
3

Set the grate
Rest a grate level on dry, flat stones 10–15 cm above the coals. Press it: it must not wobble.
-
4

Preheat and test
Heat the grate 5 minutes, scrape and oil it lightly, then hold your palm at grate height and count the seconds.
-
5

Sear, turn, move
Sear over the hot zone, turn once or twice and move the food to the cooler side before it burns.
-
6

Probe and rest
Probe the thickest part: poultry 74 °C, minced meat 71 °C, whole cuts and fish 63 °C. Rest meat 3 minutes.
Why grill over coals, not flames?
Flames are uneven, sooty and far too hot at the tips. Fat that drips into them flares up, deposits soot and chars the outside of a steak while the middle is still raw. Glowing coals give a steady radiant heat you can measure with your hand and steer by moving food or coals. That is the whole difference between a burnt sausage and a good one.
Hardwood such as beech, oak, ash, birch or hornbeam burns down to long-lasting coals. Resinous conifers spit sparks, burn out fast and taste of smoke; keep them for kindling and see which firewood to choose. If you are new to fire lays, start with fire lays and light the fire with a ferro rod or with homemade fire starters.
Grilling has one big advantage over foil packets and pot cooking: you get a crust, char marks and the smell of fire. Its drawback is that it needs your attention. Fat, wind and uneven coals change the heat within minutes, so stay at the grate.
How do you build a coal bed for grilling?
Plan on 30–45 minutes from first flame to a usable bed, longer in the cold or with damp wood. Build a fire about as wide as your grate, keep adding dry hardwood in the first 20–30 minutes, then stop feeding it. When the logs collapse and the coals are red with a grey ash coat, you are ready. Black, dull coals are spent; coals with flickering flames still sit in the fire stage.
Make more coals than you think. A grate needs a bed one-and-a-half times its size, and you will want fresh coals after 30–40 minutes. Keep a small feeder fire to one side, as in the spit cooking set-up, and rake fresh coals across when the bed fades. The firewood calculator helps you plan how much wood an evening needs.
From fire to a raked coal bed
 1Build a hardwood fire
Light a fire with dry hardwood on bare mineral soil, inside a fire ring or a fire pit. Tall flames are normal now; nothing goes on the grate yet.
 2Let the flames sink
After roughly 20–30 minutes the logs collapse and the flames shrink. Add no more large wood; small flames here and there are fine.
 3Wait for grey ash and red glow
The bed is ready after about 30–45 minutes: a layer of grey ash on top, red glow underneath, no tall flames. If wood is damp, expect longer.
 4Rake it into zones
With a stick or small shovel drag the coals into a deep pile on one side, a thin layer in the middle and almost nothing on the far side.
Heat zones: direct high, direct medium and indirect
A coal bed with zones is a barbecue with three temperatures. These are the same zones and hand-test numbers as in campfire cooking, renamed for grilling. Temperatures are rough guides at grate height and shift with wind, coal depth and your hand.

| Zone | Coals | Hand test | Approx. heat | Use it for |
|---|---|---|---|---|
| Direct high | Pile 8–10 cm deep, packed | 1–4 s | about 200–260 °C and more | Searing steak, burgers, sausage skins, char on veg |
| Direct medium | One even layer, small gaps | 5–7 s | about 150–200 °C | Chicken pieces, fish, veg, halloumi, finishing thick cuts |
| Indirect | Scattered coals or none | 8 s and more | below about 150 °C | Finishing, resting, keeping warm, escaping flare-ups |
Same numbers as the hand-test table in the campfire cooking guide. Rough guide only; confirm meat with a thermometer.
The hand test
Hold your open palm flat at the height where the food will sit, about 10–15 cm above the coals, and count how long you can keep it there comfortably. Fewer seconds mean more heat: 1–2 seconds is searing, 3–4 seconds is medium-high, 5–7 seconds is medium and 8–10 seconds is low. Pull away the moment it is uncomfortable, take off rings and watches, keep sleeves back and never test over open flames. For the full table see the hand test.
Two zones are enough
Beginners can skip the middle zone: all coals under one half of the grate, nothing under the other. Sear over the coals, finish on the empty side. That layout also gives you the safest answer to flare-ups, because the food always has somewhere to go.
Which grate works best: folding grill grate, stones or green wood?
A campfire grill grate is any flat, stable, food-safe surface you can put over coals. The best one is the one you actually carry, so compare the options before packing.
| Option | Strengths | Weaknesses | Best for |
|---|---|---|---|
| Folding / portable grill grate with legs | Stable, adjustable, easy to clean, fits a pack | Weight (a few hundred grams to 1 kg), legs sink in soft soil | Regular camp cooking, car camping, groups |
| Flat grate on stones | Works with any grate, height set by the stones | Stones must be dry and stable; needs flat rocks nearby | Fire pits and fire rings with rock available |
| Grate across logs | No stones needed | Logs burn; keep the cooking logs away from flames or replace them | Short cooks, green logs, quick meals |
| Green-wood raft | Free, light, made on site | Chars with use, only for light loads, needs wire | Sausages, bread, small fish, veg when you have no grate |
| Plank | Gentle indirect heat, no sticking | Needs preparation, one-use | Fish, cheese, tender food |
| Directly on coals | No equipment, strong char | Ash, messy, only some foods | Steak, corn in husk, onions, potatoes |
Folding grates are sold in many sizes; weights are typical, not product data. Steel is more durable than thin, plated wire.
A folding grate with legs
A small folding campfire grate with legs or a pair of pegs is the easiest option. Choose a sturdy steel one with parallel bars, because round, widely spaced wires let sausages roll and small items fall through. Set it on level, firm ground, and push the legs in so that it sits 10–15 cm above the coals. For heavy use, add a swing arm or tripod, as described in campfire cooking. More on materials and weights in campfire cookware.
A grate on stones
Two flat, dry stones about the same height make a fine grate stand; a third at the back stops the grate sliding. The stones must be dry and from high ground. Wet stones, especially river or lake stones, hold water in pores, and when that water turns to steam the stone can crack or burst and throw hot fragments. Never take stones from streams or the shore, never use stones that are layered, flaky or fresh from a cold stream, and keep your face back when you heat a stone for the first time. Choose compact, solid stones, check them by tapping and replace any with cracks.

Setting up a stable grate on stones
 1Place two flat, dry stones
Set them either side of the coal bed, about as high as your grate should be. Compare the tops by eye or with a straight stick laid across.
 2Lay the grate across
Put the grate on both stones with the coals directly below its middle. About 10–15 cm of air between coals and grate is a good start.
 3Press and rock it
Push the corners down and sideways with a gloved hand. If it rocks, shim the low stone with a small flat stone. A wobbling grate drops dinner into the coals.
 4Preheat, scrape, oil
Heat the empty grate for about 5 minutes, scrape off old residue, then wipe it with a cloth held in tongs and a drop of oil. Food sticks to a cold, dry, dirty grate.
Green-wood grill, plank grilling and cooking on coals
A green-wood grill (raft)
With no grate, you can build a raft of fresh green rods. Cut about eight straight rods, roughly 2 cm thick and 40–50 cm long, peel them, and lash them side by side to two cross bars with soft iron or stainless wire. Cotton string works for a short cook but chars through; never use synthetic cord or paracord near a fire, as it melts. Rest the raft on two stones or logs, 15 cm above medium coals (hand test 5–7 seconds), and keep it out of flames.
Anything touching food must come from wood you can name with certainty. The tree identification guide lists hazel, beech, birch, maple, sycamore, willow, ash and lime as commonly used cooking woods, and says never to use yew, laburnum, elder, spindle, cherry laurel, rhododendron, privet or black locust. If you cannot name it, do not cook on it. Pine and spruce are not toxic but taste of resin. Cut only with permission, with a bushcraft knife or folding saw; green wood chars slowly but burns eventually, so a raft is a one- or two-meal tool. Light loads only: sausages, small fish, bread dough and vegetables. A whole steak is too heavy and drips on the wood.

Plank grilling
A plank gives gentle, indirect heat and stops delicate food from sticking or falling through the bars. Use an untreated hardwood board made for cooking, or an untreated plank of a species you can identify. Soak it in water for about an hour, lay the fish fillet or cheese on top and set the plank on the grate over the medium or indirect zone. Keep the plank edges out of the flames; a plank that catches fire properly is spent, so lift it off with gloves and let the flames die before cooking on. Planks suit fillets of fish (10–20 minutes) and camembert-style cheese; for real smoke flavour, hot-smoke the fish instead. Painted, glued, varnished or pressure-treated wood is never food-safe, and neither is a pine or spruce board.
Cooking directly on coals (“dirty” grilling)
Some food can go straight onto clean hardwood coals: thick steaks, corn in its husk, whole onions and potatoes. Fan or blow the ash off one spot, lay the food on it and turn a steak after 2–4 minutes. Lift it off with tongs, brush away loose ash and cut off charred, ashy patches before eating. This only works with real hardwood coals; softwood embers spit sparks. Cooking on the coals gives strong roasted flavours, but it is messy and hard to control – save it for a thick steak and a few onions, not the whole meal. See also cooking without a grate.
How to grill on a campfire step by step
This is the routine in one go, from lighting the fire to the plate. Each step has its own drawing in the step-by-step view above.
From fire to plate
- PrepareTake meat out of the cool box last, set up a clean prep area and wash hands
- Coals30–45 minutes of hardwood, raked into zones
- GrateLevel, preheated 5 minutes, scraped, oiled
- GrillSear, turn, move to the cooler side
- Check and restProbe the core, rest meat 3 minutes, serve on a clean plate
Details that make the difference
- Oil the food, not only the grate. A thin film of oil on the food and a very hot, clean grate prevent sticking. Oil dripping onto coals causes flare-ups, so do not pour it.
- Turn rarely. Thin items (sausages) need turning every 2–3 minutes; steaks once or twice. Do not pierce meat with a fork: you lose juice.
- Season with sugar late. Sweet sauces and marinades burn above about 150 °C, so brush them on in the last 5 minutes.
- Rest the meat. Three minutes under a loose cover finishes cooking and keeps juices in.
What to grill and how long? Typical starting times
Times below are typical starting ranges, not promises. Coal depth, wind, grate height, thickness and starting temperature change them a lot, so judge with the hand test and a thermometer. The first column links to the same figures as the campfire cooking timing table.
| Food | Zone | Typical time | Done when |
|---|---|---|---|
| Sausages (raw) | Medium, turning | 10–15 min | Core 71 °C (160 °F), juices clear |
| Burger, 2 cm | High, then medium | 8–12 min | Core 71 °C (160 °F) |
| Steak, 2.5 cm | High, then indirect | 6–12 min, turn once or twice | Core 63 °C (145 °F) plus 3 min rest |
| Chicken thighs, bone-in | Sear, then medium | 25–40 min | Core 74 °C (165 °F) |
| Chicken breast, 2 cm | Medium | 12–20 min | Core 74 °C (165 °F) |
| Fish fillet | Medium, plank or oiled grate | 10–20 min | Opaque, flakes, 63 °C (145 °F) |
| Whole small fish | Medium | 15–25 min | Flesh opaque at the bone, 63 °C |
| Vegetable slices | High to medium | 8–20 min | Tender, with grill marks |
| Corn on the cob | Medium, in or out of husk | 15–25 min | Kernels tender |
| Halloumi / grilling cheese | Medium | 2–3 min per side | Golden marks, soft inside |
| Flatbread / bread slices | Medium to indirect | 1–3 min per side | Toasted with marks |
| Fruit (peach, pineapple) | Medium | 3–6 min per side | Warm, soft, marked |
Typical ranges only. Thickness, coal depth, wind and grate height change times a lot. Always check meat with a thermometer.
Steak
Let a 2.5 cm steak stand out of the fridge for 20–30 minutes (not longer), pat it dry, salt it and oil it. Sear it over the hot zone 2–4 minutes per side until a crust forms, then finish on the indirect side to your target temperature. Fat edges should face the hot zone only briefly, because the dripping fat flares. Rest 3 minutes. See the safe-temperature table below for beef, pork and lamb.
Sausages and burgers
Raw sausages and burgers contain minced meat, so bacteria sit all the way through: cook them to 71 °C in the middle. Start on the medium zone, turn every few minutes, and never leave them in the hot zone where fat bursts the skin and drips. Pre-cooked sausages only need reheating to hot throughout, as described in spit cooking.
Chicken
Bone-in pieces take longest and tolerate heat badly. Sear for 2–3 minutes per side over the hot zone, then cook on the medium or indirect side with the skin up, turning every 5–10 minutes. Poultry must reach 74 °C in the thickest part, not touching the bone. A large chicken is better on a spit or in a Dutch oven.
Fish
Fish is delicate and cooks fast. Oil a hot grate, grill whole fish or thick fillets skin-side down, and turn once with a wide spatula or let a plank do the work. Fish is done at 63 °C when the flesh is opaque and flakes easily.
Vegetables, cheese, bread and fruit
Cut vegetables into 1 cm slices or big pieces so that they cannot fall through. Brush with oil, season, and grill on the high zone for marks, then move to medium to soften. Halloumi and grilling cheese hold their shape and brown fast. Bread slices or flatbread toast in a minute or two. Fruit needs medium heat and a clean grate so that it does not taste of meat. For more ideas see campfire recipes and bannock on a stick.
Food safety: core temperatures, raw meat and the cool chain
Food poisoning is the most common way a grilled meal goes wrong. Official food-safety bodies such as the USDA's Food Safety and Inspection Service publish minimum internal temperatures; this guide uses the same figures as campfire cooking and foil packet cooking. Other countries publish slightly different numbers, so check your own authority's guidance. A small probe thermometer weighs a few grams and removes the guesswork.
| Food | Core temperature | Note |
|---|---|---|
| Poultry (pieces, whole, minced) | 74 °C / 165 °F | Thickest part, away from bone; juices clear |
| Minced meat, burgers, raw sausages | 71 °C / 160 °F | Bacteria are mixed through |
| Whole cuts of beef, pork, lamb | 63 °C / 145 °F | Then rest 3 minutes |
| Fish | 63 °C / 145 °F | Opaque, flakes easily |
| Leftovers, pre-cooked sausages | 74 °C / 165 °F | Reheat until hot throughout |

Avoid cross-contamination
- Use separate boards, plates and tongs for raw and cooked food, or wash them between uses.
- Never put cooked meat back on the plate that held it raw.
- Wash hands with soap and water for at least 20 seconds after handling raw meat. Hand sanitiser works poorly on greasy, sooty hands, so wash first.
- Only reuse marinade after boiling it for at least a minute; otherwise discard it.
The cool chain
Bacteria multiply fastest between roughly 5 °C and 60 °C. Keep raw meat at 4 °C or below in a cool box until the moment you grill, and do not leave perishables out for more than two hours, or one hour above about 32 °C. Pack raw meat at the bottom in sealed containers and take it out last. The food storage guide explains how to build a cool box that holds its temperature, and the outdoor hygiene guide covers hand washing and the kitchen area. Wash water and food waste stay at least 60 m from lakes and streams.
Flare-ups, smoke and wind: how to keep control
A flare-up happens when fat or oil drips onto hot coals and ignites. It coats food in soot, chars the outside and can burn your hand. You prevent most of them with the zone set-up: keep fatty food over the medium or indirect zone and use the hot zone only for short sears.
What to do when fat catches fire
 1Fat drips on the coals
Fatty cuts such as sausages, chicken skin and marbled steak drip. A few drops sizzle; a lot of drips on a deep coal pile will flare.
 2Flare-up: soot and burnt crust
Yellow, sooty flames lick the food. Do not wait it out; the meat blackens quickly and tastes bitter.
 3Do not splash water
Water on burning fat spits and produces steam and ash clouds; thrown water can spread burning fat. Keep water for the fire when you finish, not for the grate.
 4Move to the indirect zone
Lift the food with tongs to the cool side and close the flames by waiting. Return to the heat once the flames die.
Prevent them
- Trim thick fat caps to about 5 mm and score the rest, so less fat renders onto the coals.
- Pat food dry and use a little oil on the food, not a pool in the pan.
- Keep a cooler zone free of coals at all times.
- Put a drip tray of foil under fatty food on the indirect side, as in spit cooking.
Smoke and wind
Grilling in smoke tastes good in small amounts: dry hardwood coals produce little smoke, but dripping fat creates the acrid kind. Stay upwind, keep your face away and use long tongs. Wind fans coals and makes the heat uneven, throws sparks and can blow flames sideways. Build a windbreak on the upwind side from logs or stones, set the fire on the lee side of a rock or bank, and place tents and tarps well away. The fire must stay at least 5 m from tents and hammocks and at least 3 m from synthetic tarps. In strong or gusty wind, stop grilling; see campfire safety for wind and distances.
Tools and cleaning the grate in the field
Tools
- Long tongs (40 cm or more) for turning food and moving coals.
- Heat-resistant gloves, leather or welding-type, for the grate and hot stones.
- Probe thermometer for meat and fish.
- Clean cloth and oil for the grate; a small shovel or stick to rake coals.
- Separate boards for raw and cooked, plus a bucket or bottle of water kept for putting out the fire.
Everything is generic; you do not need specific brands. A pocket knife helps with trimming and cutting; check the Kit Builder for a full cooking kit.
Cleaning the grate
Clean the grate while it is hot. Scrape off residue with a stiff green stick, a flat stone or a ball of crumpled foil held in tongs, then wipe it with an oiled cloth. A hot grate burns off most remaining residue in 5–10 minutes. After the meal, let it cool, scrub it with hot water and a little soap well away from water, and dry it. Do not wash greasy grates in streams or lakes: food residue and soap belong at least 60 m from water. Pack foil, wipes and food scraps out; they do not burn clean in a fire. If the grate is rusty or unknown, burn it for 15 minutes before use and scrub off flakes. Cast iron grates and pans need the care described in cast iron care.
Fire site, fire bans and leaving no trace
Where you grill matters more than how. Use an existing fire ring or a built fire pit, on bare soil, away from roots, dry grass, overhanging branches and tents, with water and a shovel nearby. Fire bans and danger levels apply to all open fires, including grilling over wood and often also to charcoal grills. Rules differ by country and region, and this is no legal advice: check the local authority, the forest service or the site rules before every trip. In a ban, use a gas or alcohol stove instead; see camp stoves. If a fire gets out of hand, call the emergency number (112 in the EU).
Leave no trace: keep the fire small, burn wood down to ash, use no more wood than needed, and put the fire out completely with water, stirring until no heat is felt with the back of your hand. Scatter cold ash and remove all foil and food waste. Stones from a temporary grate go back where they came from. More in fire and leave no trace. A base camp with a designated kitchen area makes all this easier.
Grilling with kids, with dogs and without meat
With kids
Children love grilling, so give them real jobs at a safe distance. Mark a no-go zone of at least a metre around the grate, agree that everyone walks and never runs near the fire, and let kids help with skewers, bread sticks or washing veg while an adult handles tongs, grate and hot stones. Wear closed shoes and natural-fibre clothing. Treat burns by cooling under running water for 20 minutes and keep a first aid kit close. More ideas in campfire with kids.
With dogs
Dogs and hot grates do not mix: keep dogs away from the fire, never feed fat trimmings or cooked bones, and store raw meat out of reach. See camping with dogs.
Vegetarian grilling
Almost the whole method works without meat. Halloumi and grilling cheese, firm tofu, thick slices of aubergine and courgette, peppers, onions, sweetcorn, shop-bought mushrooms, potatoes pre-cooked in foil, bread and fruit all grill well. Cook vegetarian food on a clean grate or a plank, away from meat residue, and oil lightly. Start on the hot zone for marks, then move to medium. Plan portions with the calorie planner. Cheese and tofu need the cool chain too.
Troubleshooting: when the grill does not work
| Problem | Likely cause | Fix |
|---|---|---|
| Burnt outside, raw inside | Too hot, food too thick or too close | Move to indirect, raise the grate, flatten or cut thinner |
| Food sticks to the grate | Grate not hot, dirty or dry | Preheat, scrape, oil lightly, wait for the crust to release |
| Constant flare-ups | Fat dripping on deep coals, no cool zone | Trim fat, use indirect zone, keep a coal-free area |
| Not enough heat | Coals old, bed too thin, wet wood | Rake fresh coals, add dry hardwood to the side fire, lower the grate |
| Heat uneven | Wind, coals unevenly spread | Add a windbreak, rake coals, rotate food |
| Grate wobbles | Stones uneven or soft ground | Shim with a flat stone, firm the legs |
| Bitter, sooty taste | Soft or resinous wood, dripping fat | Use hardwood coals, avoid flames, keep fat off coals |
| Cooked outside, cold core | Skipped the thermometer | Probe the core; finish on the cool side |
| Grate smells of old meat | Not cleaned between uses | Burn off 15 minutes, scrub, oil |
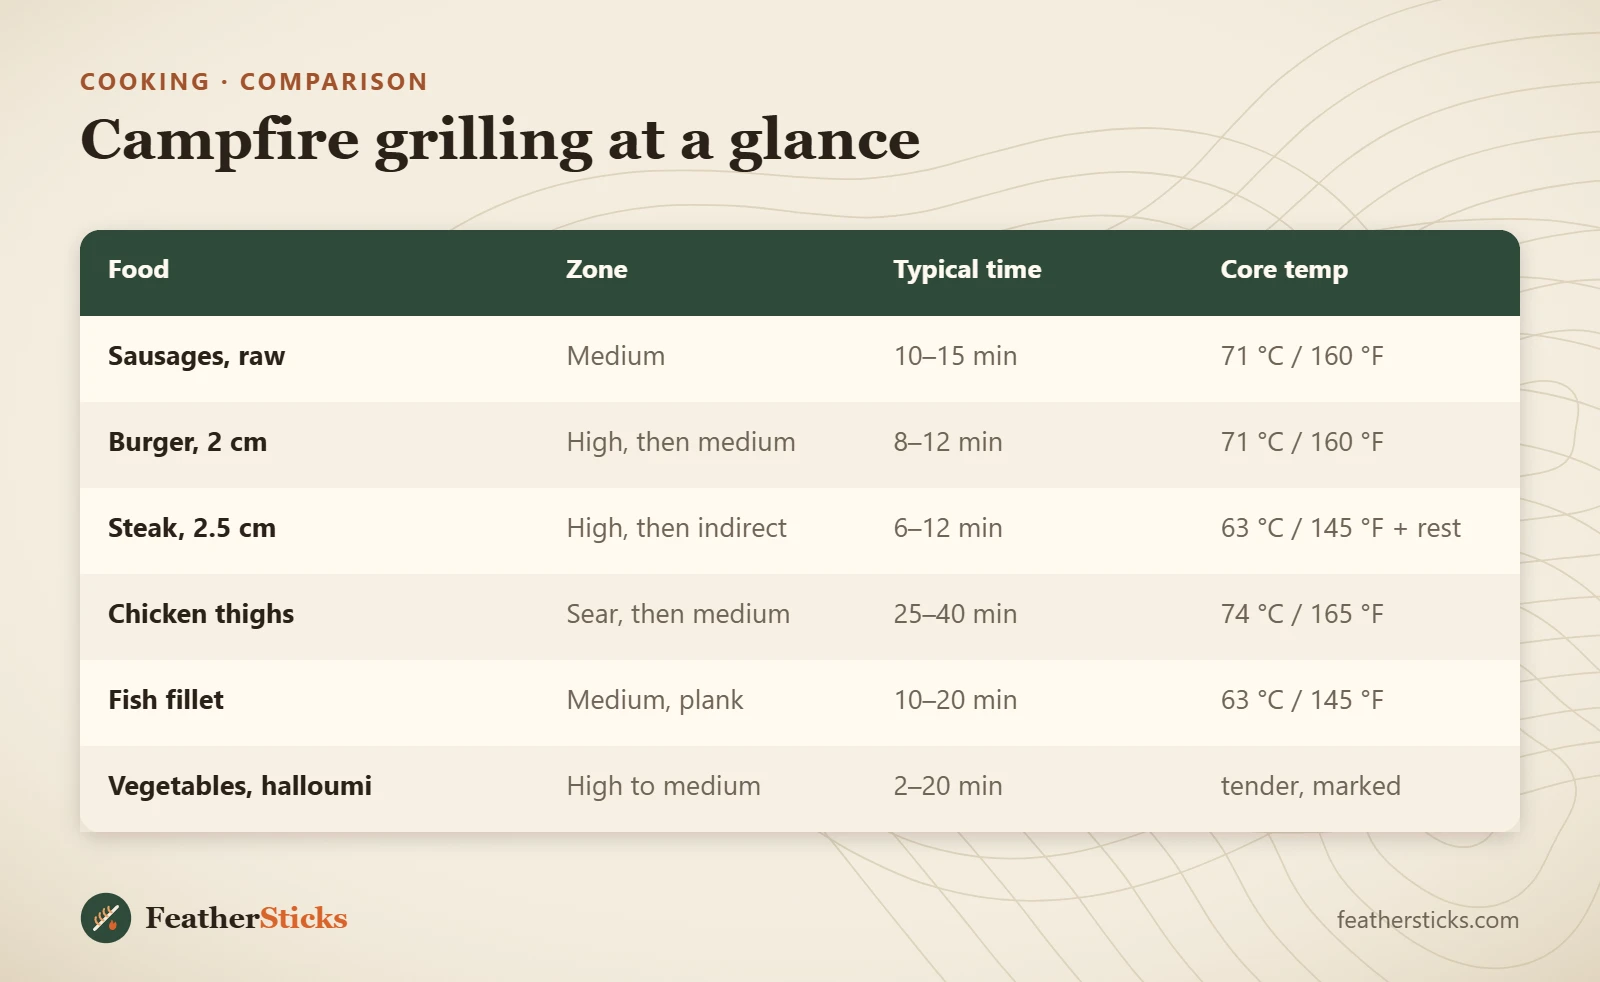
| Food | Zone | Typical time | Core temp |
|---|---|---|---|
| Sausages, raw | Medium | 10–15 min | 71 °C / 160 °F |
| Burger, 2 cm | High, then medium | 8–12 min | 71 °C / 160 °F |
| Steak, 2.5 cm | High, then indirect | 6–12 min | 63 °C / 145 °F + rest |
| Chicken thighs | Sear, then medium | 25–40 min | 74 °C / 165 °F |
| Fish fillet | Medium, plank | 10–20 min | 63 °C / 145 °F |
| Vegetables, halloumi | High to medium | 2–20 min | tender, marked |
Common mistakes
- Grilling over tall flames instead of waiting 30–45 minutes for coals.
- Building one even coal bed with no cooler zone to escape flare-ups.
- Putting a grate on wet or river stones that can burst.
- Judging doneness by colour instead of with a probe thermometer.
- Moving cooked meat onto the plate that held it raw.
- Throwing water on a fat fire.
- Using unidentified or toxic green wood for skewers and rafts.
What you need
- Folding campfire grill grate
- Long tongs
- Heat-resistant gloves
- Probe thermometer
- Wide long-handled spatula
- Cloth, oil and foil for cleaning
- Separate boards for raw and cooked food
- Water container for fire safety
FAQ
How do you grill over a campfire?
What is the best campfire grill grate?
How long should I wait before grilling on a campfire?
How do you cook steak on a campfire?
Can you put a grill grate directly on campfire stones?
What wood can I use for a green-wood grill?
How do you stop flare-ups when grilling?
What temperature should chicken and burgers reach on the grill?
Check yourself
Completed6 quick questions from this guide. Nothing is sent anywhere.
Related step-by-step guides
-
 1
-
 1
-
 1