Cooking on a Hot Stone & Plank: Campfire Cooking Without Pots
Cooking on a hot stone turns a flat, dry rock into a griddle: prop a stone 2–4 cm thick over glowing coals, heat it slowly for 30–45 minutes, test it with a drop of water and cook flatbread, eggs, thin slices of meat or fish and vegetables on it. The one rule that matters most comes first: never use stones from rivers, lakes or wet ground, because trapped water can make them burst.
This guide covers the whole craft of cooking without pots: choosing and heating a stone, what cooks well on it, cleaning and oiling, plank cooking with fish pinned to a board beside the fire, cooking straight in the embers, historic hot-stone boiling, food safety and leaving no trace. It builds on campfire cooking basics and belongs to the outdoor cooking hub.
Step by step
-
1

Choose a dry, flat stone
Pick a compact, uncracked stone 2–4 cm thick from dry ground. Never take stones from streams, lakes or wet soil: trapped water can make them burst.
-
2

Heat it slowly
Prop it on two dry support stones at the edge of the fire, then rake coals under it bit by bit. Allow 30–45 minutes and stand to the side.
-
3

Test with a drop of water
Flick a few drops onto the surface. If they dance and hiss away, the stone is ready; if they only steam slowly, wait longer.
-
4

Oil it and cook thin food
Wipe on a thin film of oil, then cook flatbread, eggs, thin slices and vegetables. Turn once with a spatula and check meat with a thermometer.
-
5

Plank fish beside the coals
Pin a fillet to a soaked, untreated hardwood plank and prop it facing the coals at hand-test 5–7 seconds. Turn it end for end halfway.
-
6

Cool, clean, leave no trace
Let the stone cool slowly, scrape it, put out the fire completely, scatter cold ash and return the stone where you found it.
Why cook on stones and planks instead of pots?
For soup, porridge or boiling water nothing beats a pot. Cooking on stones and planks is different: it is the oldest kind of outdoor cooking, it needs almost no gear, and it teaches you to read heat in a way a stove never will. A flat stone over coals is a griddle, a split board beside the fire is an oven for fish, and a bed of embers cooks potatoes and onions in their skins.
There are practical reasons, too. You save weight when you travel light, a forgotten pan does not ruin dinner, and a group can cook several things at once on a large stone. Plank cooking keeps delicate fish in one piece and adds a mild wood aroma. And for many people it is simply the most satisfying way to practise the skills in bushcraft for beginners.
The honest trade-offs: stone cooking is slower to set up than a pan, it needs a good bed of coals, and it carries one real hazard, bursting stones, that you must take seriously. If you only want a quick meal, a grill grate over the fire or a light pan is faster. If you want to learn, cook with less and enjoy the process, read on.
Danger first: why stones from rivers and wet places explode
Stones look solid, but many contain tiny pores, cracks and layers that soak up water. Stones from streams, rivers, lake shores, bogs or wet ground can be full of it, even when the surface looks dry. When such a stone is heated, the water inside turns to steam. Steam needs far more room than water, the pressure has nowhere to go, and the stone can crack, spall or burst with a bang and throw hot fragments several metres. The same warning appears in our campfire cooking guide and in the grilling guide, and it applies to fire rings, grate supports and cooking stones alike.

How dangerous is it really?
Most stones simply crack quietly when they fail. But you cannot tell from looking which stone will burst violently, and a hot fragment in the eye or on the skin is a serious injury far from help. If you hear cracking, popping or hissing from a stone, step back, keep others away and let the fire burn down before you touch it. A stone that has cracked once is retired, not reused.
Burns from hot stones and fragments are treated like any burn: cool under clean, running or poured water for 20 minutes and cover loosely. Eye injuries, large burns and burns on the face, hands or joints need medical help; call the emergency number (112 in the EU) if in doubt. Keep a first aid kit at the fire and know the basics.
Do not cool hot stones with water
The opposite risk exists too. Pouring cold water onto a hot stone, or setting a hot stone onto wet ground or snow, causes thermal shock: the surface shrinks faster than the core and the stone can crack and spit fragments. Let cooking stones cool slowly where they are.
How to choose a flat stone for cooking
The perfect cooking stone is flat, dense, uncracked, dry and the right thickness. Look for it on dry slopes, field edges, old dry stone walls you are allowed to use, scree above the waterline or in an existing fire ring that has been used before. Ask the landowner or follow site rules: taking stones from walls, protected areas or nature reserves is not allowed, and rules differ by country and region.

| Feature | Look for | Avoid | Why |
|---|---|---|---|
| Where it lies | Dry ground, high above water, sun-dried | Streams, lakes, shore, bog, ditches, wet soil | Trapped water turns to steam and can burst the stone |
| Thickness | About 2–4 cm | Thin plates under 2 cm; boulders over 5 cm | Thin stones crack, thick ones take very long to heat |
| Size | Roughly 20–30 cm across for one or two people | Pieces too small to sit firmly on supports | Room to cook and a stable bridge over the coals |
| Structure | Dense, fine-grained, even, no visible layers | Layered, flaky, crumbly or slate-like stone | Layers hold water and split along their planes |
| Surface | Flat or slightly dished top, no deep cracks | Cracks, holes, loose crust, veins that ring hollow | Cracks are weak points and trap food |
| Type | Glassy flint or chert avoided; compact stones preferred | Flint, chert, porous sandstone, shale, slate | Glassy stone shatters, porous stone soaks up water |
Rules of thumb only. No stone is guaranteed safe; heat every new stone slowly the first time.
Check the stone before you heat it
- Look: no visible layers, cracks, crumbling edges or a darker, wet-looking zone.
- Feel: the stone should feel dry and not cold and damp on its underside. A stone lying on wet soil is wet underneath even in sunshine.
- Tap: knock it gently with another stone. A clear, solid sound is good; a dull or rattling sound can mean an internal crack.
- Weigh it up: if you are unsure, choose another one or use a pan. A cast iron griddle is the safe stand-in for a stone; see cast iron care and campfire cookware.
How to heat a cooking stone safely
Start with a good fire on bare mineral soil, in an existing fire ring or a built fire pit. Dry hardwood such as beech, oak, ash or birch gives long-lasting coals; the firewood calculator helps you collect enough. You need two things: a steady supply of coals and a stable support so the stone bridges the coals like a griddle.
Heating a cooking stone step by step
 1Set two dry support stones
Place two chunky, dry stones about the same height at the edge of the fire ring, a little closer together than your cooking stone is long. They follow the same rules as the cooking stone: dry ground only.
 2Warm it at the edge
Lay the cooking stone across the supports next to the fire, not over it, for about 10–15 minutes. This drives off surface moisture gently. Listen: cracking or hissing means step back.
 3Rake coals under it
Pull a thin layer of coals under the stone with a stick, then add more every few minutes. Do not build a roaring fire under a cold stone. A full heat-up takes 30–45 minutes in total.
 4Stand to the side
Work from the side, not from above, and keep your face back while the stone heats. Glasses help; children and dogs stay outside a no-go zone of at least a metre.
Over the coals or beside them?
The bridge on two supports is the most controllable set-up, because you can rake coals in and out from the side. A second way is to lay the stone directly on a thin bed of embers on bare soil and pile coals around its edges; it heats faster but unevenly and is hard to adjust. For a fire that delivers coals steadily, a keyhole fire works well; see cooking fire set-ups and the fire lay picker.
How do you know the stone is hot enough?
The water-drop test is the classic method. Wet your fingertips and flick a few drops onto the stone from the side:
| What the drops do | Meaning | What to do |
|---|---|---|
| Lie still and slowly steam | Too cool | Keep heating, add coals bit by bit |
| Sizzle and evaporate within a few seconds | Medium heat | Good for thicker flatbread, vegetables, eggs |
| Bead up, dance and hiss away | Hot | Good for thin flatbread, thin meat and fish slices |
| Vanish at once, oil smokes heavily | Very hot | Rake some coals out, wait a few minutes |
A rough guide. Stones heat unevenly: the middle above the coals is hotter than the edges, which you can use as heat zones.
You can also use the hand test: hold your palm flat a few centimetres above the surface and count. On a ready stone, you will pull away within about 2–4 seconds. Never touch the stone, take off rings and keep sleeves back.
What cooks well on a hot stone?
A stone griddle suits food that is thin, flat and cooks quickly from one side at a time. Thick pieces burn outside before the middle is done, and runny batter flows off an uneven stone. Think griddle, not oven.

| Food | Thickness | Heat (water test) | Typical time | Done when |
|---|---|---|---|---|
| Flatbread / thin bannock | 0.5–1 cm | Medium to hot | 2–4 min per side | Puffed, brown spots, sounds hollow |
| Eggs | cracked onto an oiled, slightly dished spot | Medium | 3–5 min | White set, yolk thickened |
| Thin meat slices | about 0.5 cm | Hot | 1–3 min per side | Whole cuts 63 °C, minced 71 °C, poultry 74 °C |
| Thin fish fillet or slices | 1–1.5 cm | Medium to hot | 3–6 min in total | Opaque, flakes, 63 °C |
| Vegetable slices | about 1 cm | Medium to hot | 4–8 min per side | Tender, browned |
| Halloumi / grilling cheese | 1 cm | Medium | 2–3 min per side | Golden, soft inside |
Typical ranges only. Stone heat, wind and thickness change times a lot. Always check meat and fish with a thermometer.
Flatbread and bannock
Flatbread is the classic stone food: people have baked bread on hot stones for thousands of years. Use the bannock recipe with a little less water so the dough is stiff, press rounds 0.5–1 cm thick and lay them on a lightly floured or oiled stone. Turn when the underside has brown spots and the top starts to look dry. Thin rounds bake through in a few minutes; thicker ones belong at the cooler edge or in the ashes as an ash cake.
Eggs
Eggs work on a stone with a slight hollow or a rim of dough or onion rings to hold them. Oil the spot well and use medium heat; on a very hot stone the white burns and sticks before the yolk thickens. Cook eggs until the white is set and the yolk has thickened, and fully firm for small children, pregnant people, older people and anyone with weak immunity. Keep raw eggs cool until you use them.
Thin meat and fish
Slice meat about 0.5 cm thick and fish 1–1.5 cm thick, pat it dry and oil it, not the stone, so it does not smoke. Lay it on the hottest part, leave it until it releases by itself and turn once. Pieces this thin cook through in minutes, but minced meat, poultry and sausage still need their full core temperature; see the food safety section below. Thick steaks, whole chicken pieces and sausages are better on a grill grate or a spit.
Vegetables, cheese and fruit
Courgette, aubergine, pepper strips, onion rings, mushrooms from the shop, pre-cooked potato slices and sweetcorn kernels all cook well. Cut them evenly about 1 cm thick, oil and salt them. Halloumi browns beautifully; soft cheese melts away. More ideas are in the campfire recipes, and the calorie planner helps plan portions.
Oiling, cleaning and cooling the stone
A clean, lightly oiled stone releases food much better than a dry or dirty one. Brush off ash and grit with a bundle of grass or a clean cloth before heating. Once the stone is hot, wipe it with a few drops of a heat-tolerant cooking oil on a folded cloth held in tongs. Use only a thin film: pools of oil smoke, run off into the coals and flare. Butter burns at stone temperatures, so add it to food at the end instead.
Cleaning the stone after cooking
- Scrape while warm Scrape off residue with a wooden spatula, a flat stick or a ball of crumpled foil in tongs while the stone is still warm. Burnt-on bits come off much more easily now.
- Burn off the rest Leave the stone over the last coals for a few minutes so that fat and crumbs char. Then brush the ash off.
- Let it cool slowly Leave it on its supports until cold, often an hour or more. Never pour water over it or set it on wet ground or snow.
- Wipe and store dry Wipe the cold stone with a damp cloth. If you take it home, dry it completely and store it dry.
Food scraps, oil and dish water go into your rubbish bag or, for strained grey water, are scattered at least 60 m from lakes and streams, as in washing up at camp. Never wash a greasy stone in a stream or lake. Fat residue on a stone you leave behind attracts animals, which is one more reason to burn it off and return the stone clean.
Plank cooking: fish and meat pinned beside the campfire
Plank cooking at the campfire is an old technique from many northern cultures, best known from North America and Scandinavia. A fish fillet is pinned to a split board, and the board is propped upright facing glowing coals. Radiant heat from the coals cooks the fish slowly and evenly, the board stops it from falling apart, and the warm wood adds a light aroma. It is different from plank grilling on a grate, described in plank grilling, where the board lies flat over the coals.
Plank cooking a fish fillet by the fire
 1Use untreated hardwood
Split or saw a board about 2–3 cm thick, a little longer and wider than the fillet, from untreated hardwood you can name with certainty. A folding saw and batoning with a knife make short work of a short round.
 2Soak it about an hour
Soak the plank in water for about an hour, as for plank grilling. A wet board chars more slowly and keeps its edge from catching fire.
 3Pin the fillet
Lay the fillet skin side down and fix it with three or four carved wooden pegs pushed into pre-made holes, or with plain cotton string or wire. Never use synthetic cord, which melts.
 4Prop it and turn it
Prop the plank at a steep angle facing the coals, with the fish at hand-test 5–7 seconds. Turn it end for end halfway. A 2–3 cm fillet typically takes 20–40 minutes.
Which wood for a cooking plank?
The wood touches your food, so the same rules apply as for a green-wood grill or skewers. The tree identification guide names hazel, beech, birch, maple, sycamore, willow, ash and lime as commonly used cooking woods, and says never to use yew, laburnum, elder, spindle, cherry laurel, rhododendron, privet or black locust. If you cannot name it with certainty, do not cook on it.
Plank wood: yes or no
Use
- Untreated hardwood you can identify (for example beech, maple, birch, ash)
- Freshly split or sawn faces, free of mould and rot
- Boards sold for cooking, untreated
- Wood you have permission to cut or collect
Never use
- Resinous softwood such as pine, spruce or fir: resin taste and soot
- Painted, varnished, glued, oiled or pressure-treated wood
- Pallets, building timber, plywood and chipboard
- Toxic or unidentified species
Setting the plank
Drive the foot of the plank into the soil or wedge it with stones, and prop it from behind with a forked stick so it leans back slightly. Use the hand test at the height of the fish: 5–7 seconds is medium heat. Closer cooks faster but chars the plank edges; farther away is gentler. Keep a feeder fire to one side and rake fresh coals in front of the plank when the heat drops. Fish is done when it is opaque, flakes easily and reaches 63 °C in the thickest part.
Meat works the same way with thin, flat cuts: a butterflied chicken breast or a thin pork steak. Thicker meat needs much longer, and poultry must reach 74 °C, so a Dutch oven or a spit is usually the better choice. Planks are one- or two-use tools: once deeply charred, they go into the fire at the end of the evening.
Cooking directly in the embers vs in foil
The simplest way to cook without a pot needs no stone at all: bury food straight in hot embers. Vegetables with a thick skin or husk protect themselves: potatoes, sweet potatoes, onions, beetroot, sweetcorn in its husk, whole peppers and aubergines. The skin chars black, the inside steams in its own moisture and you eat the soft middle.

| Food | How | Typical time | Done when |
|---|---|---|---|
| Whole potatoes, sweet potatoes | Buried in hot embers, turned every 15 min | 45–60 min | A knife or stick slides in easily |
| Whole onions | In their skins, at the edge of the embers | 30–45 min | Soft when squeezed with tongs |
| Sweetcorn in the husk | On or beside the coals, turned | 15–25 min | Kernels tender |
| Whole peppers, aubergines | Directly on the coals, turned often | 10–20 min | Skin black and blistered, flesh soft |
| Ash cake (bannock) | On flat hot ash, covered with ash | 5–8 min per side | Tapped hollow, brushed clean |
Same potato times as for foil potatoes in embers in the foil cooking guide. Typical ranges only.
Foil does the same job with less ash and lets you cook cut food, fish and mixed packets; see foil packet cooking for folding, times and the downsides of aluminium waste. Ember cooking without foil produces no rubbish, but the skins get ashy and very hot. Use embers only from clean, natural wood, never from treated wood or burnt rubbish. Lift food out with tongs, let it rest a minute and brush or peel off the charred skin.
Hot-stone boiling: how people boiled water without a metal pot
Long before metal pots, people heated water and cooked stews by dropping fire-heated stones into containers that could not go on a fire: wooden bowls, bark vessels, hide bags or pits lined with clay or leaves. It is a fascinating skill to try once, and it shows how much heat a stone holds.
Hot-stone boiling in a wooden container
 1Heat dry stones in the fire
Put several dry, fist-sized stones from dry ground into the fire for about 30–45 minutes. The bursting rule matters even more here, because the stones sit right in the flames.
 2Lift with tongs or two sticks
Lift a stone with metal tongs or two green sticks used like chopsticks, wearing a leather glove. Knock off loose ash against another stone.
 3Lower it in gently
Lower the stone into the water instead of throwing it. It hisses and steams; splashing hot water scalds. Keep the container on firm, level ground.
 4Swap cooled stones
Remove cooled stones and add hot ones until the water steams or simmers. Fire-cracked stones shed grit, so let the water settle before you use it.
Expect it to take patience and many stones for a litre of water. Wooden containers char and split if a hot stone sits against the wall, so keep the stones moving. Every stone that goes into the fire follows the same rules: dry, compact, from dry ground, never from a river.
Food safety when cooking without pots
Stones, planks and embers cook unevenly, so do not judge doneness by colour alone. A small probe thermometer weighs a few grams and removes the guesswork. This guide uses the same minimum core temperatures as campfire grilling and foil cooking, based on figures published by official food-safety bodies such as the USDA. Other countries publish slightly different figures, so check your own authority's guidance.
| Food | Core temperature | Note |
|---|---|---|
| Poultry (pieces, whole, minced) | 74 °C / 165 °F | Thickest part, away from bone |
| Minced meat, burgers, raw sausages | 71 °C / 160 °F | Bacteria are mixed through |
| Whole cuts of beef, pork, lamb | 63 °C / 145 °F | Then rest 3 minutes |
| Fish | 63 °C / 145 °F | Opaque, flakes easily |
| Leftovers, pre-cooked sausages | 74 °C / 165 °F | Reheat until hot throughout |
Raw food, clean hands and the cool chain
- Keep raw meat, fish and eggs at 4 °C or below in a cool box until you cook, and do not leave perishables out for more than two hours, or one hour above about 32 °C. The food storage guide explains how to keep food cold outdoors.
- Use separate boards, plates and tongs for raw and cooked food. A stone that held raw meat is clean again only after it has been hot for several minutes.
- Wash hands with soap and water for at least 20 seconds after handling raw meat or fish; see outdoor hygiene.
- Dust and ash on a stone are harmless in small amounts, but brush the stone before cooking and keep food off spots where fat from raw meat has run.
Fire site, fire bans and leaving no trace
Stone cooking needs a real fire, so all the usual rules apply. Use an existing fire ring or fire pit where fires are allowed, on bare soil, away from roots, dry grass and overhanging branches, with water and a shovel at hand. Keep the fire at least 5 m from tents and hammocks and at least 3 m from synthetic tarps. Fire bans and forest fire danger levels apply to every open fire. Rules differ by country and region and this is no legal advice: check the local authority or site rules before you go. In a ban, use a stove instead; see camp stoves.
Before you leave the fire site
- Stone has cooled completely on its supports and been scraped clean
- Fire drowned with water and stirred until no heat is felt with the back of your hand
- Cold ash scattered thinly away from paths and water, or packed out where required
- Cooking and support stones returned to where you found them, blackened side down
- Planks burnt to ash, or packed out if the fire is already out
- All foil, food scraps, oil and rubbish packed out
- No new fire ring left behind
The full method for putting out a fire is in how to put out a campfire, and the principles are summed up in Leave No Trace. If the fire gets out of control, leave the area and call the emergency number (112 in the EU).
Troubleshooting: when stone and plank cooking goes wrong
| Problem | Likely cause | Fix |
|---|---|---|
| Stone cracks or pops while heating | Moisture inside, layers, heated too fast | Step back, let the fire die down, retire the stone, pick a drier one and heat slower |
| Stone never gets hot enough | Too thick, too few coals, wind | Add coals gradually, use a thinner stone, build a windbreak |
| Food sticks | Stone not hot or not oiled, food turned too early | Wait for the water test, oil thinly, let food release by itself |
| Burnt outside, raw inside | Stone too hot, food too thick | Move to the edge, slice thinner, finish beside the fire |
| Plank catches fire | Too close, plank too dry | Move it back, soak longer, keep edges out of flames |
| Fish slips off the plank | Too few pegs, plank too steep | Use more pegs or wire, lean the plank back a little |
| Ember potatoes hard in the middle | Embers too cool, potatoes too big | Bury deeper in fresh embers, cut large potatoes in half and use foil |
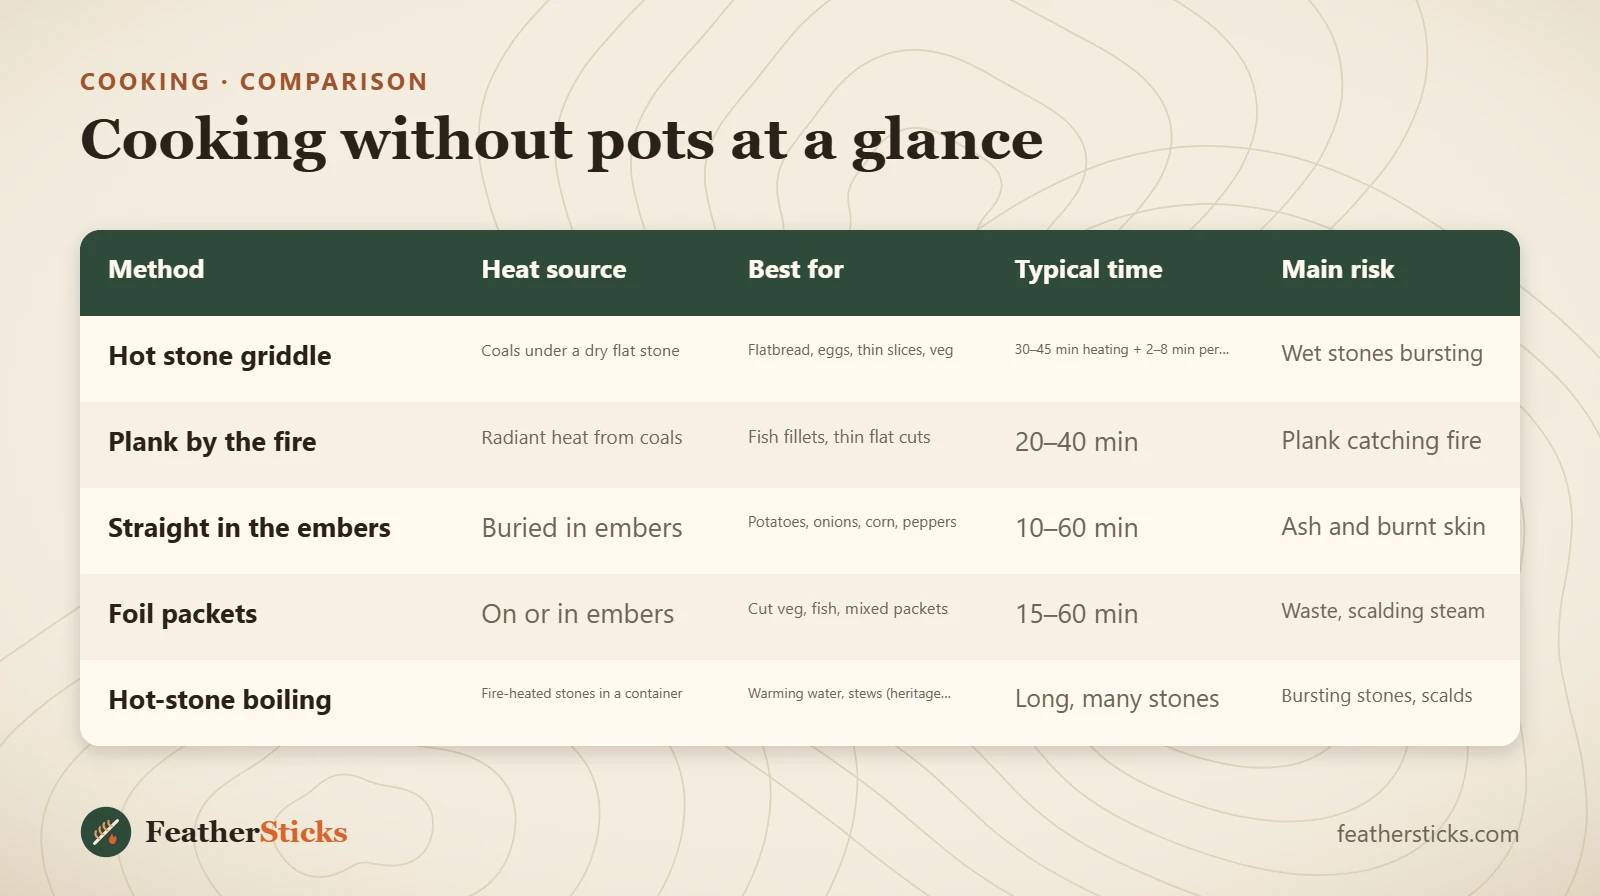
| Method | Heat source | Best for | Typical time | Main risk |
|---|---|---|---|---|
| Hot stone griddle | Coals under a dry flat stone | Flatbread, eggs, thin slices, veg | 30–45 min heating + 2–8 min per item | Wet stones bursting |
| Plank by the fire | Radiant heat from coals | Fish fillets, thin flat cuts | 20–40 min | Plank catching fire |
| Straight in the embers | Buried in embers | Potatoes, onions, corn, peppers | 10–60 min | Ash and burnt skin |
| Foil packets | On or in embers | Cut veg, fish, mixed packets | 15–60 min | Waste, scalding steam |
| Hot-stone boiling | Fire-heated stones in a container | Warming water, stews (heritage skill) | Long, many stones | Bursting stones, scalds |
Common mistakes
- Taking stones from a stream, lake shore or wet ground.
- Heating a cold stone fast over a big fire instead of warming it at the edge first.
- Leaning over a heating stone or letting children stand close.
- Using layered, flaky or cracked stones.
- Cooling a hot stone with water or setting it on snow.
- Using pine, painted or treated boards as cooking planks.
- Judging meat by colour instead of with a thermometer.
What you need
- Long tongs
- Heat-resistant leather gloves
- Wooden spatula or flat stick
- Probe thermometer
- Small bottle of cooking oil and a cloth
- Glasses or safety glasses
- Water container for putting out the fire
FAQ
Can you cook on a hot stone over a campfire?
Why do river stones explode in a fire?
What kind of stone is best for cooking on?
How long does it take to heat a cooking stone?
What wood is safe for plank cooking?
How long does plank fish take by the fire?
Can you put potatoes directly in campfire embers?
Check yourself
Completed6 quick questions from this guide. Nothing is sent anywhere.
Related step-by-step guides
-
 1
-
 1
-
 1