Washing Dishes Camping: How to Clean Pots Outdoors and Leave No Trace
Washing dishes camping the leave-no-trace way takes five moves: scrape every scrap out of the pot, carry a little water at least 60 m (about 200 ft) away from lakes and streams, wash with hot water and at most a drop of biodegradable soap, strain the food bits out and pack them away, then scatter the grey water widely over soil. Done right, nobody can tell where you washed up – and no animal has a reason to visit your camp.
This guide covers the whole job: cooking so there is less to clean, how much water you need, where to set up the washing spot, which natural scrubbers work and which ruin coated pans, how to sanitise and dry your kit, cast iron and wooden spoons, storing clean dishes away from wildlife, winter washing and the three-bowl system for groups. It belongs to the water skills series and builds on outdoor hygiene and the bushcraft basics.
Step by step
-
1

Scrape and wipe first
Scrape every scrap into your rubbish bag with a spoon or spatula, or wipe the pot out with bread. Less food in the pot means less water and no soap.
-
2

Carry water 60 m away
Fill a pot or folding bowl at the source and carry it at least 60 metres, about 70 steps, from lakes and streams. Never wash at the bank.
-
3

Hot water, one drop of soap
Warm the water, scrub with a cloth, sand or a twist of grass, and use at most one drop of biodegradable soap – often none at all.
-
4

Strain out the scraps
Pour the dishwater through a bandana or a fine sieve. The food bits go into the rubbish bag and are packed out, not buried.
-
5

Scatter the grey water
Fling the strained water in a wide arc over soil, away from camp and paths, so it soaks in without a puddle or smell.
-
6

Rinse, dry and store
Rinse with clean water, let everything air-dry in sun and wind, then pack it away with the food, out of reach of animals.
How to wash dishes when camping: the short version
Camp washing-up has three goals: keep the water clean, keep animals out of camp and keep yourself from getting ill. Everything in this guide follows from those three.
- Water. Food scraps and soap in a stream feed algae, harm aquatic insects and end up in the next person's bottle. Even soap sold as biodegradable needs soil and soil bacteria to break down – in open water it is simply a pollutant.
- Animals. A pot with porridge crust, a puddle of greasy water or a few noodles in the grass are an invitation. Foxes, martens, mice, wasps, wild boar and, in some countries, bears learn quickly where people leave food. See wildlife at camp.
- Health. Food residue in a damp pot is where bacteria grow. Dirty dishes and unwashed hands are a classic route for stomach bugs on group trips – more on that in hand hygiene outdoors.
The method is the same everywhere: carry the water to the washing, not the dishes to the water. Fill a pot, walk away from the shore, wash there, strain out the bits and spread the used water thinly over the ground. The rest of this article is detail, variations and the mistakes that are worth avoiding.
Minimise mess first: scrape, lick-clean, cook less
The easiest dishes to wash are the ones that are already almost clean. Experienced campers spend more effort on not making a mess than on scrubbing it away.
Cook what you will eat
Leftovers are the biggest washing-up problem: you cannot bury them, they smell overnight and they have to be carried out. Plan portions at home – the food and calorie planner and our meal planning guide help – and cook a little less rather than too much. A spare snack fills a gap more easily than a pot of cold pasta can be disposed of.
Scrape and wipe before any water
Scrape the pot with a spoon or a small spatula until nothing loose is left, and eat it or put it in the rubbish bag. Then wipe the inside with a piece of bread, a tortilla or a scrap of kitchen paper that goes into the rubbish. A pot that has been scraped and wiped needs a fraction of the water and usually no soap at all.
The "pot tea" trick
After a soup or a savoury meal, pour a splash of hot water into the pot, swirl it round with the spoon and drink it like a thin broth. It sounds rough and works well: the last of the food is eaten, the pot is half clean, and you have drunk some water you would have needed anyway.
| Habit | Why it helps |
|---|---|
| One-pot meals | One pot to clean instead of pot, pan and plates |
| Eat straight from the pot or your own mug | No plates; each person cleans their own mug and spoon |
| Rehydrate in the bag | Dried meals soaked in their own bag leave the pot almost clean – see dehydrating food |
| Low heat and stirring | Nothing burns on; burnt crust is the hardest job of all |
| Boil drinking water in a separate pot | The water pot never needs washing |
When something has burnt on
Do not attack burnt food with a knife or sharp stones. Pour in a little water, bring it to the boil for a few minutes and let it stand; the crust softens and lifts with a spoon or a wooden spatula. The softened bits are scraped into the rubbish bag. Our guide to soot and cleaning covers the outside of fire-blackened pots.
How much water do you need for washing up?
Less than most people think – if you scrape first. The figures below are rules of thumb for a well-scraped kit, not exact values; greasy food, burnt pots and soap all push the amount up, because soap needs rinsing.
Typical washing water per meal (rule of thumb)
Wash water does not have to be drinking quality for the first wash, but the final rinse should be clean or treated water, or the pot gets a boiling-hot rinse before the next meal (see the sanitising section below).
The water calculator covers drinking and cooking water only. On a dry camp, where you carry everything from the last source, add washing water on top – roughly 0.5–1 L per person per day for a careful cook – and carry it in a folding bag or bottle (see water containers). Near a stream you simply fetch it when you need it; in rain you can top up with rain water.
Where to wash: the washing spot at least 60 m from water
The site-wide rule on FeatherSticks is the same for camp, washing and toilet: at least 60 m (about 200 ft, roughly 70 adult steps) from lakes, streams and springs. The hygiene guide recommends 60–70 m for toilet and washing; more is better on a slope above water. The distance gives the soil room to filter and break down soap and food residue before rain can carry them into the water.
The practical routine: walk to the shore with a pot or a folding bowl, fill it, and carry it back to a washing spot well away from the water. Never wash at the bank, never dip a dirty pot into the stream to fill it, and never rinse plates in the lake "just quickly".

What makes a good washing spot
- Soil, not rock. Forest floor, leaf litter or grass let grey water soak in. Bare rock sends it straight downhill – often towards the water you are trying to protect.
- Not in a gully or dry stream bed. Anything that carries water after rain counts as water.
- Away from tents and paths. Food smells should not hang around where you sleep, and the next walker should not step into your dishwater. Think of it like the kitchen in a well-laid-out camp: cooking, washing and sleeping are separate places.
- The same spot each time on a short stay keeps the impact small; on a long stay, move the scattering area around so no patch gets soaked with grease.
When you choose a camp site, pick the washing direction at the same time. In a narrow gorge or on a lake shore where you cannot get 60 m away, go as far as the terrain allows, use no soap at all and scrape extra carefully – or plan the meal so there is hardly anything to wash.
Hot water and soap: how much is too much?
Hot water does most of the work. Fat softens and lifts at temperatures that are uncomfortable for hands, which is why a pot heated with a little water in it cleans so much faster than one scrubbed in cold water. The easy way: put a splash of water in the dirty pot right after the meal, set it back on the stove or the embers for a minute, then scrub.
Soap is optional. Most scraped camp meals need none. If you do use it, take a concentrated, unscented soap labelled biodegradable, in a dropper bottle, and use one drop on the cloth rather than in the pot. More soap means more rinsing water, more soap in the soil – and soap residue left in a pot can upset stomachs.
Hot water only vs one drop of soap
Hot water only
- Enough for scraped, not very greasy pots
- No rinsing needed, nothing in the soil
- Best choice near sensitive water
- Struggles with heavy fat and fish smell
One drop of biodegradable soap
- Cuts grease from fried food
- Needs a clean rinse afterwards
- Still only away from water, over soil
- Ordinary washing-up liquid: even less, same rules
"Biodegradable" on the label is not a licence to wash in a lake. It means the soap breaks down in soil with time and bacteria. In a stream it does not get the chance; it coats gills and harms the small life the water depends on. The rule therefore does not change: soap only at the washing spot, never in or at the water, and the grey water spread over soil.
Cleaning pots outdoors without detergent: sand, ash, grass and their limits
You do not need a sponge to clean a pot in the woods. Several natural materials work as scourers – but each has a limit, and the most important limit is the inside surface of your pot. Sand that is perfect for a steel billy can ruins a non-stick pan in one go.
Four natural scrubbers
 1Sand or fine gravel
A handful of clean sand with a little water is an excellent scourer for stainless steel and titanium. Take it from dry ground, not from the stream bed, and rinse out every grain – grit in the next meal is unpleasant.
 2Cold wood ash
Fine, cold ash from a clean wood fire is slightly alkaline and helps cut grease. Mix a pinch with water into a paste on the cloth. Only use ash from plain wood – never from burnt rubbish or painted wood – and rinse well.
 3A twist of dry grass
A folded and twisted bundle of dry grass makes a soft scrubber that is gentle on any surface. Use common grass you know, take only a pinch, and never strip plants you cannot name.
 4Snow
In winter, a handful of firm snow scrubs and rinses at the same time and leaves almost nothing behind. Wipe the pot dry afterwards so it does not freeze to anything.
| Scrubber | Good for | Avoid on |
|---|---|---|
| Sand, fine gravel | Stainless steel, titanium, outside of sooty pots | Non-stick, hard-anodised aluminium, enamel |
| Cold wood ash paste | Greasy steel pots, the outside of fire pots | Coated pans; never use warm ash |
| Dry grass twist | Everything, including coatings | Unknown or protected plants |
| Snow | Everything in winter | Pots you cannot dry afterwards |
| Pine cones, sticks, stones | Not recommended | All pots – they scratch and break |

What to carry instead
Most campers carry one small cloth and a piece of sponge with a scouring side, cut down to a few centimetres. The scouring side is for steel only; coated pans get the soft side. A small brush helps with cast iron. Whatever you carry, it must dry between uses – a permanently damp sponge is a germ farm. Our cookware guide explains which coatings tolerate what.
Grey water camping: straining scraps and scattering the water
Grey water is the used water from washing dishes, hands and yourself. Handling it properly is two steps: take the solids out, then spread the liquid so thinly that the soil can deal with it.
Strain the food scraps out
Pour the dishwater through a bandana, a piece of mesh or a small tea strainer into a second pot or straight onto the ground. What stays in the cloth – rice grains, noodle bits, crumbs – goes into the rubbish bag. Those tiny bits are exactly what draws mice and foxes to a washing spot.
- Do not bury food scraps. Animals dig them up within a night.
- Do not throw them in the fire. Wet food rarely burns completely; half-charred leftovers in the fire pit attract animals and the next camper finds them. See campfire safety and Leave No Trace.
- Pack them out in a zip bag inside your rubbish bag, as you would packaging.
Scatter it widely
Then fling the strained water in a wide arc over soil and vegetation – the motion is like sowing seed. A fine spray over several square metres soaks in and disappears within minutes. A single puddle stays, smells and teaches animals that this is a good place.

Some campsites, huts and protected areas provide a drain or a designated grey-water point, or ask for a different method. Local instructions always come first. In a few places land managers ask you to pack out even strained grey water – rules differ by country and area, so check before the trip.
Washing water from cleaning yourself and brushing teeth follows the same rule. The Leave No Trace principles behind it apply to the whole camp kitchen, from packaging to the last crumb; the food storage guide covers rubbish in detail.
Sanitising and drying: sun, air and a boiling rinse
Clean is not quite the same as safe. A pot washed and rinsed in untreated stream water still carries whatever was in that water, and a pot that stays damp in a stuff sack overnight grows bacteria. Two simple habits close that gap.
Boiling rinse
If you washed or rinsed with untreated water, bring a little water to a rolling boil in the pot before the next meal, swirl it round and pour it out – or use it for tea. The same timing as for drinking water is a sensible guide: a rolling boil for 1 minute, 3 minutes from 2,000 m altitude (see boiling water and the boiling point calculator). For mugs and spoons, a splash of just-boiled water poured over them does the job. Alternatively, do the final rinse with water you have already filtered or treated.
Drying
Let everything air-dry before it is packed: upside down on a rock, hung in a mesh bag from a branch, or spread on a clean cloth. Sun and wind dry quickly and sunlight helps against germs. A shared tea towel used for days is one of the dirtiest things in a camp kitchen – shake-dry and air-dry instead, or give every person their own small cloth and dry it in the sun.
Clean and dry: the check before packing
- Inside smooth, not greasy, under a finger
- No dark ring at the water line, nothing smells sour
- Final rinse with clean, treated or boiled water
- Dry inside and out, including lid and handle joints
- Cloth and sponge rinsed and drying, not balled up wet
Cast iron, wooden spoons and other special cases
Most camp cookware is stainless steel, titanium or aluminium and forgives almost anything. Two materials need a different routine: cast iron, which must not stay wet, and wood, which must not soak.
Cast iron
Cast iron is protected by its seasoning – a baked-on layer of oil. Long soaking and leaving it wet are what damage it, not a drop of mild soap. The camp routine takes five minutes while the pan is still warm; the full background is in cleaning cast iron at camp.
Cleaning cast iron at camp
 1Scrape while warm
Push the leftovers out with a wooden scraper or spatula while the pan is still warm and the residue soft. Scraps go into the rubbish bag.
 2Hot water and a brush
Scrub with hot water and a brush or a chainmail scrubber. A drop of mild soap is fine if there is a lot of fat. Never leave the pan to soak.
 3Dry over low heat
Put the pan back over a low flame or the edge of the embers until every drop has evaporated. Air-drying is too slow and invites rust.
 4A very thin film of oil
Rub a few drops of oil over the warm surface and wipe it off again until it looks almost dry. Too much oil turns sticky.
Wooden spoons, spatulas and cups
A carved spoon or a wooden cup is washed quickly with warm water and a cloth, rinsed and dried with a cloth or in the air – but not next to the fire, where it cracks. Do not soak wood and do not boil it; heat and long wetting split and warp it. Oil it now and then at home with a food-safe oil. Our spoon carving guide has the details, including which oils are suitable.
| Material | How to clean | Avoid |
|---|---|---|
| Stainless steel, titanium | Hot water, sand or scourer, boiling rinse | Nothing special |
| Bare aluminium | Hot water, cloth or grass | Leaving acidic food in it |
| Hard-anodised or non-stick | Soft cloth, warm water | Sand, ash, scourers, empty pan on high heat |
| Cast iron | Scrape, hot water, brush, dry on heat, thin oil | Soaking, leaving wet |
| Enamel | Soft brush, warm water | Knocks, scourers, sand |
| Wood | Warm water, quick wash, air-dry | Soaking, boiling, drying at the fire |
Storing clean kit away from animals
Even a well-washed pot smells of food to an animal's nose, and a mug with a sugary tea ring is irresistible to wasps. Clean cooking kit is therefore stored like food: closed up, away from the tent and out of reach.
- Never leave dishes out overnight. Foxes and martens carry off whatever smells good, and a pot dragged into the bushes is easily lost.
- Pack kit with the food. In central Europe a dry bag or mesh bag hung 1.5–2 m up on a thin branch, away from the trunk, keeps mice and foxes out – the method is described in storing food at camp.
- In bear country cookware, food, rubbish and toiletries all go into the canister, locker or regulation hang, and cooking and storage happen well away from the tent. Follow local rules; see bear country storage and bear safety.

Hand washing and food safety in the camp kitchen
Washing up and hand washing belong together. The cleanest pot does not help if the cook comes straight from the toilet or from handling raw meat. Wash hands with soap and a little water – 20 seconds, away from the water source – before cooking, before eating and after every toilet visit; the method is shown in hand washing in camp.
- Raw meat and fish get their own board or pot lid, and the utensils that touched them are washed before they touch cooked food.
- Everyone has their own mug and spoon and cleans them. Sharing spoons spreads colds and stomach bugs through a group within days.
- Dish cloths are rinsed after every use, wrung out and dried in the sun; on longer trips swap them for a fresh one every few days.
- Leftovers are eaten at the same meal or packed out. Food kept warm overnight is a risk; see hygiene in the camp kitchen.
- Anyone with diarrhoea does not cook or wash up for others.
Washing up in winter: frozen water and frozen pots
Cold changes the job. Water may have to be melted from snow, which costs fuel and time, and anything left wet freezes solid within minutes. The answer is to wash less and to wash immediately.
- Clean straight after eating while the pot is still warm. Pour in a splash of hot water, swirl, drink it as pot tea, wipe dry. Frozen food residue is far harder to remove later.
- Use snow as a scrubber – a handful of clean, firm snow wipes a pot well, and you shake the rest out.
- Do not set a wet pot down on snow; it freezes to the surface. Put it on a pad, a branch or the pack.
- Grey water freezes into a visible, smelly ice patch that reappears at the thaw. Use as little as possible, strain it, and scatter it widely, far from paths and far from the clean snow you collect for melting.
- Keep the sponge and cloth from freezing by wringing them hard and packing them in a bag inside the rucksack.
Plan winter meals so the washing-up is minimal – one-pot meals and rehydrating in the bag win here. Fuel planning and the cooking setup are in winter camping and camp stoves.
Group camps: the three-bowl washing line
With six or more people, a washing line with three bowls is faster and more hygienic than everyone scrubbing on their own. It is the classic system of scout camps and outdoor courses, and it needs only three bowls or pots, hot water and a strainer.
The three-bowl system
 1Bowl 1: wash
Hot water and a single drop of soap. Everyone has already scraped their own kit into the rubbish bag. Wash the least dirty things first – cups, then cutlery and plates, pots last – so the water stays usable longer.
 2Bowl 2: rinse
Clean warm water to rinse off the soap. When it turns cloudy, strain it and replace it with fresh water.
 3Bowl 3: hot rinse
Very hot or just-boiled clean water. Dip kit with tongs or in a mesh bag – never with bare hands – to kill most germs that survived washing. Children stay at bowls 1 and 2.
 4Air-dry, then dispose
Hang the kit in mesh bags or on a line to air-dry. At the end, strain all three bowls and scatter the grey water widely at least 60 m from water.
Organising it
- Set up the line at the washing spot, not in the kitchen and never at the water. Bowls stand on the ground or on a log so nothing tips over.
- One person keeps water hot on the stove or fire; the firewood for this is part of the evening's cooking wood.
- Rotate duty. A rota pinned on the first evening avoids discussions. With children, make it a game – see bushcraft with kids.
- Everyone scrapes their own kit before joining the queue; the washing team does not deal with leftovers.
For a group of six the line uses roughly 4–6 L of water per meal (rule of thumb).
The camp washing-up kit
The whole kit fits in a small bag and weighs very little. If you build your packing list with the Kit Builder or from the bushcraft kit list, add these items to the kitchen module.
Washing-up checklist
- Folding bowl or a spare pot for carrying wash water
- Small cloth plus a cut-down sponge with a scouring side
- Small brush or chainmail scrubber if you cook in cast iron
- Biodegradable, unscented soap in a dropper bottle
- Bandana, mesh or small tea strainer for grey water
- Rubbish bag with zip bags for food scraps
- Mesh bag for drying and storing clean kit
- Pot gripper for hot pots and hot water
- Small spatula or scraper (wood or silicone)
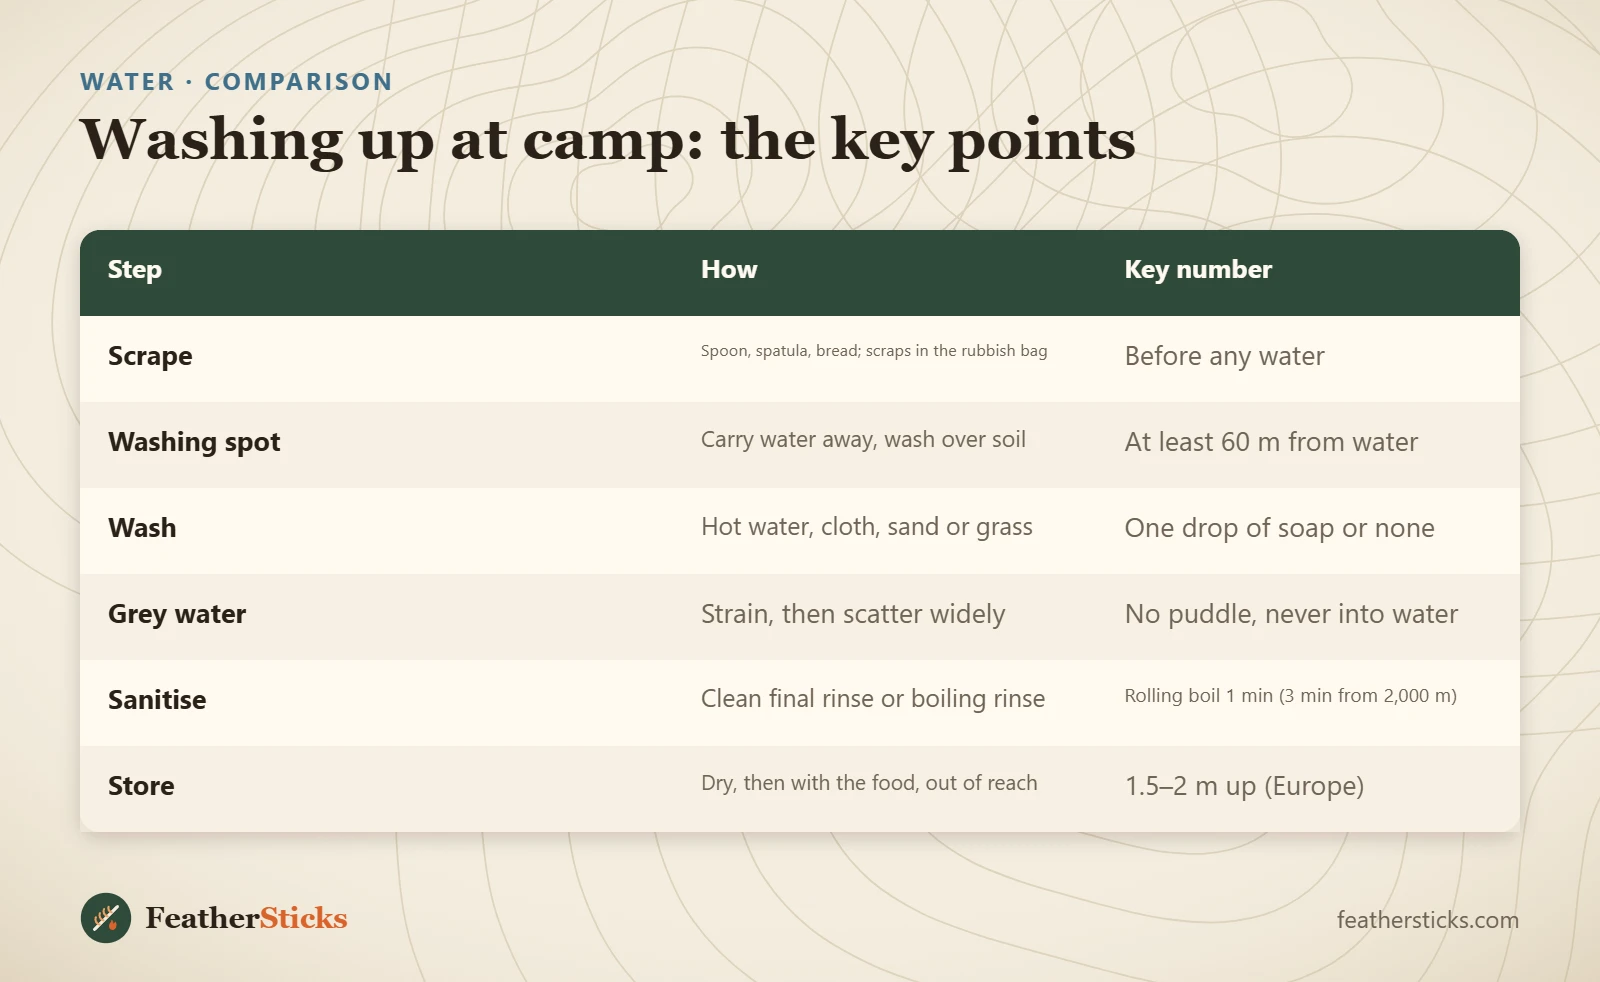
| Step | How | Key number |
|---|---|---|
| Scrape | Spoon, spatula, bread; scraps in the rubbish bag | Before any water |
| Washing spot | Carry water away, wash over soil | At least 60 m from water |
| Wash | Hot water, cloth, sand or grass | One drop of soap or none |
| Grey water | Strain, then scatter widely | No puddle, never into water |
| Sanitise | Clean final rinse or boiling rinse | Rolling boil 1 min (3 min from 2,000 m) |
| Store | Dry, then with the food, out of reach | 1.5–2 m up (Europe) |
Common mistakes
- Washing pots in the stream or at the lake shore – "biodegradable" soap included.
- Pouring all the dishwater in one spot, leaving a smelly puddle that attracts animals.
- Burying food scraps or throwing them into the fire instead of packing them out.
- Using sand or scourers on non-stick, hard-anodised or enamel pots.
- Too much soap – it needs extra water to rinse and residue can upset stomachs.
- Packing damp dishes and a wet sponge, or leaving dirty pots out overnight.
- Soaking cast iron or wooden spoons, or drying wood next to the fire.
What you need
- Folding bowl or spare pot
- Small cloth and cut-down sponge
- Biodegradable soap in a dropper bottle
- Bandana or small strainer
- Rubbish bag and zip bags
- Mesh bag for drying
- Pot gripper
- Wooden or silicone spatula
FAQ
How do you wash dishes when camping without a sink?
Where do you dump dishwater when camping?
Is biodegradable soap OK in lakes and rivers?
Can I clean pots with sand?
Do I need to sanitise dishes when camping?
How do you wash dishes in winter camping?
Check yourself
Completed6 quick questions from this guide. Nothing is sent anywhere.
Related step-by-step guides
-
 1
-
 1
-
 1