Dehydrating Food for Backpacking: DIY Trail Meals at Home
Dehydrating food for backpacking means cooking meals at home, drying them at low heat until almost no water is left, and adding the water back at camp. A dish that weighed 400 g in the pot typically ends up at roughly a quarter to a third of that, keeps for weeks in a cool, dark place and is ready after 10–15 minutes in hot water.
This guide covers DIY dehydrated meals from start to finish: why it is worth it, food dehydrator versus oven, what dries well and what does not, food safety, slicing and testing, packing labelled meal bags and rehydrating meals at camp with as little fuel as possible. It builds on our trail food planning guide and the calorie planner, belongs to bushcraft cooking and fits into the wider bushcraft basics.
Step by step
-
1

Cook and prepare lean
Cook meals as usual with lean meat and little fat. Heat meat to 71 °C, drain and blot off fat; blanch firm vegetables briefly.
-
2

Slice thin, spread evenly
Cut pieces about 3–6 mm thick and the same size. Spread sauces 3–5 mm thin on baking paper, one layer per tray.
-
3

Dry low and slow
Use a dehydrator or a fan oven with the door ajar at about 50–70 °C for 5–14 hours, depending on the food.
-
4

Test dryness, then cool
Vegetables snap, fruit is leathery, sauces crumble. Let everything cool completely before you pack it.
-
5

Pack and label meal bags
Weigh one portion per bag, seal it airtight and write the meal, the date and the water it needs on it.
-
6

Rehydrate at camp
Cover with boiling water and let it stand 10–15 minutes in a cozy, or pre-soak in safe cold water first to save fuel.
Why dehydrate your own trail meals?
Most cooked food is mostly water. A pot of chilli, a vegetable stew or cooked rice consists largely of water that you would otherwise carry up every hill. Remove it at home and you carry only the food itself – then add water at camp from a stream, lake or tap that you treat on the way. That is the whole idea behind DIY dehydrated meals, and it has three big advantages.
Three reasons to dry your own food
- Weight
- A cooked meal typically shrinks to about a quarter to a third of its weight – weigh before and after to know your own recipes
- Cost
- Home-made meals from supermarket ingredients usually cost a fraction of ready-made trekking meals
- Control
- You choose the ingredients, salt, spice level and portion size – ideal for allergies and special diets
There are trade-offs, too. Drying takes time and electricity, home-dried meals rehydrate a little more slowly than commercial freeze-dried food, and they keep for weeks rather than years. Commercial freeze-drying works under vacuum at sub-zero temperatures and removes more water than a home dehydrator can; you cannot copy that in a kitchen. For trips of a few days to a few weeks, home drying is still hard to beat.
Dehydrated meals make most sense on multi-day trips where food weight adds up: canoe tours, long hikes and base camps reached on foot. On an overnighter you can simply carry fresh food. If you are still deciding how much food you need per day, start with trail food planning and then come back here to make the food lighter.
Home-dried vs. commercial freeze-dried meals
Home-dried
- Cheap, your own recipes and portions
- Weighs about a quarter to a third of the cooked meal
- Rehydrates in about 10–15 min with hot water
- Keeps weeks to months, depending on the food
Commercial freeze-dried
- Expensive per meal
- Very light, often in a pouch you eat from
- Ready in a few minutes
- Keeps for years when sealed
Food dehydrator or oven: which works better?
Drying needs three things: gentle heat, moving air and time. Heat makes water evaporate, air carries the moist air away, and time lets moisture travel from the centre of each piece to the surface. Too much heat seals the outside ("case hardening") and leaves the inside moist, which is why low temperatures work better than high ones.

Food dehydrator
A dehydrator is a box or stack of trays with a heater, a fan and a thermostat, typically adjustable from about 35 to 70 °C. It uses far less power than an oven, runs safely overnight and dries several trays at once. Models with a rear fan and horizontal airflow dry more evenly than models with a fan in the base; with a base fan, swap the trays around once or twice. Mesh inserts for small pieces and solid sheets (or baking paper) for sauces are worth having.
Fan oven
An oven works if you want to try drying without buying anything. Use the fan setting at the lowest temperature, ideally around 50–70 °C, and keep the door slightly open – a wooden spoon in the gap is the classic trick – so moist air can escape. Many ovens cannot go much below 50 °C and their thermostats are rough, so check with an oven thermometer. Oven drying uses noticeably more electricity, ties up the oven for hours and should not run unattended with children or pets around. Check the manual: some ovens are not meant to run with the door open.
| Food dehydrator | Fan oven | |
|---|---|---|
| Temperature range | About 35–70 °C, fairly exact | Usually from 50 °C, rough thermostat |
| Airflow | Built-in fan, even | Fan setting plus door ajar |
| Capacity | 4–10 trays | 1–3 baking trays |
| Power use | Low | High |
| Overnight drying | Designed for it | Only when supervised |
| Best for | Regular use, whole trip menus | Trying it out, small batches |
What dries well – and what does not
The rule of thumb is simple: low fat dries well, high fat does not. Water leaves food in the dehydrator, but fat stays – and fat turns rancid within weeks, giving a stale, soapy taste. Starches, vegetables, fruit, legumes and very lean meat are the best candidates.

| Food | Preparation | Drying | Done when |
|---|---|---|---|
| Vegetables (peppers, carrots, peas, mushrooms, courgette) | Slice 3–6 mm; blanch firm vegetables briefly | About 50–60 °C, 6–12 h | Brittle or leathery, no moisture when snapped |
| Fruit (apple, banana, pear, berries) | Slice evenly; berries halved | About 55–60 °C, 8–14 h | Leathery, no sticky wet spots |
| Cooked rice, pasta, beans, lentils | Cook fully, spread in one layer | About 55–60 °C, 5–8 h | Hard and dry throughout |
| Cooked lean mince | Cook thoroughly, drain and blot off fat | About 60–70 °C, 6–10 h | Hard, crumbly granules |
| Sauces, chilli, bolognese, stews ("leather") | Cook with lean meat, mash, spread 3–5 mm on baking paper | About 55–65 °C, 8–12 h | Dry, crumbly leather that breaks |
Values match our trail food planning guide. Thickness, humidity, tray load and the machine change the times a lot – check, do not just set a timer.
Foods to avoid or buy ready-dried
- Fatty meat and sausage (bacon, pork belly, ordinary minced beef with lots of fat, oily fish): the fat goes rancid. Use the leanest mince you can get, or plant protein such as lentils or dried soy mince.
- Dairy (cheese, milk, cream, cream sauces, butter): home drying is not recommended. Use commercial milk powder, cheese powder or a piece of hard cheese that you carry fresh, and add oil or butter at camp.
- Eggs: do not dry them at home – use commercial egg powder if you want scrambled eggs on the trail.
- Very oily foods such as avocado, olives, nut butters and pesto: they never dry properly. Carry them separately and eat them early.
For flavour and energy, add fat after drying: a small bottle of olive oil, a few nuts or a piece of hard cheese turn a lean dried meal into a satisfying dinner. Good starting recipes for cooking at camp are in our bushcraft recipes.
Food safety: rules of thumb for drying at home
Dried food is safe because microorganisms need water to grow. The weak points are the steps before and after drying: meat that was not heated enough, pieces that are not dry inside, and dried food that gets damp again. The following are general rules of thumb, not a guarantee – when official food-safety advice in your country differs, follow it, and be extra careful when cooking for small children, pregnant people, older people or anyone with a weakened immune system.
Food safety checklist
- Start clean: washed hands, clean boards, trays and containers
- Cook meat and poultry fully first; food-safety agencies such as the USDA advise heating meat to 71 °C (160 °F) before or during drying
- Use lean meat only, drain and blot off fat
- Dry until brittle or leathery – no soft, moist centres
- Cool completely before packing, so no condensation forms in the bag
- Store airtight, cool and dark; label with the date
- Use dried meat dishes within a few weeks unless vacuum packed or frozen
- Smell, soft spots, mould or stickiness: throw it away
| Food | Room temperature | Vacuum packed | Frozen |
|---|---|---|---|
| Vegetables, fruit | Several months | Longer | Up to about a year |
| Rice, pasta, beans, lentils (cooked, dried) | Several months | Longer | Up to about a year |
| Meals with lean meat | A few weeks | Somewhat longer | Several months |
| Anything with noticeable fat | Short – eat soon | Short | A few months |
Rough guidance only. Fat content, how dry the food is, packaging and storage temperature decide. When in doubt, throw it out.
Slicing and spreading: thin and even is everything
Every piece on a tray should dry at the same pace. A thick slice next to a thin one means the thin one is brittle while the thick one is still moist inside. Aim for slices of about 3–6 mm, cut the same size and shape, and lay them in one layer with small gaps so air can move around each piece.
- Vegetables: slice carrots, courgettes and mushrooms, cut peppers into strips, use frozen peas and sweetcorn straight from the bag. Firm vegetables such as carrots, green beans and broccoli rehydrate better if blanched for 2–3 minutes first.
- Fruit: slice apples into rings, bananas into coins; dip light fruit in lemon water if you want them to stay pale.
- Rice, pasta, lentils, beans: cook them fully, rinse starchy rice, then spread in a thin, loose layer on baking paper or a fine mesh.
- Mince: cook it crumbly, drain it in a sieve, blot it with kitchen paper and spread the small granules out.
Making a sauce "leather" (chilli, bolognese, curry)
 1Cook lean, mash smooth
Cook the dish with lean meat or lentils and little oil. Mash or briefly blend it so there are no large chunks – big pieces dry slowly and rehydrate badly.
 2Spread 3–5 mm thin
Spread it evenly on baking paper or a solid dehydrator sheet, about 3–5 mm thick, slightly thinner in the middle than at the edges. Thick spots stay moist.
 3Dry until leathery
Dry at about 55–65 °C for 8–12 hours. When the top feels dry, flip the sheet and peel off the paper so the underside dries too.
 4Break up and pack
Break the dark, crumbly leather into pieces or crush it, let it cool and pack it airtight. Small pieces rehydrate faster than big sheets.
How to tell when dehydrated food is dry
Times in any table are only a starting point. Test pieces from different trays and from the thickest spots, and let a test piece cool for a few minutes first – warm food always feels softer than it is.
Dryness test in four checks
 1Vegetables snap
Dried vegetables are brittle or tough and snap or crack when bent. If a piece bends softly, it needs more time.
 2Fruit bends without tearing
Fruit is leathery and pliable but shows no wet, sticky spots when you tear it. Squeeze a handful – the pieces should fall apart again.
 3Cool completely
Let the trays cool to room temperature before packing. Warm food in a closed bag sweats, and the moisture collects on the inside.
 4Jar check
Fill a clear jar loosely and leave it closed for a day or two. If droplets or fog appear on the glass, return the food to the dehydrator.
Not sure? Troubleshooting dryness
Are there soft or sticky spots inside the thickest pieces?
Yes → Dry longer at the same temperature, or cut those pieces thinner next time.No → Go to the next check.Is the outside hard but the inside soft (case hardening)?
Yes → The temperature was too high. Lower it by 5–10 °C and dry longer.No → Go to the next check.Did the jar fog up after a day?
Yes → Back into the dehydrator for a few hours.No → Done – pack it airtight.
Packing and labelling meal bags
Pack one meal per bag, so you only open what you eat and nothing else gets damp. Freezer-grade zip bags are light and cheap; vacuum-sealed bags keep food longer and pack flatter but need a sealer. If you want to rehydrate directly in the bag, it must be rated for boiling water – otherwise rehydrate in the pot.

Building a meal bag
- Weigh the dry portion Weigh the dried components on a kitchen scale – for most adults about 100–150 g of dry meal per dinner, plus oil.
- Combine components Put base (rice, couscous, quick pasta), sauce leather or mince and dried vegetables in one bag; add spices and a stock cube.
- Note the water Test the recipe at home once and write the water amount on the bag, for example "+ 300 ml water". As a starting point, try about 2–2.5 times the dry weight.
- Label and date Write the meal name and date with a permanent marker. Mark allergens and vegetarian meals clearly on group trips.
- Bundle by day Put each day's bags together, as in the meal planning guide, and keep oil and fresh extras in a separate small bag.
In the pack, meal bags go into a food bag in the middle of the pack close to your back – see the backpack packing guide for the right spot, and the Kit Builder for the rest of your pack weight.
Rehydrating meals at camp: cold soak or hot water?
Home-dried meals take water back more slowly than commercial freeze-dried food, so they need either a bit of time in cold water or a few minutes of steeping after boiling. The key is not to keep the stove running – heat once, then let insulation do the work.

Fuel-saving rehydration, step by step
 1Pre-soak in safe water
Put the meal in a jar or the pot and cover it with water plus about 1–2 cm. Let it soak 1–2 hours, for example from the afternoon break. Only use water that is already safe to drink.
 2Bring to the boil
With the lid on, bring it to the boil and simmer for about a minute while stirring. A windscreen and lid save more gas than anything else.
 3Insulate 10–15 minutes
Take the pot off the stove and put it into an insulated cozy or wrap it in a jacket for 10–15 minutes. The food finishes softening without burning fuel.
 4Stir, add oil, eat
Stir, add a spoon of oil and salt to taste, and eat straight away. If it is still too firm, add a splash of hot water and wait a few more minutes.
| Food | Hot water + cozy | Cold soak | Notes |
|---|---|---|---|
| Dried vegetables, small pieces | 10–15 min | About 1–2 h | Thin pieces fastest |
| Rice, couscous-sized pasta, red lentils | 10–15 min | About 1–2 h | Quick-cook kinds best |
| Sauce leather (chilli, bolognese) | 10–15 min | About 1–2 h | Crush into small pieces |
| Lean mince granules | 15 min or longer | Pre-soak, then heat | Stays a little chewy |
| Fruit (for porridge) | 5–10 min | Overnight | Or eat dry as a snack |
Cold soak vs. hot rehydration
Cold soak
- No fuel, no stove needed for lunch
- Needs water that is already safe to drink
- Cold meal – fine in summer, grim in the cold
- In warm weather keep soak times short and eat right away
Hot water + cozy
- Warm meal, better morale in cold and rain
- Boiling also treats the water
- Needs stove and gas (about 15–20 g per litre in calm air)
- A cozy cuts the time on the flame to a minimum
Water and fuel
Drying saves weight only because you add the water later – so plan camps near water or carry the evening's water from the last source. Untreated water needs treatment: bring it to a rolling boil for 1 minute (3 minutes above 2,000 m), as described in boiling water, or filter it as in filtering water. The water calculator counts cooking water per day, and the boiling point and fuel calculator estimates the gas you need. For cold soaking, the water must already be safe before the food goes in.
Wash pots and spoons right after eating, with the washing-up spot at least 60 m away from lakes and streams – our guide to washing up at camp shows how.
Sample DIY dehydrated meal templates
Most dried meals follow one pattern: starch base + protein + vegetables + flavour + fat at camp. Once you have dried a few basics in bulk – rice, lentils, mince, mixed vegetables, a sauce leather – you can combine them into many meals. The templates below are starting points; weigh your own portions and test each recipe at home before a trip.
| Meal | Dry components | Dry weight | Water | Approx. kcal |
|---|---|---|---|---|
| Chilli with rice | Chilli leather with beans 60 g, dried rice 60 g, dried peppers | about 120 g | about 300 ml | about 430 + 180 with 20 g oil |
| Lentil curry (vegan) | Red lentil curry leather 60 g, couscous 50 g, dried carrots and peas 10 g | about 120 g | about 300 ml | about 430 + 180 with 20 g oil |
| Pasta bolognese | Bolognese leather 50 g, cooked and dried small pasta 70 g | about 120 g | about 300 ml | about 440 + 180 with 20 g oil |
| Vegetable noodle soup | Dried mixed vegetables 20 g, mushrooms 5 g, instant noodles 1 pack, stock | about 110 g | about 400 ml | about 450 |
| Apple-cinnamon porridge | Oats 80 g, dried apple 20 g, milk powder 25 g, cinnamon | about 125 g | about 250–300 ml | about 500 |
Dry home-made meals typically have about 3.5–4 kcal per gram before oil; 20 g of olive oil adds about 180 kcal. Check your own numbers on the labels of the ingredients you use.
Bulk drying saves time
Instead of drying each meal separately, dry a big batch of each component on one day and mix meals afterwards. Two dehydrator loads – one of rice and lentils, one of sauce leather and vegetables – are enough for a week of dinners for one person. Keep a short note of quantities and water amounts, so the next batch is quicker.
Breakfasts and snacks rarely need home drying: oats, muesli, nuts and chocolate are already dry. Dried fruit from your own apple tree, though, makes porridge and bannock much better.
Calories and food weight with dehydrated meals
Dried meals are light, but lean dried food alone is not very energy-dense. Our calorie planner works with three styles: fresh and heavy at 2.5 kcal/g, standard trail food at 4.0 kcal/g and ultralight at 5.0 kcal/g. Home-dried lean meals sit around 3.5–4 kcal/g – close to the standard style – and the oil you add at camp pushes a dinner above it.
Weight of one dinner of about 600 kcal
For a full day you still need breakfast, lunch and snacks; a typical hiking day for an average adult is about 2,500–3,300 kcal or 600–850 g of food. Fat-rich snacks such as nuts, cheese and chocolate make up for lean dinners. Use the planner to set your daily target and the meal planning guide to turn it into a menu.
Storing dried food on the trail and at camp
Dried food has two enemies on the trail: moisture and animals. Keep meal bags closed until you cook, put them in a waterproof food bag or dry bag, and keep it out of the sun. Rehydrated food is no longer dry food – eat it right away and do not keep soaked or cooked leftovers overnight in warm weather.
At night, store food away from where you sleep. Mice and foxes find even sealed bags, and in bear country storing food correctly is often required by law. Hanging, canisters and the right distances are described in storing food at camp and the guide to wildlife at camp. Pack out all bags and wrappers.
On the trail
- Meal bags closed until cooking, inside a waterproof food bag
- Food bag in the middle of the pack, out of the sun
- Rehydrated or cooked food eaten straight away
- Food stored away from the tent at night
- Empty bags and scraps packed out
- One reserve meal for delays or bad weather
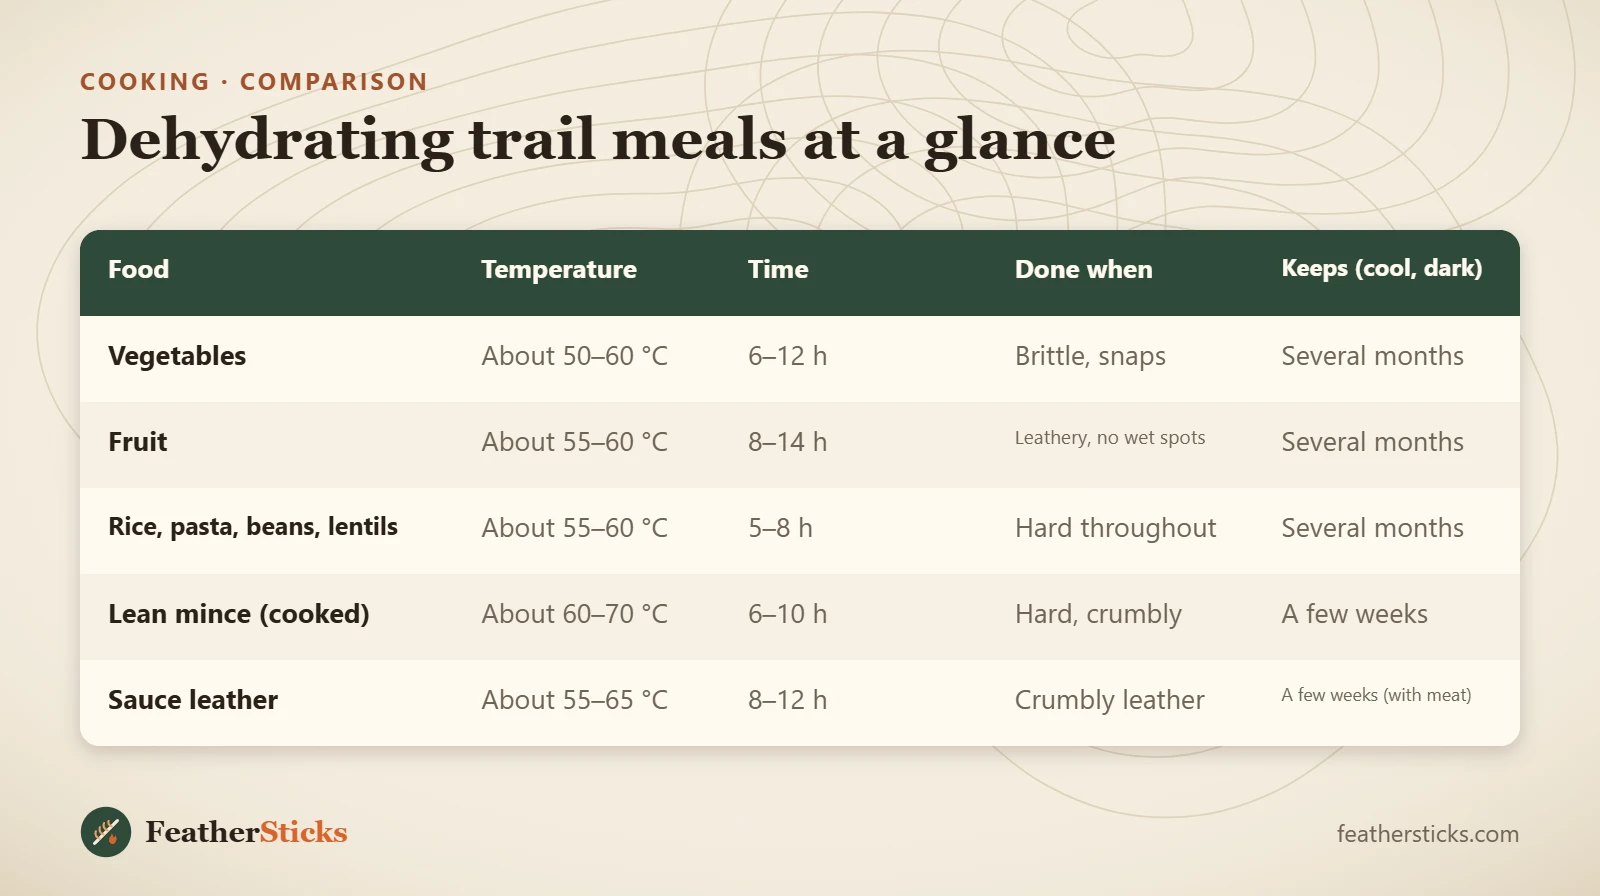
| Food | Temperature | Time | Done when | Keeps (cool, dark) |
|---|---|---|---|---|
| Vegetables | About 50–60 °C | 6–12 h | Brittle, snaps | Several months |
| Fruit | About 55–60 °C | 8–14 h | Leathery, no wet spots | Several months |
| Rice, pasta, beans, lentils | About 55–60 °C | 5–8 h | Hard throughout | Several months |
| Lean mince (cooked) | About 60–70 °C | 6–10 h | Hard, crumbly | A few weeks |
| Sauce leather | About 55–65 °C | 8–12 h | Crumbly leather | A few weeks (with meat) |
Common mistakes
- Drying fatty mince or adding oil before drying – the food turns rancid within weeks.
- Cutting pieces in different thicknesses, so some burn while others stay moist inside.
- Drying too hot, so the outside hardens and traps moisture inside.
- Packing food while it is still warm, so condensation forms in the bag.
- Not testing a recipe at home – and finding out at camp that it stays crunchy.
- Cold soaking in untreated water or leaving soaked food standing for hours in the heat.
- Forgetting to write the water amount and date on the bag.
What you need
- Food dehydrator or fan oven with oven thermometer
- Baking paper or solid dehydrator sheets
- Sharp kitchen knife or mandoline, cutting board
- Kitchen scale
- Freezer-grade zip bags or vacuum sealer, permanent marker
- Clear jar for the dryness check and for cold soaking
- Insulated pot cozy
- Small leak-proof oil bottle
FAQ
How do I dehydrate food for backpacking?
Can I dehydrate food in the oven?
How long does home-dehydrated food last?
What foods should not be dehydrated?
How do you rehydrate dehydrated meals on the trail?
How much water do I need to rehydrate a meal?
Is a food dehydrator worth it for camping?
Is cold soaking dehydrated food safe?
Check yourself
Completed6 quick questions from this guide. Nothing is sent anywhere.
Related step-by-step guides
-
 1
-
 1
-
 1