How to Carve a Spoon: Spoon Carving for Beginners, Step by Step
To learn how to carve a spoon you need a piece of fresh green wood, a sharp straight knife, a hook knife for the bowl and a clear order of work: split the log, draw the spoon, saw stop cuts, shape the outside, hollow the bowl, then dry it slowly and oil it. A first spoon takes about 3–6 hours of carving plus one to two weeks of drying, and it will be usable even if it looks rustic.
This guide to spoon carving for beginners walks through every stage with drawings, including what to do without a hook knife and how to fix the usual problems. The knife grips build on wood carving for beginners; tool choice is covered in carving tools. New to all of this? Start with bushcraft for beginners or browse all bushcraft skills.
Step by step
-
1

Get fresh green wood
Saw a straight, knot-free section of green birch, alder, lime, cherry or sycamore, 25–30 cm long and 7–12 cm thick. Use windfall or prunings, and only with the owner's permission.
-
2

Split it and draw the spoon
Split the log through the pith and shave the pith away. Draw the side profile with its crank first, then the outline on the flat face, both along the grain.
-
3

Saw stop cuts, rough out
Saw stop cuts at the neck down to the pencil line. Then remove the waste beside the handle and around the bowl; it breaks off cleanly at the cuts.
-
4

Shape handle and back
Carve the handle and the rounded back of the bowl with long, controlled cuts away from you. Always cut from wide to narrow, so the knife never dives into the grain.
-
5

Hollow the bowl
Mark the rim, then scoop the bowl with the hook knife across the grain, from the rim towards the centre. Take thin shavings and stop at an even wall of 4–5 mm.
-
6

Dry slowly, finish and oil
Let the spoon dry in a paper bag for one to two weeks, away from heat. Take a last pass of fine knife cuts, then rub in a thin coat of food-safe oil.
Spoon carving for beginners: what you need and what to expect
A spoon is the classic first "real" project in green woodworking because it contains every basic carving problem in one small object: a straight handle, a curved neck, a rounded back and a hollow. None of the cuts is difficult. What makes a spoon demanding is that there are many of them, the grain changes direction several times, and the last millimetres decide whether it feels clumsy or pleasant in the mouth.
So set honest expectations. Your first spoon will probably be thicker than you planned and a little lopsided, and it will take most of an afternoon. That is normal. Symmetry and thin, elegant walls come with the fifth or tenth spoon, not the first. What matters on the first one is that you finish it, eat with it and see what you would change.
What a finished spoon should measure
For an eating spoon that fits an adult hand and a camp bowl, aim at the sizes below. They are a starting point, not a standard; a cooking spoon is simply longer and a little stouter.

First spoon at a glance
- Log section
- 25–30 cm long, 7–12 cm in diameter, green and straight-grained
- Bowl
- About 5 cm wide, 7 cm long, 1–1.5 cm deep
- Handle
- 15–18 cm, slightly wider towards the end
- Neck
- At least 1 cm thick on a first spoon
- Bowl wall
- 4–5 mm, the same all round
- Carving time
- 3–6 hours for a beginner
- Drying
- 1–2 weeks at room temperature in a paper bag
If you have never used a carving knife, spend an hour on a try stick and a couple of tent pegs first. The carving basics explain the grips and the safe working position; this page assumes you have tried them at least once.
Which wood is best for carving a spoon?
The wood decides more than the knife. For a first spoon you want a species that cuts cleanly, has little taste or smell and does not split at the first opportunity — and you want it green, meaning freshly cut and still wet.
Why green wood?
Fresh wood holds a lot of water in and between its fibres. That water makes the fibres supple, so a sharp edge slices through them with little force and leaves a smooth, glossy surface. Once the same wood has seasoned, it is much harder; you need more force, the knife slips more easily, and hollowing a bowl with a hook knife becomes real work. Less force means more control, and more control means fewer cuts in your hand. The price of green wood is that it shrinks while drying, which is why the spoon has to dry slowly and evenly afterwards.
| Species | Carving when green | Finished spoon | Notes |
|---|---|---|---|
| Birch | Easy, even, forgiving | Pale, tough, neutral taste | The classic Nordic spoon wood. Does not keep long as a log: carve it within a few weeks. |
| Alder | Very easy, soft | Light and a little softer | Cut surface turns orange, then fades to a warm tan. Good for a first attempt. |
| Lime / linden (basswood) | Easiest of all | Soft; wears faster | Very even grain, almost no tear-out. Excellent for learning the hook knife. |
| Cherry | Firm but clean | Hard, beautiful reddish colour | Prone to cracking: remove the pith generously and dry extra slowly. |
| Sycamore / maple | Firm, crisp cuts | Pale, hard, very durable | Traditional wood for kitchenware; needs a really sharp edge. |
Do not use yew, laburnum or any wood you cannot identify with certainty for something that goes into your mouth. Avoid strongly resinous softwoods as well: they taste of resin and the bowl tears out.
How to pick the piece
- Straight and clear. No knots, no side branches, no spiral in the bark over the 25–30 cm you need. A knot in the neck or the bowl rim is where knives slip and spoons break.
- Thick enough to lose the pith. At 7–12 cm in diameter, half a log still gives a billet about 3 cm thick after the pith is gone — enough for the crank.
- Fresh. Bark tight, cut end still damp and pale, no grey or blue stains, no fungus. Wood that has lain on wet ground for a season is usually past it.
- A natural bend is a bonus. A section with a gentle curve lets the grain follow the crank of the spoon, which makes the neck stronger. For a first spoon a straight piece is easier to lay out.
Where to get wood legally
Every tree belongs to somebody. In most countries you may not cut living wood, and often not even collect fallen branches, without the landowner's permission — and nature reserves, parks and protected trees have stricter rules still. The details vary by country and region, so ask rather than assume. In practice wood is easy to come by honestly:
- Windfall and storm damage after autumn and winter gales, with permission from the owner or forester.
- Garden and orchard prunings: neighbours pruning fruit trees, birch or maple are usually glad to see a branch go.
- Tree surgeons, municipal crews and firewood sellers handle fresh logs every day; one short section costs little or nothing if you ask politely.
- Coppice and woodland work days run by conservation groups often leave exactly the sizes a carver needs.
The same caution applies when you carve on a trip: read up on the local rules for wild camping and access and take nothing from standing trees.
Keeping green wood fresh
Leave logs whole, in the bark, in the shade and off the ground, and seal the cut ends with wax or wood glue. A split billet you cannot finish today keeps for a few days in a plastic bag in a cool place, and for weeks in the freezer. In warm weather open the bag daily, or mould appears within days.
Tools: straight knife, hook knife, saw — and what to do without a hook knife
You can carve a spoon with a carving knife and a spoon knife alone. A saw makes the start faster and safer, a small axe faster still. More than that is not needed.
| Tool | Job | Needed? | What to look for |
|---|---|---|---|
| Straight knife | Outline, handle, neck, back of the bowl, finishing | Yes | Fixed blade of 5–10 cm with a Scandi grind: a sloyd knife, or your bushcraft knife if the blade is not too thick |
| Hook knife (spoon knife) | Hollowing the bowl | Yes, or burn the bowl | Single-edged, for your dominant hand, medium curve; see carving tools |
| Folding saw | Cutting to length, stop cuts at the neck | Strongly recommended | Fine teeth, locking blade; details in bushcraft saws |
| Small axe or hatchet | Splitting the log, hewing the rough shape | Optional | Light head, thin sharp bit; see axes and hatchets |
| Strop | Keeping both edges keen while you work | Yes | Leather on wood with polishing compound; method in sharpening |
| Pencil, tape, first aid kit | Layout, thumb protection, small cuts | Yes | Soft pencil; plasters and a pressure dressing within reach |
Sharpness is not a detail here. A hook knife that is merely "quite sharp" skids over end grain and tears the bowl; a keen one cuts it like cheese. Strop both knives before you start and again whenever the surface they leave turns dull or fuzzy. After the session, wipe the blades dry — green wood is wet and the sap of some species stains carbon steel — and look after them as described in tool care.
No hook knife? Burn the bowl with an ember
The old field method needs no special tool. You shape the outside of the spoon with the knife, then place a glowing ember on the marked bowl and let it char its way into the wood. Charred wood is soft and scrapes out easily; repeat until the hollow is deep enough. It is slower than a hook knife and the result is rougher, but it works with nothing more than a knife and a campfire, and it is a satisfying thing to do in camp.
Ember-burning the bowl, step by step
 1Place one ember
Carve the outside of the spoon first and mark the bowl in pencil. Lift a hardwood ember of about thumbnail size from the fire with tongs made from two green sticks and set it in the middle of the marked area. Work beside the fire on bare ground, never on dry leaves.
 2Hold it down and blow gently
Press the ember onto the wood with a green stick and blow lightly so it glows without bursting into flame. The char spreads outwards; when it nears the pencil line, stop blowing. Dab a drop of water on the rim if the edge itself starts to blacken.
 3Scrape, then repeat
Tip the ember back into the fire and scrape the soft char out with a rounded stone, a shell or the tip of the knife held like a pencil. Burn and scrape again until the bowl is 1–1.5 cm deep, then scrape down to clean, pale wood.
Reading the grain and laying out the blank with the crank
Most spoons that break, break at the neck, and they break there because the fibres do not run through it. Wood is a bundle of long fibres. Along the fibres it is strong; across a short section of them it snaps like a biscuit. The layout decides where the fibres go, so ten careful minutes with a pencil save hours later.
Three layout rules
- The spoon lies along the grain. Handle and bowl follow the length of the log, never across it.
- The pith is not part of the spoon. The soft centre of the stem cracks almost every time. Split through it and shave it off completely.
- The bowl opens towards the split face. The hollow goes into the flat, freshly split side (the side that faced the pith); the rounded back of the bowl faces the bark. That way the growth rings run round the bowl like the layers of an onion and the rim stays strong.
What is the crank and why does it matter?
Seen from the side, a good eating spoon is not straight. The bowl sits lower than the handle and tilts up towards it, so the bowl stays level on its way to your mouth while the hand is relaxed. This offset is called the crank. On a first spoon a drop of about 1–1.5 cm between the handle and the bottom of the bowl is plenty. More crank looks elegant but cuts across more fibres in the neck, unless you found a naturally bent branch whose grain follows the curve.
Draw the side view first. If you draw the top outline first and carve to it, the lines for the crank end up on wood you have already removed.
From log to laid-out blank
 1Split through the pith
Stand the 25–30 cm section on a chopping block, set the axe or a sturdy knife across the centre and drive it through with a wooden baton — no swinging. Aim exactly through the pith. For the technique see batoning.
 2Shave the pith away
The pith runs as a darker line down the middle of the split face. Take off about 5 mm of that face until no trace of it is left and the surface is flat enough to draw on. Pith left in the blank means a crack later.
 3Draw the crank on the side
Turn the billet on edge. Draw the handle high and the bowl low, with a drop of 1–1.5 cm between them and a smooth curve at the neck. Keep the lowest point of the bowl a few millimetres above the bark side.
 4Draw the outline on top
Draw a centre line along the grain first, then the spoon symmetrically around it: bowl about 5 × 7 cm, handle 15–18 cm. Keep the neck generous. A paper template folded down the middle gives two matching halves.
 5Rough out to a thick blank
After the stop cuts (next section), remove the waste down to 2–3 mm outside your lines. The blank now shows outline and crank, but the bowl is still solid and everything is deliberately too thick.
Which knife grips do you use for spoon carving?
Spoon carving uses a small set of grips in which the knife either moves away from you, or can only travel a few centimetres before something stops it. The fundamentals — sitting position, the safety circle around you, the forehand grip — are explained in detail in the carving guide. Here is how the grips apply to a spoon:
- Forehand cut for removing bulk along the handle, with the tip of the blank braced on a block and the stroke ending in the wood or in the air beside your knee.
- Chest lever for strong but short cuts on the handle and the back of the bowl.
- Thumb push for small, precise cuts into the curve of the neck.
- Pull cut towards a braced thumb for the rim and the tip of the bowl.
- Hook knife grips for the hollow, described in the section on hollowing.
Three knife grips on the spoon
 1Chest lever
Hold blank and knife in front of your chest, edge facing outwards, both wrists resting on your ribs. Open your chest and pull your shoulder blades together: the hands move apart and the blade travels only 2–5 cm. Powerful and very safe, because your arms cannot go further.
 2Thumb push
The knife hand only holds and steers. The thumb of the hand holding the spoon pushes on the spine of the blade and moves it a centimetre at a time. Ideal for working into the neck from both sides. All fingers stay behind the edge.
 3Pull cut towards a braced thumb
Edge towards you, knife-hand thumb braced on the spoon below the line of the cut. Closing the fist pulls the blade 1–3 cm and stops it before the thumb. Only for thin finishing cuts with a very sharp knife; tape the thumb or wear a thumb guard.
Cut downhill: from wide to narrow
One rule prevents most tear-out on a spoon. Wherever the shape gets narrower, the fibres end at the surface like the pages at the edge of a slanted pile of paper. Cut from the wide part towards the narrow part and the edge slides over those fibre ends; cut the other way and it digs under them, lifts a splinter and suddenly jumps. On a spoon that means: from the widest point of the bowl towards the tip, from the widest point of the bowl towards the neck, and from the handle towards the neck. The cuts meet in the hollow of the neck, which is why that spot needs small, careful strokes.

How to carve a spoon: stop cuts, roughing out and shaping
With the lines drawn, the work is a steady reduction: first the big waste, then the shape, then the surface. Resist the urge to hollow the bowl early. A thick, solid blank is strong and easy to hold; a hollowed one is fragile and awkward to brace.
Stop cuts at the neck
A stop cut is a cut across the grain that ends a split. Saw one on each side of the neck, exactly where the handle meets the bowl, down to the pencil line and not a millimetre further. When you now remove wood along the handle towards the neck, each chip breaks off at the saw cut instead of running on into the bowl. On a blank with a strong crank, add a third stop cut across the split face at the neck, to the depth of the side profile.
Removing the waste
With an axe, stand the blank on the block and hew downwards beside the handle, holding hand high above the edge and behind it; take off the corners in several light passes rather than one heavy blow. With a knife alone, brace the handle end on the block and use forehand cuts, or baton the knife down beside the handle to the stop cut. Then round the outline of the bowl with short cuts from its widest point towards the tip and towards the neck. Stop 2–3 mm outside the line.
Shaping the handle
Long, shallow shavings give a straighter handle than short chops. Work round the handle in facets — four, then eight — instead of trying to round it at once; facets show you immediately where it is still fat. Most carvers leave the handle a little wider and flatter towards the end, where it lies in the hand, and narrower but deeper at the neck, where it needs strength.
Shaping the back of the bowl
The back of the bowl is a flattened dome, something like the blunt half of an egg. Carve it with chest lever cuts and thumb pushes from the middle of the back outwards to the rim and tip, turning the spoon a little after each cut. Leave a slight ridge — the keel — running from the neck into the back of the bowl; it carries the fibres from handle to bowl and is the reason a thin spoon does not snap. Check the side view against the light again and again: the crank should be one flowing curve without a step.
Checkpoints before you hollow
- Outline symmetrical about the redrawn centre line, 2–3 mm oversize
- Crank visible in the side view, bowl lower than handle
- Back of the bowl evenly rounded, no flat spots or corners
- Neck still at least 1 cm thick and wider than you think it needs to be
- No pith, no knot and no crack anywhere in the blank
- Knife and hook knife stropped again
How to hollow the bowl with a hook knife
The hook knife (also called a spoon knife or crook knife) is a blade bent into a curve with the edge on the inside. It cuts when you sweep the curve sideways through the wood, a bit like scooping ice cream. It is also the tool that causes the most beginner cuts, because it moves in an arc and the thumb is always nearby. Two things keep it under control: short strokes that are stopped by your own hand, and thin shavings.
The two hook knife grips
- Braced pull. Hold the spoon by the handle with the bowl facing up. Take the hook knife in your fist with the edge facing you, and brace the thumb of that hand on the neck or the outside of the bowl, well away from the path of the blade. Closing the fist draws the hook through the wood in a short scoop; the thumb is the pivot and the stop.
- Thumb push. Cup the bowl in the holding hand and press that hand's thumb against the blunt back of the hook. The knife hand steers, the thumb delivers the force. Slower, but very controlled — good for the last, thin shavings and for the far end of the bowl.
In both grips the holding hand stays under or behind the spoon, never in front of the edge, and the elbows rest against the body. If you have to strain, the knife is dull or the shaving is too thick.
Hollowing the bowl in four stages
 1Mark the rim
Draw the edge of the hollow 4–5 mm inside the outline, all the way round. This line is the limit: the rim keeps its full width until the very end, because it stiffens the bowl and guides your eye for depth.
 2Scoop with a braced thumb
Start in the middle of the bowl with shallow scoops and widen the hollow towards the line. The thumb of the knife hand rests on the neck, outside the path of the edge; each stroke is a closing of the fist, a couple of centimetres long.
 3Cut from the rim to the centre
Work across the grain or diagonally, always from the rim down towards the deepest point, from both sides. Cutting up out of the bowl towards the rim lifts the fibres and tears them out, especially at the two ends of the bowl.
 4Check the wall with your fingers
Pinch the bowl between thumb and forefinger and move round it. Fingers feel thick and thin spots far better than eyes see them. Stop at 4–5 mm everywhere; hold the bowl against the sky — if light glows through, you are thin enough.
Why an even wall matters
An even wall is not about looks. Thick and thin areas dry at different speeds, and that difference is what cracks a spoon. A bowl with a heavy bottom also feels clumsy in the mouth. The opposite mistake is worse, though: chasing one deep scoop on one side until the knife comes out through the back.

Refining and thinning
Once the hollow is done, go back to the outside. Now that you can feel the wall between your fingers, take the back of the bowl down to match the inside, thin the rim to a soft edge of about 2–3 mm at the front where it meets your lips, and slim the handle. Take off the sharp corner of the rim with one long, light paring cut. Then stop: the final surface is cut after drying, when the wood is harder and takes a crisper finish.
How do you dry a carved spoon without cracks?
Wood shrinks as it loses water, and it shrinks more around the growth rings than across them. If the outside of the spoon dries and shrinks while the inside is still wet and swollen, the surface is stretched until it tears. Slow, even drying lets the moisture inside keep pace with the surface.
Drying a green spoon
- Carve to an even thickness first The best protection against cracks happens before drying: no pith, no thick lumps, a bowl wall of 4–5 mm. A thin, even spoon can shrink freely.
- Paper bag or shavings Put the spoon in a paper bag, or bury it in a box of its own shavings. Both slow the drying down and even it out. No plastic bag at this stage — it traps the moisture and grows mould.
- Room temperature, no heat Keep it in a cool to normal room, away from radiators, stoves, the campfire, a hot car and direct sun. On a trip, wrap it in a cloth inside your pack.
- One to two weeks A thin spoon is often dry after several days, a stout one takes up to two weeks. It is dry when it feels noticeably lighter, no longer cool against your cheek, and sounds bright when tapped. If you have kitchen scales: dry means the weight has stopped falling.
Cherry and other fruit woods are the most likely to crack; give them the full two weeks in shavings. A spoon that has warped slightly during drying is normal — the last cuts correct it.
Finishing cuts or sanding — and which oil is food-safe?
Dry wood is harder and cuts with a crisp, almost polished surface. Strop the knife once more and take a last pass of thin, long cuts over the whole spoon: clean up the facets on the handle, sharpen the line of the rim, remove any fuzzy patches in the bowl with the hook knife. This knife finish is the traditional surface of a carved spoon.
Knife finish or sandpaper?
Knife finish
- Cut fibres are sealed and smooth; the surface stays smooth when wet
- Needs no extra material — works in camp
- Shows facets and tool marks: the handmade look
- Demands a very sharp edge and some practice
Sanding
- Hides uneven facets and small tear-out
- Only on fully dry wood, roughly 120 to 240 grit
- Fibres lift when the spoon first gets wet: wet it, let it dry, sand once more
- Grit left in the wood dulls a knife — do all cutting first
A third option for the trail is burnishing: rub the dry spoon hard with a smooth pebble, a piece of antler or the back of a metal spoon. The pressure compresses the surface fibres and gives a soft shine without removing wood.
Oiling the spoon
Oil is not strictly necessary — an untreated birch spoon works for years — but it slows down the soaking and drying that eventually make wood rough and grey, and it brings out the colour. Use an oil that is sold as food:
- Raw linseed (flaxseed) oil and walnut oil are drying oils: they react with air and harden in the wood over a few weeks. Walnut oil is unsuitable if anyone who will use the spoon has a nut allergy.
- Food-grade mineral oil never hardens. It is tasteless and simple, but washes out and has to be renewed more often.
- Ordinary cooking oils such as olive or sunflower oil do not harden properly and can turn sticky or rancid; they are a stopgap at best.
- Avoid "boiled" linseed oil and wood finishes from the hardware shop unless they are explicitly declared safe for food contact; many contain metallic driers or solvents.
Rub in a thin coat with a cloth or your fingers, let it soak for 15–20 minutes, wipe off everything that is still on the surface and let the spoon rest for a day. Repeat two or three times. Leave a spoon treated with a drying oil for a week or two before heavy use so the oil can cure.
How long does it take to carve a spoon?
Plan a whole afternoon for the first one and do not try to rush it. Tired hands make deep cuts — in the spoon and in yourself. It is perfectly fine to rough out the blank one day, keep it in a plastic bag in the fridge overnight and hollow it the next.
| Stage | Time | Difficulty | Where beginners struggle |
|---|---|---|---|
| Splitting, removing pith, layout | 20–40 min | Easy | Splitting off-centre; drawing the outline before the crank |
| Stop cuts and roughing out | 30–60 min | Easy to medium | Sawing past the line; taking too much off the neck |
| Handle and back of the bowl | 1–2 h | Medium | Cutting against the grain; flat spots on the back |
| Hollowing the bowl | 45–90 min | Medium to hard | Tear-out at the ends of the bowl; uneven wall |
| Refining and thinning | 30–60 min | Medium | Stopping too early: the spoon stays heavy |
| Drying | 1–2 weeks | — | Impatience and heat |
| Finishing cuts and oil | 20–40 min plus curing | Easy | Thick coats of oil that stay sticky |
Carving time adds up to roughly 3–6 hours for a first spoon. With practice the same spoon takes one to two hours.
How hard is it really? Physically it is light work if the tools are sharp and the wood is green. The difficulty is concentration: keeping track of grain direction, symmetry and thickness at the same time. That gets easier quickly. Carving two or three spoons in close succession teaches far more than one spoon every few months.
Troubleshooting: tear-out, cracks, a thick spoon, a hole in the bowl
Nearly every problem on a spoon has one of four causes: a dull edge, cutting in the wrong direction, uneven thickness, or drying too fast. The table sorts the common symptoms.
| Symptom | Likely cause | Fix now | Prevent next time |
|---|---|---|---|
| Tear-out: rough, torn patches, mostly at the neck and the ends of the bowl | Cutting "uphill" against the fibres, or a dull edge | Turn the spoon and cut from the other direction with a very thin shaving; strop first | Cut from wide to narrow; in the bowl from the rim to the centre |
| Knife jumps and takes off more than intended | Shaving too thick, edge following a rising grain line | Go back to thin cuts; use the thumb push for control | Shorter strokes, facets instead of big slices |
| Crack at the end of the handle or in the bowl after drying | Pith left in, uneven thickness, or dried too fast | A hairline crack in the handle can be carved away by shortening it; a crack in the bowl means a new spoon | Shave off the pith, even wall, paper bag, no heat |
| Spoon is heavy and clumsy | Stopped too early; bottom of the bowl and neck left thick | Feel the wall with your fingers and take the outside of the bowl down; slim the handle | Thin the back after hollowing, not before |
| Hole in the bowl | Hollowed too deep in one spot without checking | Not repairable for eating. Cut the bowl into a fork-like server, a strainer or a honey dipper, or keep it as a lesson | Pinch-check the wall every few cuts; leave 4–5 mm |
| Neck snaps | Neck too thin, or grain running out of it | Carve the remaining bowl into a short scoop for salt, coffee or flour | Keep at least 1 cm; follow the grain; modest crank |
| Lopsided outline | Carved by eye without lines | Redraw the centre line and take the fuller side down to match | Paper template, redraw lines often |
| Fuzzy surface after the first wash | Sanded fibres or bruised cuts lifting when wet | Let it dry and take one more pass with a sharp knife or fine paper | Knife finish on dry wood; raise the grain before final sanding |
Is this spoon worth finishing?
Is there a crack or pith line running into the bowl?
Yes → Stop. Use the blank for practice cuts and start a new one.No → Carry on to the next question.Is the neck still at least 1 cm thick with the grain running through it?
Yes → Good — the spoon will be strong enough.No → Shorten the plan: turn it into a small scoop or a spatula.Is the bowl wall even when you pinch it all round?
Yes → Dry it, finish it, oil it.No → Thin the thick areas from the outside before drying.
Cut prevention, first aid and carving a spoon with children
Spoon carving injuries are almost always small cuts to the holding hand: the thumb and forefinger of the hand that holds the spoon, and the thumb of the knife hand during pull cuts and hook knife work. They are preventable.
Cut prevention for spoon carvers
- Sit down. Work in front of the chest or to the outside of the knee, never over the lap.
- Nobody within arm's length plus blade length.
- Sharp tools: a dull edge needs force, and force is what slips.
- Thin shavings and short strokes; every stroke has a planned end.
- Holding hand behind the edge; with the hook knife, thumb outside the arc of the blade.
- Tape or a leather guard on the thumb for pull cuts; a cut-resistant glove on the holding hand is sensible while learning.
- Sheathe the knives whenever you put them down. Stop when you are tired, cold or it is getting dark.
If it happens anyway: put the tool down, press firmly on the wound with a clean dressing and raise the hand. Small cuts stop bleeding after a few minutes of steady pressure and can then be cleaned and covered. Deep or gaping cuts, cuts that keep bleeding, and any cut followed by numbness or a finger that will not bend properly need medical care, not a plaster. What to carry and how to use it is covered in first aid kit for the outdoors.
Can children carve a spoon?
Yes, in stages and with an adult right beside them. Children who can already carve a point on a stick safely can shape a simple butter knife or spatula from soft green lime or willow. A full spoon is a project for older children with some knife practice, and the hook knife in particular needs one-to-one supervision; many families let the child carve the outside and do the hollowing together, or burn the bowl with an ember under supervision. Rules, suitable knives and first projects by age are in bushcraft with kids.
Caring for a wooden spoon
A carved spoon lasts for years with very little attention:
- Wash by hand with warm water and a little washing-up liquid soon after eating, and dry it with a cloth. Never the dishwasher: heat and long soaking crack and warp wood.
- Do not leave it standing in water or in a pot of soup overnight.
- Let it dry in the air before it goes back into a closed mess kit or stuff sack, otherwise it turns musty.
- Re-oil when the surface looks dry and pale — every few weeks with heavy use, a few times a year otherwise.
- Refresh the surface if it becomes rough: a few light knife cuts or a rub with a smooth pebble and it is as good as new.
- Stains and smells from strong food fade with time; a rub with coarse salt and a rinse helps. A spoon that has darkened is not dirty, it is used.
In camp the spoon lives with the rest of your cook kit; it does not scratch pots and does not get hot the way a metal spoon does when you stir a stew over the fire. Good first meals for a new spoon are in camp recipes, and it is just the tool for mixing bannock dough.
What to carve next: spatula, butter knife and the kuksa
After one spoon you already own all the skills for a row of useful things, and some of them are easier than the spoon itself.

- Spatula. A spoon without a bowl: split, draw, stop cuts, thin the blade to 3–4 mm at the front edge. An hour or two, and the most used tool at any campfire kitchen.
- Butter knife or spreader. Small, quick and a perfect exercise in thinning to a fine, even edge. A good first project for children and a good use for the offcut beside your spoon.
- Cooking spoon and ladle. The same spoon, 30 cm long with a stouter neck; a ladle needs a deeper bowl and a bent branch so the grain follows the angle.
- Scoop. A short-handled deep bowl for coffee, flour or salt — also the best way to rescue a spoon whose handle broke.
The kuksa: an outlook for later
The kuksa, the Nordic wooden cup with a handle, is the project many spoon carvers dream of. It is spoon carving on a larger scale: the hollow is as deep as a fist, the walls must be even, and a thick-walled vessel is far more likely to crack while drying than a thin spoon. Traditionally it is made from a birch burl, whose swirling grain resists splitting; from an ordinary half-log it works too, but needs an axe for the rough shape, a larger hook knife or a gouge for the hollow, and several weeks of very slow drying. Carve half a dozen spoons and a ladle first — then the kuksa is a natural next step rather than a frustration. The tools for it are described in carving tools.
Carving fits into the rest of camp life as well: the shavings from a spoon are excellent kindling for starting a fire, the controlled thin cuts are the same ones that make a good feather stick, and a carved toggle or tent peg completes many lashings and camp structures. If you want the carving tools on your packing list, add them in the Kit Builder or see the bushcraft kit list. Everything about knives, axes and saws is collected under tools.
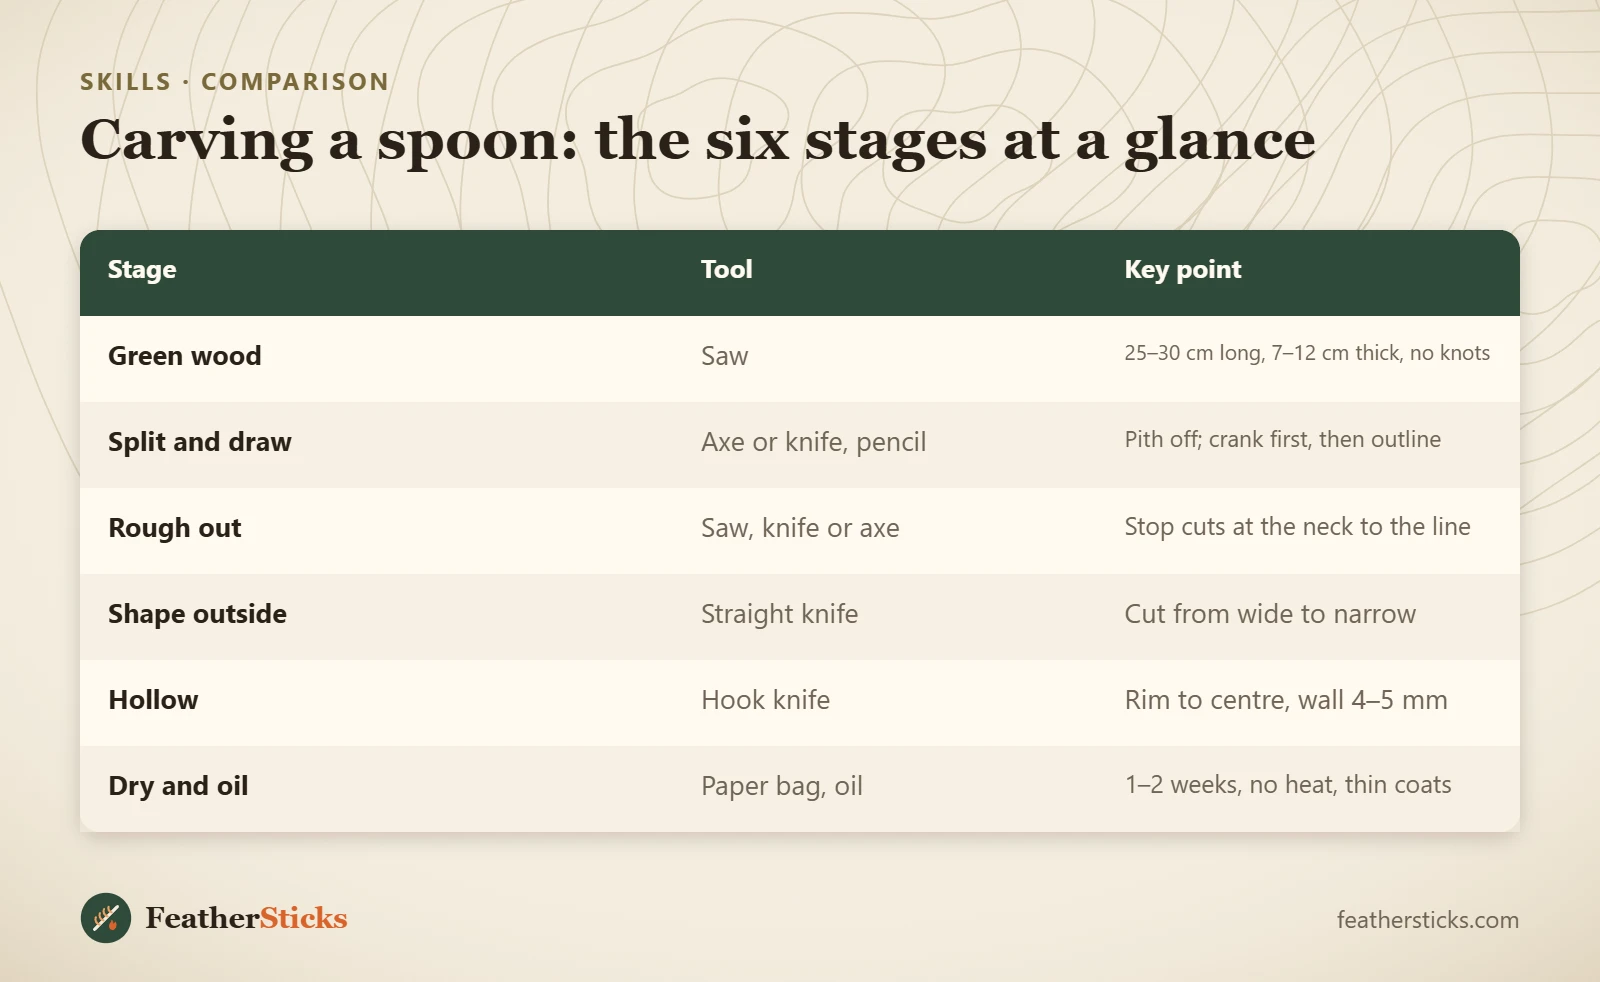
| Stage | Tool | Key point |
|---|---|---|
| Green wood | Saw | 25–30 cm long, 7–12 cm thick, no knots |
| Split and draw | Axe or knife, pencil | Pith off; crank first, then outline |
| Rough out | Saw, knife or axe | Stop cuts at the neck to the line |
| Shape outside | Straight knife | Cut from wide to narrow |
| Hollow | Hook knife | Rim to centre, wall 4–5 mm |
| Dry and oil | Paper bag, oil | 1–2 weeks, no heat, thin coats |
Common mistakes
- Using dry, knotty or unidentified wood instead of fresh green birch, alder, lime, cherry or sycamore.
- Leaving the pith in the blank — the most common cause of cracks.
- Drawing only the top outline and forgetting the crank in the side view.
- Hollowing the bowl before the outside is shaped, so the blank is fragile and hard to hold.
- Cutting against the grain at the neck and out of the bowl towards the rim, which tears the wood.
- Working with a dull hook knife and forcing thick shavings, with the thumb in the path of the blade.
- Drying the spoon beside a stove, heater or campfire to "speed it up".
What you need
- Straight carving knife (sloyd or bushcraft knife, Scandi grind)
- Hook knife for your dominant hand
- Folding saw
- Small axe or hatchet and a wooden baton (optional)
- Strop with polishing compound
- Pencil, tape or thumb guard, cut-resistant glove
- Paper bag and food-safe oil
- First aid kit
FAQ
Can you carve a wooden spoon with just a knife?
What is the best wood for spoon carving for beginners?
Do I have to use green wood?
How thick should a wooden spoon be?
How long does a carved spoon need to dry?
Should I sand a wooden spoon or leave the knife finish?
Which oil is safe for a wooden eating spoon?
Is spoon carving dangerous?
Check yourself
Completed6 quick questions from this guide. Nothing is sent anywhere.
Related step-by-step guides
-
 1
-
 1
-
 1