Hook Knife & Crooked Knife: Spoon Carving, Safe Grips and Sharpening
A hook knife is a carving knife with a blade bent into a curve, made to scoop out hollows: the bowl of a spoon, the inside of a kuksa-style cup or a small bowl. For hook knife spoon carving you hold the spoon by its handle, brace the thumb of your knife hand on the wood and close your fist, so the curve sweeps a thin shaving out of the bowl and stops after a few centimetres. Choose a single-edged hook for your carving hand, keep it razor-sharp and cut from the rim towards the centre.
This guide explains the types (single or double edge, open or tight curve, left or right hand), the safe grips, grain direction in a bowl, how to sharpen and strop the inside of the curve, care, carrying rules and first aid. It belongs to our bushcraft tools hub; the whole spoon from log to oil is in spoon carving, and the rest of the kit in carving tools for beginners.
Step by step
-
1

Pick the right hook knife
Choose a single-edged hook knife for your carving hand with a medium curve. Open curves suit eating spoons, tight curves cups and kuksas.
-
2

Hold the work safely
Hold the spoon by its handle, bowl up, in a hand wearing a cut-resistant glove. Sit, brace your elbows and keep your fingers behind the bowl.
-
3

Use the thumb-pivot cut
Brace the thumb of the knife hand on the spoon, outside the path of the blade, and close your fist. The hook scoops a short shaving and stops.
-
4

Cut from the rim to the centre
Work from the rim down into the hollow from all sides: across the grain on the sides, downhill at the ends. Never cut up and out of the bowl.
-
5

Strop the inside often
Every 20–30 minutes, strop the inside on leather wrapped round a dowel and the outside on a flat strop, edge trailing. Sharpen when stropping stops helping.
What is a hook knife, and what is a crooked knife?
A hook knife is a narrow strip of steel that runs straight out of the handle for a short distance and then curls round like a question mark. The edge runs along one long side of that strip (or both, on a double-edged hook). When you sweep the curve sideways through wood, the edge on the inside of the curve lifts a curved shaving, much like scooping ice cream. That is why it hollows a spoon bowl in a way no straight knife can.
The names overlap. Spoon knife and hook knife usually mean the same tool. Crooked knife is the English name for a related tool from North American traditions: a short, often slightly curved blade set at an angle in a handle with a thumb rest, used for shaping canoe parts, paddles, snowshoe frames and bowls. Today many people use "crooked knife" for any hook knife; in German both are usually called Löffelmesser or Hakenmesser.
A hook knife does one job: it cuts concave surfaces. Everything convex or flat (the outline, the handle, the back of the bowl) is done with a straight sloyd or bushcraft knife. Together they are the classic two-knife kit of green woodworking.

| Name | What it is | Typical use |
|---|---|---|
| Hook knife / spoon knife | Blade bent into a curve, edge on one or both sides | Spoon bowls, cups, ladles |
| Crooked knife | North American traditional tool, angled blade with thumb rest; name now also used for hook knives | Paddles, bowls, frames; today also spoons |
| Gouge | Chisel with a curved cross-section, pushed or tapped | Bowls and deep hollows, see gouges |
| Scorp / inshave | Curved drawknife-like blade | Seats and large hollows (workshop tool) |
Hook knife types: single or double edge, open or tight curve, left or right
Hook knives look alike at first glance, but four details decide whether one suits you: how many edges it has, which face carries the bevel, how tight the curve is, and which hand it is made for.
Single-edged or double-edged
A single-edged hook is sharp on one long side of the strip only. The other side is blunt, so the thumb of your holding hand can push on it. It cuts in one direction, which means you turn the spoon more often. A double-edged hook is sharp on both sides and cuts in either direction, so you can follow the grain without turning the work, but there is no safe spot for a thumb anywhere on the curve.
Single-edged vs double-edged hook knife
Single-edged
- Blunt back allows the thumb-push grip
- More control and fewer cuts while learning
- Simpler to sharpen and strop
- Cuts one way only: you turn the work more
Double-edged
- Cuts in both directions, follows the grain easily
- Works for left- and right-handed carvers
- No safe place for the thumb on the blade
- Better as a second hook once your grips are solid
Single bevel or double bevel
The bevel is the ground face that slopes down to the edge. Designs differ: some hooks have the bevel on the outside of the curve and a flat, polished inside face; others have the bevel on the inside and a flat outside; some are bevelled on both faces. It matters for sharpening, because you always sharpen the bevel and only deburr the flat face. Look closely at the edge in good light, or colour it with a marker and take one light stroke on a strop: the face that comes up shiny is the bevel.

Open, medium or tight curve
The curve decides what the knife can hollow. An open curve (larger radius, roughly 3–4 cm) takes long, smooth shavings in shallow bowls, which suits eating spoons and spatula-like scoops. A tight curve (small radius, roughly 2 cm) digs into deep, narrow hollows such as cups, ladles and the far end of a deep spoon, but chatters in a shallow bowl. Some hooks combine both: tight near the tip, opening towards the shank. These figures are typical values, not standards, and makers describe their curves differently.

Left-handed or right-handed
A single-edged hook only cuts properly in the hand it was made for. A right-handed hook cuts when held in the right hand and drawn towards the thumb with the edge facing you; a left-handed hook is its mirror image. In the wrong hand the edge faces away and the knife feels awkward and slips. Check before buying: the hand is usually stated, or you can see which side of the strip is sharp. Double-edged hooks suit both hands.
Which hook knife should you start with?
Are you new to carving?
Yes → Single-edged, for your carving hand, medium or combined curve.No → A double-edged hook can save you turning the work.Do you mainly carve eating spoons?
Yes → Medium to open curve for smooth, shallow bowls.No → For cups and ladles add a tight curve, or a bent gouge for bowls.Do you already have a sheath or edge guard for it?
Yes → Good: the hook stays covered whenever it is not cutting.No → Make or buy one before the first trip; a loose hook cuts fabric and fingers.
What do you carve with a hook knife? Spoons, kuksa and bowls
The eating spoon is the classic hook-knife project and the best way to learn it. You carve the outside with a straight knife, mark the hollow 4–5 mm inside the outline and then remove the inside with the hook until the wall is 4–5 mm thick all round. Layout, crank and drying are explained step by step in how to carve a spoon.
A kuksa (a Nordic cup carved from one piece, traditionally from a birch burl) and small bowls need deeper hollows. Many carvers remove the bulk first with a bent gouge, or by drilling or burning a starter hollow, and use a tight-curve hook knife to refine the walls. A hook alone works on small cups; it is just slow. Ladles, scoops, butter dishes and the inside of a wooden spatula's dip are all hook work too. A handful of small carved items quickly earns its place in your camp kitchen.
| Project | Best curve | Typical hollow | Note |
|---|---|---|---|
| Eating spoon | Medium to open | Shallow, about 1–1.5 cm deep | The learning project; wall 4–5 mm |
| Cooking spoon, ladle | Medium to tight | Deeper, rounder bowl | Larger blank, longer handle |
| Kuksa-style cup | Tight, plus a gouge | Deep, narrow | Several sessions; dry very slowly |
| Small bowl | Gouge for bulk, hook to finish | Wide and deep | Hook alone is slow |
| Scoop, butter dish | Open | Shallow | Good second project |
Depths and wall thickness are typical values for green wood; dry wood is harder and cuts more slowly.
How to use a hook knife safely: grips and cuts
The hook knife causes more beginner cuts than any other carving tool, because it moves in an arc and both hands work close together. The general knife-safety rules from safe knife grips all apply: sit down, keep a clear circle of arm's length plus blade length around you, never carve over your thigh, sheathe the knife whenever you put it down. On top of those, hook work depends on grips in which the blade can only travel a short way before your own hand or arm stops it.
The one exception to "cut away from your body" in hook work is a pull towards you, and it is only acceptable inside these specific, controlled grips: a short stroke, a braced thumb or braced wrists, and a stop built into the movement. A free, long pull towards your chest, belly or legs is never safe.
Three safe hook-knife grips
 1Thumb-pivot cut
Hold the spoon by its handle in your gloved hand, bowl up. Grip the hook knife in your fist with the edge facing you and brace that hand's thumb on the neck or the outside of the bowl, well outside the path of the blade. Closing the fist swings the hook through the wood in a short scoop: the thumb is both pivot and stop.
 2Thumb push on the back
The knife hand holds and steers; the thumb of the holding hand presses on the blunt back of the hook and delivers the force, a centimetre at a time. Very controlled, ideal for thin finishing cuts and the far end of the bowl. Only with a single-edged hook: on a double-edged one the "back" is a second edge.
 3Chest lever
Hold the work and the hook in front of your chest with both wrists resting on your ribs, edge facing outwards, away from you. Open your chest and pull your shoulder blades together: the hands move apart and the blade travels only a few centimetres. Useful for longer cuts across a larger cup or bowl.
Small habits that prevent cuts
- Glove and tape: wear a cut-resistant glove on the holding hand, as commonly recommended, and tape or guard the thumb of the knife hand. A cut-resistant glove reduces injuries from slips into the hand, but no glove is cut-proof.
- Thin shavings: a thick bite needs force, and force is what slips. If you have to strain, strop the knife or take less wood.
- Elbows in: keep your elbows against your body or your forearms on the outside of your knees, so the hands cannot swing.
- Look where the edge exits: before every stroke, ask where the blade goes if it jumps out of the wood. If the answer is a hand, change the grip.
- Good light and fresh hands: stop when you are tired, cold or it is getting dark.

Cutting with and against the grain in a spoon bowl
Wood is a bundle of long fibres running along the spoon. In a hollow those fibres are cut through at a slant, and at the two ends of the bowl they rise towards the surface like the edges of a slanted stack of paper. Cut "downhill", from the rim towards the deepest point, and the edge slides over the fibre ends. Cut "uphill", from the centre out towards the rim, and the edge gets under the fibres, lifts them and tears out a rough pit.
In practice: on the long sides of the bowl, cut across the grain or diagonally, from the rim down to the centre. At the two ends, cut from the end rim down into the hollow. Work from both sides alternately so the cuts meet in the middle. If a cut catches or the surface turns fuzzy, you are going uphill: stop and come from the other direction.
Grain direction in the bowl
 1Sides: across the grain
On the long sides, sweep the hook across the fibres from the rim down towards the centre line. This is the fastest, cleanest cut in the bowl.
 2Ends: downhill
At the tip and at the neck end, start at the rim and cut down into the hollow. The edge rides over the fibre ends and leaves a smooth, slightly ribbed surface.
 3Never centre to rim
Cutting from the deepest point up towards an end rim goes against the fibres and tears them out. Torn pits at the ends of a bowl are the typical sign.
What a good hook-knife surface looks like
- Even, shallow ribs like the inside of a shell, shiny rather than fuzzy
- No torn pits at the tip or neck end of the bowl
- Shavings curl and hold together instead of crumbling
- The rim line is still crisp and 4–5 mm wide until the very end
- Wall feels even when pinched between thumb and forefinger
Green wood: why the hook knife needs fresh wood
A hook knife is made for green wood: freshly cut, still full of sap. Green birch, lime (basswood), alder, willow or sycamore cuts almost like firm cheese; the same wood dried for a year is several times harder and makes the hook skate, chatter and tire your hands. Hollow the bowl while the blank is still fresh and leave only the final finishing cuts for after drying.
Learn to recognise the species before you cut, so you take a suitable, common tree and leave rare or protected ones alone: tree identification covers the bark, buds and leaves. Collect wood only with the landowner's permission. Many carvers get blanks from fresh tree work, storm damage or garden pruning; never cut living trees or branches without permission, and take only what you will carve, following leave no trace. Avoid knots and the pith in the bowl area, because both make the hook catch and the spoon crack.
Wood for hook-knife work at a glance
- Easiest species
- Birch, lime (basswood), alder, willow
- Also good
- Sycamore, field maple, cherry (cracks more easily)
- Condition
- Green, straight-grained, no knots in the bowl
- Keep fresh
- Log whole with bark, shade, or blank in a bag for a few days
- Source
- With permission only: tree work, storm wood, pruning
Sharpening a hook knife: dowel, slip stones and stropping the inside
Sharpening a hook knife follows the same logic as any knife: abrade the bevel until a small burr forms along the whole edge, then remove the burr and polish. The difference is the curve. A flat bench stone can only touch the outside of the curve, so the inside needs a curved tool: a dowel wrapped in abrasive paper, a ceramic rod, or a slip stone with a rounded edge.
Keep the angle you have. Hook knives come with a factory bevel, and the safest approach is to follow it rather than invent a new one: lay the bevel flat on the abrasive, just as you would with a Scandi grind. The general angle rules and grit progressions are in how to use a whetstone and sharpening carving tools; for straight knives, the sharpening angle calculator shows how high to lift the spine.
Sharpening a hook knife, step by step
 1Find the bevel
Check which face carries the bevel: outside, inside or both. Colour the edge with a marker and take one light stroke; the shiny face is the bevel. You sharpen the bevel and only deburr the flat face.
 2Inside: paper on a dowel
Wrap wet-and-dry paper (for example 400, then 800 and 1,500 grit) round a dowel a little smaller than the curve. Keep it flat on the inside face and move along the curve, edge trailing, so the paper never digs into the edge.
 3Outside: roll on the stone
Lay the outside of the curve on a flat stone, slip stone or strop and roll the blade as you draw it back, so the contact point travels along the whole curve. Keep the bevel flat, not lifted.
 4Test in end grain
Cut the end grain of a fresh stick. A clean, shiny cut and a curl that holds together mean the edge is keen; torn, fuzzy fibres mean another round of stropping or the next finer grit.
| Tool | Use | Note |
|---|---|---|
| Dowel with wet-and-dry paper | Inside of the curve; bevel or deburring | Cheap and exact; choose a dowel slightly smaller than the curve |
| Ceramic rod | Inside, honing and deburring | Hard and fine; see sharpening in the field |
| Slip stone (tapered, rounded edge) | Inside and outside of curves | Also suits gouges |
| Flat stone or strop | Outside of the curve, rolled | Never let the tip dig in |
| Leather on a dowel + compound | Stropping the inside | The most frequent job, every 20–30 min of carving |
Stropping: the job you do most often
A hook knife should rarely need a stone. Strop little and often: every 20–30 minutes of carving, a few edge-trailing strokes on each face restore the edge before it fades. For the inside, glue a strip of smooth leather round a dowel (or wrap a broad dowel in denim) and load it with a little polishing compound; for the outside, roll the curve over a flat strop. Pull the blade so the edge trails, never pushing it edge-first into the leather.
Care and storage of a hook knife
Green wood is wet, and the sap of some species stains carbon steel within an hour. After each session, wipe the blade dry, give a carbon-steel hook a thin film of oil (a food-safe oil if you carve kitchen items) and let the handle dry away from the stove. Store it with an edge guard: a slit leather sleeve, a cork, or a fitted sheath. A hook rolling loose in a tool bag damages its edge and whatever it touches. How to deal with rust, patina and wet handles is covered in tool care, and a matching sheath can be made following how to make a leather sheath.
Never use the hook to pry, to lever out a chunk, or to dig into dry knots. The thin strip is hardened to hold a fine edge, which also makes it prone to chipping or bending at the tip when twisted. A small chip in the edge can be ground out with paper on a dowel; a bent tip usually means a new knife.
After every session
- Wipe the blade dry, inside and outside of the curve
- Thin film of oil on carbon steel
- A few strokes on the strop so the edge is ready next time
- Edge guard on before the knife goes into the bag
- Shavings swept up; they make excellent tinder
Carrying a hook knife in public: what about knife laws?
A hook knife is a fixed blade, and knife laws generally care less about what a tool is called than about where and how you carry it. Rules differ by country and often by city: some places restrict carrying any fixed blade in public without a good reason, and many ban all knives at events, on certain public transport or in knife-free zones. Treat your hook knife like any other carving knife: sheathed, packed deep in the bag, and taken out only where you are going to carve.
Our knife law guide explains the UK and German rules and gives a cautious overview of other countries. This is general information, not legal advice; check the current rules where you live and travel.
First aid for hook-knife cuts
Most hook-knife injuries are small cuts to a thumb or the holding hand. If it happens, put the tool down first and sheathe it, then press firmly on the wound with a clean dressing and raise the hand. Small cuts usually stop bleeding after a few minutes of steady pressure and can then be cleaned and covered.
Get medical help for deep or gaping cuts, bleeding that does not stop with firm pressure, numbness, or a finger that will not bend properly – these can involve tendons or nerves. For severe bleeding call the emergency number, 112 in the EU, and keep pressing. What belongs in your kit and how to use it is in first aid for the outdoors; keep it within reach whenever you carve, not at the bottom of the pack.
If you cut yourself
- Stop and sheathePut the knife away so there is no second injury.
- Press and raiseFirm pressure with a clean dressing, hand above the heart.
- CheckDeep, gaping, still bleeding, numb or stiff? Get medical care.
- Call 112 if severeHeavy bleeding: call for help and keep pressing.
Hook knives and children
Children can learn to hollow with a hook knife, but it comes after solid straight-knife skills, not before. A child who reliably keeps the safety circle, cuts away from the body and sheathes the knife can start with a single-edged hook in soft green lime or willow, with an adult sitting right beside them, one to one. Many families let the child carve the outside of the spoon and do the hollowing together, or start with a shallow scoop rather than a deep bowl. A cut-resistant glove and a taped thumb are sensible for every beginner, whatever their age.
Age is a poor guide; attention and hand control matter more. Progressions and first projects are in bushcraft with kids, and simple straight-knife projects to build up to the hook in whittling for beginners.
Hook knife problems and fixes
Most hook-knife trouble comes from four causes: a dull edge, the wrong curve for the hollow, cutting uphill, or wood that is too dry. The table sorts the common symptoms.
| Symptom | Likely cause | Fix |
|---|---|---|
| Knife chatters and leaves ridges | Curve too tight for a shallow bowl, bite too deep, dull edge | Use the open part of the curve, thinner shavings, strop |
| Tear-out at the ends of the bowl | Cutting from the centre up to the rim | Cut from the end rim down into the hollow |
| Knife skates without biting | Dull edge, or dry wood | Strop or sharpen; carve green wood |
| Knife feels awkward and slips | Wrong hand for a single-edged hook | Use a hook made for your hand, or a double-edged one |
| Hand cramps or blisters | Squeezing to force a dull edge, long sessions | Strop more often, relax the grip, take breaks |
| Hole through the bowl | Deep scooping in one spot without checking | Pinch-check the wall every few cuts; stop at 4–5 mm |
Practice drill: one bowl, three grips
- Carve the outside of a spoon blank, then hollow only half the bowl with the thumb-pivot cut
- Hollow the other half with the thumb push on the back of a single-edged hook
- Compare surfaces against the checklist above and strop between halves
The hook knife in your bushcraft kit
On a trip, a hook knife and a sloyd knife together weigh very little and fit in a small tool roll with a strop. That is enough to carve a spoon, a scoop or a stirrer around the campfire, and the shavings go straight onto the fire as kindling. Pack it in its guard inside the roll, never loose in a pocket. If you also want to split blanks, add a small folding saw or a light hatchet. Plan the whole kit with the Kit Builder; if you are just starting out, bushcraft for beginners shows where carving fits in.
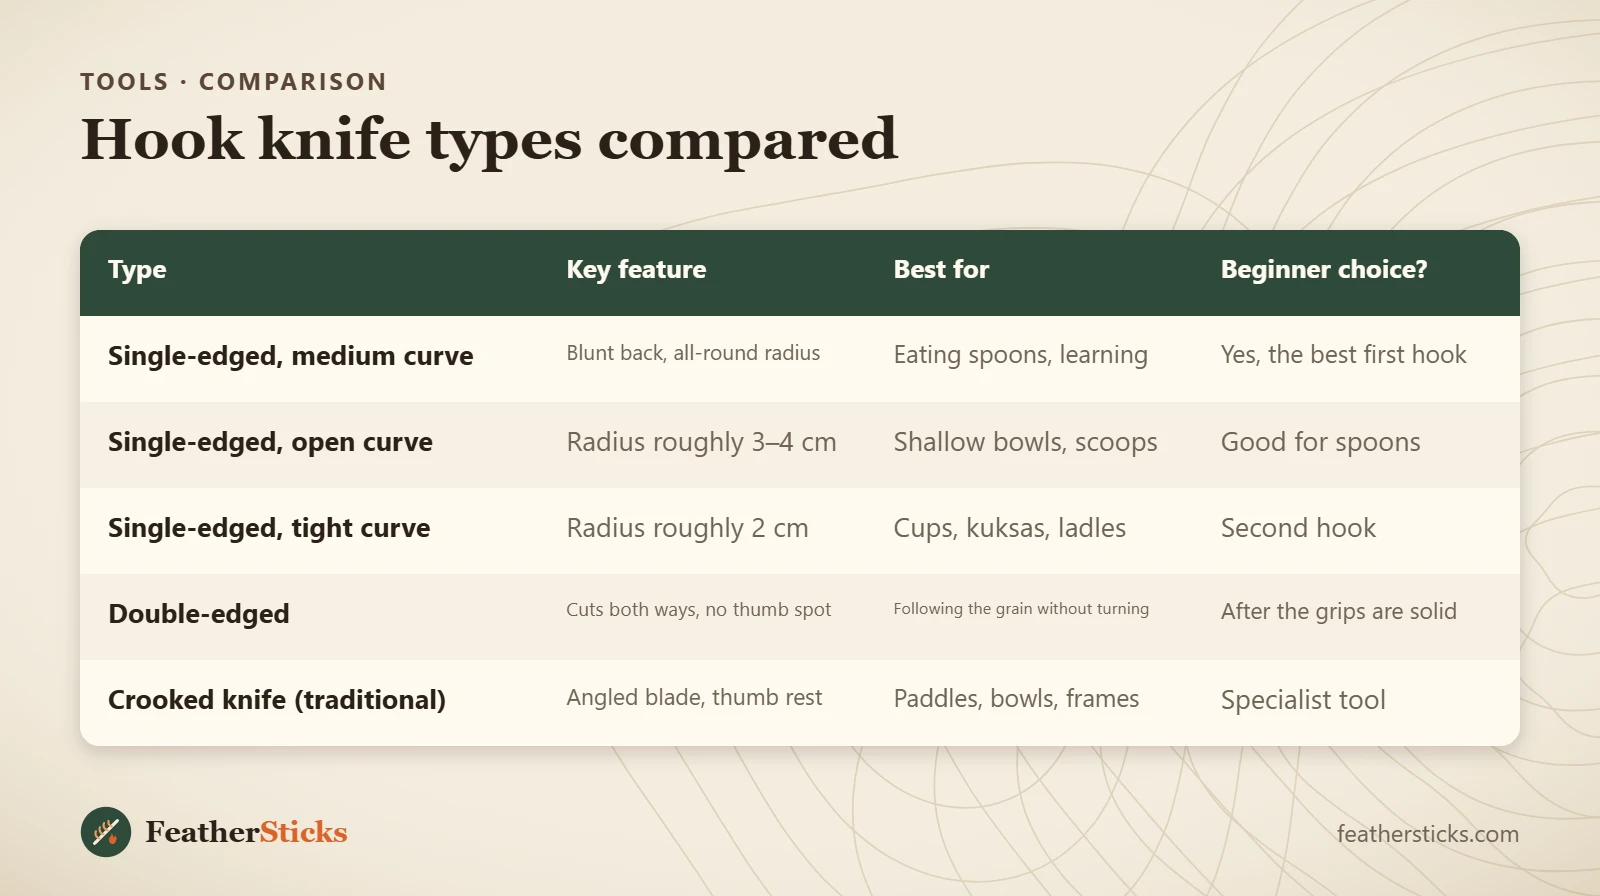
| Type | Key feature | Best for | Beginner choice? |
|---|---|---|---|
| Single-edged, medium curve | Blunt back, all-round radius | Eating spoons, learning | Yes, the best first hook |
| Single-edged, open curve | Radius roughly 3–4 cm | Shallow bowls, scoops | Good for spoons |
| Single-edged, tight curve | Radius roughly 2 cm | Cups, kuksas, ladles | Second hook |
| Double-edged | Cuts both ways, no thumb spot | Following the grain without turning | After the grips are solid |
| Crooked knife (traditional) | Angled blade, thumb rest | Paddles, bowls, frames | Specialist tool |
Common mistakes
- Buying a single-edged hook for the wrong hand.
- Bracing a thumb on the rim of the bowl, in the path of the edge.
- Using the thumb-push grip on a double-edged hook.
- Cutting from the centre up to the rim and tearing the grain.
- Taking thick bites with a dull hook instead of stropping.
- Hollowing dry, seasoned wood instead of green wood.
- Carrying the hook loose without an edge guard.
What you need
- Single-edged hook knife for your carving hand, medium curve
- Straight sloyd or bushcraft knife for the outside
- Cut-resistant glove and thumb tape or a leather thumb guard
- Dowel with wet-and-dry paper, ceramic rod or slip stone
- Leather-wrapped dowel, flat strop and polishing compound
- Edge guard or sheath for the hook
- First aid kit within reach
FAQ
How do you use a hook knife?
What is the difference between a hook knife and a crooked knife?
Should I buy a single-edged or a double-edged hook knife?
How do you sharpen a hook knife?
Do I need a left-handed hook knife?
Can you use a hook knife on dry wood?
Is a hook knife legal to carry?
Check yourself
Completed6 quick questions from this guide. Nothing is sent anywhere.
Related step-by-step guides
-
 1
-
 1
-
 1