How to Make a Leather Knife Sheath: Pattern, Stitching and Wet Moulding
To make a leather knife sheath, you trace your knife onto paper, cut vegetable-tanned leather to that pattern, glue in a welt strip, punch stitch holes, sew a saddle stitch with two needles, then wet-mould the leather around the knife and let it dry slowly. The welt keeps the cutting edge away from the thread, and moulding gives a fit that holds the knife without a strap.
This guide covers sheath styles, materials, tools and every step, plus the fit test, safety while you work, care and troubleshooting. It is written for a first DIY knife sheath on a fixed-blade knife like those in our bushcraft knife guide, and it needs no workshop: a table, a cutting board and a few hand tools. Find more projects in the tools section.
Step by step
-
1

Make a paper pattern
Fold paper around the knife, trace it and add a 12–15 mm margin on the open side. Test the folded pattern on the knife, then transfer it to the leather.
-
2

Cut leather and welt
Cut the pieces on a board along a steel ruler. The blade always moves away from the hand that holds the ruler.
-
3

Glue the welt, punch the holes
Glue and clamp the layers with the welt between them. Mark a line 4 mm from the edge and punch the stitch holes with chisel and mallet.
-
4

Sew a saddle stitch
Use waxed thread about four times the seam length, with a needle on each end. Both needles pass through every hole. Pull each stitch snug and lock the end.
-
5

Wet-mould and dry slowly
Dampen the sheath, press it around the knife wrapped in plastic film, and dry it at room temperature for one to two days.
-
6

Finish the edge and test fit
Bevel, sand and burnish the edge, add a thin wax coat, then check: upside down it holds, and one hand still draws the knife.
Why a good knife sheath matters
A knife is only as safe as the way you carry it. The sheath covers the edge so you cannot cut yourself or your pack, keeps the knife where you left it while you scramble over a log, and lets you draw it with one hand. A sheath that is too loose loses the knife; one that is too tight makes you pull with force, and a knife that suddenly comes free is a cutting accident waiting to happen.
Factory sheaths are often generic. A leather sheath pattern made around your own knife fits its handle, guard and blade shape exactly, and you can adjust the carry position to how you sit and move. It is also repairable with a needle and thread, which is more than most plastic can claim.
Legal points belong here too. A covered knife is easier to justify when you carry or transport it, but a sheath does not change what the law says about carrying fixed blades in public. Rules differ by country and region; read knife laws for bushcraft before you wear a knife outside the woods. For safe grips and the blood circle see knife safety.
Sheath styles compared: pouch, fold-over and dangler
Before you cut anything, decide which style you want, because it changes the pattern. All three below can be made with the method in this guide; they differ in how the knife is retained and how the sheath hangs.

| Style | Retention | Carry | Difficulty | Best for |
|---|---|---|---|---|
| Deep pouch (Scandi style) | Friction from a moulded fit, no strap | Fixed belt loop sewn to the back | Easiest | Carving and general bushcraft |
| Fold-over with welt | Moulded fit, optional strap with snap | Belt loop or dangler tab | Medium | Larger knives, rougher use |
| Dangler | Moulded fit or strap | Hangs on a short strap and swings | Hardest | Sitting, crouching, long days |
Belt loop or dangler loop?
A belt loop is a leather strip sewn behind the mouth. The sheath sits close to the belt and stays put, which is good for walking and bad for sitting: the handle digs into your hip. A dangler hangs from a short strap or loop and swings, so it folds out of the way when you sit or crouch. It needs a second strap and a more careful pattern.
For a first sheath choose the deep pouch. It has the fewest parts, the moulding does most of the retention work, and the same skills carry over to the others.
Materials: the right leather, thread and welt
Vegetable-tanned or chrome-tanned?
Use vegetable-tanned leather ("veg-tan"). It is firm and unfinished, and when damp it softens enough to be pressed into a shape that it keeps once dry. That is the whole principle of wet moulding a leather sheath. Chrome-tanned leather is soft, often waterproofed and dyed through, and it does not hold a moulded shape. A sheath from it stays floppy and may collapse around the blade, so skip it for this job. Avoid thin garment leather and anything with a plastic coating.
Buy leather labelled for tooling or "saddle" use, in a flat piece, from a hide that is cut from the firm back area rather than the stretchy belly. Light brown natural veg-tan is the usual choice and takes wax and dye well.
| Knife | Front and back layers | Welt | Total at the seam |
|---|---|---|---|
| Small or folding knife | 2–2.5 mm | 1.5–2 mm | about 6–7 mm |
| Bushcraft knife, 8–12 cm blade | 3–3.5 mm | 2–3 mm | about 8–10 mm |
| Large knife or machete-style blade | 3.5–4 mm | 3 mm | about 10–11 mm |
Thicker leather gives a stiffer sheath but is much harder to stitch by hand. Over about 10 mm at the seam, the holes need an awl and strong hands.
The welt
The welt is a strip of leather, about 10 mm wide, sandwiched between the layers along the edge side. A knife's cutting edge sits right at the seam. Without a welt, the edge presses on the thread each time you push the knife in and slowly cuts the stitches. With a welt, the edge presses on leather instead and the thread runs through the welt's outer part, safely out of reach.

Thread and needles
- Thread: waxed polyester or waxed linen, about 0.8–1.0 mm, in a colour you like. Waxed thread glides through the holes and resists rot. Unwaxed thread frays and wicks water.
- Needles: two blunt-tipped harness or saddler's needles that match the thread. Blunt tips go through prepared holes but do not pierce the thread or your fingers as easily.
- Glue: contact cement or a leather glue. It holds the layers while you sew; the stitches carry the load.
- Finishing: beeswax or leather balm. Skip heavy oils: they soften leather, and a soft sheath no longer holds the knife.
Tools you need, and improvised alternatives
A kit for one sheath costs far less than a ready-made one, and the tools last for years. Nothing here needs a bench, and every item has a workable stand-in.
| Tool | Job | Improvised alternative |
|---|---|---|
| Utility knife or sharp knife | Cutting leather | A craft blade with spare blades |
| Steel ruler or straight edge | Guides the blade, keeps cuts straight | A metal ruler or a flat steel bar; not plastic |
| Cutting board or mat | Protects table and blade | A thick piece of scrap wood or cardboard stack |
| Stitching groover or dividers | Marks the stitch line 4 mm from the edge | Dividers, or a ruler and a pencil |
| Stitching chisels and mallet | Punch evenly spaced holes | An awl and a ruler, with marks every 4 mm |
| Awl | Opens holes, helps pull needles | A sharp nail in a wooden handle |
| Edge beveler | Rounds the cut edges | Sandpaper, taking more time |
| Clamps or clips | Hold layers while the glue dries | Strong binder clips or clothes pegs |
| Sandpaper, 220 to 400 grit | Smooths edges | A fine file and a rough cloth |
| Plastic film and a bowl | Wet moulding | A zip bag cut open |
Keep the blade sharp (see sharpening): a dull one needs more force.
Making the pattern from paper around the knife
The pattern is the most important step: a mistake here costs you leather. Use ordinary paper or thin card and work with your knife in hand. The sheath described here is a one-piece fold-over: the leather is folded at the spine side, the open edge side and the tip are stitched, and the welt goes inside the edge-side seam.
The paper pattern in three steps
 1Wrap the knife
Fold a sheet of paper around the blade with the crease along the spine. Pinch it snug but not tight, since leather is thicker than paper and needs a little room. The handle stays out of the mouth.
 2Mark outline, mouth and stitch line
Open the paper and trace the knife, then add a margin of 12–15 mm on the open side and a little beyond the tip. Mark the mouth line across the guard, and draw the stitch line 4 mm inside the final edge.
 3Cut, test and transfer
Cut the paper pattern, fold it round the knife and check that it slides in and out. Then trace the pattern onto the rough (flesh) side of the leather, and mark a separate welt strip about 10 mm wide.
What it should look like
- The folded pattern grips the blade lightly all along its length and the knife slides out with a tug.
- The widest part of the guard and handle shoulder fits through the mouth without being forced.
- The margin on the edge side is wide enough for the welt and the 4 mm stitch line, so thread never crosses the blade path.
If you plan a strap, a belt loop or a dangler tab, draw those pieces now, with your belt width in mind.
Cutting the leather: always on a board, always away from the hand
Cutting is the part of the job with the most real injuries, and most of them happen when the blade runs toward the fingers or the holding hand, or when the cut is made on a surface that lets the leather slip. Set up before you cut.

Cutting steps
- Lay the leather smooth side up on the board. Place the pattern on top and trace it.
- Put the steel ruler on the line. Press it flat with your free hand, fingers on the side away from the blade path.
- Draw the knife along the ruler in several light passes. The first only scores the surface. Two to four passes cut 3 mm leather cleanly.
- Cut curves freehand with slow, short cuts, turning the leather rather than twisting the knife. Never cut curves toward yourself.
- Cut the welt strip the same way: a straight strip, about 10 mm wide and as long as the edge-side seam plus the tip.
Change the blade or strop the knife when cuts begin to drag. A dull blade wanders, tears fibres and needs more force, and force is what makes accidents.
Gluing the welt and punching the stitch holes
Dry-fit the pieces first: fold the leather round the knife in its plastic film and check that the margin and welt look right. Then work in a ventilated place, away from open flames, because contact cement gives off flammable fumes.
Gluing
Roughen the glue surfaces slightly with sandpaper, spread a thin even coat of cement on the welt and on the edge-side margin of both layers (not on the pocket area), let it go tacky, then press the welt onto one layer, flush with the outer edge. Close the fold and press the layers together from the fold outward. Clamp the seam or press it under a heavy book while it dries. The knife stays out during this step.
Marking and punching holes
Holes in six moves
- Mark the line With dividers or a groover, scratch a line 4 mm in from the edge along the open side and round the tip. Check once more that the line sits within the welt.
- Set the chisel Place the first chisel (three to five prongs) at the start of the line with the leather on a solid board or a piece of scrap hardwood.
- Strike straight Hit with the mallet until the prongs go through all layers. Keep the chisel upright so the holes come out square, not slanted.
- Step along Place the first prong in the last hole punched and strike again. This keeps the spacing even at about 4 mm.
- Turn the corners Round the tip with single-prong holes so the spacing stays equal. A tight curve with a long chisel gives uneven holes.
- Check the back The holes must be through all layers on the back too. If any hole is blind, finish it with an awl, holding the awl straight.
No chisels? Mark every 4 mm with dividers and open each hole with an awl held upright. It is slower but works, and the stitches are equally strong. Always point the awl away from your fingers and stop pushing when the point breaks through; a sudden slip drives it into your hand.
Saddle stitch with two needles
The saddle stitch is the stitch for a leather sheath because each stitch is locked by a second thread. If one stitch is cut, the others do not run out, which is the opposite of machine stitching. It looks like a row of straight stitches on both sides.
Cut a length of waxed thread about four times as long as the seam. This is a rule of thumb; a thicker leather stack needs a little more. Thread a needle on each end of the thread, passing the end through the eye about 5 cm and pinching it.
The saddle stitch, hole by hole
 1Measure and thread
Thread about four times the seam length, with a needle on each end. If you run short, the whole seam has to be unpicked, so be generous.
 2Centre the thread
Pass one needle through the first hole and slide the thread until both halves are equal. One half now lies on the front, the other on the back. Colours in the picture are only to tell the two halves apart.
 3Needle A through hole 2
Take the needle on the front and push it through the next hole to the back. The thread now lies along the front surface between hole 1 and hole 2.
 4Needle B through the same hole
Take the needle from the back and pass it through the same hole to the front, beside the first thread. Take care not to pierce the thread already in the hole, which you can feel as a snag.
 5Pull snug, repeat, lock
Pull both ends evenly until the stitch sits flat; do not strangle the leather. Continue hole by hole. At the end, go back over the last two stitches, then trim the thread and press the ends flat.
Rhythm and checks
Always start each stitch with the same needle: for example, the right needle goes first, then the left goes through the same hole from the other side. That makes every stitch lean the same way. Pull both threads with the same force, and never wrap thread around bare fingers.
A good seam has stitches that all lie at the same slant, are evenly tight, and look the same on both sides. A seam that puckers is too tight; one that shows gaps between layers is too loose.
Repairs of old sheaths follow the same method; see the repair kit for what to carry.
Wet moulding the leather to the knife
Wet moulding is what turns a stitched leather pouch into a sheath that fits your knife. Veg-tan leather soaks up water and softens, and as it dries it keeps the shape you pressed into it. Only vegetable-tanned leather does this; chrome-tanned leather springs back or stays floppy.
Protect the blade first. Wet veg-tan contains tannins that react with steel and cause dark stains and rust, even on a clean blade. Wrap the blade tightly in plastic film (cling film), two or three layers, with no loose ends that could snag. A sealed sleeve of thin plastic works as well. Never mould with a knife that is only oiled.
Wet moulding in three steps
 1Wrap the knife
Cover the whole blade in plastic film, from the guard to the tip, smoothing out creases. Keep the wrap tight enough to follow the blade but not so thick that the sheath ends up too loose later.
 2Dip the sheath
Submerge the stitched sheath in cool water until the leather turns dark and stops releasing bubbles. Lift it out and let it drip. It should feel cool and flexible, not dripping wet. If it starts to stiffen before you finish, dip it again.
 3Press it round the knife
Push the wrapped knife all the way in, then press the leather with your fingers snug around the blade, the guard and the handle shoulders. Work from the mouth to the tip. Leave the knife inside.
Shaping details
Press the leather around the guard and the front of the handle, where the retention comes from. You can use a smooth blunt tool, such as a bone folder or a rounded wooden stick, to press along the welt and the spine. Do not poke deeply; you want a gentle contour. Press the stitching line flat so it does not stick out.
Drying slowly
Let the sheath dry with the knife inside, at normal room temperature, for one to two days, depending on thickness and humidity. Drying time varies: if the leather is still cool and dark, it is not ready.
- Do not use a stove, a radiator, a hair dryer or direct sun. Fast heat makes leather shrink and go brittle, and the shape can warp.
- Do keep it away from draughts and lay it on its side so air reaches both faces.
- When it is dry and the colour has lightened, remove the knife and film and check the fit.
Edge finishing, wax and the drain hole
A raw cut edge looks fuzzy and soaks up water. Finishing it is cheap and makes the sheath look professional, and a sealed edge keeps moisture out of the welt. Do it after the sheath has dried completely, while the knife is out.
Three passes at the edge
 1Bevel
Run the edge beveler along both corners of the cut face, light passes, away from your fingers. The sharp corners become small chamfers. Bevelling removes the stubborn fuzz that sandpaper alone leaves.
 2Sand
Sand the cut face smooth with 220 grit, then 400, wrapping paper around a small block. Keep the movement along the edge, and wipe off the dust. The layers should now look like one block.
 3Burnish
Dampen the edge with a little water and rub it briskly with a piece of canvas, a smooth wooden slicker or a hard cloth until it turns dark and shiny. The friction seals the fibres. Repeat if the edge is still dull.
Wax, dye and oil
If you want colour, apply leather dye to the sheath before waxing, in thin even coats, and let it dry. Then rub on a thin coat of beeswax or leather balm and buff it with a soft cloth. The wax repels water and gives the surface a soft sheen. Use little: too much makes the leather greasy and the knife slippery. Heavy oils soften the leather and can even weaken the moulded shape, so keep oils for the knife blade, as described in knife and axe care.
The drain hole
A small drain hole, about 3 mm, is optional but useful. Place it in the seam allowance beyond the tip of the blade, never where the blade tip or edge sits, so water and condensation can leave the sheath. Punch it with a hole punch or a round awl. It does not make leather waterproof, so you still dry the sheath and the knife after wet weather.
Fit and retention test
A sheath is finished only when it passes two simple checks. Do them before the first trip, not on it.

Fit checklist
- Hold the sheath with the mouth down over a soft surface and shake it lightly: the knife stays in.
- Wear it on a belt and draw the knife with one hand: the sheath does not lift off the belt.
- The knife seats with a clear, firm feel and does not rattle.
- Thread ends are hidden and no stitch runs close to where the cutting edge sits.
- The edge shows no sign of cutting into the welt after ten draws and returns.
If the fit is too loose, a strap with a snap or button over the handle is the simplest fix. If it is too tight, put the knife in for a day with a damp cloth wrapped around the leather outside, then dry slowly again. A strap also makes sure the knife cannot fall out when you bend over in a crowded place.
Safety while you work
You will be handling a sharp knife, an awl and needles for hours. The following habits prevent nearly all trouble.
- Cut on a board, blade away from your hands. Never hold the leather in your palm and cut toward it.
- Keep the knife sharp. Dull blades slip. See sharpening a knife.
- Awl and chisel: keep the free hand out of the path, and use a solid backing so the point does not skid across the table.
- Needles: blunt-tipped, kept in a pin cushion or a piece of cork when not in use. Count them at the end of the day, especially with children around.
- Glue: ventilation, no flames and no smoking; cement fumes are flammable and unpleasant.
Keep a first aid kit nearby with plasters and wound dressings. Our kit list shows what belongs in a basic kit. If you teach this to a young person, work through the knife basics in bushcraft with kids first and supervise every cut.
Care of the finished sheath
A well-made leather sheath lasts for decades if you treat it right, and the most important rule is the same as for any leather: keep it dry and let it dry slowly when wet. After a wet day take the knife out, wipe the mouth, and let the sheath dry at room temperature, away from fire and radiators.
Do not store a knife in its sheath for weeks. Leather holds moisture against the steel and tannins can attack the blade, so rust appears even in a sheath that feels dry. Store the oiled knife next to the sheath in a dry room. The full routine is in leather sheath and axe mask care and storing knives and axes. Re-wax the outside once or twice a year and re-stitch any seam that opens. For the bigger picture see bushcraft for beginners and plan your carry with the Kit Builder.
Troubleshooting a leather sheath
| Symptom | Likely cause | Fix |
|---|---|---|
| Knife falls out when shaken | Moulding too light, or leather too thin at the mouth | Re-wet and mould again with the knife wrapped, or add a retention strap |
| Knife is very hard to draw | Leather too tight or dry-moulded too hard | Dampen and leave the wrapped knife in for a day, dry slowly |
| Stitches cut after a few weeks | No welt, or thread in the blade path | Replace thread, add or widen the welt |
| Rust marks on the blade | Wet leather, no plastic wrap, or long storage inside | Remove rust as in tool care; wrap the blade next time; store outside the sheath |
| Sheath has warped | Dried too fast or near heat | Re-wet, reshape round the wrapped knife and dry slowly |
| Fuzzy, rough edge | Edge not bevelled, sanded or burnished | Repeat bevel, sand and burnish |
| Stitches pucker the leather | Pulled too tight | Unpick and restitch with even, gentler tension |
| Layers separate along the seam | Glue too thin, no clamping | Reglue and clamp; stitches should carry the load |
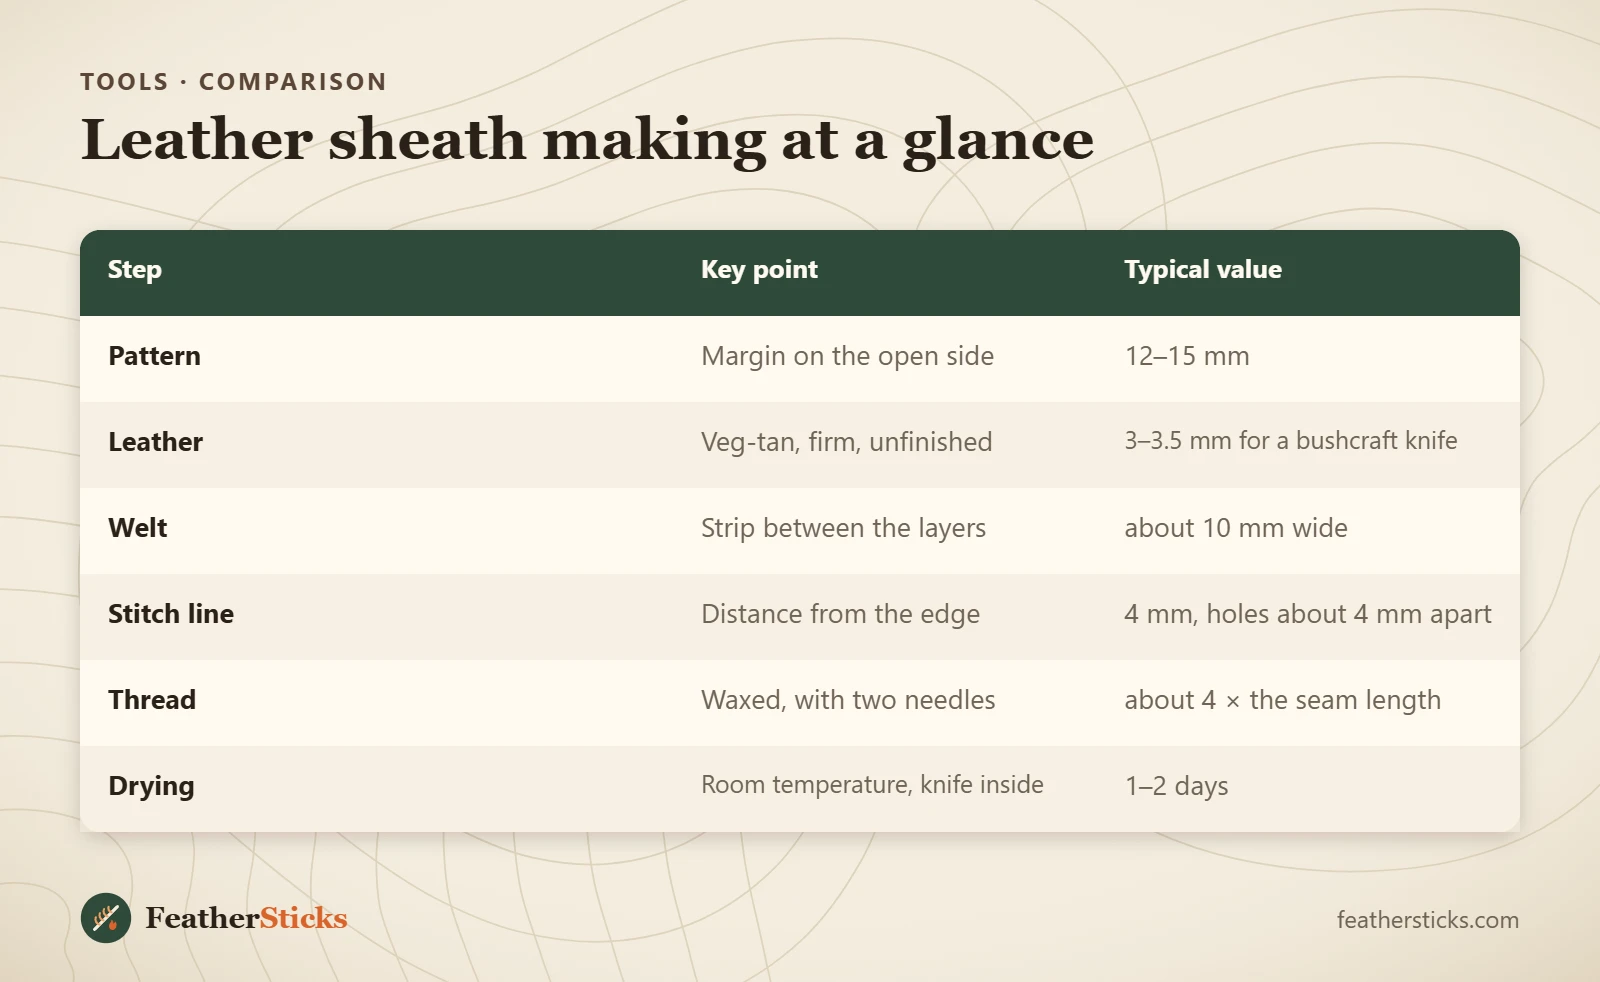
| Step | Key point | Typical value |
|---|---|---|
| Pattern | Margin on the open side | 12–15 mm |
| Leather | Veg-tan, firm, unfinished | 3–3.5 mm for a bushcraft knife |
| Welt | Strip between the layers | about 10 mm wide |
| Stitch line | Distance from the edge | 4 mm, holes about 4 mm apart |
| Thread | Waxed, with two needles | about 4 × the seam length |
| Drying | Room temperature, knife inside | 1–2 days |
Common mistakes
- Leaving out the welt, so the edge slowly cuts the stitches.
- Using chrome-tanned or coated leather that cannot be moulded.
- Wet moulding without plastic film around the blade, which causes stains and rust.
- Drying the sheath by the fire or on a radiator, which warps and cracks the leather.
- Cutting toward the holding hand or without a board underneath.
- Cutting the thread too short and running out in the middle of the seam.
- Soaking the finished sheath in oil, which softens it and loosens the fit.
What you need
- Vegetable-tanned leather, 3–3.5 mm, plus a welt strip
- Waxed polyester or linen thread and two blunt harness needles
- Steel ruler, utility knife and a cutting board
- Stitching chisels with a mallet, or an awl and dividers
- Contact cement or leather glue and clamps
- Edge beveler and 220 to 400 grit sandpaper
- Plastic film and a bowl for wet moulding
- Beeswax or leather balm
FAQ
What leather is best for a knife sheath?
Why do I need a welt in a knife sheath?
How does wet moulding a leather sheath work?
Do I have to wrap the knife in plastic when moulding?
Can I make a knife sheath without special tools?
How tight should a knife sheath be?
Can I store my knife in the leather sheath?
Check yourself
Completed6 quick questions from this guide. Nothing is sent anywhere.
Related step-by-step guides
-
 1
-
 1
-
 1