Field Repair Kit: What to Pack and How to Fix Gear Outdoors
An outdoor repair kit is a small pouch of tape, patches, thread, cord and a few spares that turns a ripped tarp, a hissing mat or a snapped tent pole from a ruined trip into a ten-minute job. A standard kit weighs about 150–250 g, an ultralight one under 100 g, and it is the cheapest insurance in your pack.
This guide gives a camping repair kit list in weight classes, shows how to pack it small, and walks through the repairs you will actually face: how to repair a tarp in the field, how to fix an air mattress leak, how to splint a pole, rescue a zip and keep a boot together long enough to walk home. It also says plainly what not to repair. It belongs in every bushcraft kit list and complements the first aid kit; more in our gear guides.
Step by step
-
1

Pack a compact kit
Gaffer tape, self-adhesive patches, mat patches, needle and strong thread, pins, cable ties, cord, a spare buckle and a lighter. About 150–250 g.
-
2

Keep it small and reachable
One zip bag in the lid pocket. Wind tape round a bottle or pole instead of carrying the roll.
-
3

Patch torn fabric
Wipe it clean and dry, cut a patch with round corners 2 cm bigger than the tear all round, press hard and patch both sides.
-
4

Find and patch a mat leak
Inflate fully, find the leak with water or soapy foam, mark it, dry it, apply the patch and weigh it down while it cures.
-
5

Splint a broken pole
Slide a repair sleeve of 10–15 cm over the break, centre it and tape both ends smooth. A stick and cord work in a pinch.
-
6

Know the limits, mend at home
Field repairs get you home. Replace anything safety-critical and redo the repair properly after the trip.
What goes in an outdoor repair kit? A camping repair kit list
The right kit is the one you will actually carry, so build it around the failures that really happen: fabric rips, punctured mats, snapped poles, broken buckles and stuck zips. Everything below is a generic category – no brands – and most of it you already own.
| Item | Weight (rough) | Fixes |
|---|---|---|
| Repair tape or gaffer tape, wound on a bottle or pole | 10–25 g for 1–2 m | Tarp and tent rips, pole splints, boot soles, cracked bottles, quick patches on everything |
| Self-adhesive fabric patches (nylon or cuben-style, round corners) | 5–10 g | Tarp, tent, jacket and sleeping bag holes |
| Mat repair patches and the glue that fits your mat | 10–25 g | Air mattress and self-inflating mat punctures |
| Needle and strong thread (waxed thread, dental floss or inner strands of cord) | 3–8 g | Seams, strap stitching, torn clothing, tie-outs |
| Safety pins (3–4, mixed sizes) | 2–4 g | Zip pulls, closing tears, holding a hem |
| Cable ties (4–6, small and medium) | 5–10 g | Broken buckles, pole splints, frame and strap fixes |
| Spare cord: guyline or paracord, 3–5 m | 15–35 g | Guylines, tie-outs, boot laces, strap replacement |
| Spare buckle (side-release or slider, matching your webbing) | 5–15 g | Pack, strap or tarp-bag buckles |
| A few metres of thin wire (1–3 m) | 5–10 g | Glasses, pack frames, zip pulls, binding |
| Super glue, one small tube | 3–5 g | Small cracks, loose soles, frayed webbing ends |
| Small multitool or knife with pliers | 30–120 g | Cutting, pliers for zip sliders and pole ends |
| Lighter | 10–20 g | Sealing cord ends, shaping plastic (see campfire safety) |
| Tent pole repair sleeve (only if you carry a tent) | 15–30 g | Snapped or split poles |
| Spare zip slider (only if a zip is critical) | 2–5 g | Failed zips on bags and tents |
| Class | Weight | Contents |
|---|---|---|
| Ultralight | ≈ 60–100 g | Tape on a pole, 2 patches, needle and thread, 2 pins, 4 cable ties, 3 m cord, lighter |
| Standard | ≈ 150–250 g | Ultralight plus mat patches and glue, spare buckle, wire, super glue, small multitool |
| With a tent or for a group | ≈ 300–450 g | Standard plus pole sleeve, spare zip slider, extra tape, seam sealer, a bigger fabric piece |
Weights are rough values for typical generic items; weigh your own kit.
Match the kit to the trip. A weekend with a tarp needs tape, patches, cord and a needle; a tent adds pole and zip parts; a winter trip adds buckle and glove repairs. The Kit Builder adds a repair pouch to your packing list so it is not forgotten.
How to pack a repair kit small – and where to keep it
A good kit is flat, flexible and in one place. Keep it in a single zip bag, labelled, in the lid pocket or the top of the pack, where you can reach it without unpacking. A kit buried under the sleeping bag will be left unused until it is too wet to repair anything.
- Tape: wind 1–2 m round a bottle, a trekking pole, a lighter or a pencil instead of carrying the roll. It saves bulk and the tape stays clean.
- Needle and thread: push the needle into a piece of card or cloth, wind the thread round it and wrap it in a scrap of tape so the point cannot poke through the bag.
- Patches: round the corners at home and carry them flat, between two pieces of backing paper.
- Cable ties and pins: clip them on a safety pin or keep them in a small bag so they do not spread through the pack.
- Glue: in its own small bag, away from fabric and the first aid kit. A home-made pine pitch stick is a natural back-up for jobs on wood.

Check the kit before every trip: does the glue still flow, are the patches still sticky, is the thread rotten, is the lighter full? Replace what you used straight after you get home, otherwise the next trip starts with a gap.
How to repair a tarp or tent in the field: torn fabric
A rip in a tarp or tent fabric spreads under tension, so act early. The method is the same for a tarp, a tent, a jacket or a rucksack: clean, dry, rounded patch, press, repeat on the other side.
Patching torn fabric
 1Clean and dry the area
Wipe both sides with a cloth or a wipe and let the fabric dry. Dirt, grease and moisture are why most field patches peel. Stop the rip spreading first by tying off the load or a stitch across its end.
 2Cut a patch with round corners
The patch should extend about 2 cm past the tear in every direction. Cut the corners round: square corners catch on the pack and peel up first.
 3Press hard from the middle out
Lay the fabric flat, remove the backing and place the patch without wrinkles. Press firmly from the middle out for at least a minute; warmth from your hand helps.
 4Turn it over and patch the inside
A second patch on the other side holds the torn edges together and doubles the grip. Keep the repaired area unloaded for a while before you pitch tight again.
For tears longer than a hand, sew the edges together first with a loose herringbone or whip stitch, then patch over the seam. Tape alone peels from a long rip in the first rain. Seam tape and sealant need dry, warm conditions to cure, so treat them as a home job.
| Symptom | Field fix | Better fix at home |
|---|---|---|
| Small hole or cigarette-size burn | Patch with round corners both sides, or a piece of tape over a round patch | Replace the patch with one matched to the fabric |
| Straight rip under 10 cm | Stitch across the end to stop it, then patch both sides | Sew the edges, patch and seam-seal |
| Long rip across a panel | Stitch it closed, tape the seam and keep the load off it | Panel repair or professional repair |
| Torn seam or seam tape peeling | Sew it with strong thread, add tape over the stitches | Re-tape or re-seal the seam |
| Leak along a seam in rain | Pitch lower or move the leak off the sleeping area | Seam sealer, dry, warm and cured |
| Zip tape ripped | Tape over it and use safety pins to close the opening | Replace the zip |
How to fix a broken grommet or tie-out with a pebble
A ripped-out grommet or torn tie-out loop is a common tarp failure, especially in wind. If the corner fabric is still sound, you can make a new anchor point in a minute with a pebble and a piece of cord – a "button" tie-out. This is the classic way to make a tie-out anywhere on a tarp; see also choosing a tarp.
The pebble tie-out
 1Look at the damage
The fabric near the corner must be undamaged. If the rip runs along the seam or the hem, patch it first, as described above, before you build the tie-out on it.
 2Pebble behind the fabric
Pick a smooth pebble about the size of a large coin or a hazelnut and push the fabric up round it from behind, so a round bump forms. Keep the pebble in the bump with your fingers.
 3Cord round the neck
Wrap cord round the base of the bump, making a loop that cannot slip off the pebble, and tie it with a clove hitch or two half hitches. The cord should sit snug in the fabric fold.
 4Tie the guyline and tension
Attach the guyline to the new loop and pull in line with the tarp edge. Loop and pebble should hold; a stone with sharp edges would wear through the fabric, so choose a smooth one.
The pebble tie-out works with anything round: a pebble, a pinecone, a small stick or a bit of folded cloth. It is a temporary fix; on a tarp you plan to keep, sew a proper reinforced loop from webbing at home. The paracord guide shows which cord to carry for guylines and tie-outs, and natural cordage covers making cord on the spot.
How to fix an air mattress leak: find it, dry it, patch it
A sleeping mat that slowly loses air makes a cold night, and the first thing to know is that finding the leak is harder than patching it. Work calmly: inflate the mat fully, search it systematically, mark the spot, and give the patch time to cure. Until the patch has cured, a spare layer or a pile of dry leaves under the mat helps; more in sleeping gear.
Find and patch a leak
 1Inflate it fully and listen
Inflate until firm but not taut. Hold sections to your ear and cheek and feel along seams and the valve. A hiss or a cool draught often finds a large leak without water.
 2Use water or soapy foam
Submerge the mat section by section in a lake, a bucket or a basin and watch for a stream of bubbles. Or wipe it with soapy water and wait for foam to grow at the hole.
 3Mark the spot and dry it
Circle the leak with a marker or a pen straight away, because the bubbles will vanish and the mark will not stick to a wet mat. Dry the area completely.
 4Patch and weigh down
Apply the glue as the patch instructs, press the patch on, and weigh it down with a flat object. Let it cure for the stated time before you inflate it fully.
Not every slow leak is a hole. Check the valve first: dirt on the seal, a half-closed valve or a cracked valve body all leak. Cold also drops air pressure overnight, so a mat that "leaks" only in the cold may need a top-up and nothing else.
| Symptom | Likely cause | Fix |
|---|---|---|
| Soft after 1–2 hours | Puncture or valve not closed | Check the valve, then use the water test |
| Soft only in the morning after a cold night | Air cools and contracts | Top it up; no repair needed |
| Hiss near the valve | Dirty or damaged valve seal | Clean the valve and seal; check the valve body |
| Leak on a seam | Seam failure | Patch over the seam with a larger patch, or replace the mat if it is long |
| Bubbles on a foam-filled self-inflating mat | Puncture in the cover | Same as an air mat; dry well, the foam inside soaks up water |
| Patch peels again | Dirt or moisture under it | Remove, clean with alcohol or soapy water, dry, glue again |
How to repair a broken tent pole in the field
A pole snaps at a joint or splits where it is bent most. With a repair sleeve – a short tube slightly wider than the pole – you can splint it in five minutes. Without one, use a straight stick and tape or cable ties. It will not be as strong, but it keeps the tent standing for the rest of the trip.
Splint a snapped pole
 1Assess the break
Look at where the pole broke. A clean snap is easy to splint; a long splinter needs a longer sleeve. Keep the shock cord in place, it holds the sections together.
 2Slide the sleeve over the break
Slip the sleeve onto one end, align the two broken ends as straight as you can and slide the sleeve across so it sits centred on the break, with 5–7 cm either side.
 3Tape both ends
Wrap tape tightly round each end of the sleeve and over the pole. Add a cable tie on the ends if you have one. Wrap smoothly so there are no edges.
 4Thread it and test
Thread the pole through its channel and pitch. If the sleeve snags in the channel, add a layer of tape to smooth its edges, and pull the pole through gently.
For a pole without a sleeve, lash a straight stick or a tent peg along the break with tape or cord at three points and let the splint extend 10–15 cm either side. Poles with a long split in the middle may need two splints; keep tension on the guylines low in wind.
Zips, straps, clothing, boots, stove and other quick fixes
After fabric, mat and poles, a handful of small failures account for most of the rest. The table is a symptom-first lookup; the sections after it explain the ones that need care.
| Symptom | Field fix | Notes |
|---|---|---|
| Zip opens behind the slider | Squeeze the slider sides slightly (see below) or close it with a safety pin through the pull holes | Gentle, in small steps; replace the zip at home |
| Zip pull broke off | Thread a cord loop, safety pin or wire through the slider hole | Take the pull as an excuse to replace it at home |
| Pack strap torn from the body | Sew with strong thread through the old holes; add a cable tie or cord lashing if needed | See backpacks; fix properly at home |
| Buckle cracked | Replace with the spare buckle or tie the strap with a cord and a knot | Webbing needs to be re-threaded to fit a new buckle |
| Hole in clothing | Sew the edges; patch inside with tape or a fabric patch | Round corners; tape over wool will not stick |
| Down leaking from a hole | Pull the feathers back into the hole with a pin, patch over it | Do not pull feathers out, it opens the hole |
| Boot sole peeling off | Wrap tape or cord around the boot and sole, or fasten with cable ties through the seam | A get-home fix only; see footwear |
| Glasses arm or screw lost | Wire or thread through the hinge, or tape the frame | Replace the screw at home |
| Headlamp flickers or dies | Check the battery orientation, clean the contacts with a cloth, bend contacts gently | See lighting |
| Stove sputters or leaks fuel at the connection | Check the O-ring, tighten by hand, move to a safe place | See camp stoves; no fuel-line repairs |
| Water bottle cracked | Tape it for cold water only; replace it for hot liquids | Do not boil in a cracked bottle |

A failed zip
Most zip failures are a slider that has worn or been pulled slightly open, so the teeth no longer mesh behind it. First check that the teeth are clean and not bent or missing; sand or grit can cause the same symptom. If the zip simply opens, squeeze the slider gently from the sides with pliers, a little at a time, and test after each squeeze. Squeezing too hard crushes the slider and the zip will bind or break, so go slowly and stop when it holds. If one tooth is missing or the slider is cracked, use a safety pin through the holes or the spare slider.
Rucksack straps and buckles
Webbing frays from the ends; a quick pass with a lighter melts the end of a synthetic strap flat, with the fire safety rules from the fire safety guide in mind. A torn strap can be sewn through its old holes with strong thread or lashed with cord. For a cracked buckle, a spare of the same size is the best fix; if you have none, tie the straps with a knot or use a cable tie. Always fix the load-bearing parts of the pack at home, using proper webbing and thread.
Torn clothing and down leaks
Sew the edges of a tear together with small stitches and then patch inside with a self-adhesive patch. For down garments or bags, a small hole will leak feathers. Pull them back in carefully from the outside with a pin and patch over the hole; pulling feathers out only enlarges the hole. Use patches made for the fabric: tape sticks poorly to wet or very fuzzy fabric.
Boot soles, glasses, headlamp and bottle
A boot sole that has come loose is a get-home problem. Wrap tape or cord around the boot and sole, or use cable ties through the stitching holes to hold it. It will not last, and the boot should be repaired or replaced properly. Glasses survive on wire or thread through the hinge and a little tape. A headlamp that flickers usually has dirty or loose battery contacts; clean them with a cloth and check the battery orientation, and carry spare batteries, see lighting. A cracked water bottle can be taped and used for cold water, but replace it before you pour hot water into it.
Stoves: keep it simple
Stove problems that you can solve outdoors are limited to the simple ones: a blocked jet that you can clean as the maker says, a worn O-ring at the cartridge connection that you can check and replace, and a loose connection you tighten by hand. If you smell gas, close the valve, move away from any flame and do not light anything. Do not modify valves or fuel lines. See camp stoves for safe use.
Improvised repairs from nature (in brief)
Nature supplies some stopgaps when the kit runs out. They are weaker than a proper repair, but they can save a trip.
- Cord: plant fibres from nettle stems or lime bast can be twisted into cord for lashings and tie-outs, see natural cordage.
- Pitch glue: resin from conifers such as spruce or pine, warmed and mixed with fine charcoal and a little fibre, makes a traditional waterproof glue for small jobs. It is messy, brittle and temporary, and it needs a fire, so only use it where fire is permitted. Fat-rich pine wood, see fatwood, is a resin source too, but never harvest from living trees.
- Splints and pegs: a straight stick can splint a pole, replace a lost tent peg or serve as a toggle on a tie-out.
- Lashings: cord, root or flexible bark strips hold a broken frame together, see lashings.
Treat all of them as get-home measures and replace them with proper repairs afterwards.
What not to repair in the field
Some failures are not a repair job. A repair that fails on a tarp costs you a wet night; a repair that fails on safety equipment can cost much more.

Repair or replace?
Repair in the field
- Tarp and tent fabric, poles and zips
- Sleeping mat punctures
- Webbing, buckles, strap stitching
- Clothing tears and down leaks
- Glasses, headlamp contacts, bottle caps
Replace, do not repair
- Gas valves, regulators and fuel lines
- Climbing ropes, slings, harnesses and anything that holds a fall
- Helmets and cracked safety gear
- Boots whose soles are failing on a steep or icy route
- Paracord or cord used to hold a person, see paracord
If a safety-critical item is damaged, retire it, and change your plan: shorten the route, use a lower route or turn round. A broken boot sole on easy ground is a get-home fix; on steep or icy ground it is a reason to stop. For emergencies and rescue, see first aid kit and trip planning.
After the trip: proper repair and maintenance at home
A field repair is a loan, not a gift. When you get home, dry everything, then redo what you taped, pinned or tied: sew the strap, replace the zip, seam-seal the tarp and re-patch the mat with the right patch.
- Dry and clean tents, tarps and mats before storing; damp fabric rots and mildews. Sleeping bags need their own routine: see sleeping bag care.
- Replace temporary patches with proper ones, and re-seal seams where the tape peeled.
- Restock the kit straight away, so the next trip starts complete.
- Look after tools such as the knife and multitool: see tool care.
- Buy smart: a repairable, simple item often beats a cheap throwaway, see budget kit.
Practise each repair once at home in daylight, with a spare scrap of fabric: it is a lot quicker than in the rain.
Repair kit checklist
- Gaffer or repair tape, wound on a bottle or pole
- Fabric patches with round corners, in a flat pocket
- Mat patches and glue that fit your mat, not expired
- Needle and strong thread, point protected
- Safety pins, cable ties, 3–5 m of cord
- Spare buckle and a few metres of wire
- Lighter and a knife or small multitool
- Pole sleeve and spare slider if you carry a tent
- Everything in one labelled zip bag in the lid pocket
- Contents checked and replenished after each trip
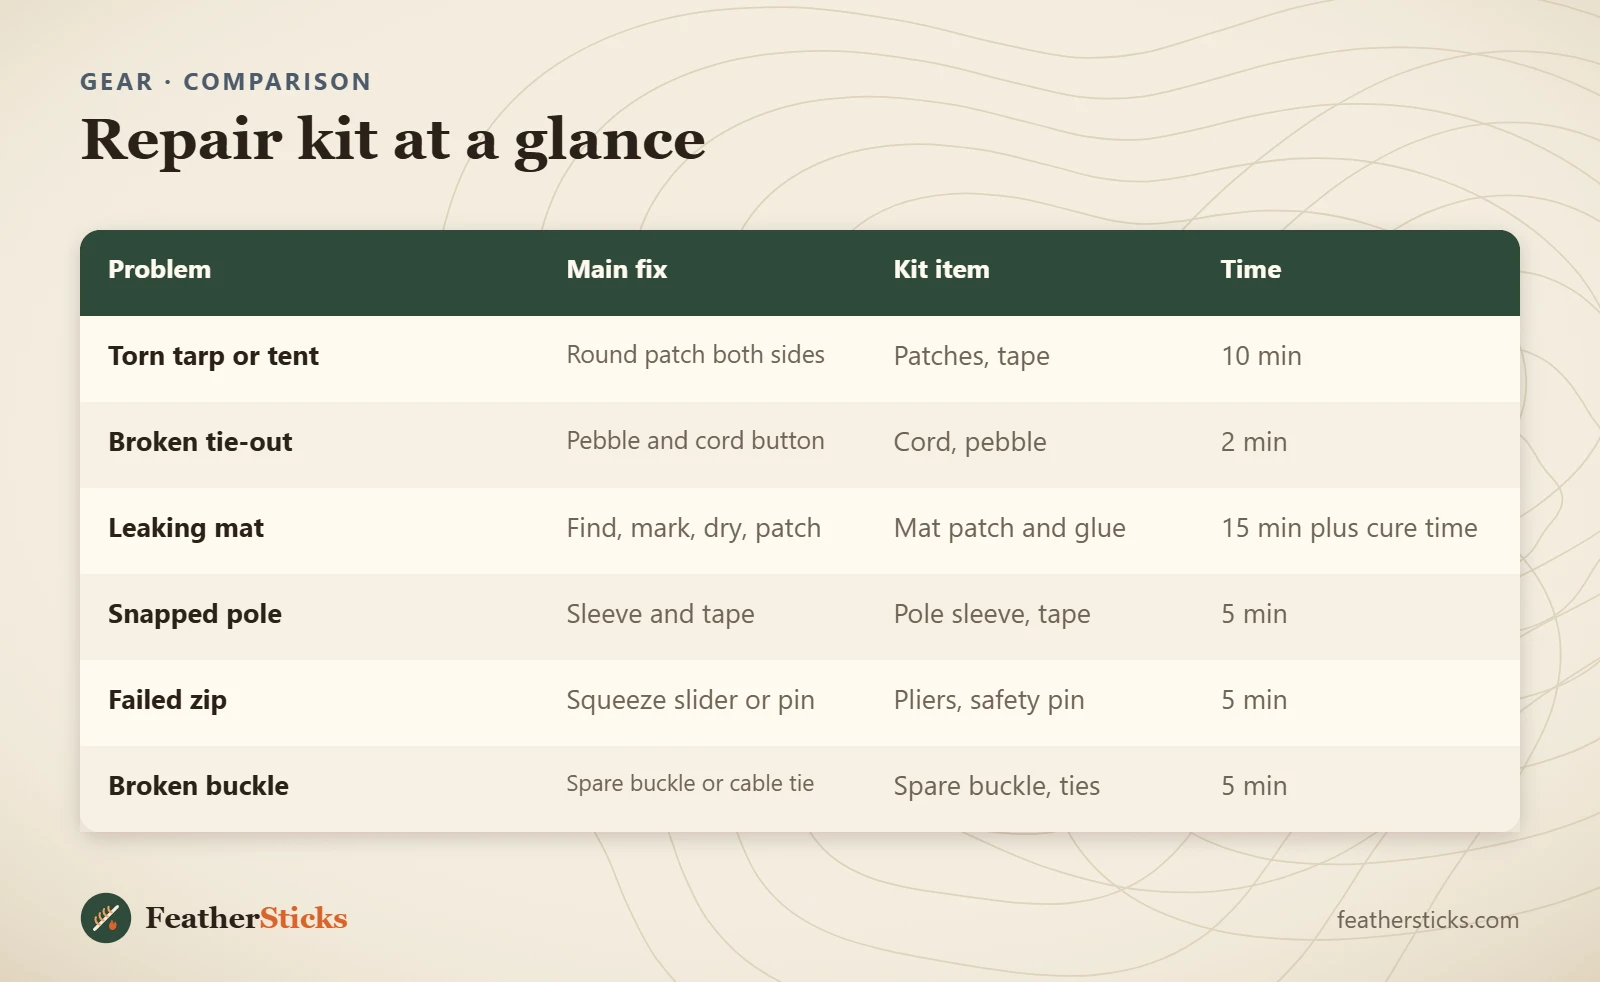
| Problem | Main fix | Kit item | Time |
|---|---|---|---|
| Torn tarp or tent | Round patch both sides | Patches, tape | 10 min |
| Broken tie-out | Pebble and cord button | Cord, pebble | 2 min |
| Leaking mat | Find, mark, dry, patch | Mat patch and glue | 15 min plus cure time |
| Snapped pole | Sleeve and tape | Pole sleeve, tape | 5 min |
| Failed zip | Squeeze slider or pin | Pliers, safety pin | 5 min |
| Broken buckle | Spare buckle or cable tie | Spare buckle, ties | 5 min |
Common mistakes
- Patching a dirty or wet surface, so the patch peels in the first rain.
- Using square patch corners that catch and lift.
- Patching only one side of a tear.
- Taping a mat leak without finding the actual hole or checking the valve.
- Squeezing a zip slider too hard and crushing it.
- Repairing safety-critical gear in the field instead of replacing it.
- Never restocking the kit after a trip.
What you need
- Gaffer or repair tape on a bottle or pole
- Self-adhesive fabric patches and mat patches
- Needle and strong thread
- Cable ties, safety pins, spare cord
- Spare buckle, thin wire, small tube of glue
- Small multitool or knife and a lighter
- Pole repair sleeve (tent users)
FAQ
What should be in an outdoor repair kit?
How do I repair a tarp in the field?
How do I find a leak in an air mattress?
How do I fix a broken tent pole?
Can I fix a zip in the field?
Is super glue good for outdoor repairs?
What should I never repair myself outdoors?
How much does a repair kit weigh?
Check yourself
Completed6 quick questions from this guide. Nothing is sent anywhere.
Related step-by-step guides
-
 1
-
 1
-
 1