Pine Pitch Glue: How to Make Pine Resin Glue and a Pitch Stick
Pine pitch glue is a traditional bushcraft glue made from conifer resin and finely crushed charcoal, melted together over gentle heat. Warm, it is sticky and can be shaped. Once it cools it sets hard and waterproof. Wound onto the end of a stick as a pitch stick, it travels in your kit for years and only needs warming before each use.
This guide covers how to collect resin without hurting trees, how to clean it, how to melt it without setting it on fire, the rule-of-thumb ratios, how to build a pitch stick and what the glue is good for: hafting, sealing seams, small repairs and fire lighting. It belongs to our bushcraft skills and builds on tree identification and campfire safety. New to the outdoors? Start with bushcraft for beginners.
Step by step
-
1

Find old resin runs
Look for hardened resin on existing wounds of spruce or pine. Never cut a tree to make it bleed, and take only a little.
-
2

Clean the resin
Pick out bark, needles and insects, then break the resin into small pieces so it melts evenly.
-
3

Melt it gently
Put the resin in a small can, stand the can in a pot of water on embers and keep a lid at hand. No open flame.
-
4

Stir in crushed charcoal
Add finely crushed charcoal, about one part to four parts resin by volume, plus a little beeswax if you like.
-
5

Make a pitch stick
Dip the end of a stick, lift it, let the layer set, dip again. Repeat until the blob is about thumb-thick.
-
6

Warm, apply, let it cool
Warm the tip near embers until soft, dab it onto the joint, press the parts together and let them cool.
What is pine pitch glue?
Conifers such as pine and spruce produce resin to seal wounds in their bark. Fresh resin is clear and runny. Exposed to air, it slowly thickens and hardens into amber-coloured lumps. Pure resin is sticky when warm but brittle when cold: it cracks like glass when the joint flexes. Mixing in fine charcoal powder, a filler, changes that. The charcoal stiffens the warm glue, reduces stickiness on your fingers and makes the hardened glue tougher.
That mixture is pitch glue, also called pine pitch, resin glue or simply pitch. Traditional recipes often added other fillers and binders, such as fine plant fibre, ground bark or dried animal dung. For a camp version you need just two ingredients, plus one optional extra:
- Resin from spruce, pine or another conifer: the glue itself.
- Charcoal from your fire, crushed to powder: the filler.
- Beeswax (optional), a small amount: makes the glue less brittle.
Pitch glue is a thermoplastic: warm it and it softens, cool it and it sets. There is no curing time and no chemical reaction, and that is why one pitch stick can be used again and again. The same property means it softens on a hot day in the sun and becomes brittle in hard frost.
Raw resin vs pitch glue
Raw resin
- Amber, sticky, smells of turpentine
- Brittle when cold, cracks easily
- Sticks to everything, hard to shape
- Use: fire lighting, raw material
Pitch glue
- Black, glossy, firm when cold
- Tougher, takes some knocks
- Shapeable when warm, sets in minutes
- Use: hafting, sealing, small repairs
How strong is pitch glue?
Strong enough for jobs where it fills gaps and is held mechanically: a point set into a slotted shaft and bound with cord, a sealed seam on a bark container, a coated whipping on the end of a rope. It is not a structural adhesive. Do not trust it alone on anything that carries your weight, takes heavy blows or holds a cutting edge to a handle. It is best seen as a gap-filling, waterproof sealant and binder that works together with lashings and good fits.
Which trees give the best resin?
Almost any conifer resin works. In Europe and much of North America the most common sources are spruce and pine, because both bleed visibly where bark is damaged. You do not need to know the species, but you should know the difference between conifers and the toxic yew. The full key is in identifying conifers.
| Tree | How to recognise it | Resin | Notes |
|---|---|---|---|
| Spruce | Single, prickly, four-sided needles on woody pegs; cones hang | Often plenty of beads and runs on old wounds and broken branches | The most common source in planted forests |
| Pine | Long needles in bundles of two (Scots pine), orange upper trunk | Runs on wounds, stumps and broken limbs | Resin-saturated pine wood is fatwood |
| Fir | Soft, flat needles with two white stripes below; cones stand upright | Resin blisters in smooth bark | Leave the blisters alone: they sit in living bark |
| Larch | Soft needle tufts on knobs, bare in winter | Sticky resin on wounds | Usable, but less common to find in quantity |
| Yew | Flat needles, plain green underneath, red berry-like arils | No resin | Toxic. Not a resin source |
Hardened, amber-coloured resin is easiest to work with because it is clean and does not smear. Fresh, clear resin is softer and gets everywhere; it is also part of the tree's active wound seal. Very old, crumbly resin still melts, but it may be darker and more brittle. Mixing resin from different trees is fine.
Collecting resin ethically and legally
Resin is a tree's wound dressing. The one rule that matters: collect only from existing wounds and dried runs, and never wound a tree to make it bleed. Cutting, peeling or scoring bark on a living tree damages it and opens the way for fungi and insects. Historically, resin was tapped commercially by cutting trees on purpose. That is not something to copy in the woods.
Collecting resin without harming the tree
 1Look for old wounds
Search for broken branches, storm damage, old scars and stumps where hardened resin has run down the bark. Amber beads and drips are what you want.
 2Lift only loose drops
Pry off hardened drops and runs with a wooden spatula or your fingers and let them fall into a small tin. A knife tends to cut into the bark; if you use one, work only on the resin, never on the bark.
 3Leave the seal, take a little
Leave the thin layer that covers the wound itself, since it keeps fungi out. Take a few drops from each tree and move on rather than scraping one tree clean.

Good places to find resin
- Storm damage and broken branches: the tree has bled and sealed the wound; the runs below are often hard and easy to lift.
- Stumps after forestry work: resin collects on the cut surface. Ask before taking anything from a working forest.
- Fallen trees and firewood: resin on dead wood harms no one; logs in a woodpile often carry runs.
- Old fatwood: resin-rich pine stumps can be scraped or the resin melted out. See where to find fatwood.
How much do you need? For a pitch stick a small handful of resin is plenty. That handful should come from several trees. A walk through a spruce forest with a tin in your pocket is usually enough.
Before you collect any resin
- You take only hardened runs and loose drops from existing wounds or dead wood
- You do not cut, peel or score any living bark
- You leave the layer that seals the wound
- You have permission, or collecting small amounts is clearly allowed there
- You are not in a nature reserve or a national park core zone
Resin is highly flammable: heat it safely
The same property that makes resin a superb fire starter makes melting it the riskiest part of this craft. Hot resin gives off flammable vapours, and if the can touches a flame or overheats, the contents can catch fire and burn fiercely with thick black smoke. Burning resin is also extremely sticky: a splash on skin keeps burning heat in place.

Safe heating methods
- Water bath (double boiler): stand the resin can in a pot of water and heat the pot on embers. The water limits the temperature to its boiling point, so the resin cannot overheat. This is the safest method and works well for most resin.
- Can on embers: if the resin stays too stiff in the water bath, set the can at the edge of a bed of glowing coals, never in flames, and heat in short bursts while stirring. Stay with it the whole time.
- Never: in or over open flames, on a stove at full power, indoors, in a tent or near your shelter.
Keep a lid or a flat stone that covers the can within reach. If the resin catches fire, put the lid on to smother it and take the can off the heat with a stick or pot grab. Do not pour water into burning resin: it can spatter hot material. The usual campfire rules apply as well: fire at least 5 m from tents and hammocks and 3 m from synthetic tarps, and no fire at all during fire bans. No permitted fire means no pitch making. Fire bans and danger levels are explained in when fire is allowed.
Work sitting or kneeling at a stable spot, with the can on a level surface. Wear long sleeves of wool or cotton rather than synthetics, and keep a pot of clean water nearby for cooling burns, not for the can. A small fire burned down to embers is ideal; the fire lay picker helps you choose one that gives a good coal bed.
Ingredients and ratios: how much charcoal?
There is no single correct recipe. Resin differs from tree to tree and from fresh to old, so ratios are starting points that you adjust after a test. The figures below are rules of thumb by volume, not weight.

| Mix | Resin : charcoal | Result | Good for |
|---|---|---|---|
| Softer | about 5 : 1 | Stickier, more flexible, softens sooner in warmth | Sealing seams, coating whippings |
| Standard | about 4 : 1 | Firm when cold, sticky when warm | General use, pitch sticks |
| Harder | about 3 : 1 | Stiffer and less tacky, can get brittle | Filling gaps in hafting joints |
| Standard plus wax | 4 : 1 plus a small piece of beeswax | Less brittle in the cold, a little softer | Kit pitch sticks for winter |
Making the charcoal powder
Take charcoal from your own fire once it has burned down: pieces that are black all the way through, with no brown wood left inside. Let them cool completely. Wrap them in a scrap of cloth or bark and crush them between two stones, then grind until you have a fine, flour-like powder. Coarse grit makes lumpy, weak glue. Hardwood charcoal works well, but any well-charred wood will do. Never use barbecue briquettes with additives.
Beeswax: optional
A small piece of beeswax, as a rule of thumb no more than about a tenth of the resin volume, makes the glue less brittle, especially in cold weather. Too much wax makes it soft and greasy. If you have none, leave it out: resin and charcoal alone make perfectly good pitch.
How to make pine resin glue, step by step
With clean resin, charcoal powder and a safe heat source ready, mixing takes about ten to twenty minutes. Use a can you never want to cook in again: resin does not wash out. A small steel food can with a wire handle bent from a coat hanger or a stick through two holes works well.
Melting and mixing pitch glue
 1Crush the charcoal
Grind fully charred, cold charcoal between two stones into fine powder. Do this first, so you never have to leave hot resin unattended.
 2Resin in the can, can in the water
Fill the can about half full with clean resin pieces and stand it in a pot of water on embers. Keep the lid next to it. The resin softens and slowly turns liquid.
 3Skim off bark bits
Bark flakes, needles and insects float up or sink. Lift them out with a twig. For very dirty resin, pour the melt through a scrap of metal mesh into a second can.
 4Stir in charcoal and wax
Add the charcoal a spoonful at a time and stir after each addition until the mix is smooth and black, then add wax if you use it. Check with a test drop before you stop.
Cleaning resin before melting
The less dirt you melt, the less you have to fish out. Spread your resin on a flat stone or a piece of bark, pick out obvious bark flakes, needles and insects, and break big lumps into pieces about the size of a pea. Small pieces melt evenly, so you need less heat and less time over the fire. Wet resin spits when heated; let it dry in the sun or in your pocket first.
Don't overheat it
Heating resin for a long time drives off its volatile components and makes the pitch harder and more brittle. Those vapours are flammable and irritate the eyes and lungs. Keep the heat low, the session short and your face out of the smoke, and work in the open air with the wind at your back. If the resin starts to smoke heavily, take it off the heat.
How to make a pitch stick
A pitch stick is the traditional way to store and carry pitch glue: a short stick with a thick blob of hardened pitch on one end. To use it, warm the blob, dab it on, and let it set again. A stick of about 20–30 cm, pencil to finger thick, gives you a handle long enough to keep your fingers away from the heat.
Building a pitch stick layer by layer
 1Dip the end
Keep the pitch warm and liquid in the water bath. Dip the end of a dry, peeled stick a few centimetres deep. A few notches near the end help the first layer grip.
 2Lift and let it set
Lift the stick out and hold it over the can for a few moments while the layer thickens. Turn it slowly so the pitch does not drip off one side.
 3Repeat until thumb-thick
Dip again and again, letting each layer set a little. After several dips the blob is about the thickness of your thumb, which is plenty for many repairs.
 4Let it cool and harden
Lay the stick down with the blob on a cold stone or push the bare end into the ground. Within a few minutes the pitch is hard, black and glossy.
You can also pour leftover pitch into a mould, such as a twist of foil or a small tin, and break off pieces later. Never press hot pitch into shape with bare fingers: wet a flat stick or your knife spine and use that instead. Scrape any pitch left in the can into a final blob before it sets, or keep the can as your dedicated pitch pot.
Testing and adjusting the mix
Before you make the whole batch into a pitch stick, test a drop. Put a little pitch on a cold stone or drip it into cold water, wait a minute, then check it.
- Press with a thumbnail: good pitch is firm and leaves at most a slight dent. If it is soft and gummy, add charcoal.
- Bend or knock it: if it shatters at once, it is too brittle. Add a little resin or a small piece of beeswax.
- Touch it: cold pitch should not stick to your fingers. If it does, add charcoal or heat it a little longer.
- Stretch it warm: warm pitch should pull into a short, thick thread, not run like syrup.
Is the pitch ready?
Does a cold test drop shatter when you knock it?
Yes → Too brittle: add some resin or a small piece of beeswax, stir and test again.No → Good. Check the surface next.Is the cold drop still soft or sticky?
Yes → Too soft: add a spoonful of fine charcoal, or heat a little longer at low heat.No → Good. Check how it handles warm.Does warm pitch run like syrup?
Yes → Let it cool a little before dipping, or add charcoal.No → Ready. Build your pitch stick.
What can you use pitch glue for?

- Hafting: the archaeological classic. Points were set into a slotted shaft, bound with sinew or plant fibre and sealed with pitch. For camp crafts the same method fixes a point to an arrow shaft or a fish spear, or a bone or antler piece to a handle. Bind first, then seal the binding.
- Sealing seams: pitch closes leaks in birch bark containers, baskets and wooden boxes. Warm the seam a little and work the pitch into the gap. Do not use it where hot food or drink touches the pitch: heat softens it.
- Waterproofing bindings: a thin coat over a whipping, a lashing or the end of natural cordage keeps out water and stops fraying.
- Small repairs: filling a crack in a wooden handle, fixing a loose ferrule, sealing a split in a bark sheath. For gear made of synthetic fabric, a proper patch from your repair kit is better: pitch is stiff and cracks when fabric flexes.
- Fire lighting: pitch burns hot and long, like fatwood. A pitch stick lights from a match and burns like a torch for a short while; shavings or crumbs of hard resin added to tinder help in damp weather.
What pitch glue is not for
Do not use pitch to fix an axe or hatchet head. A head is held by a tight fit and a wedge, and a loose head must be re-wedged or rehung, as shown in replacing an axe handle. Likewise, a broken knife handle needs a real repair, not a blob of pitch. Glue that softens in the sun is no substitute for a sound mechanical joint on a tool that you swing or cut with.
How to use a pitch stick for hafting and repairs
Pitch only sticks to clean, dry surfaces, and it grips better on rough ones. Prepare the joint before you warm the stick, so the glue does not set before you are ready.
Applying pitch from a pitch stick
- Prepare the joint Clean and dry both parts. Roughen smooth surfaces with your knife, fit the parts together and do the binding first if there is one.
- Warm the parts slightly Hold the joint near the embers for a moment. Cold wood or stone chills the pitch so fast that it does not bond.
- Soften the tip Hold the pitch blob near embers, not in flame, and turn it until the surface turns glossy and soft. If it catches fire, blow it out at once.
- Dab and work it in Dab the pitch onto the joint or binding and spread it with a wet stick or your knife spine. Do not smear it with your fingers.
- Press and let it cool Press the parts together, hold them still for a minute or two and leave the joint until it is completely cold before loading it.
For a smooth finish, pass the hardened joint briefly near the embers again so the surface melts slightly and flows. Excess pitch can be scraped off cold with the knife spine. To undo a pitch joint, warm it until it softens and pull the parts apart.
Storing pitch and cleaning your hands
Hardened pitch keeps for a long time. Store the pitch stick so that it cannot glue itself to the rest of your kit: in a small tin, wrapped in paper or a piece of bark, or in its own bag. Keep it out of hot cars and direct sun, where it can soften and stick. In hard frost it becomes brittle, so protect it from knocks in winter.
Storage and cleaning at a glance
- Store
- Pitch stick in a tin or wrapped, cool and dry
- Shelf life
- Long, as long as it is not overheated or contaminated
- Hands
- Rub with oil or fat first, then soap and warm water
- Knife and tools
- Wipe with a little oil or alcohol, from the spine side
- Pitch can
- Keep as a dedicated pitch pot; never cook in it again
Getting resin and pitch off your hands
Water and soap alone barely touch resin. Rub your hands with a little oil or fat first, such as cooking oil, butter or lard from your camp kitchen, until the resin dissolves and rolls off, then wash with soap and warm water. Wipe tools and blades with oil or alcohol, as described in tool care, always from the spine side. On clothing, pitch is very hard to remove, so wear old clothes for this job.
Pitch glue with children
Pitch glue is not a craft for young children. Hot resin sticks to skin and causes deep burns, and the can is a fire risk. That does not mean children cannot take part. Younger children can help find old resin runs on a walk and learn why we never cut trees. Older children can crush charcoal and test cold drops. An adult does all heating, stirring and dipping, and keeps children at a safe distance from the hot can.
Teenagers with experience around fire can make their own pitch stick under close supervision, with long sleeves and a pot of cool water nearby. Age guidance and fire rules for groups are in campfires with children.
Troubleshooting pitch glue
| Symptom | Likely cause | Fix |
|---|---|---|
| Pitch shatters when cold | Too much charcoal, overheated, or no wax | Remelt with some fresh resin or a little beeswax |
| Pitch stays sticky when cold | Too little charcoal, very fresh resin | Stir in more fine charcoal; heat a little longer at low heat |
| Glue does not hold | Surface dirty, wet, smooth or cold | Clean, dry, roughen and pre-warm both parts |
| Lumpy, grainy pitch | Charcoal too coarse, bark bits left in | Grind charcoal finer; skim or strain the melt |
| Resin spits and bubbles | Water in the resin | Dry the resin before melting; keep the heat low |
| Can catches fire | Too hot, or in contact with flame | Lid on, off the heat, let it cool; use a water bath next time |
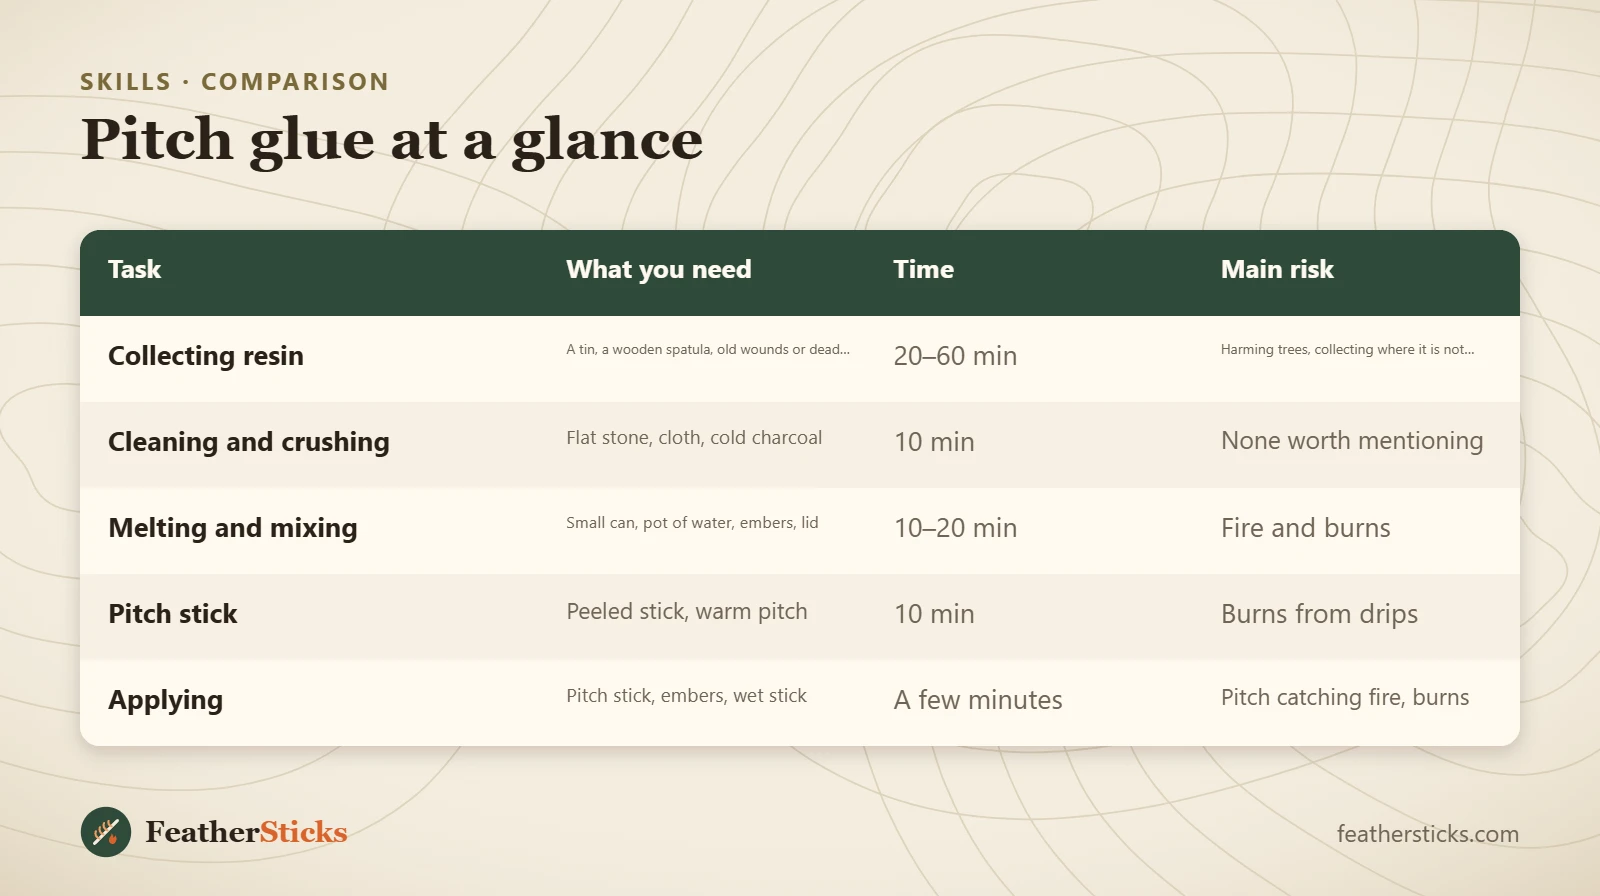
| Task | What you need | Time | Main risk |
|---|---|---|---|
| Collecting resin | A tin, a wooden spatula, old wounds or dead wood | 20–60 min | Harming trees, collecting where it is not allowed |
| Cleaning and crushing | Flat stone, cloth, cold charcoal | 10 min | None worth mentioning |
| Melting and mixing | Small can, pot of water, embers, lid | 10–20 min | Fire and burns |
| Pitch stick | Peeled stick, warm pitch | 10 min | Burns from drips |
| Applying | Pitch stick, embers, wet stick | A few minutes | Pitch catching fire, burns |
Common mistakes
- Cutting or scoring living bark to make a tree bleed.
- Scraping a wound clean, including the layer that seals it.
- Heating the can in open flames or leaving it unattended.
- Pouring water into burning resin instead of putting the lid on.
- Using coarse charcoal grit or briquettes instead of fine, pure charcoal.
- Pressing hot pitch into shape with bare fingers.
- Trusting pitch alone to hold an axe head or a knife handle.
What you need
- Small steel can with a wire handle (dedicated pitch pot)
- Pot for the water bath and a lid or flat stone
- Wooden spatula and stirring twigs
- Two stones and a cloth for crushing charcoal
- Peeled sticks of about 20–30 cm for pitch sticks
- A little beeswax (optional)
- Oil or fat for cleaning hands
- First aid kit and clean water for cooling burns
FAQ
How do you make pine pitch glue?
Can you take resin from a living tree?
What is the ratio of charcoal to resin?
Is pine resin flammable?
What is a pitch stick?
How do you get pine resin off your hands?
What can pine pitch glue be used for?
Check yourself
Completed6 quick questions from this guide. Nothing is sent anywhere.
Related step-by-step guides
-
 1
-
 1
-
 1