How to Replace an Axe Handle: Hang an Axe Head Step by Step
To replace an axe handle, saw the old handle off below the head, drive the stub out of the eye, shape the top of a new hickory or ash handle until the head slides most of the way on by hand, seat it by rapping the handle end, then lock it with a dry hardwood axe wedge, trim, oil and sharpen. With basic hand tools it is an afternoon's work, and a well-hung head will stay tight for years.
This guide covers when a handle really must go, safe removal, how to judge grain on a hickory axe handle or an ash one, fitting the eye, wooden and steel wedges, finishing with linseed oil, checking the hang, the soaking myth and troubleshooting. It builds on our guides to axes and hatchets and knife and axe care in the tools section, and on the knife skills in bushcraft for beginners.
Step by step
-
1

Inspect and decide
Look for cracks at or below the head, a head that moves and chewed wood from overstrikes. If any of these show, stop using the axe until it has a new handle.
-
2

Remove the old handle
Saw the handle off just below the head, drill a few holes into the wood in the eye, then drive the stub out through the wide top of the eye. Wear eye protection.
-
3

Choose a new handle
Pick hickory or ash with straight grain and growth rings in line with the bit, in the same length as the old handle and with a tongue slightly larger than the eye.
-
4

Fit the tongue to the eye
Test-fit, find the shiny pressure marks and take them down with rasp or knife, a little at a time, until the head slides most of the way on by hand.
-
5

Seat the head and wedge it
Rap the handle end on a block until the head is fully seated, then drive a dry hardwood wedge into the kerf with a mallet. A steel cross wedge is optional.
-
6

Trim, oil, check, sharpen
Saw off the excess 3–5 mm above the eye, oil the wood with linseed oil, check that the bit lines up with the handle and sharpen before the first use.
When does an axe handle need replacing?
A wooden handle is a wear part. It absorbs every blow, every overstrike and every swing between a damp autumn and a dry heated room, and sooner or later it gives up. The head, if it was forged from decent steel and has not been overheated, can easily outlive several handles. Knowing when to stop patching and replace the axe handle is the first and most important decision.
Clear signs that the handle must go
- Cracks at or below the head. A split running out of the eye, a crack across the handle just below the head, or a long split along the grain. This is exactly where a handle breaks in mid-swing.
- A head that will not stay tight. If the head still moves after it has been seated and re-wedged as described in tightening a loose axe head, the wood in the eye has shrunk or been crushed too far.
- Overstrike damage. Missing the target with the bit and hitting the wood with the handle just below the head chews the fibres away. Shallow dents can be smoothed; deep notches, frayed wood or cracks starting from them weaken the handle where it is stressed most.
- Rot or soft wood. Dark, soft, crumbly wood in or just below the eye, often after the axe was left stuck in a stump or stored wet.
A handle that breaks in the field is not taped up: mask the head and work on with a saw and a knife.

Re-wedge or replace the handle?
Is there a crack at or below the head, or is the wood in the eye soft and dark?
Yes → Replace the handle. No wedge repairs broken or rotten wood.No → Go on to the next question.Are there deep overstrike notches or frayed fibres below the head?
Yes → Replace the handle; the strongest part has been cut away.No → Go on to the next question.Does the head still move after seating it and driving or renewing the wedge?
Yes → Replace the handle: the wood in the eye has shrunk or been crushed.No → The handle can stay. Oil the end grain and check the head before every session.
Safety first: never use an axe with a loose head
A head that leaves the handle during a swing travels far and fast, and nobody nearby can dodge it. That is why our axe safety guide treats a loose head as a hard stop, not something to finish the log with. The same seriousness applies to the repair: most injuries during rehandling come from the bit, from flying wood and steel fragments when the stub is driven out, and from tools slipping.
Before you start
- Mask the bit or wrap it in a thick cloth and tape for every step that does not need the edge.
- Wear safety glasses whenever you drill, drive, saw or strike. A splinter or a chip of steel in the eye is a hospital visit.
- A stable bench, a vise or solid blocks. Never hold the head in your hand while you drive the stub out.
- Wooden or rawhide mallets for striking the handle and wedge; no steel hammer on the head itself.
- Children and dogs out of the workspace; see bushcraft with kids for sensible rules around edged tools.
- A first aid kit within reach, with dressings for cuts; treating knife and saw cuts explains what to do.
Tools and materials for hanging an axe head
You do not need a workshop to hang an axe head, but the job goes far better with the right handful of tools. Most bushcraft households already own the saw and the knife; a rasp and a decent mallet are the usual additions. If you like making your own gear, our guide to carving a mallet and wedges shows how to make the mallet from a log.
| Item | Used for | Notes |
|---|---|---|
| Saw (fine-toothed handsaw or folding saw) | Cutting off the old handle, cutting the kerf, trimming | A fine saw leaves a clean kerf; see choosing a saw |
| Drill with wood bits (about 6–10 mm) | Relieving the wood stuck in the eye | Keep the bit inside the wood, away from the steel |
| Drift: hardwood dowel or steel punch | Driving the stub out of the eye | Slightly smaller than the bottom of the eye |
| Wooden mallet | Driving the drift and the wedge, tapping the handle end | Does not mushroom the wedge or mark the handle |
| Rasp, spokeshave and/or carving knife | Shaping the tongue to the eye | See carving tools for knife and spokeshave |
| New handle and a dry hardwood wedge | The repair itself | Many handles come with a wooden wedge |
| Boiled or raw linseed oil, rags, metal can with lid | Finishing the handle | Used rags can self-ignite – handle them as described below |
Removing the old handle
Getting the old wood out is often the slowest part of the job, because the wedge and years of compression have locked it into the eye. Most axe eyes are slightly tapered: wider at the top, where the wedge spreads the wood, and narrower at the bottom. That is why the stub always comes out through the top of the eye. Driving it downwards means forcing the widest part of the wood through the narrowest part of the steel.
Removing the old handle in three stages
 1Saw off below the head
Mask the bit, lay the axe on the bench and saw the handle off a finger's width below the head. Hold the handle, not the head, with the free hand. The long part of the old handle is now scrap or a pattern for the new one.
 2Drill out the centre
Stand the head on a block with the top of the eye facing up and drill several holes into the wood in the eye, along its length. Keep the bit in the wood, clear of the steel walls. The holes relieve the pressure of the wedge so the stub collapses inwards.
 3Clean eye – no fire
Once the stub is out, clean old wood fibres, glue and rust from the inside of the eye. Never heat the head to burn the wood out; it can ruin the temper of the bit.
Driving out the stub
Turn the head upside down and support it on two solid blocks or the open jaws of a vise, so the top of the eye faces down into the gap and the stub has somewhere to go. Set a drift on the remaining wood from the bottom of the eye and drive it with a mallet. Use a hardwood dowel first; if the stub refuses to move, a steel punch works, but strike carefully so you do not burr the edge of the eye. Wear safety glasses for the whole operation.
Old steel wedges usually come out with the wood; if one sticks, drill around it first. Patience pays: a cracked eye really does end the life of a head.
Cleaning and checking the head
With the eye empty, inspect the head in good light. Hairline cracks running from the eye, a badly mushroomed poll or deep rust pits inside the eye are reasons to have the head checked or retired. Light rust comes off with steel wool and oil as shown in removing rust. Smooth any sharp burrs at the bottom edge of the eye with a file so they do not cut into the new wood. Keep the old handle: its length, curve and swell are a useful pattern for choosing the replacement.
Choosing a new handle: hickory or ash, grain and length
The handle decides how the axe feels, how much shock reaches your hands and how long the repair lasts. Two woods dominate: hickory, the traditional handle wood in North America, and ash, the traditional choice in Europe. Both combine toughness with some flex. Which one you get usually depends more on where the axe and the handle come from than on any big difference in use.
| Material | Strengths | Weaknesses | Good for |
|---|---|---|---|
| Hickory | Very tough, absorbs shock well, forgives overstrikes better than most woods | Heavier than ash; moves with humidity if left unoiled | All axes, especially splitting and felling axes |
| Ash | Tough, springy, a little lighter, traditional in Europe | Somewhat less resistant to overstrikes; must be kept dry | Hatchets, forest axes, carving axes |
| Fibreglass / composite | No oiling, survives overstrikes | Usually fixed with epoxy, not rehandled in the field; more vibration | Not covered here – a different repair |
Grain orientation: rings in line with the bit
Look at the end of the tongue, the part that will sit in the eye. The growth rings should run in line with the bit, from poll to edge, along the long axis of the eye. Swing forces bend the handle in that direction, and wood copes best with bending along its rings. A handle with rings running across the eye is weaker and tends to crack just below the head. Our axe guide shows the same rule from above; wood types and tree identification explains why ring structure differs between species.

Straight grain and run-out
Now look along the sides. The fibres should run as straight as possible along the whole handle. Run-out means the fibres leave the surface at an angle instead of running end to end; every place where that happens is a potential crack line. As a rule of thumb, a little run-out near the knob is acceptable, while run-out in the upper third, near the shoulder and in the tongue, is a reason to choose another handle. Also avoid knots, cracks, dark streaks of decay and handles that are visibly twisted.
Length, shape and eye size
Replace like with like. A hatchet gets a hatchet handle, a forest axe a forest-axe handle; changing the length changes balance, swing path and safety. The ranges below match those in our axe types table.
| Axe type | Typical handle length | Notes |
|---|---|---|
| Hatchet / hand axe | 30–40 cm (12–16 in) | One-handed; short arc, so kneel when using it |
| Small forest axe | 45–60 cm (18–24 in) | The usual bushcraft all-rounder |
| Forest / felling axe | 65–80 cm (26–32 in) | Two-handed, needs a clear safety circle |
| Splitting axe | 60–80 cm (24–32 in) | Often a straighter, thicker handle |
Common market ranges, not a standard. A rule of thumb for two-handed axes: holding the head with your arm hanging straight, the handle end reaches roughly to your armpit.
Handles are sold for particular eye sizes and shapes. Measure the length and width of the eye at the top and at the bottom, or take the head with you when buying. The tongue of a new handle should be slightly larger than the eye so that you can shape it down to a tight fit; a tongue that drops straight through is useless. Straight handles suit many hatchets and splitting axes, curved handles with a swell at the knob suit most forest and felling axes. Finally, let the new handle sit indoors for a week or two before you fit it, so its moisture content settles to the room you store the axe in – a handle that dries out after hanging will shrink in the eye.
Fitting the eye: shaping the tongue until the head seats snugly
This is where an axe is hung well or badly. The aim is a tongue that fills the eye completely, with wood touching steel all round, and a head that sits down on the shoulder of the handle with the bit lined up. The only method that reliably gets there is slow: test, mark, shave, test again.
Fitting the tongue in four stages
 1Mark the eye depth
Hold the head beside the tongue with the top of the eye level with the top of the handle and mark where the bottom of the eye falls. Everything above that line will be inside the steel; the wood below it is the shoulder and stays untouched.
 2Test-fit and find the high spots
Push the head onto the tongue by hand until it stops, then pull it off. Pressure points show as shiny, burnished spots. Rubbing pencil graphite or a little soot inside the eye first makes them show as dark marks.
 3Shave only the marks
Clamp the handle and take the marked spots down with rasp, spokeshave or knife, cutting away from your body. Keep the faces flat and the tongue symmetrical; do not round it into a cone, and never cut below the line into the shoulder.
 4Most of the way by hand
Repeat until the head slides most of the way onto the tongue with hand pressure and does not wobble. The last part of the way is done by seating, not by more shaving.
How tight is tight enough?
If the head drops onto the shoulder by hand, you have taken off too much. A head that will not go more than a short way on is still too tight, and driving it on by force can split the tongue or even crack the eye. Somewhere in between – the head sliding on most of the way under firm hand pressure – is right. Check the fit from all four sides between passes: daylight between wood and steel at the bottom of the eye means the tongue is uneven.
Tools for shaping
A coarse rasp removes wood quickly and evenly and is the easiest tool for beginners. A spokeshave or a sharp carving knife gives cleaner surfaces at the end. Use the controlled strokes from whittling and carving, always away from the body; carving helpers covers spokeshaves and drawknives.
Hanging the head: kerf, seating and the axe wedge
Once the tongue fits, three things lock the head on: a saw kerf in the top of the tongue, a head seated fully onto the wood, and a wedge that spreads the wood against the inside of the eye. Most commercial handles already have a kerf; if yours does not, cut it before you seat the head. In our glossary you will find the term explained in one line.
Hanging the head in four stages
 1Saw the kerf
Clamp the handle and saw a slot down the middle of the tongue, running from the poll side to the bit side of the eye. As a rule of thumb it goes about two-thirds of the eye depth, so the wedge can spread the wood without splitting the handle below the head.
 2Seat the head
Push the head on by hand, hold the axe head-up by the handle and rap the knob end firmly on a chopping block. The handle stops, the heavy head keeps going and seats itself. Strike the handle, never the head.
 3Trim to 3–5 mm
After the wedge is in, saw off the wood and wedge standing above the eye, leaving about 3–5 mm proud. The small overhang can spread slightly over the eye and helps lock the head.
 4Cross wedge and oil
If you use a steel wedge, drive it in across or at an angle to the wooden wedge. Then soak the fresh end grain with linseed oil to slow down moisture exchange.
Seating: tap the handle end, not the head
Seating relies on inertia. Rapping the knob end on a block, or tapping it with a mallet, drives the handle up into the head. Hitting the head with a hammer instead can mushroom the poll, mark the cheeks and, worst of all, crack the eye. Check after every few raps: the head should creep down until the wood fills the eye completely and stands slightly above the top. Stop when the head no longer moves; more blows only crush fibres.
Driving the wooden wedge
Use a dry, straight-grained hardwood wedge about as long as the eye and slightly wider than the kerf. Many people put a little wood glue on it; this is optional and helps keep the wedge from working loose, while epoxy fills make a later rehandle much harder. Start the wedge straight in the kerf and drive it with a mallet. It advances quickly at first, then more slowly; when it stops moving under firm blows, it is home. The part that breaks off or stands above the eye is trimmed later.
A good wooden mallet makes this easy and saves your hammer from mushrooming the wedge. If you do not own one, carve a mallet from a short piece of hardwood log; the same guide shows how to make spare wedges.
Wooden wedge
- Does the main work: spreads the wood along the eye
- Always needed
- Dry hardwood, straight grain
- Driven first, into the kerf
- Trimmed with the handle top
Steel cross wedge
- Spreads the wood in the second direction
- Optional extra security
- Small, ridged steel
- Driven last, across or at an angle
- Not too close to the edge of the eye, or the wood splits

Trimming, linseed oil finish and checking the hang
Trim
Saw off the wedge and the protruding wood about 3–5 mm above the top of the eye, as in our loose head guide. Some prefer to trim flush; either works as long as the wood fills the eye completely. Use a fine saw held flat against a piece of card on the steel so the teeth do not scratch the head.
Linseed oil
Many new handles are varnished. Varnish is slippery when wet and cannot be refreshed in spots, so many users sand it off with 180–240 grit before oiling. Then rub in a thin coat of boiled or raw linseed oil, let it soak for 20–30 minutes and wipe off every bit still on the surface. A new handle takes two or three thin coats on consecutive days; after that, two to four times a year is enough. Give the end grain at the top of the eye and at the knob extra oil, because end grain exchanges moisture fastest. The full routine is in axe handle care.
Check the hang
Before the axe goes back into service, run through these checks:
Final checks after rehandling
- The wood fills the eye completely at the top, with no gaps around it and the wedge firmly in place.
- There is no gap between the bottom of the head and the shoulder, and no visible movement when you try to twist or rock the head.
- Sighting down from the knob end, the bit lines up with the centre line of the handle.
- Laid on a flat table on the bit and the knob end, a common check is that the edge touches somewhere around its middle, not right at the toe or the heel.
- No new cracks in the tongue, the handle or the eye.
Recheck the head after the first session or two of real work. A fresh handle can settle slightly; a few more taps on the wedge are normal at this stage. After that, the quick look at the eye before each use described in axe maintenance is all it needs.
Soaking a loose head in water: myth and short-term fix
Standing a loose axe head-down in a bucket of water overnight is the most widespread quick fix there is, and it does work – for a short time. The wood swells and the head feels tight. The problem comes afterwards. The wood swells against steel that cannot give way, so its fibres are crushed. When the handle dries again it shrinks back from a smaller starting size, and the head tends to be looser than before. Meanwhile the inside of the eye rusts and wet end grain invites rot.
At best, soaking is a stopgap for one small job, and the real repair still has to follow; a head that needs it should not be swung near other people. The lasting fixes are mechanical: seat the head, renew the wedge, or hang a new handle. Soaking in oil for days spares the steel but softens the wood without improving the fit.
Troubleshooting a new axe handle
Most problems after rehandling come from rushing the fit or from wood that was too wet.
| Symptom | Likely cause | What to do |
|---|---|---|
| Head drops onto the shoulder by hand | Too much wood taken off the tongue | Use a wider wedge plus a steel wedge only if the gap is small; otherwise a new handle |
| Head stops far short of the shoulder | Tongue too large or uneven, high spots not found | Pull the head off, mark again, shave the marks; never force it |
| Tongue splits below the head while wedging | Kerf too deep, wedge too thick or driven with too much force | Replace the handle; next time keep the kerf to about two-thirds of the eye depth |
| Bit points off to one side | Tongue shaped unevenly | Before wedging: shave the side it points away from. After wedging: rehandle |
| Head loose again after a few weeks | Handle was not dry, or stored too warm and dry | Re-seat and drive the wedge deeper; acclimatise the next handle indoors first |
Prevention is cheaper than repair. Work on a proper chopping block, keep the swing controlled and tired arms rested – the techniques in processing firewood and batoning cause far fewer overstrikes than chopping thin wood on the ground. The firewood calculator helps you split only as much as you actually need.
After the repair: sharpening, mask and first aid
Sharpen before the first use
Rehandling is a good moment to restore the edge, since the head has been handled, clamped and probably knocked during the work. A sharp edge bites instead of glancing off, which is a safety issue as much as a performance one. File out chips, then refine with a round axe stone or a puck as described in sharpening an axe; at home a bench stone works as well, see whetstones for axes. Put the mask back on when you are done. A spare wedge belongs in a base-camp repair kit, and the Kit Builder helps you decide whether the axe comes along at all.
If something goes wrong
Cuts from the bit, the knife or the saw are the typical rehandling injuries. Press a clean dressing firmly on the wound and keep the pressure up; for bleeding that will not stop, call 112 (EU) or your local emergency number. Our guide to first aid for cuts covers cleaning, dressing and when to see a doctor. Splinters and wood dust in the eye need careful rinsing with clean water and, if anything stays stuck, medical help – another reason to wear safety glasses from start to finish.
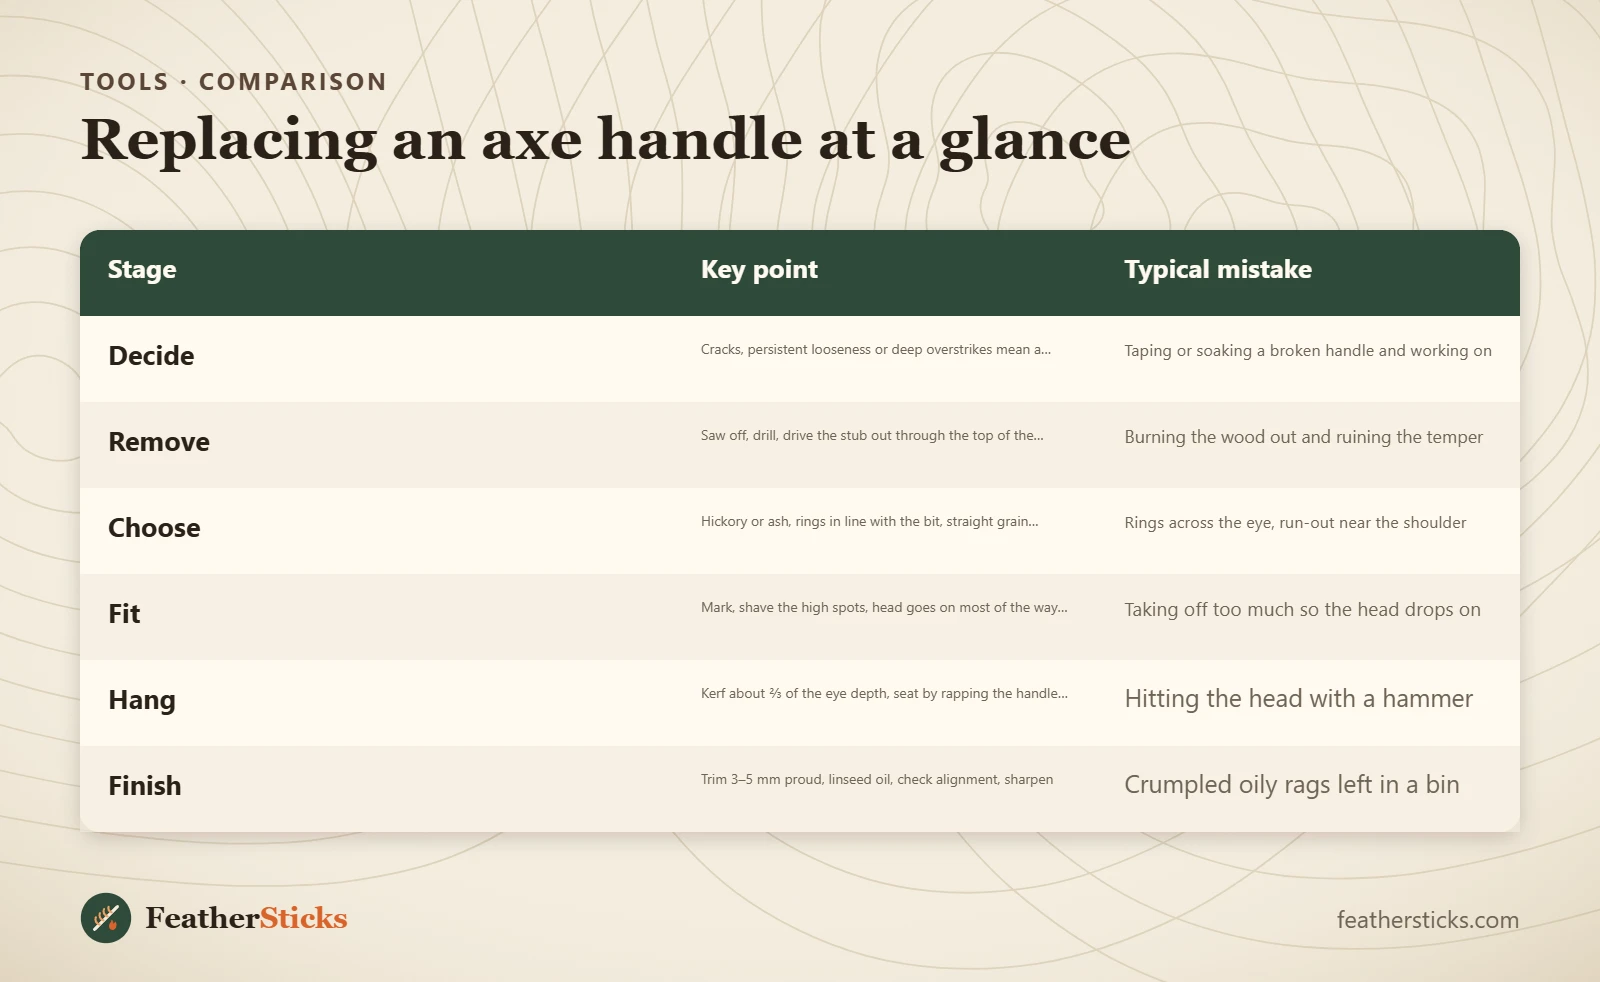
| Stage | Key point | Typical mistake |
|---|---|---|
| Decide | Cracks, persistent looseness or deep overstrikes mean a new handle | Taping or soaking a broken handle and working on |
| Remove | Saw off, drill, drive the stub out through the top of the eye | Burning the wood out and ruining the temper |
| Choose | Hickory or ash, rings in line with the bit, straight grain, same length | Rings across the eye, run-out near the shoulder |
| Fit | Mark, shave the high spots, head goes on most of the way by hand | Taking off too much so the head drops on |
| Hang | Kerf about ⅔ of the eye depth, seat by rapping the handle, dry hardwood wedge | Hitting the head with a hammer |
| Finish | Trim 3–5 mm proud, linseed oil, check alignment, sharpen | Crumpled oily rags left in a bin |
Common mistakes
- Carrying on with a cracked handle or a head that moves, even "just for this log".
- Heating the head to burn the old wood out of the eye.
- Choosing a handle with growth rings across the eye or with run-out near the shoulder.
- Shaving too much off the tongue so the head drops onto the shoulder by hand.
- Hammering on the head instead of tapping the handle end to seat it.
- Soaking a loose head in water and treating that as the repair.
- Leaving linseed-oil rags crumpled up instead of drying them flat outdoors or keeping them under water.
What you need
- Fine-toothed saw and a drill with wood bits
- Hardwood drift and a wooden mallet
- Rasp, spokeshave or a sharp carving knife
- Vise or solid blocks, safety glasses, work gloves
- New hickory or ash handle with a dry hardwood wedge
- Optional steel cross wedge
- Linseed oil, rags and a metal can with a lid
- Axe file and stone for the edge afterwards
FAQ
Can I replace an axe handle myself?
Which way should the grain run on an axe handle?
Is hickory or ash better for an axe handle?
How deep should the kerf for the axe wedge be?
Do I need a metal wedge as well as a wooden one?
Why does my new axe handle keep coming loose?
Check yourself
Completed6 quick questions from this guide. Nothing is sent anywhere.
Related step-by-step guides
-
 1
-
 1
-
 1