How to Use a Whetstone: Sharpening Your Bushcraft Knife at Home
To use a whetstone, prepare the stone (soak it, splash it or oil it, depending on type), lay the knife at its bevel angle, grind one side until a burr runs along the whole edge, repeat on the other side, then work up through finer grits and finish on a strop. On a Scandi grind the wide bevel lies flat on the stone, so the knife sets its own angle of about 10–12° per side; on a V-grind you hold about 15–20° yourself.
This guide is about the home bench: the stones, grits, lubricants and the slower, more thorough work that keeps tools at their best. For quick touch-ups on a trip, see sharpening in the field; for the knives themselves, bushcraft knives. Both belong to our tools section, and a sharp edge is one of the foundations of bushcraft for beginners.
Step by step
-
1

Prepare the stone
Soak a soaking stone until no more bubbles rise, wet a splash-and-go stone, or oil an oil stone. Set it on a damp cloth or holder so it cannot slide.
-
2

Set the angle
Lay a Scandi bevel flat on the stone, about 10–12° per side. On a V-grind, raise the spine to about 15–20° and check with a marker.
-
3

Raise a burr
Grind one side with even pressure until a fine burr runs from heel to tip, then do the same on the other side.
-
4

Refine through the grits
Move from medium to fine with lighter pressure each time, alternating strokes 5-3-2-1 until the burr is almost gone.
-
5

Strop and test on paper
Strop 10–20 times per side with the spine leading, then slice a sheet of paper. A clean, quiet cut means the job is done.
Whetstone at home vs sharpening in the field
In the woods, sharpening is maintenance: a few strokes on a small diamond plate and a strop keep a good edge working. At home you have time, space, water, light and a full set of stones, so this is where you repair chips, re-establish a bevel that has gone rounded, polish carving tools and set every edge up before a trip.
The technique is the same as in the field – angle, burr, refine, strop – but the bench lets you do it properly. A large stone gives you a long, stable stroke, so the bevel stays flat and the edge straight. You can use a coarse stone without worrying about weight, and you can flatten the stones themselves, which nobody does at a campfire.
Bench stone at home vs field kit
Home bench
- Full set of grits from coarse to very fine
- Long stones (often about 15–20 cm) for steady, flat strokes
- Repairs: chips, rounded bevels, broken tips
- Time to flatten stones and polish carving tools
Field
- Small double-sided diamond plate and a strop
- Short strokes on a log or rock
- Touch-ups only; keeps a good edge working
- See the field sharpening kit
A good rhythm: a bench session before each trip and stropping every evening in camp.
Types of sharpening stones: water, oil, diamond and ceramic
All sharpening stones do the same job – hard particles scratch steel off the edge – but they differ in speed, maintenance and what they need as lubricant. You do not need every type. Most people end up with one or two medium/fine stones and a strop, plus a flattening plate if they use water stones.

Water stones
Synthetic water stones cut fast and leave a fine, even scratch pattern. As you sharpen, the surface releases loose abrasive that mixes with water into a grey slurry; this slurry keeps cutting, which is why water stones feel so effective. The price is wear: softer water stones hollow out (dish) quickly and need regular flattening. They also crack if they freeze while wet.
Oil stones
Oil stones are natural (for example novaculite) or synthetic (aluminium oxide or silicon carbide). They are hard, wear slowly and stay flat for a long time, but they cut more slowly than water stones. They work with a thin honing oil that floats away the metal particles. Once a stone has been oiled, it stays an oil stone – water will no longer soak in properly.
Diamond plates
Diamond particles bonded to a steel plate cut every steel, including very hard, wear-resistant grades, and stay flat for years. They work with water, a drop of soapy water or even dry. A coarse diamond plate doubles as a flattening plate for water stones.
Ceramic stones
Ceramic stones and rods are very hard and usually fine. They are excellent for honing and for straightening a slightly rolled edge, wear slowly and are used dry or with a little water. They are too slow for repairs. A ceramic rod also reaches the inside of hook knives, as described in hook knife care.
| Type | Speed | Lubricant | Maintenance | Best use |
|---|---|---|---|---|
| Water stone | Fast | Water (soak or splash) | Flatten often; protect from frost | Home bench, all grits |
| Oil stone | Slow to medium | Thin honing oil | Flatten rarely; clean off old oil | Durable home stone |
| Diamond plate | Fast, any steel | Water or dry | Rinse; stays flat | Coarse work, hard steels, flattening, field |
| Ceramic | Slow, fine | Dry or water | Scrub clean when it loads up | Honing, rolled edges, curves |
No product tests – typical behaviour of each family. Always follow the maker's instructions for your stone.
Sharpening stone grit: what the numbers mean
The grit number describes the size of the abrasive particles. Low numbers are coarse and remove steel quickly; high numbers are fine and polish. Each stage removes the scratches of the one before, so you work from coarse to fine and never skip more than about one step.
One caution: grit numbers are not universal. Japanese (JIS), European (FEPA) and other scales use different methods, and diamond plates are often sold by particle size in micrometres or by names like "coarse" and "fine". A "1,000" from one system is not exactly a "1,000" from another. Treat the ranges below as typical orientation values – they match those in our field sharpening guide.

| Range | Typical grit | Job | Use it when |
|---|---|---|---|
| Coarse | about 200–400 | Repair | Chips, a broken tip, a badly rounded bevel, changing an angle |
| Medium | about 800–1,000 | Sharpen | A dull but undamaged edge; the grit you use most |
| Fine | about 3,000–6,000 | Hone | Refining after the medium stone; regular touch-ups at home |
| Extra fine | 8,000+ and strop compound | Polish | Carving tools and a mirror finish for clean cuts in green wood |
Which grit do I need first?
If you buy one stone, make it a combination stone of about 1,000 / 4,000–6,000: the medium side sharpens, the fine side refines. Add a coarse stone (about 200–400) or a coarse diamond plate only when you have chips to repair or stones to flatten. Carving knives and gouges for spoon carving benefit from an extra-fine stone or simply more time on the strop.
Soaking vs splash-and-go: water, oil or dry?
Lubrication carries the removed steel and loose abrasive (the swarf) away so the surface does not clog. Which liquid you use, and how, depends entirely on the stone – and the maker's instructions always win over general rules.
- Soaking stones (many medium and coarse water stones) go into a tub of water until no more air bubbles rise, typically 10–15 minutes. A soaked stone stays wet through a session; keep a spray bottle handy for the surface.
- Splash-and-go stones (many fine water stones and some harder synthetic stones) are only wetted on the surface. Soaking them for a long time can harm some of them, so do not leave them in the tub.
- Oil stones get a thin film of honing oil spread over the surface. Use only a few drops; wipe the dirty oil off at the end.
- Diamond plates and ceramic stones work with a little water or dry. A drop of washing-up liquid in the water helps keep diamond plates clean.
| Stone | Preparation | During sharpening | Avoid |
|---|---|---|---|
| Soaking water stone | Submerge until bubbles stop (about 10–15 min) | Spray the surface; keep the slurry | Storing it wet in the tub; frost |
| Splash-and-go stone | Wet the surface | Re-wet when it looks dry | Long soaking unless the maker allows it |
| Oil stone | Thin film of honing oil | Add a drop when the surface turns dark and dry | Water after oil; thick oils |
| Diamond plate | Splash of water (or dry) | Rinse off swarf now and then | Heavy pressure on a new plate |
| Ceramic stone | Dry or a little water | Wipe off grey streaks | Expecting it to repair chips |
Setting up a safe sharpening station
Most sharpening accidents happen because the stone slides or the hand holding the blade slips. A good set-up removes both risks before the first stroke.
Sharpening station checklist
- A solid table at about hip height, so you stand upright with your arms relaxed
- Stone in a rubber holder, on a non-slip mat or on a damp folded cloth
- Good light from the side, so you can see the scratch pattern and the edge
- Tub or spray bottle with water (or honing oil for an oil stone), rag and towel
- Permanent marker, sheet of printer paper, strop with compound
- Flattening plate or coarse diamond plate for water stones
- Children and pets out of the work area; phone out of the hand
- A first aid kit with plasters and a pressure bandage within reach
Never sharpen on your knee or with the stone in your hand: at home you have a table, use it.
How to use a whetstone on a Scandi grind
The Scandi grind – one wide, flat bevel on each side meeting at the edge – is the classic bushcraft knife geometry and the easiest one to sharpen on a whetstone. The bevel is its own angle guide: lay it flat on the stone and the angle is set, typically about 10–12° per side. See Scandi grind in the glossary and knife grinds for the background.
Scandi grind on a bench stone
- Find the flat Lay the bevel on the medium stone and rock the blade gently until it settles with no gap at the edge or the shoulder. Slurry pushed out at both lines tells you it lies flat.
- Pressure on the bevel Hold the handle in your fist and put two or three fingertips of the other hand on the blade over the bevel, never near the edge. Press evenly; pressing only on the spine lifts the edge off the stone.
- Long strokes, heel to tip Push the blade along the stone, edge leading or in small circles, and work in sections from heel to tip. At the curved belly, lift the handle slightly so the bevel stays flat as the edge sweeps up to the point.
- Use the whole stone Spread your strokes over the full length and width. Working only in the middle dishes the stone and gives you a curved bevel.
- Burr, then the other side When a burr runs along the whole edge, switch sides and do the same with about the same number of strokes. Then move on to the finer grits.
The most common Scandi fault is a rocking wrist. Every small lift of the spine rounds the bevel into a convex shape, and after a few sessions the edge no longer lies flat at all. Lock the wrist, move from the shoulder and check the scratch pattern: it should cover the whole bevel evenly, from shoulder to edge.
Micro-bevel or zero edge?
Some people add a tiny, slightly steeper micro-bevel at the very edge for a more robust apex. It makes touch-ups quicker but removes the "bevel as guide" feel. If you have one, sharpen the main bevel flat on the bench whenever the micro-bevel grows wider than about 1 mm; the pros and cons are covered under Scandi sharpening.
Holding the angle on a V-grind or secondary bevel
Flat grinds with a small secondary bevel, many pocket knives and most kitchen knives have an edge bevel that is too narrow to "feel" on the stone. You have to hold the angle – typically about 15–20° per side – yourself. Two simple aids make that much easier, and the sharpening angle calculator tells you how high to lift the spine for your blade.
Finding and holding a V-grind angle
 1Colour the bevel
Paint the narrow edge bevel with a permanent marker along its whole length. The ink shows exactly where the stone touches.
 2Raise the spine
Lay the blade flat and lift the spine until the bevel touches. As a rough geometry check: for a blade about 25 mm wide, a spine raised about 6–9 mm above the stone gives roughly 15–20°.
 3Edge-leading strokes
Push the blade edge-first along the stone, as if slicing a thin layer off it, with a locked wrist. Keep the spine at the same height through the whole stroke.
 4Read the ink
After a few light strokes, look at the bevel. Ink gone only at the edge: too steep. Only at the shoulder: too flat. Gone evenly: right – now keep that angle.
Whatever you use, consistency matters more than the exact number: a steady 17° gives a better edge than a wobbling 15°. If the factory bevel is unknown, simply match it with the marker rather than grinding a new angle – reshaping by hand takes a long time and removes a lot of steel. The angle table in knife sharpening angles lists typical values by tool, and the sharpening angle calculator shows what angle your Scandi bevel really has.
Raising and removing the burr: the grit progression
The burr (wire edge) is the thin lip of steel that folds over to the opposite side when you have ground one side all the way to the apex (see burr). It is your proof that the two bevels really meet. No burr means you have not reached the edge yet, no matter how many strokes you made.
Feel for it by drawing your thumb gently across the edge, from the spine side off the edge – never along it. A burr catches the skin slightly, like a tiny hook. Check heel, belly and the last centimetre at the tip; the tip is where it is most often missing.
From coarse stone to strop
 1Coarse: only for damage
Start on a coarse stone (about 200–400) only if there are chips, a broken tip or a badly rounded bevel. Grind until the deepest chip is gone and a burr forms along the whole edge, then move on.
 2Medium: the main work
On the medium stone (about 800–1,000), raise a burr on each side. This is where a dull but undamaged knife starts, and where most of the sharpening happens.
 3Fine: shrink the burr
On the fine stone (about 3,000–6,000), use lighter pressure and alternate: five strokes per side, then three, two, one. The burr becomes smaller with every round.
 4Strop it off
Finish with 10–20 edge-trailing strokes per side on a leather strop with compound. The last traces of the burr come off and the apex is polished.
Why not leave the burr? Because it feels sharp for a few cuts, then folds over and the knife seems dull again. Typical signs are an edge that catches unevenly on paper or goes dull after the first stick. The fix is always the same: lighter, alternating strokes on the fine stone, a few very light edge-trailing strokes, then the strop.
For the strop, use leather on a hard backing so a Scandi bevel stays flat; soft backings slowly round it. Spine leading, edge trailing, light pressure – the full technique is in strops and compound, and a homemade strop is a good offcut project after a leather knife sheath.
Sharpening axes and carving tools on stones
Axes and hatchets
An axe is too heavy and too awkward to push across a bench stone safely. At home, move the stone, not the axe: clamp or wedge the head firmly with the edge pointing up or away from you, and work the convex bevel with a round axe puck or a narrow hand-held stone in small circles. Typical angles are about 20–25° per side for a hatchet or forest axe; the convex profile forms naturally from the circular strokes. Chipped bits need a file first. The whole process, including filing, is shown under axe sharpening, and axe types and care are in axes and hatchets.

A sharp axe also makes splitting firewood safer, because it bites instead of bouncing.
Carving knives, hook knives and gouges
- Sloyd and carving knives are Scandi grinds: sharpen exactly as above, but go further up the grits – fine stone, extra-fine stone or extended stropping – for a polished bevel that leaves shiny cuts in carving.
- Hook knives: sharpen the outside bevel on a flat stone or strop, rolling the blade so the bevel follows the curve. Deburr the inside with a ceramic rod or a dowel wrapped in fine abrasive paper, kept flat against the inner face.
- Gouges: rock the outside bevel along the stone while rotating the tool so the whole curve is ground evenly. Remove the burr inside with a slip stone or a shaped dowel with abrasive paper and compound.
Details for each tool shape are in carving tools.
Flattening a whetstone: why and how
Every stone wears, and it wears most where you sharpen most – usually in the middle. The surface becomes hollow (dished). A dished stone rocks the blade, rounds the Scandi bevel and grinds a curve into a straight edge. Flattening a whetstone (also called lapping or truing) restores a flat surface.

How to flatten a whetstone
 1Check with a straightedge
Lay a steel ruler or straightedge on the stone along its length and across. Light shining through under the middle means the stone is dished.
 2Draw a pencil grid
Draw a grid of pencil lines over the whole wet or dry surface. The lines show which areas the flattening plate has reached.
 3Rub in figure-eights
Rub the stone face down on a flattening plate, a coarse diamond plate, or wet-and-dry abrasive paper on a flat glass or stone tile, using water and figure-eight strokes with even pressure.
 4All lines gone
Check the grid often. When every pencil line has disappeared, including the corners, the surface is flat again. Lines left in the middle mean keep going.
 5Chamfer and rinse
Break the sharp edges of the stone with a few strokes at an angle, so they do not chip or catch the blade. Rinse off all loose grit and let the stone dry slowly.
How often should you flatten?
There is no fixed interval; check with the straightedge. Soft, fast-cutting water stones may need a quick flattening after every session or two, harder stones every few sessions. Little and often is far quicker than removing a deep hollow once a year. Oil stones dish slowly and are flattened only occasionally, usually with loose abrasive powder and oil on a flat glass plate; keep oil and water equipment separate.
Diamond plates normally stay flat and are not flattened. Do not use one diamond plate to flatten another, and keep the flattening plate itself for flattening – coarse diamond particles left on a fine stone leave deep scratches in the next edge. Rinse the stone thoroughly after lapping.
Cleaning and storing sharpening stones
A clean, dry stone cuts better and lasts longer. Clogged stones turn shiny and slick and stop removing steel; a frozen, wet water stone can crack.
- Water stones: rinse off slurry under running water, flatten if needed, then let them dry slowly at room temperature, away from heaters and direct sun. Never store them in the water tub or let them freeze wet.
- Oil stones: wipe off the dirty oil with a rag after each session.
- Diamond plates: rinse, scrub lightly with a soft brush and soapy water, dry to prevent rust on the steel base.
- Ceramic stones: scrub grey metal streaks off with a scouring pad and water or a mild abrasive cleaner.
Store stones in their boxes or a cloth bag, labelled by grit, so fine stones never touch coarse ones. The knives themselves need care too: wipe off slurry and water, dry the blade, oil carbon steel and store it outside the leather sheath for long periods, as described in knife and axe care.
How to test sharpness safely
Test the edge with methods that keep your skin out of the way:
- Paper test: hold a sheet of printer paper by one corner and slice downward from heel to tip. A sharp edge cuts smoothly and quietly; snags, tears or crunching mark the sections that need more work.
- Light test: hold the blade edge-up under a lamp and look straight down onto the edge. A sharp apex reflects no light; bright spots or a shiny line are dull, rolled or chipped areas.
- Wood test: take a thin, continuous curl off a dry stick, or cut fine feather sticks. Torn, fuzzy fibres show the edge is not yet there.
There is no need to test on your arm or fingers. The paper and wood tell you everything, and a freshly sharpened edge cuts skin with almost no pressure.
What does the edge need now?
Does it slice paper cleanly from heel to tip with no bright spots?
Yes → Done. Strop to maintain it and pack the knife.No → Go to the next question.Does it improve after 20 strokes on the strop?
Yes → The burr was left on or the edge was slightly rolled. Strop and retest.No → Go to the next question.Are there visible chips or a wide shiny line?
Yes → Back to the coarse stone (about 200–400), then medium, fine and strop.No → Back to the medium stone (about 800–1,000) until a full burr forms, then fine and strop.
Whetstone problems: troubleshooting by symptom
| Symptom | Likely cause | Fix |
|---|---|---|
| No burr after many strokes | Angle too low, grit too fine for a dull edge, or edge never reached | Marker check; go down to the medium or coarse stone and keep going until the burr forms |
| Scratches only on the shoulder of the Scandi bevel | Bevel slightly convex from earlier rocking, or stone dished | Flatten the stone, then grind the bevel flat again on the medium stone |
| Tip stays dull or gets rounded | Handle not lifted at the belly; tip runs off the stone | Lift the handle as the curve reaches the stone; slow down for the last centimetres |
| Stone feels slick and stops cutting | Clogged (glazed) surface | Flatten or refresh the surface; on oil stones clean off old oil |
| Deep scratches after the fine stone | Coarse grit carried over from the previous stone or flattening plate | Rinse blade and stones between grits; keep stones separate |
| Edge dull after a few cuts | Burr left on | Alternate 5-3-2-1 with less pressure, light edge-trailing strokes, then strop |
When something goes wrong, go back one stage instead of pressing harder.
Sharpening safety and what to do if you cut yourself
- Stable stone on a non-slip base, at a comfortable height. Never sharpen in your lap.
- Fingers on the flat of the blade, over the bevel area, never in front of the edge. Feel for the burr across the edge, never along it.
- Glove on the hand holding a stone, puck or file when sharpening axes and gouges.
- One job at a time: no sharpening while talking to someone or with children running around. Teach young people only under supervision, as in knife safety for kids.
- Put the knife down on the table with the edge away from you between steps, and sheath it as soon as you are done.
Small cuts happen. Clean the wound, cover it and keep pressure on anything that bleeds more than a little. Heavy bleeding needs firm, continuous pressure with a dressing and a pressure bandage; if it does not stop, or a finger loses feeling or movement, get medical help and call 112 in an emergency. Our first aid guide for cuts covers the steps.
Once the knives are sharp, pack them sensibly: a sharp knife in a good sheath is part of a well-planned belt kit and can be weighed into your load with the Kit Builder. Carry rules differ by country, so check knife law before taking a freshly sharpened blade into town.
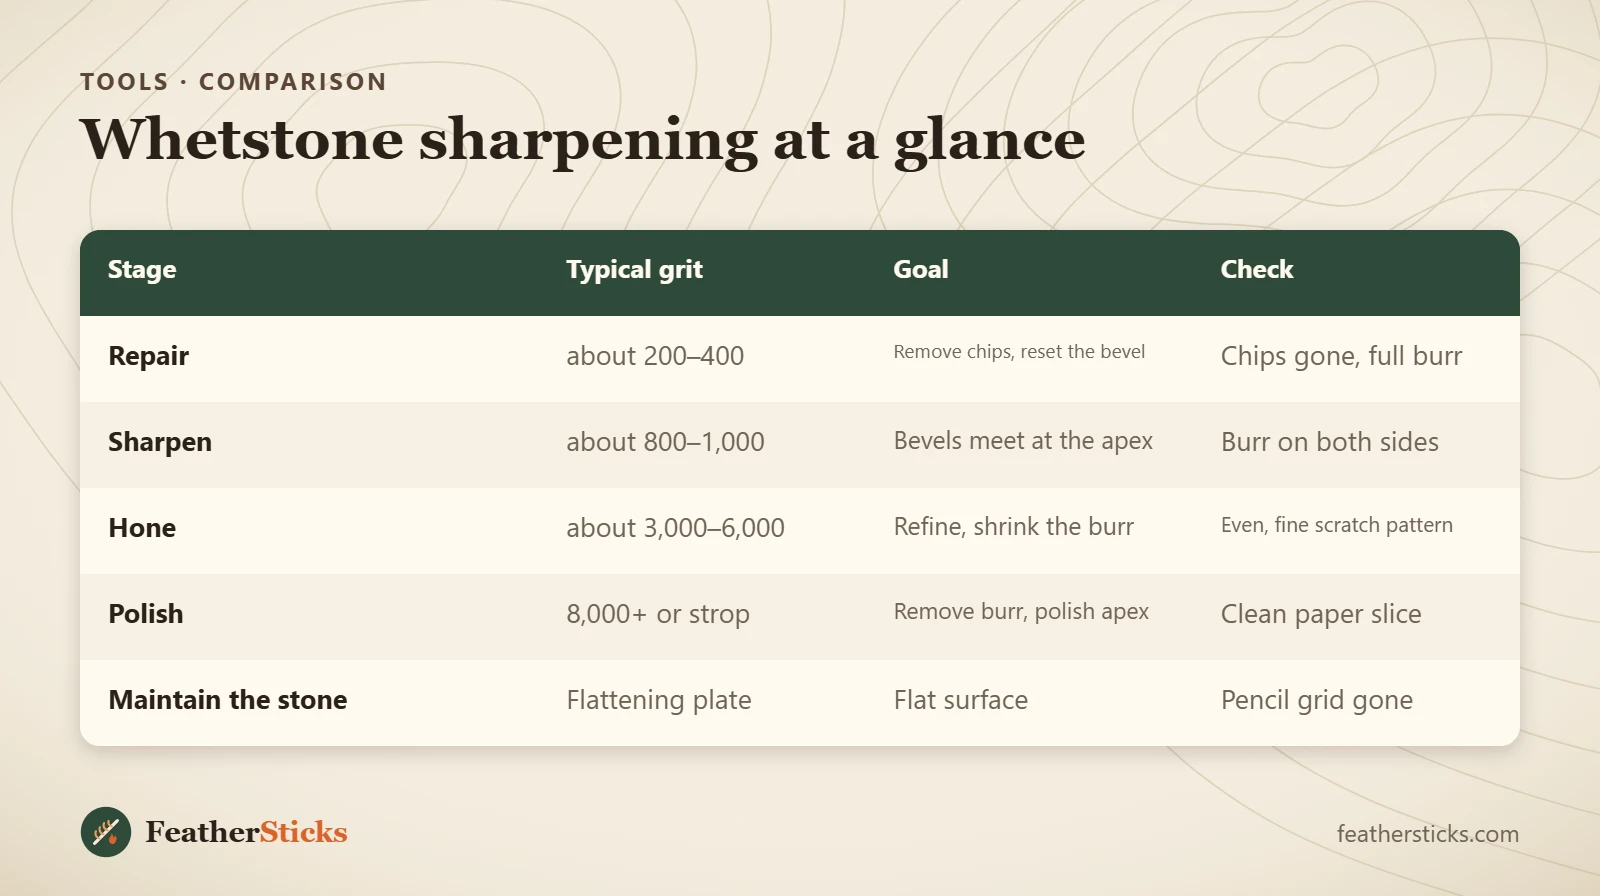
| Stage | Typical grit | Goal | Check |
|---|---|---|---|
| Repair | about 200–400 | Remove chips, reset the bevel | Chips gone, full burr |
| Sharpen | about 800–1,000 | Bevels meet at the apex | Burr on both sides |
| Hone | about 3,000–6,000 | Refine, shrink the burr | Even, fine scratch pattern |
| Polish | 8,000+ or strop | Remove burr, polish apex | Clean paper slice |
| Maintain the stone | Flattening plate | Flat surface | Pencil grid gone |
Common mistakes
- Rocking the wrist on a Scandi grind, which rounds the bevel after a few sessions.
- Switching sides before a burr runs along the whole edge, including the tip.
- Skipping from a coarse stone straight to a very fine one, so the deep scratches never disappear.
- Leaving the burr on, so the edge folds and feels dull after the first cuts.
- Never flattening water stones, then fighting a dished surface.
- Using water on an oil stone, or carrying coarse grit onto a fine stone.
- Storing water stones wet in the tub or letting them freeze.
What you need
- Combination water stone, about 1,000 / 4,000–6,000
- Coarse stone or coarse diamond plate (about 200–400) for repairs
- Flattening plate (or coarse diamond plate) and a steel straightedge
- Non-slip stone holder or damp cloth, tub and spray bottle
- Leather strop on a hard backing with polishing compound
- Ceramic rod or slip stones for hook knives and gouges
- Permanent marker, soft pencil, printer paper
- Cut-resistant glove for axes and gouges
Calculators for this topic
FAQ
How do you use a whetstone for the first time?
What grit whetstone is best for a bushcraft knife?
How long should I soak a whetstone?
What angle do I hold for a Scandi knife on a whetstone?
How do I know when to flatten my whetstone?
Can you sharpen an axe on a whetstone?
Why is my knife still dull after using a whetstone?
Check yourself
Completed6 quick questions from this guide. Nothing is sent anywhere.
Related step-by-step guides
-
 1
-
 1
-
 1