Bushcraft Machete & Parang: Types, Safe Use and Sharpening
A bushcraft machete is a long, fairly thin chopping blade built for one job above all: cutting green, springy growth – brambles, saplings, grass, cane and brush – with fast, light strokes. A parang is a shorter, thicker, convex-edged cousin that also copes with woody stems and light wood processing. To use a machete safely, clear a zone of about two arm-plus-blade lengths, cut down and away from your body at roughly 45°, hold vegetation with a stick instead of your hand, and make sure every miss ends in the ground or in empty air – never near your legs.
This guide compares the main blade types, gives an honest answer to "machete vs axe" for temperate European woods, and walks you through grip, swing, sharpening, carrying, the law and first aid. It belongs to our overview of bushcraft tools and builds on bushcraft for beginners.
Step by step
-
1

Pick the blade for the growth
Long, thin blades for grass and soft green growth; shorter, thicker parangs and bolos for woody brush.
-
2

Check edge, handle and lanyard
Before you start: edge sharp and free of chips, handle tight without cracks, lanyard intact and snug.
-
3

Clear your safety zone
Nobody within about two arm-plus-blade lengths, roughly 3 m. Look up and around for branches and vines.
-
4

Set your stance
Feet apart, knees soft, target an arm plus blade away, free hand behind you. The arc must end away from your legs.
-
5

Cut at 45°, hold with a stick
Hook the stem with a forked stick, pull it taut and cut down and outward at about 45° on the tensioned side.
-
6

Sheathe, clean and sharpen
Sheath on as soon as you stop. Wipe the blade dry, oil it thinly and touch up the edge with a file or puck.
Machete types: latin, bolo, kukri-style and parang
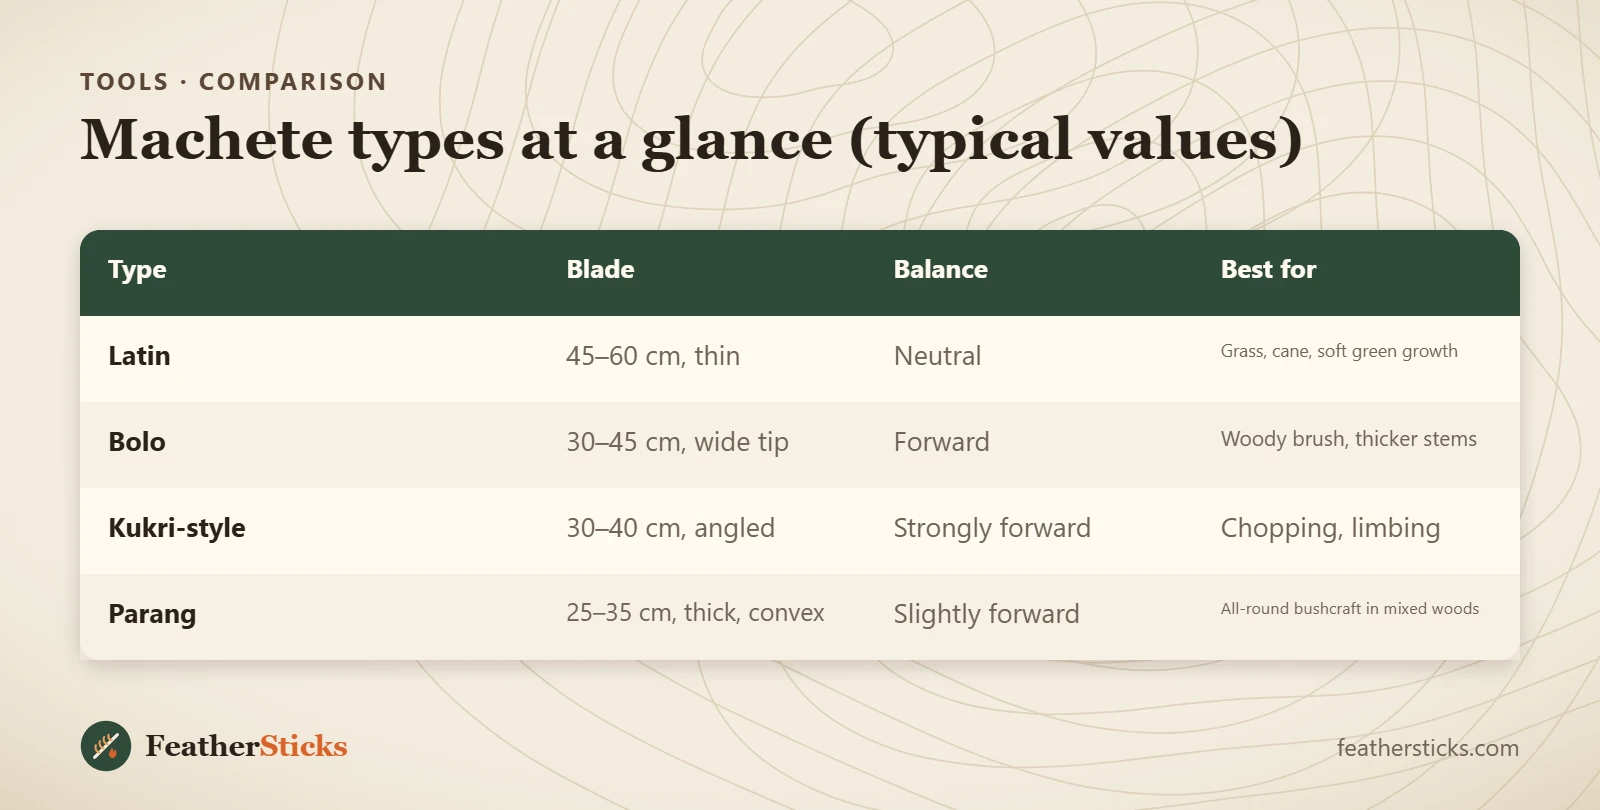
"Machete" is a family name. The shape of the blade decides where the weight sits, and the weight distribution decides what the tool is good at. A blade that is light and long cuts soft growth with a whip-like stroke; a blade with weight towards the tip chops woody stems; a thick, short blade survives batoning and light wood work. None of them is the "best machete" – only the best one for your vegetation.

| Type | Typical blade | Balance | Best for | Limits |
|---|---|---|---|---|
| Latin | 45–60 cm, thin (about 2–3 mm) | Neutral, light | Grass, cane, soft green growth, long sweeping cuts | Flexes and bounces on hard wood; poor for batoning |
| Bolo | 30–45 cm, widening to the tip | Forward | Woody brush, thicker green stems, chopping | Heavier in the hand; less precise for fine work |
| Kukri-style machete | 30–40 cm, angled blade | Strongly forward | Chopping, limbing, notches | Awkward for long horizontal sweeps; the curve takes practice to sharpen |
| Parang | 25–35 cm, thick (about 4–6 mm), convex edge | Slightly forward | All-rounder: brush, woody stems, splitting small wood | Heavier per centimetre; slower in grass and cane |
Thickness and length figures are common rules of thumb, not standards. "Kukri-style" here means a machete with a kukri-like angled blade, not the traditional knife.
Parang vs machete: what is the difference?
In everyday use, parang vs machete comes down to thickness, length and edge. A typical latin machete is long and thin with a fairly fine edge – fast and light, but it flexes and chips if you use it like an axe. A parang is shorter and much thicker, usually with a convex edge and its weight a little forward of centre. It chops woody stems better, tolerates batoning and occasional knots, and fits into a pack more easily. For mixed temperate woodland, where green brush alternates with dead branches, a parang or a short bolo is usually the more useful bushcraft machete.
Parts of a machete
The edge runs from the handle to the tip; the back is the spine. The sweet spot – the part of the edge that cuts best with least vibration – usually lies in the front third, behind the tip. The handle ends in a flared butt that stops the tool sliding out of your hand, and a hole for the lanyard.

Machete vs axe vs saw: what works in European woods?
The honest answer to machete vs axe depends on what grows where you camp. Machetes come from tropical and subtropical regions, where the main job is cutting through fast-growing, green, soft vegetation. Central European woods are different: you mostly process dead wood for the fire, often hardwood such as beech or oak, and the undergrowth is thinner. Here a folding saw plus a small axe or hatchet does more work with less risk than a machete. A bushcraft knife handles the fine work.
Where the machete shines is brush and green growth: clearing brambles from a campsite you have permission to use, opening an overgrown path on your own land, cutting green poles for a camp bed or pot hanger where cutting is allowed, or trimming bracken and grass. A machete cuts a bramble tangle in a fraction of the time a knife or saw would need – and that is exactly what it was designed for.
| Task | Machete / parang | Small axe | Folding saw | Knife |
|---|---|---|---|---|
| Brambles, nettles, grass | Best | Poor | Poor | Slow |
| Green saplings up to thumb-thick | Very good | Good | Good | Possible |
| Dead branches 5–10 cm | Moderate (parang); poor (latin) | Good | Best | Batoning only |
| Splitting firewood rounds | Small wood only (parang) | Best | – | Batoning, small wood |
| Cutting logs to length | Poor | Moderate | Best | – |
| Carving, feather sticks | Possible (parang, near the handle) | Rough work | – | Best |
General tendencies. For a full firewood workflow see processing firewood and the firewood calculator.
Do you need a machete at all?
Do you regularly work in dense green growth (brambles, brush, cane) where you have permission to cut?
Yes → A machete or parang is worth carrying.No → Saw plus knife, and perhaps a small axe, will cover almost everything.Do you also need to process dead wood for the fire?
Yes → Choose a parang or short bolo – or pair a light machete with a saw.No → A light latin or bolo is enough for green growth.Do you mostly travel on foot through towns and on public transport?
Yes → Think twice: long blades are heavily restricted in public – see the law section below.No → Choose by task and weight.
Length, weight and steel: the trade-offs
Every machete is a compromise between reach, power, control and weight. Understanding the trade-offs helps you choose – and it helps you use the tool safely, because a blade that is too long or heavy for you is the one that wanders off line.
What each property gives – and costs
- Longer blade
- More reach and speed at the tip; harder to control and to carry; the arc travels further towards your body
- Shorter blade
- More precise, packs easily; less reach, so you stand closer to the work
- Heavier, forward weight
- Chops woody stems with less effort; tires the arm faster
- Lighter blade
- Fast, many strokes per minute in grass; bounces on hard or dead wood
- Thin blade
- Cuts soft growth cleanly; flexes, chips or bends if abused
- Thick blade (parang)
- Tough, batons small wood; slower and heavier
Which steel is best for a machete?
Most machetes use simple carbon steel heat-treated to be relatively soft and tough rather than very hard. That is deliberate: a machete hits stones, roots and soil, and a softer edge rolls or dents instead of chipping out, and you can restore it with a file in the field. The downside is rust – carbon steel needs drying and a thin coat of oil, as described in knife and axe care. Stainless machetes resist rust but are often harder to sharpen in the field. For bushcraft, a tough carbon-steel blade you can file is usually the practical choice.
What length machete for bushcraft?
As a rule of thumb, a blade of roughly 30–45 cm suits most bushcraft in temperate woods: long enough to keep your hands away from the cut, short enough to carry and control. Long latin blades of 50–60 cm make sense for open grass and cane, much less so among trees, where branches catch the tip on the backswing. Weight it against the rest of your kit list; the Kit Builder helps you see what a heavy blade costs you in pack weight.
Grip and lanyard: holding a machete securely
Hold the handle firmly but not in a clenched fist: a death grip tires the forearm within minutes and makes the stroke stiff. The flared butt should sit against the little-finger side of your hand. Let the wrist stay loose enough to snap the blade through at the end of the stroke – most of the cutting power comes from that snap and from the sweet spot, not from muscle.
A lanyard (wrist loop) keeps a sweaty or tired hand from throwing the blade. Thread your hand through the loop, then twist so the cord lies snugly around the back of the wrist; it should not be loose enough to let the handle swing freely. Check the cord for wear before each session. Gloves with a good grip help on wet handles and protect against thorns; avoid smooth or bulky gloves that let the handle slip.
How to use a machete safely: stance, swing and 45° cut
Machete injuries follow a pattern: the blade passes through the stem more easily than expected, or glances off, and continues along its arc into a leg, a knee or the hand holding the vegetation. How to use a machete safely therefore comes down to one rule: plan where the blade goes after the cut, and make sure nothing of yours – or anyone else's – is there.
Before the first stroke
- Nobody within about two arm-plus-blade lengths (roughly 3 m) in any direction – more in front and downhill
- Arc clear above and around: no low branches, vines or guylines of the tarp that can catch the blade
- Firm footing: no loose leaves over roots, no wet logs underfoot, nothing to trip over when you step
- Sturdy boots, long trousers, grippy gloves; eye protection when cutting thorny or springy growth
- Edge sharp – a blunt blade glances off instead of biting
- First aid kit with a pressure bandage within reach, and someone knows where you are
Stance
Stand with your feet about shoulder-width apart, one foot slightly back, knees soft. Position the target an arm plus a blade length away, in front of your cutting shoulder – too close and the arc ends at your shins; too far and you lean and lose control. Keep the free hand behind you or on a hook stick, never on the plant you are cutting.
The swing
Raise the blade to about shoulder height, not overhead – an overhead swing has more power than you need and less control. Cut down and outward at roughly 45° through the stem, letting the wrist snap at impact so the sweet spot does the work. Swing away from your body: the follow-through should end low and out to the side, beyond your foot, in the ground or in empty air. Never swing towards your legs, between your feet or across your body towards the other leg.
The safe machete swing, frame by frame
 1Grip and lanyard
Lanyard snug around the wrist, flared butt against the little finger, grip firm but relaxed. A clenched grip tires the arm and stiffens the stroke.
 2Shoulder height, not overhead
Raise the blade only to about shoulder height. Overhead swings are harder to stop and more likely to catch branches on the way back.
 3Down and out at about 45°
Cut down and outward through the stem, wrist snapping at impact. The typical error is pulling the blade across the body, which bends the arc towards your legs.
 4Follow-through ends outside
Seen from above, the arc finishes out to the side, beyond your feet. If the stem gives way suddenly, the blade carries on into empty space – not into you.

Why 45°?
A stroke at roughly 45° cuts across the fibres at a slant, which needs less force than a straight cross-cut and makes the blade less likely to bounce. A slanted stroke also travels through the stem and onward along a predictable line, which you have already checked is clear. Dead-straight horizontal strokes bind more often; steep downward strokes tend to split the stem and stop abruptly – and abrupt stops jar the wrist.
Hold vegetation with a stick, never with your hand
The most common machete wound is to the hand holding the plant. Carry a forked hook stick – about forearm length, with a short fork at the end. Hook the stem, pull it away from you so it stands taut, and cut on the tensioned side. Tension makes green wood cut cleanly, and your hand stays a full arm's length from the blade.
Clearing brush with a hook stick
 1Hook it, pull it taut
Hook the stem with the fork and pull it away from your body. The hand on the stick is the only hand near the plant.
 2Cut the taut side
Cut down and outward at about 45° on the tensioned side. Slack stems bend away from the blade and make it bounce.
 3Clear with the stick
Lift cut material aside with the stick, not your hand – thorns and hidden ticks wait in brambles (ticks and insects). On paths and camp areas, trim the stub flush: a sharp 45° spike at shin height is a hazard.
 4On slopes: nobody below
Never work above or below another person. Working downhill is the tricky direction: a stumble pitches you forward towards the blade and cut stems slide towards your feet, so slow down and keep a firm stance.
What a good stroke looks like
- Distance
- Arm plus blade to the target
- Height
- Blade raised to about shoulder height
- Angle
- About 45° down and outward
- Contact
- Front third of the blade (sweet spot)
- Free hand
- Behind you or on the hook stick
- After the cut
- Blade ends outside your legs, then you reset your feet
Chopping vs batoning with a machete
Chopping and batoning use the blade in two very different ways, and machete types differ in how well they take each.
Chopping is the machete's natural mode: a fast, snapping stroke that lands the sweet spot on the target. For stems thicker than your thumb, cut a small V – one stroke from each side at about 45° – rather than hammering the same spot. On dead hardwood, a light latin machete mostly bounces; switch to a saw instead of forcing it.
Batoning means setting the edge on the end of a stick and driving the blade through with a wooden baton struck on the spine. A thick parang handles this well for small wood; a thin latin blade can bend or crack. Baton only over the part of the blade that rests on the wood, keep the stick short (under the blade length) and strike the spine near the stick, never the thin tip. The full method, including safe positions for your hands, is in our guide to batoning.
Chopping or batoning?
Chop
- Green stems, brush, saplings
- Notches in green poles
- Stems thicker than a thumb: cut a V from both sides
- Any machete type
Baton
- Splitting small, dry sticks for kindling
- Parang or thick bolo only
- Wooden baton on the spine, never a stone or hammer
- Stick shorter than the blade
For the fire itself, a machete is a secondary tool in temperate woods. Splitting rounds is the axe's job, and keeping a fire going all night needs far more wood than a machete can process comfortably – see keeping a fire going overnight before you plan around one.
Sharpening a machete: convex edge, file and puck
A machete edge meets soil, stones and knots, so it is sharpened tougher than a carving knife: most machetes and parangs carry a convex edge that curves into the apex. As a rule of thumb, about 20–25° per side works for woody brush – the same range as an axe – and slightly finer for grass and soft growth. The tools are the ones you use for an axe: a flat file to shape and repair, a round puck (combination stone) to sharpen and a strop to finish. The basics of angles and burrs are in sharpening in the field; the axe section there applies almost one to one.

Sharpening a machete in the field
 1Brace the blade
Lay the machete flat on a log, edge facing away from you, and brace it with pegs or a clamp so it cannot slide.
 2File into the edge
With a gloved hand and a file of about 20–25 cm, push towards the edge on the push stroke only, following the convex curve. Lift the file on the way back.
 3Puck in small circles
Coarse side first, in small circles along the whole edge until you feel a burr, then the other side; repeat on the fine side. Fingers stay behind the edge.
 4Strop and check
Finish with edge-trailing strokes on a strop or leather, then look at the edge against the light: bright spots are blunt and need another pass.
Work evenly along the whole edge so it keeps its gentle curve; flat spots near the handle are common because that part is easy to forget. Kukri-style blades need the curve followed carefully with a round or small file. Never test sharpness with your fingers along the edge – feel across it from the spine side, or slice paper. A convex grind (see the glossary) is forgiving: small angle errors blend into the curve.
| Symptom | Likely cause | Fix |
|---|---|---|
| Blade bounces off stems | Blunt edge, straight cross-cut, slack stem | Sharpen; cut at 45° on the tensioned side |
| Edge rolls or dents | Soft steel hitting soil or stones | Raise the angle slightly; file out the dent and re-hone |
| Edge chips | Edge too thin, hard dead wood, frozen wood | File back to sound steel, use a more convex edge; saw dead wood instead |
| Hand stings, blade vibrates | Striking near the handle or tip, not the sweet spot | Adjust distance so the front third lands; loosen the grip |
| Handle slips | Wet or worn grip, lanyard too loose | Grippy gloves, adjust the lanyard, dry the handle |
Machete sheath and carrying safely
A good sheath covers the whole edge including the tip, holds the blade so it cannot slide out when you bend over, and has a drain or vent so moisture does not rust the blade. Leather is traditional and quiet; synthetic sheaths shrug off rain. If yours is worn, making a leather sheath covers the basic construction – for long, heavy blades use thicker leather and a welt.
- Sheath on whenever the machete is not in your hand. Never leave a bare blade lying in grass or leaf litter, where someone can step or kneel on it.
- Walking with it in hand: sheathed if possible; otherwise hold it at your side, edge down and facing away from your body, tip pointing at the ground. If you stumble, throw it clear.
- In a pack: sheathed, inside the pack or strapped so the edge cannot work free – not dangling on the outside. See backpacks.
- Handing over: sheathed, handle first; let go only when the other person says they have it.
- In camp: give tool work its own spot away from paths and the fire, as in setting up camp.
Machetes and the law: carrying long blades in public
Carrying long blades in public is restricted in many countries, and a machete is about as long as everyday blades get. The details are in our knife law guide; the summary below follows it. Status October 2026 – general information, not legal advice. Rules differ by country and region and change often.
United Kingdom
Section 139 of the Criminal Justice Act 1988 makes it an offence to have any article with a blade or point in a public place without good reason or lawful authority. The only exception is a non-locking folding pocketknife with a cutting edge of 3 inches (7.62 cm) or less – a machete obviously is not. Camping and bushcraft are not named as good reasons; a court decides if you are charged. In addition, "zombie-style" knives and machetes are on the list of banned weapons that may not be possessed or sold. A plain working machete is not banned as such, but it should travel packed with your trip kit, on the way to land where you have permission to use it – never carried openly.
Germany
A machete is generally treated as a fixed-blade knife with a blade far over 12 cm. Under § 42a of the Weapons Act (Waffengesetz), carrying it in public is only allowed with a legitimate interest or for transport in a locked container. On top of that, since 31 October 2024 carrying any knife is banned at public events, on long-distance public transport and its stations, and in weapon- and knife-free zones set by the states; transport is allowed there if the knife can only be reached with more than three hand movements. Fines can reach €10,000. In practice: machete sheathed, in a locked case, deep in the pack, until you are on site.
Elsewhere
Many countries, such as Sweden, require carrying in public to be justified by the circumstances; in the US and Canada, rules vary by state, province and city. Check the rules for every country on your route, and remember that parks and reserves often ban cutting vegetation altogether.
First aid for machete cuts
Machete cuts can be deep and bleed heavily, typically to the hand holding the plant, the shin or the knee. Prepare before you start: a first aid kit with gloves, sterile dressings and a pressure bandage, a charged phone, and a partner or someone who knows where you are – see safety when going solo.
If the machete cuts you
- Stop and make the blade safe Drop the machete away from you or sheath it, so nobody else gets hurt while you help.
- Press firmly Put on gloves if you can, press a sterile dressing or the cleanest cloth you have firmly on the wound and keep pressing.
- Pressure bandage Wrap a pressure bandage firmly over the dressing. If blood soaks through, add more dressing on top – do not remove the first layer.
- Call for help Heavy, spurting or uncontrolled bleeding: call 112 (Europe) immediately and keep pressing until help arrives. Tourniquets are for trained users only.
When not to use a machete
Knowing when to leave the machete in its sheath is part of using it well. Put it away – or choose a saw or knife instead – in these situations:
Leave the machete sheathed when…
- Children are using it unsupervised – or at all, at a young age. Long swinging blades are not a beginner tool; start children with a knife under close supervision as described in bushcraft with kids.
- Other people are close by. In a busy camp or a group clearing a path side by side, the safety zone cannot be kept. Space people out or take turns.
- You are tired, cold, rushed or it is getting dark. Fatigue and poor light are when strokes wander. Check the daylight left and stop early.
- The footing is bad: ice, wet rocks, steep or loose slopes.
- The wood is dead, hard or frozen. The blade bounces or chips – use a saw.
- You have no permission to cut, or are in a protected area.
- Fine work is needed: carving, feather sticks and food prep belong to a knife.
| Type | Blade | Balance | Best for |
|---|---|---|---|
| Latin | 45–60 cm, thin | Neutral | Grass, cane, soft green growth |
| Bolo | 30–45 cm, wide tip | Forward | Woody brush, thicker stems |
| Kukri-style | 30–40 cm, angled | Strongly forward | Chopping, limbing |
| Parang | 25–35 cm, thick, convex | Slightly forward | All-round bushcraft in mixed woods |
Common mistakes
- Holding the plant with your free hand instead of a hook stick.
- Swinging across the body or towards the legs instead of down and out to the side.
- Working with other people inside the safety zone, or above and below each other on a slope.
- Using a thin latin machete like an axe on dead hardwood until it chips or bends.
- Leaving a bare blade lying in grass or leaves instead of sheathing it.
- Carrying a machete openly in town or on public transport.
- Carrying on when tired – the last strokes of the day are the risky ones.
What you need
- Parang or machete with a 30–45 cm blade and a secure sheath
- Lanyard (wrist loop) in good condition
- Forked hook stick, cut on site or carried
- Flat file (20–25 cm) with handle, round axe puck and a strop
- Grippy work gloves, sturdy boots, eye protection for thorny growth
- First aid kit with a pressure bandage
- Lockable case or bag for transport
FAQ
Is a machete good for bushcraft?
What is the difference between a parang and a machete?
Machete or axe: which is better?
How do you use a machete safely?
Why cut at a 45° angle with a machete?
How do you sharpen a machete?
Is it legal to carry a machete?
What length machete is best?
Check yourself
Completed6 quick questions from this guide. Nothing is sent anywhere.
Related step-by-step guides
-
 1
-
 1
-
 1