Bushcraft Bed & Ground Insulation: How to Build a Warm Camp Bed
A good bushcraft bed puts a thick, dry layer of insulation between you and the ground, because cold earth pulls heat out of your body all night by conduction — far more than the air around you. The fastest solution is a sleeping pad with the right R-value; without one, a log-framed bed filled with dry leaves, grass or bracken, or a raised bed lashed from dead poles, does the same job.
This guide explains why the ground is the biggest heat thief, how pads and natural insulation compare, how thick a debris bed must be, and how to build a log-framed bed, a raised bed and a stretcher bed step by step — plus how to keep it dry, deal with ticks, and leave no trace. For every other shelter topic, see the shelter hub; for the basics behind all of it, start with bushcraft basics.
Step by step
-
1

Choose a dry, level spot
Pick level, slightly raised ground with no hollows, water channels or dead branches overhead. Clear stones, cones and sticks.
-
2

Lay two side logs
Place two dead logs about 70 cm apart to frame a bed roughly 2 m long. Pin them with stakes so they cannot roll.
-
3

Keep the moisture out
Spread a groundsheet between the logs, or a layer of dead sticks, so ground moisture cannot soak into the filling.
-
4

Fill with dry debris
Heap at least 40–50 cm of loose, dry leaves, grass or bracken into the frame. It compresses to about half under your weight.
-
5

Add your pad and test it
Lay your pad on top and lie down before dark. Wherever you feel cold ground, add more debris until the bed stays warm.
Why does the ground make you cold at night?
Heat flows from warm to cold in three ways: by radiation, by convection (moving air) and by conduction — direct contact. Lying down, a large part of your body presses against the ground, and soil, rock and especially wet earth conduct heat much better than still air. On top of that, the ground is enormous: it never "warms up" under you the way a small air pocket does. It just keeps taking heat for the whole night.
Your sleeping bag cannot fix this on its own. Its insulation works because the filling traps air, and your body weight squashes the filling flat where you lie on it. Under your hips, shoulders and back, a compressed sleeping bag insulates very little. That is why experienced campers say the pad matters as much as the bag, and why the sleeping gear guide treats the two as one system.

Moisture makes it worse. Water conducts heat far better than air, so damp ground, a wet groundsheet or soggy leaves pull heat away faster and can soak into your clothes and bag. Wind adds a second loss: if cold air can blow underneath you — on a raised bed or in a hammock — convection takes over from conduction. Whatever kind of bed you build, the job is the same: a thick layer of dry, trapped air between you and the cold.
The colder the ground, the more insulation you need. Frozen or snow-covered ground and wet autumn soil are the most demanding. Losing heat all night does more than spoil your sleep: it is one path towards hypothermia, especially when you are tired, hungry or damp.
Sleeping pad or natural insulation?
For a normal trip, a sleeping pad is the better choice almost every time. It is quick, predictable, works on any ground and leaves no trace. Its warmth is given as an R-value (tested to ASTM F3340): the higher the number, the better it stops heat flowing into the ground, and R-values add up when you stack pads. The glossary explains the term briefly.
Our sleeping bag & pad calculator works out which R-value you need from the night low. As a rule of thumb it suggests about R 2 when nights stay at 10 °C or above, R 3 from 5 to 9 °C, R 4 from 0 to 4 °C, R 5 down to −10 °C, R 6 down to −20 °C and R 7 below that — one step more if you sleep cold. Typical values: a closed-cell foam pad about R 2, a self-inflating pad about R 3.5, an insulated air pad about R 4.5, and foam plus insulated air pad about R 6.5.
Natural insulation — a deep bed of dry leaves, grass, bracken or fallen boughs — has no tested R-value. How warm it is depends entirely on how dry, fluffy and thick it is, and it changes during the night as it compresses. It is the right tool when you have no pad, when your air pad has punctured, when the ground is so cold that your pad alone is not enough, or when you want to practise the skill. Often the best answer is both: your pad on top of a debris bed.
Sleeping pad vs natural bed
Sleeping pad
- Known warmth (R-value)
- Ready in a minute, works anywhere
- Leaves no trace
- Can puncture (air pads) or be too thin alone in winter
Debris or raised bed
- Free and found on site
- Can add a lot of warmth under a thin pad
- 30 minutes to several hours of work
- Needs permission, dry material and dismantling
| Option | Typical insulation | Build time | Best for |
|---|---|---|---|
| Closed-cell foam pad | ≈ R 2 | None | Summer; backup under an air pad |
| Insulated air pad | ≈ R 4.5 | A few minutes | Autumn and nights around freezing |
| Foam + insulated air pad | ≈ R 6.5 | A few minutes | Winter, frozen ground |
| Debris bed in a log frame | No tested value; depends on dryness and thickness | 30–60 min | No pad, failed pad, extra warmth |
| Raised bed or stretcher bed | Little on its own; needs a pad | 1–3 h | Wet or rocky ground, longer camps |
R-values as used in the sleep calculator and the sleeping gear guide. A natural bed is not a substitute for a pad in hard frost; combine them.
How thick should a debris bed be?
A debris bed is the simplest kind of ground insulation: a deep heap of dry plant material that you lie on. Its weakness is compression. Leaves that look generous when you pile them pack down dramatically once your weight is on them, and they keep settling through the night. The rule of thumb is to heap at least twice as much as you need and judge the bed only after you have lain on it.
The table gives rule-of-thumb thicknesses for dry leaf litter, measured after you have compressed it by lying on it. They match the bed values in our debris shelter guide. Treat them as starting points: damp material, wind and a tired, cold body all need more.
| Expected night low | Compressed bed | Loose heap to start with | Notes |
|---|---|---|---|
| Above +10 °C | 15–20 cm | 30–40 cm | Often enough without a pad |
| +5 to +10 °C | 20–25 cm | 40–50 cm | A foam pad on top helps a lot |
| 0 to +5 °C | 25–30 cm | 50–60 cm | Use a pad on top if you have one |
| Below 0 °C | 30 cm+ | 60 cm+ | Do not rely on debris alone; pad on top, warm bag |
Guidance values, not guarantees. Wet or matted debris insulates far less and can chill you; test the bed before dark.

Best and worst materials
- Dry beech and oak leaves: curly, springy and easy to gather in autumn woodland — the classic filling.
- Dead grass and dead bracken: very good when dry; bracken also stays springy for a long time.
- Conifer needles: pack flat; usable as a base layer, but need more thickness.
- Fallen conifer boughs: springy and keep the filling off damp ground — only where they are already lying (see below).
- Avoid: wet or rotting leaves, moss stripped from trees or rocks, and anything green or cut from living plants.
After rain, look for drier litter under dense conifers, beneath overhangs and on the lee side of fallen logs. Carry it in a tarp, a large bag or a jacket used as a sheet — it doubles or triples each load. A bed for one person needs far more material than most people expect: think several big armfuls, not a few handfuls.
How to build a log-framed bushcraft bed
The log-framed bed is the workhorse of natural ground insulation. Two side logs keep the filling in place, stop it spreading out under you and give you a clear edge in the dark. It is quick, needs no cord and works under a tarp, in a lean-to or in the open. Plan about 30–60 minutes for one person, most of it gathering debris.
Use only dead, fallen wood for the frame: logs of about 15–25 cm diameter and a little longer than the bed, so roughly 2.2–2.5 m for an adult of 1.80 m. A folding saw makes shortening them easy; an axe is rarely needed. Keep the inside about 2 m long — your height plus around 20 cm — and about 70 cm wide, the same crib size our debris shelter guide uses for a quick leaf bed.
Building a log-framed debris bed
 1Clear and mark the outline
Remove stones, cones and sticks, then lie down and mark your head and feet. The inside should be about your height plus 20 cm and about 70 cm wide. Look up: no dead branches above the bed.
 2Place and pin the side logs
Roll two dead logs of 15–25 cm into place along the outline. Drive a short stake on the outside of each end, or wedge stones there, so the logs cannot roll away when you push against them in your sleep.
 3Fill with dry debris
Spread a groundsheet first if you have one, then heap dry leaves, grass or bracken until the pile rises well above the logs — at least 40–50 cm loose for a mild night, more if it will be cold.
 4Compress, top up, add the pad
Lie on it, shuffle around, get up and fill the hollows. Repeat until you cannot feel cold ground at your hips and shoulders, then lay your pad on top.
A warm camp bed from top to bottom
- Rated for the night low — see the sleep calculator.
- Adds known insulation and stops leaves poking through.
- 15–30 cm+ after compression, depending on the night low.
- Keeps ground moisture out of the filling.
- Two dead logs of 15–25 cm, pinned so they cannot roll.

What it should look like: a long, flat-topped mattress of leaves that fills the frame to the top of the logs or higher after you have lain on it, with no thin patches where the groundsheet shows through. If you can feel the shape of the ground under your hip when lying on your side, it is too thin. Raise the head end slightly with extra leaves or a rolled jacket — a slight slope with your head uphill is more comfortable than lying flat on a slope the other way.
Spruce bough beds: only with fallen or permitted material
Old woodcraft books describe thick beds of freshly cut spruce or fir boughs, laid like roof tiles. They are springy and fragrant — and cutting them from living trees damages the forest and is forbidden in most places without the landowner's explicit permission. Today a bough bed means boughs that are already lying on the ground: wind-thrown branches, storm debris or tops left after forestry work where you are allowed to use them.

Lay fallen boughs with the curved side up and the cut ends pointing towards your feet, overlapping like shingles, so the springy tips are under your body. They make an excellent base layer under leaves because they hold the filling off damp ground. Shake them out first: dead needles and small insects drop off. Resinous wood stains clothing, so a groundsheet on top keeps your bag clean.
Raised bed and stretcher bed: off the ground with lashings
A raised bed lifts you off wet, rocky, root-covered or crawling ground. It is popular at longer camps and in wet seasons, but it takes more time, needs cord and poles, and comes with one important catch: raising yourself off the ground does not make you warm. You swap conduction for moving air underneath, and a stretcher of fabric under your back has almost no insulation of its own. It is the same reason the sleep calculator gives a hammock no shelter bonus. On a raised bed you still need a pad, a debris layer on top, or both.
Raised bed frame
The simplest frame uses two trestles, one at the head and one at the foot. Each trestle is a crossbar lashed to two uprights driven into the ground or resting on stacked logs, about 30–40 cm above the ground. Two long side poles of sound dead wood — roughly 2.4 m long and 6–10 cm thick — rest on the crossbars. Lash every crossing with a square lashing; the lashings guide shows each turn, and the knots guide covers the clove hitch that starts and finishes it. Thin paracord or tarred bank line is enough for a one-person bed.
Raised stretcher bed in four steps
 1Build two trestles
Lash a crossbar to two uprights at 30–40 cm height with square lashings, once for the head end and once for the foot end. Push down hard on the crossbar: it must not slip or rock.
 2Lay the side poles
Rest two sound dead poles of about 2.4 m across both trestles. Lash or notch them at the crossbars so they cannot roll inwards when you lie down.
 3Fold the tarp round the poles
Fold a tarp in thirds around both poles, 60–70 cm apart: your body weight pins the layers together. The poles want to pull towards each other, so their spacing must be fixed at the crossbars.
 4Add insulation on top
Air moves freely under a raised bed. Lay your pad or a thick layer of dry leaves on the stretcher before you get in, and test it while it is still light.
Stretcher bed with a tarp
The stretcher works like a rescue stretcher. Lay the tarp flat, place one pole about a third of the way across, fold the tarp over it, place the second pole on the fold and fold the rest back over. Friction between the layers holds everything as soon as you lie on it. The tarp needs to be about three times as wide as the pole spacing, so roughly 2–3 m for poles 60–70 cm apart, and as long as your body; a mid-sized tarp from our tarp guide works. If you need the same tarp as your roof, use a second sheet, a strong bag or a lattice of dead sticks instead.
Before trusting it, sit on the middle and bounce gently. If a crossbar slips, re-lash it; if a pole bends a lot, replace it. Never use rotten wood, and never build a raised bed between living trees in a way that strips bark — the same tree-protection habits apply as for a hammock.
| Ground | Best bed | Why |
|---|---|---|
| Dry woodland floor | Pad, or pad on a log-framed debris bed | Quick; debris adds warmth |
| Damp soil, autumn | Groundsheet + debris bed + pad | Moisture barrier is essential |
| Rocky or root-covered | Raised or stretcher bed with pad | Evens out the ground |
| Waterlogged, flood-prone | Move somewhere else | No bed fixes a wet site |
| Frozen or snow-covered | Foam + insulated pad, boughs only if fallen | Highest insulation needed |
Keeping your camp bed dry: groundsheet and drainage
Dry insulation is warm insulation. A debris bed that soaks up water from below or rain from above loses most of its value and can chill you through the night. Three things keep it dry:
- The right spot. Slightly raised, level ground that drains well — never a hollow, a dry stream bed or the bottom of a slope where water and cold air collect. Our site selection guide goes through it in detail.
- A barrier below. A groundsheet between soil and debris stops ground moisture from wicking up. Without one, a layer of dead sticks or fallen boughs lifts the filling a few centimetres and lets water drain underneath.
- A roof above. Debris beds need cover in rain. Build under your tarp, keep the bed inside the drip line, and make sure the groundsheet does not stick out beyond the roof edge, or it will funnel rain straight into your bed — see camping in the rain.
Is your bed going to stay dry?
Is the spot in a hollow or a water channel?
Yes → Move — no bed can fix a wet site.No → Continue to the next question.Is the ground damp to the touch?
Yes → Use a groundsheet or a layer of dead sticks under the debris.No → A groundsheet is still useful but optional.Is rain possible tonight?
Yes → Build under a tarp or lean-to, inside the drip line.No → Keep a tarp ready anyway; dew also wets loose leaves.Does the groundsheet stick out from under the roof?
Yes → Fold it under so it cannot collect rain.No → Good — your bed is protected.
Condensation is the hidden problem. On clear, cold nights dew settles on everything in the open, including the top of your bed and your sleeping bag. A tarp overhead or a bivvy bag around your bag prevents most of it. In the morning, if you stay another night, fluff the leaves up and let them air in any sunshine.
Ticks, insects and other guests in leaf litter
Leaf litter and long grass are prime habitat for ticks, and a bed made of them brings that habitat right up to your body. Ticks can transmit Lyme disease and, in parts of Europe, tick-borne encephalitis (TBE). Wear long trousers tucked into socks while gathering, use a repellent according to its label, and check your whole body the next morning and again in the evening — especially the groin, armpits, back of the knees, waistband, hairline and behind the ears. Our ticks and insects guide covers repellents, tick checks and removal; follow the official advice of public health agencies in your country.
Leaf piles also shelter spiders, beetles, ants and the occasional mouse. Shake out leaves you have gathered, avoid anthills and rotting logs that are full of life, and keep food out of the bed and away from your sleeping area. A groundsheet or bivvy bag between you and the debris keeps most crawling things off your sleeping bag. A raised bed helps against crawling insects, but not against flying ones — in midge or mosquito season a net matters more than any bed.
Bug-proofing a natural bed
- Long trousers tucked into socks while gathering debris
- Repellent on clothes and skin as directed on the label
- Gather from open, dry patches, not from rotting logs or anthills
- Groundsheet or bivvy bag between you and the leaves
- No food in or near the bed
- Full-body tick check in the morning and again in the evening
Combining your bed with a shelter
A bed is only half a sleep system; the other half is the roof and walls. The best combination depends on the shelter you have:
- Tarp: the most common pairing. Build the log-framed bed first, then pitch the tarp over it in an A-frame or lean-to — or pitch first and build underneath. Keep the bed well inside the drip line. Fires stay at least 3 m from a synthetic tarp, and at least 5 m from your bed and leaf pile, which burn as readily as tinder.
- Lean-to: a natural or tarp lean-to with the bed along the back wall. A reflector fire in front is a classic set-up, but it needs a lot of wood, an attended fire and a safe distance; the overnight fire guide and fire safety explain the rules, and the firewood calculator shows how much wood a night takes.
- Debris shelter: the bed is built into the hut. In a debris shelter the bed matters as much as the shell — 20–30 cm compressed for nights around freezing.
- Tent: a pad is usually enough, but on frozen ground a foam pad under the air pad is the simplest upgrade; debris under a tent floor is rarely worth the work.
- Open bivouac: a debris bed plus a bivvy bag and a small tarp is a light, very traditional night — check the wind with the wind chill calculator, because wind cools a raised or open bed fast.
Hammock: the alternative to a ground bed
If the ground is wet, rocky, steep or full of roots and you have two suitable trees, a hammock skips the ground problem entirely. But it creates a new one: your weight squashes the sleeping bag underneath you, and air moves freely below, so a hammock is cold from below until you insulate it. The answer is an underquilt that hangs under the hammock, or a pad inside it — the hammock insulation section and the sleep calculator's hammock mode give the details.
Hammocks have their own rules: tree-friendly straps, sound, living trees of sufficient diameter, no dead branches overhead and permission where you hang. Compared with a log-framed bed, a hammock is faster to set up and leaves less trace on the forest floor, but needs more gear. Our tent, tarp or hammock comparison helps you decide.
Leave no trace: taking your bed apart
A natural bed changes a small patch of forest floor: leaves and needles are home to insects, fungi and seedlings, and a compacted rectangle of bare soil stays visible for a long time. Practise only where you have permission, use dead material only, gather in small patches over a wide area rather than raking one spot bare, and take the bed apart when you leave.
Taking down a camp bed
 1Pull stakes, return the logs
Pull out the stakes and roll the side logs back to where you found them, or at least away from the bed area. Untie and pack all cord from a raised bed — cord left behind can trap wildlife.
 2Scatter the debris widely
Spread the leaves and grass out over a large area instead of leaving a heap. Scattered material returns to the forest floor quickly; a pile marks the spot for months.
 3Check: no trace left
Look back from a few metres away. No heaps, no cord, no litter, no bare rectangle. Fluff up flattened ground cover with your boot and take every bit of rubbish with you.
The same applies at regular camps: keep sleeping areas at least 60 m from lakes and streams, use existing clearings where you can, and follow the low-impact routines in our camp setup guide. In Germany, staying overnight in the forest and building natural structures are regulated by the Bundesländer; check the details in wild camping in Germany before you go.
Camp bed problems and fixes
| Symptom | Likely cause | Fix |
|---|---|---|
| Cold at hips and shoulders | Bed compressed flat where you weigh most | Add debris under hips and shoulders, put the pad on top |
| Cold from below on a raised bed | Air moving under a stretcher | Pad or leaves on the stretcher; wind wall of debris or packs |
| Damp, clammy cold | Wet debris or no moisture barrier | Groundsheet underneath, drier material, roof overhead |
| Rolling off the edge | Logs too far apart or not pinned | Narrow the frame to about 70 cm, stake the logs |
| Leaves poking and itching | No layer between you and the debris | Pad, groundsheet or bivvy bag on top |
| Stretcher sagging to the ground | Poles too thin or not fixed apart | Thicker poles, lash or notch them at the crossbars |
Practice drill: the one-hour bed
On a dry afternoon close to home, with permission, give yourself one hour: 10 minutes for the site and logs, 40 minutes for debris, 10 minutes for test lies and top-ups. Then lie on it for half an hour at dusk with only a jacket. You will learn how much debris "enough" really is — almost always more than you piled. Dismantle it afterwards. Practising when nothing is at stake also teaches the most important habits for nights alone; read solo safety and tell someone where you are. Starting your bed early matters on short days: check sunset with the daylight calculator.
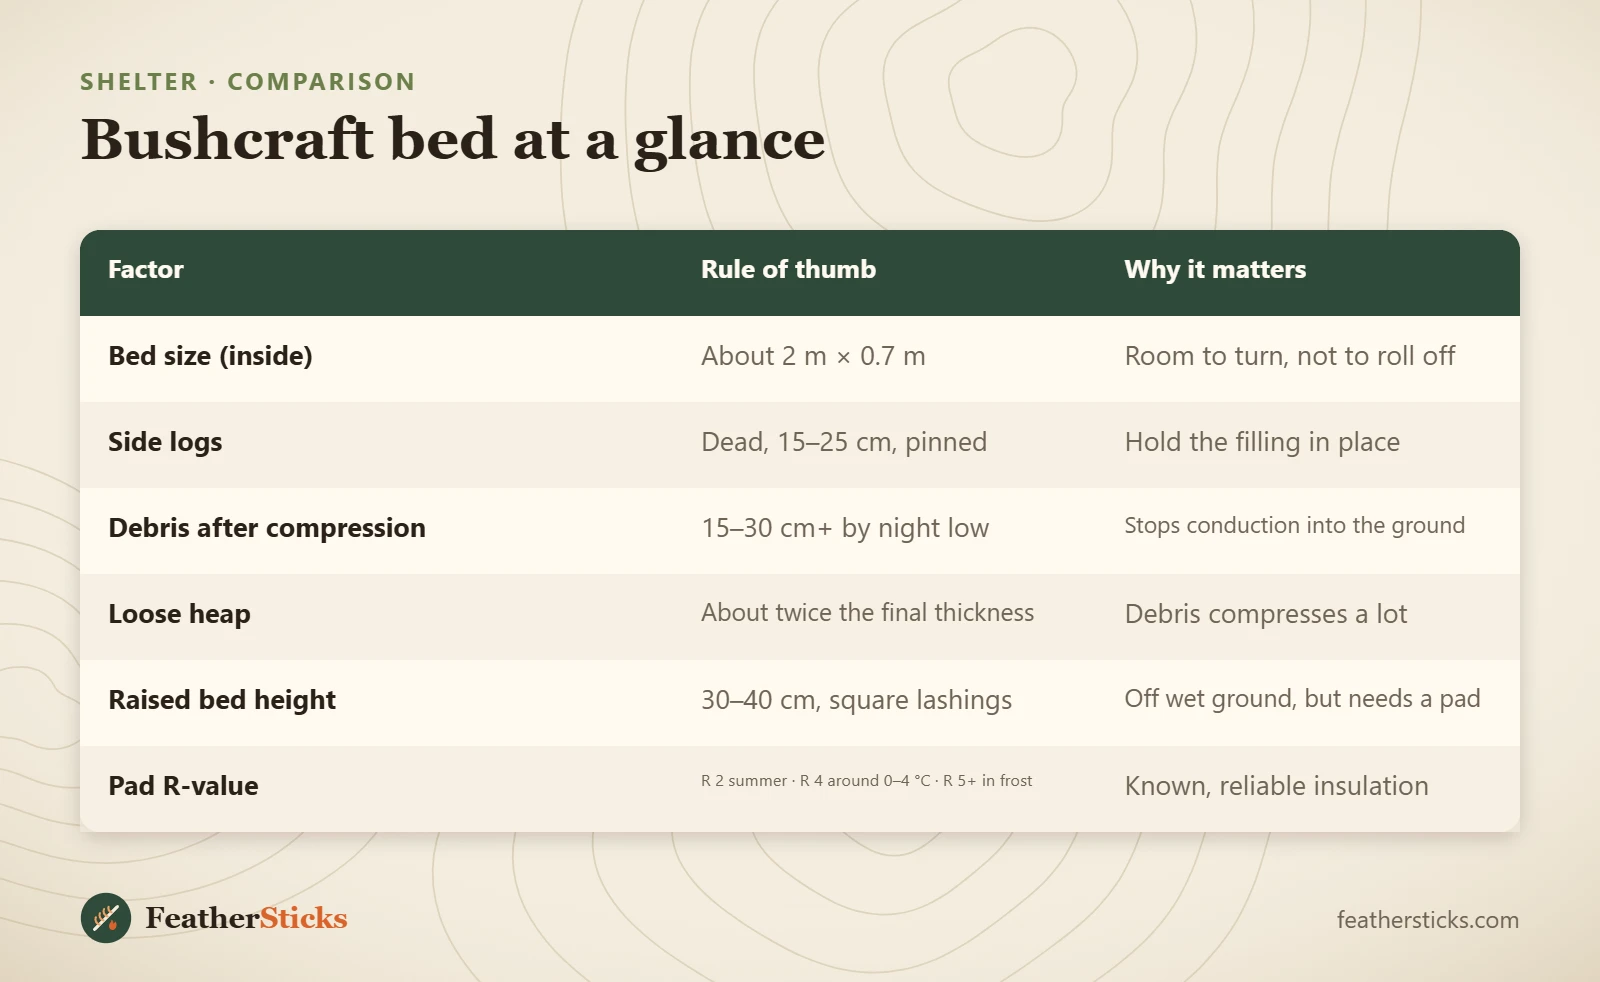
| Factor | Rule of thumb | Why it matters |
|---|---|---|
| Bed size (inside) | About 2 m × 0.7 m | Room to turn, not to roll off |
| Side logs | Dead, 15–25 cm, pinned | Hold the filling in place |
| Debris after compression | 15–30 cm+ by night low | Stops conduction into the ground |
| Loose heap | About twice the final thickness | Debris compresses a lot |
| Raised bed height | 30–40 cm, square lashings | Off wet ground, but needs a pad |
| Pad R-value | R 2 summer · R 4 around 0–4 °C · R 5+ in frost | Known, reliable insulation |
Common mistakes
- Trusting the sleeping bag alone — compressed filling under you hardly insulates.
- Piling a thin layer of leaves and only noticing at night how flat it packs.
- Using damp or rotting leaves that hold water instead of air.
- Building a raised bed and assuming it is warm without a pad.
- Cutting living branches or boughs for bedding.
- Letting the groundsheet stick out beyond the tarp so it collects rain.
- Leaving a heap of leaves and logs behind instead of scattering them.
What you need
- Sleeping pad (closed-cell foam as backup)
- Groundsheet or thin tarp
- Folding saw for trimming dead logs
- Gloves for gathering debris
- Large bag or tarp to carry leaves
- 10–15 m of cord for a raised bed
- Tick repellent and tick tweezers or card
FAQ
Why is sleeping on the ground so cold?
How thick should a leaf bed be?
Is a raised camp bed warmer than sleeping on the ground?
What R-value do I need under me?
Can I cut spruce branches for a bough bed?
How do I make a bed without a sleeping pad?
How do I keep a debris bed dry?
Check yourself
Completed6 quick questions from this guide. Nothing is sent anywhere.
Related step-by-step guides
-
 1
-
 1
-
 1