What Is Paracord? Types, 550 Cord Uses & a Bushcraft Cordage Kit
What is paracord? Paracord is a thin nylon cord built like a miniature rope: a braided outer sheath around several loose inner strands. The best-known version, "550 paracord" or Type III, is about 4 mm thick and has a nominal minimum breaking strength of 550 pounds (≈ 249 kg) when new, dry and unknotted. That makes it a superb camp cord for ridgelines, guylines, hangs and repairs – and still nothing you may climb on, abseil with or hang a person from.
This guide explains the types, what the numbers mean, how nylon behaves when wet, and where tarred bank line, Dyneema guyline, accessory cord or jute do a job better. Then it gets practical: a pre-cut cordage kit that matches our tarp pitch & cordage planner, and illustrated steps for sealing, whipping, gutting and storing cord. Part of our gear guides; the knots themselves are in essential bushcraft knots.
Step by step
-
1

Match the cord to the job
Paracord for the ridgeline and general camp use, thin low-stretch cord for guylines, tarred bank line for lashings. None of it is climbing rope.
-
2

Pre-cut your kit at home
Cut one ridgeline of 8 metres, six guylines of 2 metres and keep 10 metres as a utility hank. That is about 30 metres and 200 grams.
-
3

Cut clean and seal the ends
Cut with a sharp knife, then melt each end at the edge of a flame until sheath and core fuse. Molten nylon drips and burns, so keep skin away.
-
4

Coil every length into a hank
Wind figure-eights between thumb and little finger, wrap the tail round the middle and tuck a loop under the last turn. It runs out without tangles.
-
5

Tie knots with an extra turn
Paracord is smooth and stretchy. Add a turn to friction knots, leave longer tails, and re-tension lines after rain or at dusk.
-
6

Check it, retire it, take it home
Run each line through your fingers. Cut out sections with a damaged sheath or glazed, stiff spots, and pack out every scrap – nylon does not rot.
What is paracord and how is it built?
Paracord is short for parachute cord: it was developed as suspension line for parachutes and later became the general-purpose utility cord of soldiers, and then of hikers and bushcrafters. Technically it is a small kernmantle cord, from the German words for core (Kern) and sheath (Mantel):
- The sheath (mantle) is a tube braided from many fine nylon yarns. It protects the core from abrasion, gives the cord its round shape and colour, and carries a good part of the load.
- The core (kern) consists of several separate inner strands lying loosely side by side. In Type III cord there are seven to nine of them, and each strand is itself twisted from two or three finer yarns.
Sheath and core are not glued together. That is why you can pull the inner strands out and use them separately – and why a cut end must be sealed, or the sheath slides back and the core creeps out.

This construction explains the character of paracord. It is supple, knots easily, is pleasantly round in the hand and very strong for its weight. It is also elastic: by specification, parachute cord has to stretch by at least 30 % before it breaks. That stretch protected parachutists from opening shock; under a tarp it means a line that sags when it gets wet. More on that in the section on nylon and polyester.
Type III ("550") paracord at a glance
- Construction
- Kernmantle: braided nylon sheath, 7–9 inner strands
- Diameter
- ≈ 4 mm (nominal 5/32 inch)
- Breaking strength
- 550 lb ≈ 249 kg – nominal minimum, new and unknotted
- Stretch
- At least 30 % before breaking; more when wet
- Weight
- ≈ 6–7 g per metre dry
- Melting point
- Roughly 220–260 °C, depending on the nylon
What does "550" mean? Breaking strength vs safe working load
The number in "550 paracord" is the minimum breaking strength in pounds for Type III cord: 550 lb, about 249 kg or 2.4 kN. It is a laboratory figure for a new, dry, straight piece of cord, pulled slowly and evenly until it fails. In camp, almost nothing about a cord matches those conditions.
- Knots bend the fibres sharply and can cost roughly 20–50 % of the strength, depending on the knot and how well it is dressed – see knot strength and safety.
- Sharp bends and edges – a thin branch stub, a metal ring, a tent stake – concentrate the load on a few fibres.
- Water makes nylon a little weaker and a lot stretchier; sunlight, abrasion and age weaken it permanently.
- Jerks multiply the force. A load that drops even a short way into a cord pulls far harder than its weight.
For this reason, riggers never work with breaking strength. They use a safe working load: a small fraction of the breaking strength. A common rule of thumb for general-purpose cordage is no more than about one fifth for a steady load, and one tenth or less when knots, wear and movement are involved. For Type III paracord that puts the sensible working range at roughly 25–50 kg of static load – a food bag, a wet tarp in wind, a pot over the fire. This is a rule of thumb, not a rating: commercial paracord is rarely tested piece by piece, and there is no certificate behind the number on the packet.
From the label to real life: Type III paracord (rule-of-thumb values)
Paracord types: Type I to IV, micro and nano cord
The familiar type numbers come from the US military specification for nylon parachute cord. Shops use them as generic size classes, and have added "micro" and "nano" cord below Type I for crafts and small repairs. The figures below are the widely published nominal values. Treat them as an order of magnitude: commercial cord varies from maker to maker and is usually not individually tested.
| Type | Diameter | Nominal breaking strength | Inner strands | Typical uses |
|---|---|---|---|---|
| Nano cord | ≈ 0.75 mm | ≈ 16 kg (36 lb) | None – solid braid | Zip pulls, sewing, tying small parts |
| Micro cord | ≈ 1.2 mm | ≈ 45 kg (100 lb) | None – solid braid | Lanyards, whipping, tent and pack repairs |
| Type I | ≈ 2 mm | ≈ 43 kg (95 lb) | Thin core, often 1 strand | Light guylines, tie-outs, gear loops |
| Type II | ≈ 3 mm | ≈ 181 kg (400 lb) | 4–7 | Guylines, light ridgelines, bootlaces |
| Type III ("550") | ≈ 4 mm | ≈ 249 kg (550 lb) | 7–9 | Ridgelines, hangs, lashings – the all-rounder |
| Type IV ("750") | ≈ 5 mm | ≈ 340 kg (750 lb) | 11 | Heavier ridgelines, handles, base-camp lines |
Nominal minimum breaking strengths for new, dry, unknotted cord. Diameters are approximate; commercial cord varies. None of these cords is rated for carrying people.

Mil-spec vs commercial paracord
"Mil-spec" means the cord is made to the military specification: nylon sheath and nylon core, a defined number of inner strands (in Type III each one twisted from three yarns), a minimum strength and a minimum stretch, usually with a coloured marker thread in the core that identifies the manufacturer. "Commercial" or "550-style" cord copies the look and the size, but the maker decides the details: inner strands are often two-ply, the count may be lower, and the fibre may be polyester or a blend.
Neither is automatically better for camping. Commercial cord is fine for guylines and general use and comes in bright colours that are easy to find in the leaf litter. What matters is that you know what you have:
- Count the strands. Cut a short piece, push the sheath back and count. Seven or more inner strands in a 4 mm cord is a good sign; three or four thick, fluffy ones means a decorative cord.
- Feel it. Good cord is firm and round and keeps its shape when pinched. Cord that flattens easily has a thin core.
- Melt an end. Nylon and polyester melt to a hard, glossy bead. A cord that chars or burns like paper contains other fibres.
- Buy by description, not by slogan. "Type III, 7 strands, nylon/nylon" tells you something. "Survival strength" does not.
Nylon or polyester: stretch when wet, UV and melting
Classic paracord is nylon (polyamide). Much of the cheaper cord sold as paracord is polyester. The two look alike and behave differently, and the difference matters most on a tarp.
| Property | Nylon paracord | Polyester cord |
|---|---|---|
| Stretch | High – absorbs shock, but lines sag | Low – lines stay tight |
| When wet | Absorbs water, gets longer and somewhat weaker; dries slowly | Absorbs almost nothing, length and strength stay the same |
| UV resistance | Moderate – fades and weakens after long sun exposure | Good |
| Abrasion | Very good | Good |
| Knots | Supple, knots hold reasonably well | Often stiffer and smoother; add a turn |
| Heat | Melts at roughly 220–260 °C; softens well before that | Melts at roughly 250–260 °C |
| Best for | General use, hangs, anything that takes a jerk | Ridgelines and guylines that must stay tight |
The practical consequence: a nylon ridgeline tensioned drum-tight on a dry evening will hang slack after an hour of rain, because wet nylon lengthens. That is not a defect, just a property. Either re-tension the line – which is why adjustable knots matter – or use low-stretch cord for the lines that must stay tight. Our guide to rigging a tarp ridgeline shows the set-up.
Both fibres melt long before wood burns, and neither survives contact with flame, embers or a hot pot. A cord that hangs over a fire needs distance and should carry its load on a wooden hook or a green stick, not on the cord itself. Sparks from resinous wood leave pinholes in a sheath that you only notice when it fails – one more reason for the regular check described under care and retiring.
Pre-stretching a nylon line
New nylon cord can also shrink a little the first time it gets soaked and dries again. If you want a ridgeline that behaves predictably, deal with both effects at home once:
Wet-stretch a ridgeline
- Soak it Put the cut and sealed line in a bucket of lukewarm water for about half an hour, so the fibres take up water all the way through.
- Tension it wet Tie it between two solid points – two trees or fence posts – and tighten it hard with a trucker's hitch. Do not use your body weight on a doorknob or a railing; pull by hand only.
- Re-tighten as it gives After ten minutes and again after an hour, take up the slack. Most of the initial stretch comes out in this time.
- Let it dry under tension Leave it until completely dry, then coil it. The line will still lengthen in rain – it is still nylon – but noticeably less than a fresh one.
Bank line vs paracord – and the other cords worth carrying
Paracord became the default mostly because it is everywhere. For several camp jobs another cord is better, lighter or cheaper, and experienced bushcrafters usually carry two or three kinds. The most common question is bank line vs paracord, so start there.
Tarred bank line or paracord?
Tarred bank line
- Thin: about 1.5–2 mm, a 30 m roll fits in a pocket
- Tar coating grips – knots and lashings stay put
- Hardly stretches, sheds water, resists rot
- Cheap enough to cut without thinking
- Thin cord bites into hands and bark; tar smell and sticky fingers
Paracord (Type III)
- Thick: about 4 mm, comfortable to pull hard on
- Smooth sheath – friction knots need an extra turn
- Stretches, more so when wet
- Stronger per line; inner strands as a bonus
- Bulky and heavier for the same length
Tarred bank line is a twisted or braided nylon twine soaked in tar, originally made for fishing set lines. It is sold by size number: #12 is about 1.5 mm with a nominal strength of roughly 45 kg, #36 about 2 mm and roughly 150 kg – figures that vary by maker. For lashings, tripods, pot hangers, tie-out loops and repairs it is hard to beat, because every turn locks on the one below. It is too thin for a comfortable ridgeline and too abrasive for a hang over a living branch.
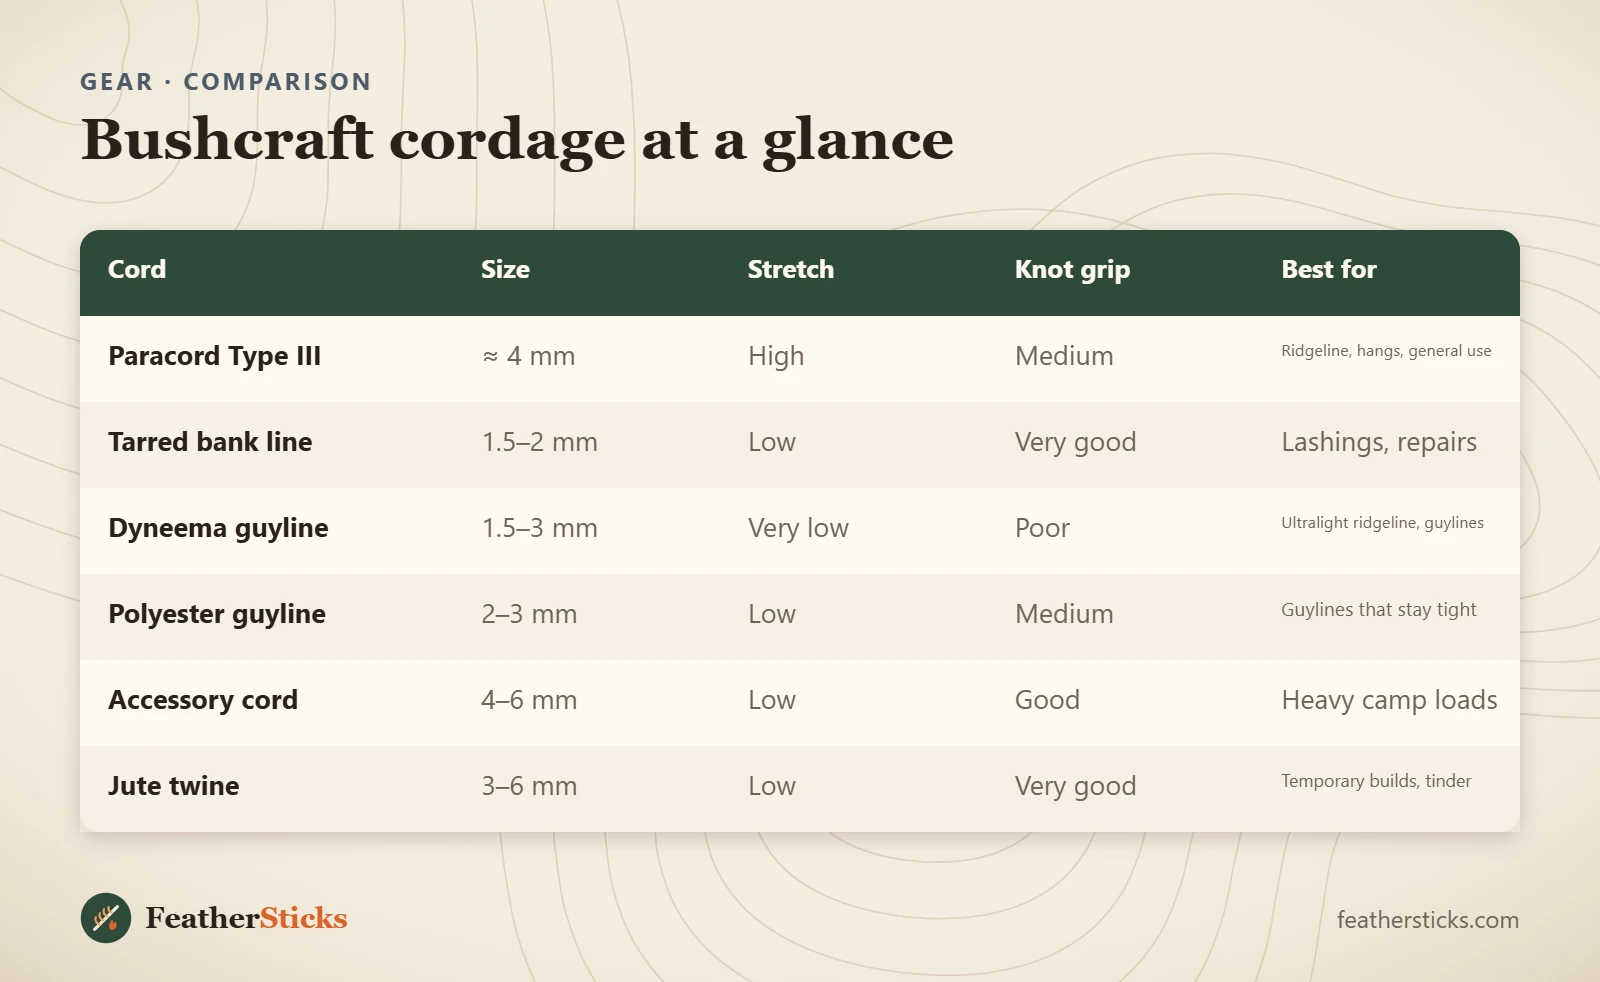
| Cord | Typical size | Stretch | Knot grip | Strong points | Weak points |
|---|---|---|---|---|---|
| Paracord, Type III | ≈ 4 mm | High | Medium | Versatile, tough, inner strands, cheap | Sags when wet, bulky |
| Tarred bank line | 1.5–2 mm | Low | Very good | Grips, compact, cheap, weatherproof | Thin in the hand, tar rubs off |
| Dyneema / UHMWPE guyline | 1.5–3 mm | Very low | Poor – slippery | Lightest for its strength, absorbs no water | Many knots slip; melts at about 145–150 °C; expensive |
| Polyester guyline | 2–3 mm | Low | Medium | Stays tight, often reflective, cheap | Stiffer; little reserve for heavy jobs |
| Accessory cord (EN 564) | 2–6 mm | Low | Good | Tested minimum strength printed on the reel, very abrasion-resistant | Heavier and dearer than paracord |
| Jute or sisal twine | 3–6 mm | Low | Very good | Biodegradable, cheap, fuzz works as tinder | Weak, rots when stored damp |
| Natural cordage | 2–5 mm | Low | Good | Made on the spot, free, rots away harmlessly | Slow to make, strength varies |
Qualitative comparison. Strength depends on the individual product; only certified accessory cord comes with a guaranteed minimum.
Dyneema / UHMWPE guyline
Cord made from ultra-high-molecular-weight polyethylene is the lightweight choice: thinner and lighter than paracord for the same job, with almost no stretch and no water uptake. A ridgeline in 2 mm Dyneema stays where you tensioned it. The price is a very slippery surface – a taut-line hitch simply slides, and many people use small line tensioners or knots with extra turns instead – and a low melting point, so it must stay well away from fire and from hot friction.
Accessory cord
Accessory cord from the climbing shop is kernmantle cord like paracord, but with a tight sheath, little stretch and – the important difference – a tested minimum breaking strength under the European standard EN 564: 3.2 kN for 4 mm and 5.0 kN for 5 mm, for example. That makes it the honest choice for heavy camp loads such as a large food hang. It is still static cord for holding and hauling gear, not a rope for catching falls.
Jute, sisal and natural cordage
Natural-fibre twine grips better than any synthetic and may be left on a temporary structure to rot. Jute has a second life: untwist a piece, fluff the fibres into a nest and it takes a spark from a ferro rod – see tinder for how to prepare it. And if you want to make cord yourself from nettle or lime bast, our guide to natural cordage shows the reverse-wrap technique; its section on paracord vs natural cordage weighs up the two.
550 paracord uses: which cord for which job?
The classic 550 paracord uses in camp are ridgelines, guylines, food hangs, lashings, replacement laces and repairs. For each of them there is a best cord and an acceptable one. The table assumes ordinary camp loads; lengths for the tarp lines follow the tarp planner.
| Job | Best choice | Paracord? | Length | Notes |
|---|---|---|---|---|
| Tarp ridgeline | 3–4 mm polyester or 2–3 mm Dyneema | Yes – re-tension when wet | Tree distance + 3 m (8 m for trees 5 m apart) | See tarp shelter setups |
| Guylines | 2–3 mm polyester or Dyneema guyline | Yes, but bulky | 2 m each; 6 for an A-frame, 4 for a lean-to | Bright or reflective cord prevents trips |
| Prusik loops on the ridgeline | 2–3 mm cord, clearly thinner than the ridgeline | Only on a thicker ridgeline | ≈ 60 cm of cord per loop | Thin on thick grips; equal diameters slip |
| Food or bear hang | 3–4 mm smooth cord; accessory cord for heavy bags | Yes | ≈ 15 m | See hanging food and wildlife in camp; never stand under the load |
| Lashings | Tarred bank line or jute | Works if every turn is pulled hard | 2–4 m per joint | See cord for lashings |
| Bootlace | Paracord, whole or gutted | Yes – ideal | Length of the old lace | Seal the ends thin so they pass the eyelets; see lacing techniques |
| Sewing and gear repairs | Inner strands, or a single yarn of one | Inner strands | 30–50 cm at a time | Needs a needle with a large eye |
| Drying line | Any cord | Yes | 3–5 m | A twisted double line holds clothes without pegs – see clothing and layering |
| Hammock suspension | Rated straps and suspension only | No | – | Paracord is not made for body weight |
Which cord should you buy first?
Do you mainly need lines for a tarp and general camp jobs?
Yes → Start with 30 m of Type III paracord in a visible colour and cut the kit described below. It is the most forgiving cord to learn knots on.No → Go on to the next question.Do you want to build camp furniture, tripods and pot hangers?
Yes → Add a roll of tarred bank line (#36) or jute twine. The grip saves you more frustration than any extra strength.No → Go on to the next question.Are you counting every gram, or tired of re-tensioning in the rain?
Yes → Swap the ridgeline and guylines for 2–3 mm Dyneema or polyester guyline and keep a 10 m paracord hank for everything else.No → Paracord plus a small roll of bank line covers almost everything – stay with that.
Emergency uses – and their limits
Much of paracord's reputation rests on "101 survival uses". Some are real: tying a splint, improvising a sling together with a triangular bandage, rigging an emergency shelter from a tarp or poncho, replacing a broken pack strap, lashing a stretcher frame from poles, or marking a route with short bright pieces you collect again. Our first overnight guide shows how little of this you need when a trip is planned well.
Others deserve honesty. Thin cord is not a tourniquet: it cuts into tissue instead of compressing it, and belongs nowhere near a bleeding limb – a pressure bandage from the first aid kit does that job. An inner strand will work as fishing line in a pinch, but it is thick and visible in the water, and fishing needs a licence or permit in most countries. Snares from inner strands are illegal in many places and no way to feed yourself on a weekend trip. And every use that involves hanging, lowering or pulling a person is out.
How much paracord to carry – and how to pre-cut it
A single 30 m bundle that you cut "as needed" ends up as a bag of odd lengths. A pre-cut kit is faster to pitch, lighter and easier to check. The lengths below are the same assumptions the tarp pitch & cordage planner uses, so the numbers on your screen match the hanks in your pack.
- Ridgeline: distance between the trees plus 1.5 m at each end for wraps and knots. For trees 5 m apart that is 8 m; a 10 m line covers trees up to 7 m apart.
- Guylines: 2 m each – six for an A-frame or storm pitch (12 m), four for a lean-to (8 m).
- Reserve: the planner adds 10 %. Ridgeline plus six guylines is 20 m, so plan 22 m for the shelter.
- Prusik loops: two, each from about 60 cm of thinner cord, to slide the tarp along the ridgeline.
- Utility hank: one uncut length of about 10 m for a drying line, a pot hanger, lashings and whatever breaks.
Together that is roughly 30 m. In Type III paracord at 6–7 g per metre it weighs about 200 g and packs to the size of a fist. In bear country, add a separate 15 m hang line.
| Piece | Number | Length each | Total | Prepared at home |
|---|---|---|---|---|
| Ridgeline | 1 | 8 m | 8 m | Ends sealed; fixed loop at one end; its own colour |
| Guylines | 6 | 2 m | 12 m | Ends sealed; small fixed loop at one end |
| Prusik loops | 2 | ≈ 60 cm (thinner cord) | 1.2 m | Tied into loops with a double fisherman's knot |
| Utility hank | 1 | 10 m | 10 m | Ends sealed, left uncut |
| Bank line or jute | 1 small roll | 10–20 m | – | For lashings and repairs |
Ridgeline 8 m suits trees about 5 m apart (tree distance + 2 × 1.5 m). A lean-to needs only four guylines.
Pre-cutting checklist
- Measure against a tape or your arm span, not by eye – most people guess short
- Seal or whip every end before the cord goes into the pack
- Give the ridgeline a different colour from the guylines so you grab the right hank in the dark
- Tie the fixed loops at home, where you can check them against a diagram
- Coil each piece into its own hank; keep the six guylines together in a small bag
- Write the lengths on a slip of tape on the bag – after a season nobody remembers
The Kit Builder adds cordage to your packing list automatically, and the bushcraft kit list shows where it sits among the other essentials. Which tie-outs those lines attach to is covered in choosing a tarp.
How to cut paracord and seal the ends
An unsealed paracord end frays within minutes: the sheath unravels, the inner strands slide out, and the cord no longer passes through a tie-out or holds a knot. Sealing takes ten seconds per end. Do it at home, at a table, with a window open – melting nylon gives off unpleasant fumes, and a lighter has no place in a dry forest during fire-danger periods.
Cutting and sealing a paracord end
 1Cut straight across
Lay the cord on a piece of wood and press a sharp knife straight down through it. A wrap of tape around the cut point keeps the sheath from shifting. Sawing with a dull blade pulls the core out – see sharpening if yours struggles.
 2Melt at the edge of the flame
Hold the end beside the flame, not in it, and turn it for a few seconds until the fibres turn glossy and draw together. In the flame the nylon catches fire, blackens and drips. Hold the cord pointing slightly downwards and away from you, never over your lap or bare feet.
 3Shape it on something cold
While the end is still soft, roll and press it on a flat stone, the back of the knife or the metal of the lighter. Do not use bare fingers: molten nylon sticks to skin and keeps burning. A wet fingertip a few seconds later is the most you should risk.
 4Check the result
A good end is smooth, hard and no wider than the cord, with sheath and core fused into one. If you can see white strands or the sheath slides, cut a centimetre off and repeat.

Whipping: the no-flame alternative
A whipping is a tight binding of thin thread around the end of a cord. It needs no flame, works on natural-fibre rope that cannot be melted, never leaves a sharp bead, and is the tidy solution where open flames are banned. Use waxed thread, dental floss or a single inner strand of paracord; about 30 cm is plenty for a 4 mm cord. The simplest version is the common whipping:
Common whipping step by step
 1Lay a loop along the cord
Form a long, narrow loop of thread and lay it on the cord with the bend pointing towards the cord end and just short of it. The short tail points back along the cord; the long end is your working end.
 2Wrap towards the end
Wind the working end tightly around the cord and over the loop, working towards the cord end. Each turn lies snug against the last, with no gaps and no crossings. Continue until the whipping is at least as long as the cord is thick – one and a half times is better.
 3Pass the end through the loop
Keep the turns pinched with one hand and thread the working end through the eye of the loop that still sticks out beyond the last turn.
 4Pull under and trim
Pull the short tail. The loop slides under the turns and drags the working end with it; stop when the crossing sits in the middle of the whipping. Trim both ends close. The typical mistake is loose turns – a whipping you can slide with a fingernail will not last.
Gutting paracord: using the inner strands and the empty sheath
"Gutting" means removing the core. You end up with two materials from one cord: fine, strong thread and a flat, supple tube. It is the quickest way to get sewing thread in camp, and the reason a few metres of real paracord are worth carrying even if your tarp lines are something else.
Removing the inner strands
 1Cut off the fused end
In a sealed end, sheath and core are welded together. Cut it off cleanly on a piece of wood. For long pieces, work in sections of one to two metres – friction makes longer pulls hard.
 2Push the sheath back, pull the strands
Pinch the strands where they emerge and push the sheath back along them like a sleeve, then pull the strands out in one smooth motion. If they jam, stroke the bunched sheath flat towards the far end and pull again.
 3Two materials
The empty sheath is flat and soft and holds knots better than whole cord; the strands can be used as they are or untwisted into single yarns for fine sewing. Seal the ends of the sheath again – it frays even faster when empty.
What the inner strands are good for
- Sewing and repairs: a single strand closes a torn pack seam or re-attaches a tarp tie-out; one yarn of a strand passes through a normal needle for clothing.
- Whipping and seizing: the thread for the whipping above, or for binding a split tool handle.
- Light lashings and ties: bundling kindling, tying a bandage in place, fixing a spoon blank to dry.
- Emergency fishing line: possible, with the legal caveat above. A strand is often quoted at around 15 kg nominal in mil-spec style cord; in commercial cord nobody has tested it.
What the empty sheath is good for
The gutted sheath is roughly half the weight, lies flat and grips itself well. It makes excellent bootlaces, zip pulls, knife and whistle lanyards, glasses retainers and tie-out loops. Its strength is clearly lower than that of the whole cord – assume well under half – so it is for light duties only. Do not pull the core out of cord that still has to carry a tarp.
How to store paracord without tangles
Cord stuffed loose into a pocket comes out as a knot. Three storage methods solve this; which one fits depends on the length and on how fast the cord has to be ready.
The figure-eight hank with quick release
 1Wind figure-eights on your hand
Trap the start of the cord under your thumb and wind it in figure-eights between thumb and little finger. The crossing in the middle is the point: every turn puts a half-twist into the cord and the next one takes it out again, so nothing kinks.
 2Slide it off and wrap the middle
Stop when about half a metre is left. Slide the bundle off your fingers while pinching the crossing, and wrap the remaining cord firmly around the waist of the eight.
 3Tuck a loop under the last turn
Finish by pushing a small loop of the tail under the last wrap and pulling the wrap snug. The hank now survives being thrown into a pack, and a single pull on the tail opens it.
 4Pay it out
Undo the tuck, drop the wraps and pull: the eights come off one after the other without twisting. Tie off one end first and walk the hank to the second tree.

Daisy chain for long lines
The daisy chain, or chain sinnet, shortens a long line to about a third of its length and cannot tangle. Make a slip loop near one end, reach through it, pull a new loop of the standing cord through, and repeat to the end; lock the chain by passing the end itself through the last loop. To release, take the end back out and pull – the whole chain runs open in seconds. It suits a 15 m hang line or a ridgeline, but it adds bulk and holds water, so let chained cord dry before storing it.
Winder card or spool for thin cord
Bank line, micro cord and inner strands are too thin to hank well. Wind them on a flat card with a notch at each end – a piece of thin wood, a cut-up plastic lid or a carved stick. A card stops the cord taking a set from tight wraps round the fingers and lets you cut off exactly what you need.
Whatever the method: store cord dry, out of the sun and away from fuel, insect repellent and battery acid. Solvents and acids damage nylon without leaving a visible mark.
Which knots hold in slippery paracord?
New paracord is smooth and springy, and that affects knots. Friction hitches creep, short tails work loose, and a knot that was fine in old jute may roll in fresh nylon. Three habits fix most of it: add a turn to any knot that holds by friction, leave tails of at least five to ten cord diameters, and dress and set every knot – arrange the parts neatly, then pull each one snug. The full instructions are in essential bushcraft knots; the Knot Finder picks a knot for a given job.
| Job | Knot | Tip for smooth cord |
|---|---|---|
| Fixed end of a ridgeline | Bowline, or round turn and two half hitches | Leave a long tail on the bowline, or lock it with a half hitch |
| Tensioning a ridgeline | Trucker's hitch | Tie it off slipped so it releases after a wet night |
| Adjustable guyline | Taut-line hitch | Three turns inside the loop instead of two |
| Tarp on the ridgeline | Prusik loop | Loop cord clearly thinner than the ridgeline; three wraps |
| Making a closed loop | Double fisherman's knot | Permanent – expect to cut it rather than untie it |
| Joining two cords | Sheet bend, doubled | Double it whenever the cords differ in thickness |
| Start of a lashing | Clove hitch or timber hitch | Trap the tail under the first wraps – see start and finish knots |


Prusik loops and a pre-tied bowline are worth making at home, as described in pre-rigging a ridgeline. With the kit above, pitching then comes down to one wrap around the first tree, a trucker's hitch on the second and six taut-line hitches – the sequence the tarp planner lists for each pitch.
Care, when to retire a cord, and leaving nothing behind
Paracord needs little care, but it is not immortal. Dirt works into the sheath and grinds the fibres from inside, sunlight slowly embrittles nylon, and one careless evening by the fire can ruin a line. A two-minute check after each trip keeps surprises away.
- Dry it loosely before storing. Nylon does not rot, but damp hanks grow mildew, smell and stay heavy.
- Wash it when it is gritty: lukewarm water, a little mild soap, rinse, air-dry in the shade. No bleach, no tumble dryer, no radiator.
- Untie knots before storage. A knot left in for months sets a permanent kink and hides wear.
- Inspect it by running every metre slowly through your fingers under good light.
| What you see or feel | What it means | What to do |
|---|---|---|
| Cut or worn-through sheath, white core visible | Core is exposed and no longer protected | Cut the section out and seal the new ends; the shorter pieces become guylines |
| Glazed, shiny, hard patch | Fibres melted by friction or heat | Cut it out – melted fibres are brittle |
| Stiff or lumpy section, thin spot | Core strands broken or bunched inside | Cut it out; if there are several, retire the whole line |
| Pinholes with dark, hard rims | Spark or ember damage | Cut out; keep cord further from the fire |
| Faded, chalky, rough surface along its length | UV ageing | Demote to light duties or retire |
| Flat, fuzzy sheath everywhere | General abrasion from long use | Retire from ridgeline duty; fine as lashing cord |
| Contact with fuel, solvent or acid | Possible invisible damage | Retire it – you cannot inspect for this |
"Retire" does not have to mean the bin. A ridgeline with one bad spot becomes two guylines; worn guylines become lashing cord and tie-out loops; the last short ends become zip pulls. Only cord that has been near chemicals, or is damaged throughout, goes in the household waste.
Paracord bracelets and "survival" gadgets: how much cord is really in them?
Paracord bracelets are sold as emergency cord on your wrist. They are a pleasant craft project and a way to always have some cord with you. It helps to know how much: the usual cobra weave takes up about 30 cm of cord for every 2.5 cm of bracelet, so a bracelet for an average wrist holds roughly 2 to 3 metres. Wider "king cobra" weaves hold about twice that. A belt or a rifle-sling-style strap can hold considerably more.
How far does the cord in a bracelet go?
In other words: a bracelet replaces one guyline or a pair of bootlaces, not a shelter kit. Three more points belong to an honest assessment:
- Unpicking takes time. A tightly woven bracelet takes several minutes to undo with cold fingers, and the cord comes out kinked. Weaves advertised as "quick deploy" open faster but are bulkier.
- Built-in tools are small. Buckles with a whistle, a tiny ferro rod, a compass bead or a blade are harder to use than the real thing. A proper whistle – see distress signals – and a full-size ferro rod weigh little and work when it matters. Blades in buckles can also fall under knife carry rules in some countries – see knife law.
- Worn cord ages. Sweat, sunscreen, sun and constant flexing wear a bracelet. Do not count on cord that has spent two summers on your wrist for anything demanding.
The same goes for "survival paracord" with extra strands in the core – a waxed tinder thread, a monofilament fishing line, a thin wire. These can be useful backups, but test them at home: light the tinder strand with your own fire steel before you trust it, and remember that the extra strands replace some of the load-bearing ones. If you like carrying cord on you, a hank in a jacket pocket or a spare pair of paracord bootlaces gives you more usable metres with less fuss.
For the bigger picture of what belongs in a pack – and what is marketing – see bushcraft for beginners.
| Cord | Size | Stretch | Knot grip | Best for |
|---|---|---|---|---|
| Paracord Type III | ≈ 4 mm | High | Medium | Ridgeline, hangs, general use |
| Tarred bank line | 1.5–2 mm | Low | Very good | Lashings, repairs |
| Dyneema guyline | 1.5–3 mm | Very low | Poor | Ultralight ridgeline, guylines |
| Polyester guyline | 2–3 mm | Low | Medium | Guylines that stay tight |
| Accessory cord | 4–6 mm | Low | Good | Heavy camp loads |
| Jute twine | 3–6 mm | Low | Very good | Temporary builds, tinder |
Common mistakes
- Reading "550" as a safe load – it is a nominal breaking strength for new, unknotted cord.
- Using paracord for hammock suspension, climbing or anything a fall could shock-load.
- Leaving cut ends unsealed, so the core creeps out and the sheath frays.
- Melting ends into a hard blob that snags in tie-outs and scratches hands.
- Pitching a nylon ridgeline tight in the evening and not re-tensioning once it gets wet.
- Carrying one long bundle instead of pre-cut, hanked lengths.
- Leaving ridgelines, offcuts and lashings in the forest – synthetic cord does not rot.
What you need
- Type III paracord, about 30 m, in a visible colour
- Thin cord (2–3 mm) for two prusik loops
- Small roll of tarred bank line or jute twine
- Sharp knife and a piece of wood to cut on
- Lighter (for sealing, at home)
- Waxed thread or dental floss for whipping
- Small bag for the guylines
Calculators for this topic
FAQ
What is paracord made of?
What does 550 paracord mean?
Can you climb or abseil with paracord?
Bank line vs paracord: which is better for bushcraft?
How much paracord should I carry?
Does paracord stretch when wet?
How do you seal paracord ends without a lighter?
How much cord is in a paracord bracelet?
Check yourself
Completed6 quick questions from this guide. Nothing is sent anywhere.
Related step-by-step guides
-
 1
-
 1
-
 1