Bushcraft Belt Kit: What to Carry on Your Belt and How
A bushcraft belt kit is a small set of tools worn on a sturdy belt: a sheathed knife, a fire kit pouch, a small first aid pouch, a water bottle and a few signalling and navigation items. It sits between your pockets and your pack, so it stays with you when you take the pack off to collect firewood, explore or wait out a twisted ankle. A typical belt kit weighs about 1–1.3 kg without water.
This guide shows how to choose the belt, where each pouch goes so nothing digs in when you sit, what to carry for a day walk and for a camp day – and, just as important, when the knife belongs on the belt and when it must go back into the pack. It builds on the bushcraft kit list and our bushcraft for beginners guide.
Step by step
-
1

Think in three layers
Pockets carry what never leaves you, the belt carries the working kit, the pack carries shelter, sleep and food. The belt kit stays on when the pack comes off.
-
2

Choose a sturdy belt
Pick a stiff leather or webbing belt about 4–5 cm wide that holds pouches without sagging. A quick-release buckle drops the whole kit in one move.
-
3

Mount the knife safely
Wear the sheathed knife on your strong side, slightly ahead of the hip bone, with a sheath that holds it securely even upside down.
-
4

Add fire, first aid and water
Fire kit pouch on the weak side in front, small first aid pouch further back, bottle behind the hip. Keep the buckle and the centre of your back free.
-
5

Do the sit test
Sit on a log, crouch and kneel. Move anything that presses, swings into your legs or knocks the handle up. Keep the total light.
-
6

Pack the knife for the journey
On the way there and back the knife goes sheathed into a case deep in the pack. It moves to the belt only in the woods, where you use it.
What is a bushcraft belt kit?
A belt kit is the middle layer of a carry system that many bushcraft instructors teach in some form: pocket, belt, pack. Each layer holds the items you would least like to be separated from at that distance from your body.
- Pocket layer: the few things that never leave you, even when you take off your belt to sleep – a whistle, a lighter, a small compass, your phone and perhaps a small pocket knife. These weigh a couple of hundred grams at most.
- Belt layer: the working kit for the day – fixed-blade knife, fire kit, first aid for small injuries, water and a cup, cord, sometimes a folding saw. Enough to make fire, treat a cut, drink and signal.
- Pack layer: everything for the night and for comfort – shelter, sleep system, cook pot, food, spare clothing and the full first aid kit. Our backpack guide covers how to pack it.

A belt kit is not the same as a survival kit for an unplanned night. It will not keep you warm through a cold night, but with the pocket layer and your clothes it covers the first hours of most problems.
Why carry a belt kit when you have a pack?
The strongest argument for a belt kit is simple: packs get put down. You set the pack against a tree to collect firewood, leave it at camp to fetch water, drop it to cross a stream or to look at something off the path. Every time, the knife, the fire kit and the first aid items inside it are suddenly 50 or 500 metres away.
Other reasons are more practical:
- Speed: the knife, cup and fire kit are where your hand expects them. You do not dig through the lid pocket ten times a day.
- Camp work: on a base camp day you walk a lot between fire, shelter and wood pile without a pack. The belt carries the tools you need on every trip.
The downsides: extra weight on the hips, pressure under a pack's hip belt, and a knife on the belt raises legal questions outside the woods. A belt kit is a tool for the woods, not an everyday outfit.
Choosing the belt: width, material and buckle
An ordinary trouser belt is usually too thin and too soft: pouches tilt outward, the sheath swings and the belt rolls over at the top. A belt for a belt kit should be stiff and about 4–5 cm wide – as a rule of thumb, that is the width most belt pouches and sheath loops are made for. Measure the loops on your sheath and pouches before you buy; a belt that is too wide will not go through them, one that is too narrow lets everything slide.
Leather or webbing?
Thick leather (often 3–4 mm) is stiff, quiet, repairable and does not melt near the fire, but it stretches a little when wet and needs wax or oil. Nylon or polyester webbing is lighter, dries fast and does not mind rain, but it can melt from sparks and hot embers and some webbing is too floppy to hold heavy pouches. Many bushcrafters use leather for camp days and webbing on wet trips.
Buckle: frame or quick release
A classic metal frame buckle with a prong is robust and can be repaired in the field. A plastic or metal quick-release buckle has one big advantage: you can drop the whole kit with one movement – useful when you sit down for a long time, when you put on a pack, and when you need to get out of the kit fast, for example before crossing a river, where nothing should tie you to a heavy load.
| Belt | Strengths | Weaknesses | Best for |
|---|---|---|---|
| Leather, 4–5 cm, frame buckle | Stiff, quiet, heat-tolerant, repairable | Heavier, needs care, stretches when wet | Camp days, fire work |
| Webbing, 4–5 cm, quick release | Light, dries fast, kit off in one move | Can melt near fire, may be floppy | Wet trips, water crossings |
| Stiffened webbing ("rigger" style) | Holds heavy pouches upright | Less comfortable when sitting | Saw, bottle and several pouches |
| Ordinary trouser belt | Already owned | Too thin and soft, pouches tilt | A single small sheath only |
Many people wear a separate kit belt over their normal trouser belt, so the whole kit comes off without undoing the trousers. Tighten it so pouches do not bounce, but you can still breathe deeply and crouch.
The knife: sheath, retention and position
The knife is the centre of most belt kits. A fixed blade of about 9–11 cm, as recommended in our bushcraft knife guide, is long enough for carving, feather sticks and food and short enough to sit comfortably on the belt. What makes it safe on the belt is the sheath.
What a belt sheath must do
- Hold the knife upside down. Turn the sheathed knife over and shake it gently: it must not fall out. A moulded leather sheath holds by friction, a plastic sheath clicks, some have an extra strap with a snap.
- Protect you from the edge. The blade must not be able to cut through the side or the tip of the sheath when you sit, fall or kneel. A welt (an extra strip of leather between the seams) keeps the edge away from the stitching.
- Fit the belt. A fixed belt loop keeps the sheath close and stable; a dangler hangs it from a short strap or ring so it swings out of the way when you sit.
If you want to make your own, our guide to making a leather knife sheath walks through pattern, wet moulding, welt and belt loop.
Knife position on the belt (rule of thumb)
- Side
- Strong side (right hip for right-handers); cross-draw on the weak side is an option
- Position
- Slightly ahead of the hip bone, not behind it and never in the centre of your back
- Height
- Handle at or just above belt level; the sheath tip must clear a log seat
- Retention
- Holds upside down; strap or snap for rough walking
- Check
- You can draw and resheath with one hand without looking at the blade
Practise drawing and resheathing slowly. Resheath by guiding the back of the blade along the sheath mouth with your other hand well away from the opening – never hold the sheath with your fingers wrapped around the mouth. Most knife cuts in camp happen while putting the knife away, not while carving; our knife safety rules cover the basics.
Can I wear a knife on my belt? Knife law in practice
For a belt kit the most important legal fact is that transporting and carrying are different things. A knife sheathed and packed in a closed case at the bottom of your rucksack is being transported. The same knife on your belt is being carried – ready to hand. Most countries treat the two very differently. This is general information, not legal advice; rules differ by country and, in Germany, by federal state, and they change. Our knife law guide has the details and the sources (status October 2026).
United Kingdom
Under section 139 of the Criminal Justice Act 1988, having any bladed or pointed article in a public place is an offence unless you have a good reason or lawful authority. The only general exception is a non-locking folding pocketknife with a cutting edge of up to 3 inches (7.62 cm). A fixed blade on your belt therefore always needs a good reason – and a public place includes footpaths, country parks and car parks. Camping and bushcraft are not named in the statute; whether your reason is good enough is decided by a court. In practice UK bushcraft works best on private land with the owner's permission, with the knife packed on the way there.
Germany
§ 42a of the Weapons Act restricts carrying fixed blades with a blade over 12 cm and one-hand-opening locking knives; a fixed blade of up to 12 cm is outside § 42a. A legitimate interest can lift the restriction, and bushcraft is commonly treated as a "generally recognised purpose" – but it is not named in the Act and is judged case by case. Walking in the forest with the knife on the belt is arguable; walking through a village with it is a grey area. On top of that, since 2024 every knife is banned at public events, on long-distance public transport and its stations, and in zones the states set up, for example in local public transport. Transport stays lawful if the knife can only be reached with more than three hand movements; for § 42a knives the cautious choice is a locked case.
| Situation | Knife | Why |
|---|---|---|
| At camp or working in the woods (with permission) | On the belt | You are using it as a tool |
| Walking in the forest between camp and work site | On the belt, discreetly | Arguable in Germany; in the UK only on permission land or with a good reason |
| Village, shop, inn, petrol station | Packed in the rucksack | Hard to justify; take it off at the forest edge |
| Train, bus, station, market, event | Packed, not ready to hand | German location bans cover every knife; UK public place |
| In the car | In the luggage in the boot | Not in a door pocket or the centre console |
The belt-kit routine for knife carry
 1Sheathed, into a case
Before you leave home, the knife goes into its sheath and then into a box or small case. For one-hand locking knives and blades over 12 cm, lock the case – Germany's § 42a asks for a locked container.
 2Deep in the main compartment
The case goes to the bottom of the pack, with clothes or the sleeping bag on top, so it takes more than three hand movements to reach. The belt and empty pouches can be worn – a fire pouch is not a legal problem.
 3In the woods: onto the belt
At camp or the place you have permission to work, the knife moves to the belt. Now it is a tool in use, and it stays with you when the pack comes off.
 4Before the village: back in the pack
On the way out, take the knife off at the forest edge – before the village, the car park, the inn or the station. Typical mistake: walking into a shop after the trip with the knife still on the belt.
The same routine applies to the saw and, in the UK, to any blade or point. In Germany a saw is a tool rather than a knife, but transport companies, event organisers and local orders can still exclude dangerous objects – pack it away too. Children and teenagers should only wear a knife under adult supervision and within the rules for their age; see bushcraft with kids.
What to carry on your belt: pouch by pouch
A good belt kit is short. Every item should answer a likely problem within the next few hours: cut, fire, thirst, getting lost, being found. Here is what most belt kits contain, in order of importance.
1. Fire kit pouch
A small pouch with at least two independent ways to make fire: a ferro rod with striker, a lighter, and a little prepared tinder in a waterproof tin – cotton pads with petroleum jelly, a few pieces of fatwood or a tin of char cloth. Together that is about 110 g. Our guide to building a fire kit explains the backups. Keep a second lighter in your trouser pocket: if the belt comes off, you can still make fire.
2. Small first aid pouch
The belt pouch is not your full first aid kit – that stays in the pack. It covers the small problems that happen dozens of times a season: plasters, a few strips of tape, blister plasters, tweezers or a tick card, and a compact pressure dressing for a deeper cut from knife or saw. A pair of disposable gloves and an emergency blanket fit if the pouch is big enough. Restock it after every trip. In an emergency call 112 (Europe), 999 (UK) or 911 (North America).
3. Water bottle and cup
A single-wall stainless steel bottle of about 1 litre (around 250 g empty) in a pouch, often with a steel cup nested over the bottom. You can boil water in both directly at the fire – see boiling water – which double-walled vacuum bottles do not tolerate. With water this is the heaviest item on the belt, so it goes behind the hip. A filter or tablets fit in the bottle pouch's side pocket; more in water containers.
4. Compass and whistle
A small baseplate compass and a loud whistle weigh only a few dozen grams. Keep them on a short cord or in a front pocket. Three blasts on a whistle are the widely recognised distress signal – see whistle and light signals – and the compass only helps if you can use it with a map: map and compass basics. Keep the compass a hand's width away from the steel knife, buckle and bottle when you take a bearing, as they can pull the needle.
5. Folding saw
A folding saw with an 18–27 cm blade (roughly 150–400 g) in its own narrow pouch makes firewood and shelter work far safer than batoning everything with the knife. On a camp day it earns its place on the belt; on a short walk it can stay in the pack.
6. Cord
About 5–10 m of 3–4 mm cord, coiled into a small hank, handles a quick lashing, a replacement bootlace or a ridgeline for an emergency poncho. A 10 m hank weighs well under 100 g; see our paracord guide.
Optional extras
A small sharpening stone, a small headlamp for the walk back after dusk, a bandana and tape wrapped around the bottle. Add one thing at a time and remove it if you never use it.
Belt pouch setup in four steps
 1Knife first
Slide the sheath onto the belt from the free end and place it on your strong side. Everything else is arranged around it.
 2Fire kit on the weak side, front
The fire pouch sits in front of the opposite hip, where either hand reaches it – also when you are cold or injured on one side.
 3First aid and water further back
The first aid pouch follows behind the fire kit; the bottle, the heaviest item, rides just behind the hip so it does not swing into your thigh.
 4Check it on the body
Buckle it on and look: the buckle and the centre of the back are free, the knife handle is where your hand drops naturally, and nothing bounces when you walk.
| Item | Typical weight | Where |
|---|---|---|
| Belt, 4–5 cm | 150–300 g | Around the hips |
| Fixed-blade knife + sheath | 150–250 g + sheath | Strong side, ahead of the hip |
| Fire kit (ferro rod, lighter, tinder) | ≈ 110 g | Weak side, front |
| Small first aid pouch | 100–200 g | Weak side, behind the fire kit |
| Steel bottle 1 L + cup | ≈ 250 g + cup, + 1 kg water | Behind the hip |
| Compass + whistle | ≈ 30–70 g | Front pocket or cord on the belt |
| Folding saw (camp day) | 150–400 g | Behind the weak hip |
| Cord, 5–10 m | under 100 g | In a pouch |
Values are typical ranges for mid-range gear, consistent with our kit list and saw guide. Weigh your own items once on a kitchen scale.
Left, right, front, back: where each pouch goes
There is no single correct layout, but a few rules keep a belt kit safe and comfortable. Think of the belt seen from above, with the buckle at the front.

- Knife on the strong side, slightly forward. There your hand finds it, you can see the handle, and it does not dig into your back when you lean against a tree. Left-handers mirror the layout; check that the sheath can be worn on the left (see knife sheaths).
- Fire kit at the front of the weak side. Reachable with both hands, easy to check.
- Heavy items behind the hip, not in front. A full bottle in front of the hip swings into the thigh with every step.
- Centre back stays free. Anything there presses when you sit back, sleep or lean on a pack, and a knife there is dangerous if you fall backwards. You also cannot see or reach it easily.
- Buckle area stays free. You need to bend at the waist, and you need the buckle to take the kit off fast.
Sitting, crouching, kneeling: the sit test
A belt kit that feels fine when standing can become a problem the moment you sit on a log by the fire. The classic issue is the knife: in a sheath with a fixed belt loop, the tip hits the seat and pushes the handle up into your ribs, or the sheath twists outward. A dangler or a slightly more forward position solves it.
The sit test for your knife position
 1Standing
Upright, every layout looks fine. The sheath hangs straight, the handle is in reach. This is not the test.
 2Sitting with a rigid loop
Sit on a log: a long sheath on a fixed loop hits the seat, levers the handle up and can twist the edge towards the sheath wall. Move it forward or change the sheath.
 3Dangler or forward position
On a dangler the sheath swings forward along the thigh and stays clear. Repeat the test while crouching and kneeling at the fire.
Belt kit and a backpack hip belt
The second conflict is the pack. A loaded pack carries most of its weight on the hip belt, exactly where the belt kit sits. A pouch under the padded hip belt presses into the hip bone after a few kilometres.

Solutions, from simple to radical: slide pouches forward of the hip belt, wear the kit belt slightly lower, move the bottle into the pack while walking, or carry the belt kit in the pack on long walking days and put it on at camp. Our backpack fitting guide shows how the hip belt should sit.
How heavy should a belt kit be?
As a rule of thumb, keep the belt kit around 1–1.3 kg without water. With a full 1-litre steel bottle you are at about 2–2.3 kg – more than that pulls the belt down, makes the trousers slip and tires the lower back on a long day. Weight at the hips is easier to carry than in the hands, but it adds to the load on the same structure as a pack's hip belt.
Typical belt kit weights
Count the belt kit as part of your base weight (and the water as consumable) when you plan a trip. The pack weight calculator adds base weight, water and food and shows the load as a share of your body weight; the commonly quoted rules of thumb are about 10 % for a day hike and 20 % for multi-day trips. The Kit Builder lists the items themselves.
Comfort check: walk fast, jog a few steps and push through some brush. Nothing should slap your legs, rattle or snag – a rubber band around cup and bottle silences most noise.
Belt kit list examples: day walk vs camp day
The right belt kit depends on what you are doing. Two typical examples – adapt them to season, terrain and local rules. Neither replaces the pack layer: on a day walk you still carry a warm layer, a rain jacket, food, a sit mat and the full first aid kit, as listed in the day trip section of the kit list.
Day walk belt kit
- Belt, 4–5 cm, quick-release buckle
- Fixed-blade knife in a secure sheath (packed until you reach the woods)
- Fire kit pouch: ferro rod, lighter, tinder in a tin
- Small first aid pouch: plasters, tape, blister plasters, tweezers or tick card, pressure dressing
- Steel bottle 1 L with cup, filter or tablets
- Compass and whistle on a cord or in a front pocket
- Second lighter and phone in the trouser pocket
Camp day belt kit
- Everything from the day walk kit
- Folding saw in its own pouch behind the weak hip
- 5–10 m of cord in a small hank
- Small sharpening stone for touching up the edge
- Small headlamp for the way back to the shelter after dusk
- Bandana or work gloves for handling hot pots and firewood
In winter keep the lighter warm close to your body – gas lighters fail in the cold. In summer check fire bans before you rely on the fire kit. Children can wear their own belt with a whistle, a small bottle and plasters, while adults carry knife and saw.
Alternatives: chest rig, possibles bag and neck knife
A belt is not the only way to keep the core kit on your body. Three common alternatives:

A possibles bag is the shoulder-bag version of the belt kit: one bag with fire kit, cup, first aid and small tools, worn across the body or hung on a branch at camp. It is easy to take off and to hand to someone, which makes it popular for camp days. A chest rig solves the hip-belt conflict completely and keeps navigation items in sight. A neck knife – a small fixed blade on a cord – is a backup cutting tool, not a main knife. Choose a cord with a breakaway connector or one that can easily be removed, and remember that it is carried just like a knife on the belt.
DIY belt pouches: simple and cheap
Belt pouches are an easy first sewing project, and making your own lets you size each pouch exactly to its contents. A piece of 2–3 mm leather with a fold-over flap, a snap and a belt loop sewn on the back is enough – the stitching is the same as for a leather sheath. Waxed canvas works too and tolerates sparks better than nylon; an old felted wool sweater makes a quiet, insulating bottle pouch. Make the belt loop slightly wider than the belt, use strong waxed thread, round the corners so they do not catch and leave a drain hole at the bottom. A coloured tab helps you find a dropped pouch in the leaf litter. Check stitching, loops and snaps after every trip, and dry leather slowly at room temperature.
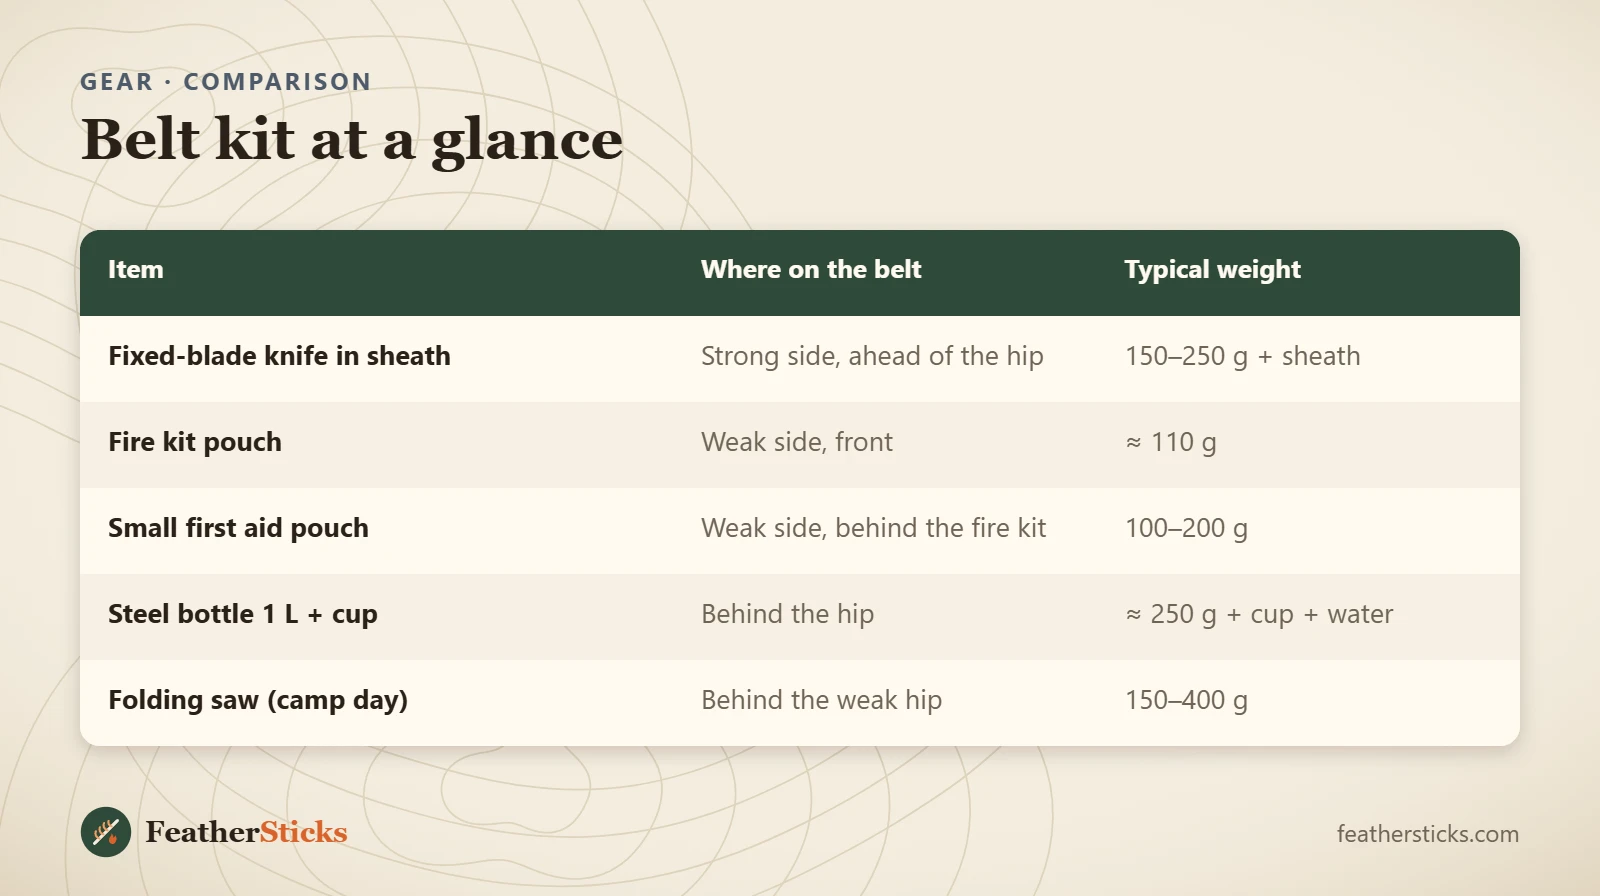
| Item | Where on the belt | Typical weight |
|---|---|---|
| Fixed-blade knife in sheath | Strong side, ahead of the hip | 150–250 g + sheath |
| Fire kit pouch | Weak side, front | ≈ 110 g |
| Small first aid pouch | Weak side, behind the fire kit | 100–200 g |
| Steel bottle 1 L + cup | Behind the hip | ≈ 250 g + cup + water |
| Folding saw (camp day) | Behind the weak hip | 150–400 g |
Common mistakes
- Wearing the knife on the belt in town, in shops or on public transport instead of packing it.
- Using a thin trouser belt that lets pouches tilt and the sheath swing.
- Putting the knife or a heavy pouch in the centre of the back.
- A sheath that does not hold the knife upside down.
- Overloading the belt until it pulls the trousers down and presses under the pack hip belt.
- Keeping the only lighter in the belt kit – nothing left in the pocket if the belt comes off.
- Never doing the sit test before the first long evening at the fire.
What you need
- Stiff belt, 4–5 cm wide, frame or quick-release buckle
- Fixed-blade knife with a secure sheath (belt loop or dangler)
- Fire kit pouch with ferro rod, lighter and tinder
- Small first aid pouch
- Single-wall steel bottle with cup and pouch
- Compass and whistle
- Folding saw with pouch for camp days
FAQ
What should be in a bushcraft belt kit?
Is it legal to wear a knife on my belt?
Which side should I wear my knife on?
How wide should a belt for a belt kit be?
What is a possibles pouch?
Does a belt kit work with a backpack hip belt?
Check yourself
Completed6 quick questions from this guide. Nothing is sent anywhere.
Related step-by-step guides
-
 1
-
 1
-
 1