Crossing a Stream Safely: How to Ford a River When Hiking
Crossing a stream safely starts with a decision, not a technique: if you are in doubt, you do not cross. Turn back, wait for the water to drop or walk to a bridge. Fast water only a little above the knee can knock an adult over, and cold water takes strength away quickly. The bigger mistake is rarely the technique — it is the decision to go in at all.
When a ford is reasonable, the method is simple: read the water, pick a wide and shallow spot, open your hip belt, keep your shoes on, face upstream and shuffle sideways with a pole as a third leg. This guide covers each step, group methods, depth rules of thumb, what to do if you fall in and how to warm up afterwards. It belongs to our water skills and links closely with trekking poles and hypothermia first aid.
Step by step
-
1

Ask first: do you need to cross?
If the water is fast, brown, rising or above the knee, don’t cross. Turn back, wait for it to drop or find a bridge.
-
2

Read the water
Check speed, depth, colour, sound and floating debris, and think about rain or snowmelt upstream.
-
3

Choose the crossing point
Look for a wide, shallow, straight section with a calm runout and low banks — away from bends, fallen trees and falls.
-
4

Prepare on the bank
Open the hip belt and chest strap, keep your shoes on, pack the phone in a dry bag and take your hands out of pole straps.
-
5

Face upstream and shuffle
Lean on a pole planted upstream, move one point at a time and work across slightly downstream.
-
6

Warm up and dry your feet
Put on dry socks, keep moving and watch everyone for signs of cold, especially after deep or long crossings.
The first rule of river crossing safety: if in doubt, don’t cross
Every stream crossing technique taught by mountain clubs and rescue organisations begins with the same sentence: the safest crossing is the one you do not make. Moving water is deceptively strong. The force on your legs grows quickly with speed and depth, the bottom is invisible and slippery, and a fall in a cold mountain stream turns a small mistake into an emergency within minutes. No technique, pole or group method makes an unsafe river safe.
So before you think about how to cross, ask whether you need to. There are almost always alternatives:
- Turn back or change the route. A day lost is a small price; plan routes with an escape option in mind, as described in trip planning.
- Wait. Small streams fed by rain often fall within hours to a day once the rain stops. Streams fed by snowmelt or glaciers usually run lowest in the early morning and rise during warm afternoons — water that is too high at 4 pm may be crossable after a night at camp.
- Find a bridge, footbridge or easier section. Walk up- or downstream; check the map for bridges, braided sections where the river splits into smaller channels, or a lake outlet. A detour of an hour is usually quicker than a rescue.

Make the decision as a group and give everyone a veto. The person who is least confident, smallest or most tired sets the limit, not the strongest. Pressure from a schedule, a booked hut or a car at the other end is one of the most common reasons people go in when they should not.
How to read a stream before fording it
Spend a few minutes looking at the water before you decide anything. Walk along the bank, look from a raised point if you can and check these signs:
- Speed. Throw a stick into the main current and walk along the bank beside it. If you have to walk briskly to keep up, the water is fast; knee-deep water at that speed is beyond most walkers.
- Depth. Clear water looks shallower than it is. Probe with a pole from the bank, and remember that the deepest part is usually in the middle or on the outside of a bend.
- Colour. Clear water with a visible bottom is the best case. Brown water means run-off and a river that may still be rising; milky grey glacial water hides the bottom completely.
- Sound. A low rumble or the knocking of stones rolling along the bed means the river is moving its bed load — far too strong to wade.
- Debris and banks. Floating branches, foam lines and freshly wet, flattened grass along the banks show rising water. A dry high-water line well above the current level shows what this stream can do.
- Upstream weather. Thunderstorms over the hills, rain in the night or a warm, sunny day on snowfields can raise a stream hours later, even under a blue sky where you stand. Our guide to reading the weather helps you see it coming; if thunder is already rolling, also read lightning safety.
| Sign | Good sign | Warning sign |
|---|---|---|
| Speed (stick test) | Slower than a slow walk | Faster than a brisk walk |
| Colour | Clear, bottom visible | Brown, milky, bottom invisible |
| Surface | Small even ripples | Standing waves, boils, whirlpools |
| Sound | Gentle murmur | Rumbling, knocking stones |
| Debris | None | Branches, foam lines, fresh litter |
| Trend | Falling, dry stones emerging | Rising, wet banks, rain upstream |
Water levels are a matter of timing as much as place. Plan a route with a known ford so that you reach it in the morning, and work out with the hiking time calculator and the daylight calculator whether you have time to wait or turn back if the crossing is too high.
Choosing a crossing point: where to ford a river
The best place to cross is rarely where the path meets the water. Walk along the bank and look for these features:
- Wide, shallow, straight sections. A river that spreads out runs shallower and slower. Riffles — where the water ripples evenly over small stones — are often the shallowest places.
- Braided sections. Where a river splits into several channels around gravel islands, each channel carries only part of the water.
- A safe runout. Look downstream: if you fell, where would the current take you? You want slow water, a gravel bank or a pool, not rapids, a waterfall or fallen trees.
- Low banks on both sides. You need to get in calmly and out easily, ideally onto a gravel bar slightly downstream of where you start.
Places to avoid
- The outside of bends. The current pushes against the outer bank, scours it deep and often undercuts it. The inside of a bend is shallow but leads you towards the deep side.
- Strainers. Fallen trees, log jams and fences in the water let water pass but hold people and packs under the surface. Never cross upstream of one.
- Above rapids and falls, and directly below falls, where the water churns and can hold a person in the pool.
- Narrow sections. The same amount of water squeezed into a gap runs deeper and faster — the jump across rocks that looks tempting is a classic accident spot.
- Slick rock slabs and big boulders. Hopping from stone to stone looks dry and safe but a slip on wet rock or algae causes many injuries; wading on a gravel bed is often safer.


Preparing for a stream crossing: pack, shoes and electronics
A few minutes of preparation on the bank decide how a slip ends. Everything here is about two goals: being able to get free of your pack if you fall, and having stable feet on the bottom.
Before you step in
- Hip belt and chest strap undone, shoulder straps slightly loosened
- Shoes or boots on and laced firmly — never barefoot
- Phone, GPS and power bank in a dry bag high in the pack
- Sleeping bag and spare clothes in a waterproof liner
- Hands out of the pole straps, poles set a little longer
- Hat or cap secured, nothing dangling that can snag
- Route across and exit point agreed with the group
- One person ready on the bank to watch and point
Why the hip belt must be open
A closed hip belt ties a heavy pack to your body. If you fall, the pack can float you face down or drag you under and you cannot get it off. With belt and chest strap open, you can shrug it off in a second. Pack design and fitting are covered in choosing and packing a backpack.
Shoes on, never barefoot
Bare feet slip, get cut on sharp stones and glass, and go numb in cold water within moments. Many walkers keep their boots dry on easy, slow crossings by changing into closed camp shoes with a heel strap; on anything harder, keep the boots on and accept wet feet. Flip-flops and loose sandals come off in the current. More detail is in footwear for stream crossings and bogs.
Electronics and dry gear
A phone that drowns in the river is also your emergency line. Put it, a GPS and a power bank in a roll-top dry bag or two zip bags, and keep them where you can reach them on the far bank. Tips on keeping devices charged are in power banks and phones outdoors. Some walkers roll up or take off long trousers to keep a dry pair for afterwards; wet trousers also cause drag.
Stream crossing technique: face upstream and shuffle sideways
The technique taught for solo wading is the same almost everywhere: face upstream, slightly angled towards your destination, and move sideways in short shuffling steps. Facing the current lets you lean into it and keeps your knees from buckling, as they would if the water pushed you from behind. Use a pole or a sturdy stick, planted upstream, as a third leg.
Crossing with a pole as a third leg
 1Probe ahead
Before each move, probe the depth and the bottom with the pole. A pole that sinks much deeper than expected or is pushed sideways hard by the current tells you to go back.
 2Plant it upstream and lean in
Face the current and plant the pole a little upstream of you. Lean on it so that your two feet and the pole form a stable tripod. With two trekking poles you get a four-point stance.
 3Move one point at a time
Move only one foot or the pole, so two points always stay on the bottom. Slide your feet along the bed rather than lifting them high, and test each foothold before putting weight on it.
 4Work slightly downstream
Cross at a slight angle downstream — it is easier than fighting the current — and aim for a low, gravelly exit. Do not relax until both feet are on dry ground.
Footwork and balance
- Keep your feet about shoulder-width apart and your knees slightly bent.
- Never cross your legs; shuffle the leading foot out first, then bring the other one after it.
- Look at the far bank or at your next foothold, not at the rushing water — staring into moving water makes many people dizzy.
- Go slowly. A crossing that takes several minutes is normal; hurrying is how people slip.
- If the water gets deeper or faster than you judged, back out the way you came. Turning round in the middle is harder than reversing your steps.
Choosing a pole or stick
Trekking poles work well when set a little longer than usual and used without the straps, so a trapped pole cannot twist your wrist. A sturdy, straight wooden staff about shoulder height is even stiffer. Carbon poles can snap under a sideways load; aluminium tends to bend first. Test a dead branch before you trust it — rotten wood breaks exactly when you lean on it.
How deep is too deep? Depth rules of thumb
There is no safe depth in moving water, only less risky ones. Speed matters as much as depth: fast water at shin height can be harder than slow water at the knee. The guide below is a rule of thumb for fit adults in moderate current, not a guarantee.

| Depth | What it means | Typical action |
|---|---|---|
| Ankle | Usually manageable; slippery stones are the main risk | Cross with care, poles help |
| Shin, below the knee | Current pushes noticeably, footing harder | Only if the water is slow and clear; use a pole |
| Knee | Serious — fast water can knock you over | Only slow water, experienced group methods; otherwise turn back |
| Above the knee / thigh | Pack and body catch a lot of current | Do not cross — wait, detour or turn back |
The depth that counts is at the knee of the smallest and lightest person in the group. Water at an adult’s shin can reach a child’s thigh. Cold water lowers every limit, because legs lose strength and feeling quickly. A heavy pack raises your centre of gravity and catches the current — lighter walkers with big packs are especially easily swept off their feet.
Group techniques for fording a river
Several people crossing together are more stable than individuals, because they form a wider base and share the force of the current. The methods below are commonly taught by mountain and outdoor organisations. They work only in water that is already within reach for the group — they are not a way to cross water that is too deep or fast. Practise them in a calm, shallow stream first.
Common group crossing methods
 1Pairs
Two people stand side by side, gripping each other’s shoulder straps or clothing. The stronger person stands upstream and takes the brunt of the current; the pair moves across together.
 2In line with the current
Three to five people line up one behind the other in a row parallel to the current, each gripping the pack straps or hip belt of the person in front. The strongest stands at the upstream end and breaks the current for the others; the whole line moves sideways across while staying parallel to the flow.
 3Wedge
The group forms a triangle with the strongest person at the point facing upstream and the others gripping behind. The point splits the current and the people behind stand in calmer water.
- Agree simple calls before you start: “step”, “stop”, “back”.
- Move on one person’s call, in small steps, and keep the grip firm but easy to release.
- Keep the line short; more than five people becomes hard to coordinate.
- Do not tie people together with rope. A rope across or along moving water can trap and drown people; rope techniques belong to trained swiftwater teams.
- If one person wobbles, the others stand still and support until they are steady again.
Solo vs group crossing
Solo with a pole
- Simple, no coordination needed
- Three points of contact
- No one nearby to help if you fall
- Use only on easy, shallow crossings
Group methods
- Wider base, current shared
- Strongest person shelters others
- Needs practice and clear calls
- Never a reason to cross water that is too high
What to do if you fall in
Even careful walkers slip. What you do in the first seconds matters most. The guidance below is what swiftwater and outdoor organisations commonly teach for moving water; it does not replace a course.
If the current takes you
 1On your back, feet first
Roll onto your back with your feet pointing downstream and near the surface, so your feet — not your head — meet rocks. If your pack drags you under, slip out of it; the straps are already open.
 2Do not try to stand up
In fast water, a foot can wedge between stones and the current then pushes you under. Stay in the floating position until the water is slow and shallow enough to crawl or walk out.
 3Swim at an angle to the bank
Turn onto your front and swim hard at roughly 45 degrees towards the bank, letting the current carry you downstream while you move across. Aim for slower water, a gravel bar or an eddy behind a rock.
 4Get out, get warm, get help
Get out of the wind, change into dry clothes and insulate. Anyone who was swept away, swallowed water, is confused or shivering hard needs a check — call 112 if in doubt.
If you are heading towards a strainer, swim hard away from it as early as possible. Swiftwater courses teach that, if contact cannot be avoided, you approach it head first and try to climb over the top rather than be pushed under — but this is a last resort, and the real lesson is not to cross upstream of one.
Helping someone who falls in
Do not jump in after them. Shout, point to the bank they should swim to, and run downstream along the bank. Reach with a pole or a branch from a stable position, or throw something that floats. Many people drown trying to rescue others, and a second person in the water makes it worse. When they are out, treat them for cold first, then for injuries.
After the crossing: warm up and dry out
Once everyone is across, the job is not finished. Cold water chills feet and legs fast, and a wet, tired group in wind can slide into hypothermia even in summer. Close the hip belt again, eat something and keep moving to warm up, or stop and change if anyone is soaked.
- Feet: pour the water out of your boots, wring out the insoles and put on dry socks at the next stop. Wet feet blister and soften quickly; foot care on long wet days is covered in choosing and caring for footwear.
- Clothing: wet cotton stays cold; wool and synthetics still keep some warmth. Change wet base layers early — see layering outdoor clothing.
- People: watch for strong shivering, clumsy hands, slurred speech or someone going quiet. These are early signs of cooling and a reason to stop, shelter and rewarm.
- Kit: check that phone, map and first aid kit are dry and in place before you walk on.
The minutes after a wet crossing
- RegroupCount heads, check everyone is fine and has all their kit.
- Dry feetEmpty boots, dry socks, adjust laces.
- Eat and drinkA warm drink and a snack help the body make heat.
- MoveWalk briskly for a while to warm the legs.
If you camp after a crossing, pitch at least 60 m from the water and above any high-water marks — a stream can rise in the night. Our guide to choosing a campsite explains why.
Crossing streams with children and dogs
Children
Children are lighter, shorter and lose heat faster, so every limit drops. Judge the depth at the child’s knee, not yours. In practice, with young children only shallow, slow, clear water qualifies; anything else means a bridge or a different route. An adult goes first to test the crossing, a second adult stays with the child on the upstream side, holding a hand or a grip on their clothing. Carrying a child through moving water adds weight high on the adult and blocks the view of the feet — keep it to very short, calm and shallow crossings. More ideas for safe days outdoors are in bushcraft with kids.
Dogs
Many dogs swim well, but fast or cold water can sweep them away just as easily as people. Do not let a dog swim across a strong current, and never go into dangerous water after a dog that has been swept away — call it to the bank and run downstream instead. A leash can wrap around legs and rocks in the current; a harness with a handle is safer for lifting a dog over short sections. Dry and warm the dog afterwards. See bushcraft with your dog for more.
Cross or not?
Is there a bridge, detour or option to wait?
Yes → Use it — that is the safest crossing.No → Read the water carefully.Is the water clear, slow and below the knee of the smallest person?
Yes → Check the runout and choose a spot.No → Do not cross.Is the runout free of strainers, rapids and falls?
Yes → Prepare and cross with a pole or group method.No → Find another place or turn back.
Practising and planning river crossings
Practise in a warm season on a shallow, slow stream with a gravel bed and a safe runout: probe with a pole, shuffle across facing upstream, try the pair and line methods with friends, and get used to how the current feels at ankle and shin depth. That experience makes it much easier to recognise when a real crossing is beyond you.
When planning, mark every stream crossing on the map, look for bridges and alternatives, and check recent rain and snowmelt. Tell someone your route and turn-back time, as explained in map and compass navigation and distress signals and getting found. Pack a basic first aid kit and a warm spare layer in a waterproof bag. In some protected areas, walking in streams is restricted to protect spawning fish and riverbanks; rules differ by country, so check locally.
River crossing is one of the hazards covered in our bushcraft basics guide. The most important skill is still the decision at the bank — and the confidence to say “not today”.
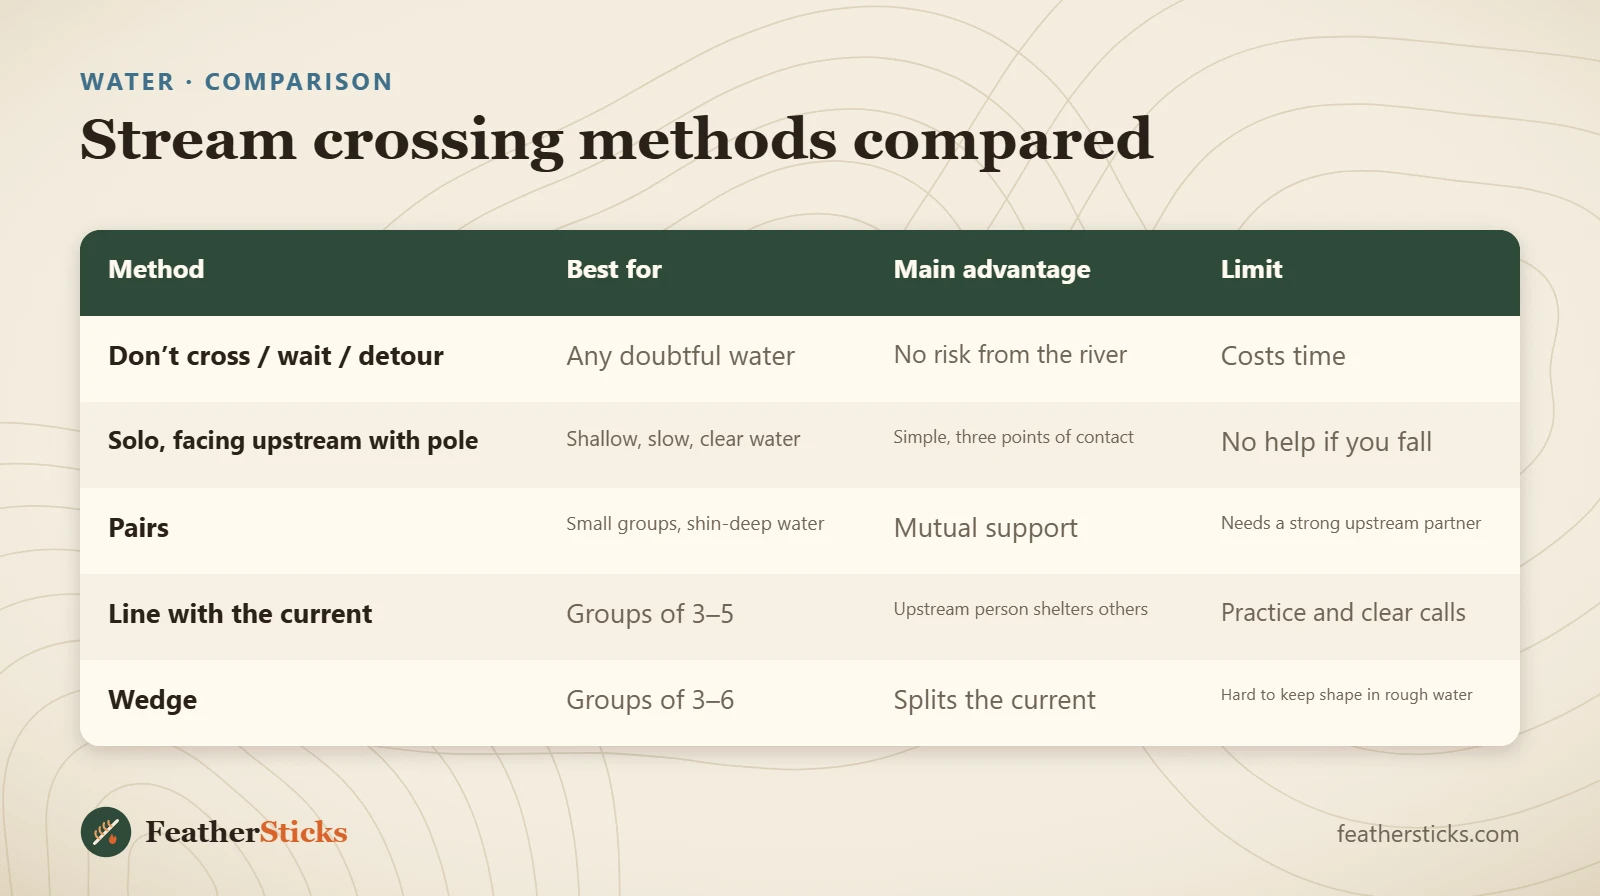
| Method | Best for | Main advantage | Limit |
|---|---|---|---|
| Don’t cross / wait / detour | Any doubtful water | No risk from the river | Costs time |
| Solo, facing upstream with pole | Shallow, slow, clear water | Simple, three points of contact | No help if you fall |
| Pairs | Small groups, shin-deep water | Mutual support | Needs a strong upstream partner |
| Line with the current | Groups of 3–5 | Upstream person shelters others | Practice and clear calls |
| Wedge | Groups of 3–6 | Splits the current | Hard to keep shape in rough water |
Common mistakes
- Crossing because of time pressure instead of waiting or turning back.
- Keeping the hip belt and chest strap closed.
- Crossing barefoot or in loose sandals.
- Choosing the narrowest point or the outside of a bend.
- Crossing upstream of fallen trees, rapids or a waterfall.
- Judging depth by the tallest person instead of the smallest.
- Tying people together with rope in moving water.
What you need
- Trekking poles or a sturdy wooden staff
- Dry bag or zip bags for phone, GPS and power bank
- Waterproof pack liner
- Closed camp shoes with a heel strap
- Spare dry socks and a warm layer
- Topographic map with bridges and fords marked
- Small first aid kit
FAQ
How deep is too deep to cross a stream?
Should you face upstream or downstream when crossing a river?
Should I take my boots off to cross a stream?
Why should you unbuckle your backpack when crossing a river?
When is the best time of day to cross a stream?
What should you do if you fall into a river?
Is it safe to cross a river with trekking poles?
Check yourself
Completed6 quick questions from this guide. Nothing is sent anywhere.
Related step-by-step guides
-
 1
-
 1
-
 1