Dry Bags & Waterproof Packing: Keep Your Kit Dry in Any Rain
Dry bags for hiking are the simplest insurance you can carry: a pack liner plus a few roll-top bags keep your sleeping bag, warm layers, electronics, fire kit and first aid dry when the pack itself is soaked. Almost no backpack is waterproof – water gets in through seams, zips, wet straps and the back panel – so the reliable approach is to make the inside waterproof.
This guide shows why packs leak, how a pack liner, a rain cover and dry bags compare honestly, how to close a roll top so it really seals, which materials and sizes make sense, a colour-coding system and how to pack for rain, river crossings and boats. It builds on the packing order in our backpack guide and is part of the bushcraft gear guides.
Step by step
-
1

Line the pack first
Open a waterproof liner inside the main compartment before anything goes in. Everything that must stay dry goes inside it.
-
2

Sort into coloured dry bags
One colour per job: sleeping bag, dry clothes, first aid, food, electronics. You find each bag fast, even in the dark.
-
3

Squeeze out the air
Press the air out before closing. A flat, firm bag packs smaller and does not balloon when the pack is squeezed.
-
4

Roll three times, then clip
Straighten the top, roll it at least three tight turns over the stiff edge and close the buckle.
-
5

Pack in the right order
Sleeping bag at the bottom, heavy items against the back, clothing around them, liner closed, tarp and rain jacket on top.
-
6

Keep wet and dry apart
Wet clothes and the wet tarp travel outside the liner. The dry set stays sealed until you are under the roof for the night.
Why do backpacks leak?
Most pack fabrics are coated and fairly water-resistant when new, so it is tempting to call a pack "waterproof". In steady rain it is not, for four reasons:
- Seams and zips: every stitch is a hole. Factory seam tape is rare in packs, and zips – even coated ones – let water creep through under pressure.
- Wicking straps and webbing: wet shoulder straps, compression straps and haul loops soak up water and carry it into the pack where they are sewn in.
- The back panel: rain running down your jacket pools between your back and the pack and soaks the padding. A rain cover cannot stop this, because the back has to stay open.
- Ageing coatings and canvas: polyurethane coatings wear and flake after years of use; waxed canvas sheds a shower but soaks up water once the wax wears thin.
Add water from inside – a leaking bottle, a wet tarp packed on top of a sleeping bag, condensation – and the bottom of an unlined pack is where everything ends up. The fix is not a more expensive pack but a waterproof layer inside it.

Pack liner vs rain cover vs dry bags: an honest comparison
There are three tools, and they do different jobs. Our backpack guide calls the liner the most important of the three – here is why, with the downsides of each.
| Pack liner | Rain cover | Dry bags | |
|---|---|---|---|
| What it is | One large waterproof bag lining the main compartment | Elasticated cover over the outside of the pack | Separate roll-top bags for groups of items |
| Keeps dry | Everything inside it, whatever the pack does | Most of the pack fabric – not the back panel | Each bag's contents, even if the pack floods |
| Weak points | One closure for everything; can tear on sharp items | Blows off or turns in wind; water enters at the back; snags in brush | Cost and weight add up; empty space between round bags |
| Extra benefit | Cheap, light, simple | Pack fabric stays drier and lighter; keeps mud off | Organises the kit; contents protected when you open the pack in rain |
| Typical weight | About 50–250 g | About 60–200 g | About 20–250 g each |
Weights are typical ranges for 50–70-litre liners and covers and 2–20-litre bags; they depend on fabric and size.

Which combination is best?
For most bushcraft trips the answer is a liner plus two or three dry bags for the items that must never get wet – sleeping bag, dry clothes and electronics. The liner does the heavy lifting; the dry bags are a second barrier and keep the kit organised, so you can open the pack in rain and take out one thing without exposing the rest.
A rain cover is a useful extra rather than the plan. It earns its place on long rainy days and with canvas packs, which would otherwise soak up a kilogram or more of water, and it keeps mud off when the pack stands on the ground. In dense brush or strong wind, many people leave it at home. A long poncho that covers the pack does a similar job – see rain gear: jackets, ponchos and gaiters.
What do you need for your trip?
Is there any chance of rain, snow or wet ground?
Yes → Use a pack liner – always. Continue below.No → A liner is still the cheap insurance; at least put electronics and the first aid kit in zip bags.Will you cross rivers or travel by canoe or kayak?
Yes → Liner plus dry bags for sleeping bag, clothes and electronics, closed and clipped before you reach the water.No → Go on to the next question.Is your pack made of canvas or will it rain for days?
Yes → Add a rain cover or a poncho over the pack to keep the fabric from soaking up water.No → Liner plus one or two dry bags is enough.
How to close a roll top dry bag correctly
A roll top dry bag seals by folding: the stiffened strip at the top is rolled down on itself until water would have to travel around several tight turns to get in. That only works if the closure is done properly. The rule most manufacturers and outdoor guides give – and the one our rain camping guide uses – is at least three tight turns, then clip.
Closing a roll top, step by step
 1Straighten the top
Hold the two ends of the stiffened strip and pull them apart so the edges lie flat on each other. Check that no strap, cord or fabric fold is caught in the opening – a single trapped corner is a channel for water.
 2First turn over the stiff edge
Fold the top over the stiffener, tight and flat. Push out the remaining air with the other hand while you fold. A loose first turn makes every following turn loose as well.
 3At least three turns
Keep rolling in tight, even turns – three at least, more if the bag is not full. Leave enough fabric above the contents to roll: a bag stuffed to the brim cannot be closed properly.
 4Clip the buckle
Bring the buckle ends together over the top and click them shut, or clip each end to a side loop if the bag has them. Squeeze the bag gently: a tight closure holds the air in.

Five habits that keep a roll top dry
- Do not overfill. Choose a bag with room for the roll – roughly a hand's width of empty fabric above the contents.
- Keep the closure clean. Sand, pine needles and grit in the fold create gaps and wear the coating.
- Closure up or inwards. In the pack, the rolled end faces up or towards the middle, never down into the bottom where water collects.
- Splash-proof is not submersible. Most roll tops shed rain and splashes reliably and survive a short dunking; few are made for long submersion. Treat "waterproof" claims with caution and protect a phone with a second bag.
- Check the buckle. A cracked buckle lets the roll open – carry a spare as part of your field repair kit.
Dry bag materials, sizes and weights
Dry bags differ mainly in fabric. Lighter fabrics save grams but tear more easily; heavy coated fabrics are tough but add weight quickly once you carry several bags. All values below are typical ranges, not product data.
| Material | Typical weight (10 L bag) | Strengths | Weaknesses | Best use |
|---|---|---|---|---|
| Thin silicone- or PU-coated nylon | About 20–40 g | Very light, packs small, slippery so it slides into a full pack | Punctures and abrades easily; not for rough handling outside the pack | Inside a liner: clothes, sleeping bag, organising |
| Medium PU- or TPU-coated nylon or polyester | About 50–100 g | Good balance of weight and toughness, usually welded or taped seams | Coating ages over years; seams can fail if stored damp | Everyday dry bags, electronics, first aid |
| Heavy PVC or TPU-coated fabric | About 150–300 g | Very tough, abrasion-resistant, often fully welded | Heavy and bulky; stiff in cold weather | Canoe and kayak trips, strapped outside a pack |
| Clear film windows or clear bags | About 30–80 g | You see the contents without opening | Film scratches and cracks; less robust | Maps, phone, small items you check often |
| Compression dry bag with air valve | About 80–180 g | Air escapes through a valve, straps compress the load | Heavier; valve is one more weak point | Sleeping bag and bulky insulation |
Weights vary with design and closure; a large pack liner of thin fabric often weighs about 50–100 g, a heavy-duty one 150–250 g.
Which sizes do you need?
Buy bags for the items you will put in them, not as a matching set. Typical sizes for a bushcraft kit:
| Content | Typical size | Tip |
|---|---|---|
| Phone, power bank, cables | 1–3 L | Small and bright so you find it; phone also in a zip bag |
| First aid kit, fire kit | 1–3 L | In the lid or top of the pack, see the colour code below |
| Dry set (base layer, socks, hat) | 5–10 L | Sealed at home, opened only at camp |
| Warm layer (fleece or puffy) | 8–13 L | Can share a bag with the dry set on short trips |
| Food for 1–3 days | 8–15 L | Keeps smells and crumbs contained |
| Sleeping bag | 10–20 L | A 0 °C synthetic bag can fill 10–15 L, a down bag about half – see sleeping gear |
Tapered or oval bags fill a pack better than round ones, and several small bags pack more flexibly than one big bag. Pack volume itself – and how many litres your kit needs – is covered in the backpack volume table and the Kit Builder. If weight is a concern, add your bags to the pack weight calculator: five heavy bags can weigh as much as a small tarp.
A colour-coding system for dry bags
Coloured bags turn a pack into a cupboard with labelled drawers. You reach in with a headlamp, see orange and know it is the sleeping bag, without emptying the pack in the rain. Any system works as long as it is the same on every trip and everyone in the group knows it. One that is easy to remember:
| Colour | Content | Where in the pack |
|---|---|---|
| Orange | Sleeping bag (and sleeping clothes on short trips) | Bottom of the liner |
| Green | Dry set and warm layer | Around the heavy core |
| Yellow | Food | Heavy core, close to the back |
| Red | First aid kit | Lid or top of the pack |
| Grey or blue (small) | Electronics and fire kit spares | Lid or top of the pack |
| Plain stuff sack or mesh | Wet things: shell, towel, socks, tarp | Outside the liner or in an outer pocket |
Bright colours are easier to find in the dark and in leaf litter; a strip of coloured tape or a marker works on bags you already own.
Colour coding also helps in groups: the shared first aid and fire kits are always red and always in the same pocket, so anyone can find them in an emergency. Our first aid kit guide recommends exactly that – a clearly marked, waterproof pouch at the top of the pack.
What must stay dry – and what can get wet
Not everything needs a dry bag. A pot, a saw or a tent peg does not care about rain. Concentrate your waterproofing on the items whose failure turns an uncomfortable night into a dangerous one.
| Item | Why it must stay dry | How to pack it |
|---|---|---|
| Sleeping bag | Wet down clumps and loses most of its warmth; synthetic fill copes better but gets heavy and cold | Own dry bag inside the liner, bottom of the pack – see sleeping gear |
| Insulation and dry set | Your reserve against cold after a wet day; damp layers can push you towards hypothermia | Sealed dry bag, opened only at camp |
| Phone, GPS, headlamp, power bank | Water damages electronics; the phone is your emergency line | Zip bag plus small dry bag; see keeping devices dry |
| Fire kit and tinder | Damp tinder and soaked matches make fire in wet weather much harder | Sealed match case, tinder in a tin or zip bag – see the fire kit guide |
| First aid kit | Damp dressings are no longer sterile; tablets dissolve | Waterproof pouch, sterile items in a zip bag inside |
| Map and documents | Paper turns to pulp; ID and tickets get ruined | Map case or zip bag; documents flat in a small dry bag |
| Food | Wet food spoils, packaging tears, smells spread | Dry bag; remove paper and cardboard packaging at home |
What can travel without a dry bag: cookware, the saw and knife (sheathed), tent pegs, water bottles, cord and the tarp itself – the tarp is going to get wet anyway, so it rides on top of the closed liner where you can reach it first. Keep tinder separate from food and fuel, and never put a fuel canister in the same bag as the sleeping bag.
Compression and squeezing out the air
Air trapped in a closed dry bag takes up space and turns the bag into a balloon that will not fit into the pack. Before the final roll, kneel or press on the bag to push the air out, then roll. With a compression dry bag, close the roll top first, then pull the straps evenly – the air escapes through a one-way valve in the base.
- Compress for the walk, not for storage. Sleeping bags and puffy jackets recover their loft when unpacked at camp; stored compressed for months, the fill loses springiness. At home they belong loose in a large sack – see sleeping bag care and storage.
- Do not over-compress in winter. A hard, tiny sleeping-bag package looks efficient but strains seams and fill; compress to fit the space, not to the limit.
- Use the air on water. On canoe trips, a little air left inside a closed bag adds some buoyancy, which helps recover kit after a capsize. It is no substitute for a buoyancy aid.
- Soft bags fill gaps. Slightly under-compressed clothing bags mould around the hard items and stop the load from shifting, as our packing order recommends.
Waterproof packing in your backpack, step by step
Waterproof packing follows the same order as normal packing – it just adds a liner and a few bags. Keeping it consistent with the backpack guide means the pack carries well and stays dry.
Waterproof packing order
- Liner inOpen the liner inside the main compartment.
- Sleeping bag downIn its dry bag at the bottom of the liner – light, bulky, not needed until camp.
- Heavy coreFood bag, pot, water and stove close to the back at shoulder-blade height.
- Clothing aroundDry-set and warm-layer bags fill the gaps.
- Close the linerAir out, roll or twist, tuck the closure in.
- Tarp and shell on topOutside the liner, so you pitch shelter first. Lid: first aid, electronics, headlamp, fire kit.
A few details make the difference in real rain. Fold the closed liner top down beside the load rather than leaving it standing up under the lid, where rain runs in. Keep the first aid kit, headlamp, map and fire kit in the lid or hip-belt pockets – in small dry or zip bags – so you never need to open the liner during the day. Water bottles live in the side pockets, outside the liner; a leaking bottle inside soaks everything.
On a rainy approach, keep the pack closed and the shell on. Camping in the rain shows the rest of the routine: tarp up first, then unpack under the roof, one bag at a time.
The wet and dry clothes routine
The best dry bag in the world does not help if you put wet clothes into it. On a multi-day trip in rain, the system is simple and strict:
- Dry set: base layer, socks, hat and – in cold weather – a warm layer, sealed in a dry bag at home. It comes out only when you are under the finished roof for the night.
- Wet set: the clothes you walk in. In the morning you put them back on, damp and cold, and they warm up within minutes of walking. Unpleasant, but it keeps the dry set dry.
- Wet bag: a separate stuff sack or the outer pocket for wet shell, towel and socks – outside the liner, never inside a dry bag with dry things.
Wet and dry, kept apart
Dry side (inside the liner)
- Sleeping bag in its dry bag
- Dry set: base layer, socks, hat
- Warm layer
- Electronics and first aid
- Opened only under a roof
Wet side (outside the liner)
- Tarp and groundsheet after use
- Rain jacket and trousers
- Walking clothes, wet socks, towel
- Separate stuff sack or outer pocket
- Hung up at camp when possible
When you break camp in the rain, pack the sleeping bag and dry set first while the tarp still gives shelter, and pack the wet tarp last, in its own bag on top of the liner. Hanging and venting wet clothes is covered in clothing in the rain, and choosing shells that keep you as dry as possible in rain gear. The layers themselves are explained in bushcraft clothing.
Packing for river crossings, canoes and boats
Near water, waterproof packing is not about rain any more but about a possible dunking. Before you wade, everything that must stay dry should already be in closed bags inside the closed liner: the phone, GPS and power bank in a dry bag high in the pack, where you can reach it on the far bank. Open the hip belt and chest strap so you can get out of the pack quickly if you fall – the full procedure, including when not to cross at all, is in crossing a river safely.
On canoe and kayak trips, heavier PVC or TPU dry bags and waterproof barrels take the place of a backpack. Secure bags to the boat with a short strap or clip so nothing floats away after a capsize, but keep lines short and tidy so they cannot tangle a swimmer. Keep a small bag with phone, a warm layer and a snack within reach of your seat. Ferro rod and lighter belong on your person or in a sealed pocket, as the fire kit guide suggests.

Water trips also mean refilling and treating water from rivers and lakes – see refilling water on the trail – and, on the coast, salt spray and sand that wear closures quickly. Rinse roll tops and buckles in fresh water after a coastal or coastal camping trip.
DIY alternatives: bin bags, rubble sacks and zip bags
You do not need to buy anything to start packing waterproof. A thick bin bag or a builder's rubble sack makes a good pack liner, and resealable freezer bags protect small items. The trade-off is durability: thin bags tear on the corner of a pot or a sharp stick, so choose heavy-duty bags and replace them when they show holes. Closing a plastic liner works best with the gooseneck:
Closing a bin-bag liner with a gooseneck
 1Heavy bag as a liner
Open a thick bin bag or rubble sack inside the pack and fill it in the usual order. Thin kitchen bags tear too easily for this job.
 2Air out, twist the neck
Press out the air and twist the empty top of the bag into a tight rope several times, close to the contents.
 3Fold back and tie
Fold the twisted neck back down on itself and hold it with an elastic band, a hair tie or a turn of cord. Tuck it in beside the load, closure facing up.
| Option | Good for | Limits |
|---|---|---|
| Heavy-duty bin bag or rubble sack | Pack liner, wet-tarp bag, ground sheet in an emergency | Tears on sharp items; replace when holed |
| Freezer or zip bags | Phone, documents, first aid dressings, tinder, matches | Zips wear out; double-bag electronics |
| Old dry bag with a pinhole | Second barrier inside a liner, food or wet-gear bag | Patch it or use it only where a leak does no harm |
| Plastic food container with lid | Fire kit, phone, delicate items | Bulky; check the seal |
| Shower cap or elasticated bag | Improvised hip-belt pocket or lid cover | Only for splashes |
Single-use plastic is not ideal, but a heavy bag that you reuse for many trips is a good bargain. Take every scrap and wrapper home again, in line with Leave No Trace. More money-saving ideas are in surplus and DIY gear.
Care, leak testing and repair
Dry bags fail slowly: a pinhole from a pine needle, a worn corner, a peeling seam. Check them before the season and after rough trips.
Checking and caring for dry bags
 1Light test
Turn a light on inside the bag in a dark room, or hold the bag against a bright window. Pinholes show as tiny points of light. Mark them with a pen.
 2Bubble test
Close the bag with air inside, roll it three times and press it under water in a basin or bath. A thin stream of bubbles shows a leak at a seam or in the fabric.
 3Patch it
Clean the spot with soapy water or alcohol, let it dry, and apply a patch with round corners about 2 cm larger than the hole on every side. Press hard; patch inside and outside if you can.
 4Dry inside out
After every trip turn the bags inside out and hang them open until completely dry. Damp bags left closed grow mildew, which smells and damages coatings and seams.
| Symptom | Likely cause | What to do |
|---|---|---|
| Damp contents after rain | Too few turns, overfilled bag, closure facing down | Leave room, roll three tight turns, closure up or inwards |
| Bag will not close | Overfilled or too much air inside | Use a bigger bag or squeeze the air out first |
| Bubbles along a seam | Seam tape or weld failing | Seal with seam sealer at home, or retire the bag to a non-critical job |
| Sticky or flaking inside | Coating breaking down after long, damp storage | Use it only inside a liner; replace for critical items |
| Musty smell, dark spots | Stored damp | Wash with mild soap, dry fully inside out, store loose and dry |
| Roll keeps opening | Cracked buckle or stiffener | Replace the buckle; tie the ends with cord as a field fix |
Wash dirty bags by hand with lukewarm water and a mild soap; never in the washing machine or the dryer. Store them loose and dry, out of direct sunlight, which ages coatings. Tape, round patches and a spare buckle belong in your field repair kit, and the fabric repair steps there work for dry bags too.
Waterproof packing on a budget
Waterproof packing is one of the cheapest upgrades in bushcraft. In order of value:
- A heavy-duty liner – a rubble sack or a dedicated pack liner. This alone keeps most kits dry.
- One good dry bag for the sleeping bag – the item you can least afford to get wet.
- Zip bags for phone, documents, first aid dressings and tinder.
- Two or three light dry bags in different colours for the dry set, food and electronics.
- A rain cover or poncho – useful for canvas packs and long wet spells, but last on the list.
Second-hand dry bags are fine if they pass the light and bubble tests. The budget gear guide explains what to buy first across the whole kit, and the bushcraft kit list shows where waterproofing fits in. New to all of this? Start with bushcraft for beginners and keep the glossary entry on dry bags at hand for the terms.
Waterproof packing checklist
- Pack liner checked for holes
- Sleeping bag in its own dry bag
- Dry set sealed and labelled
- Electronics and phone in a dry bag or double zip bag
- Fire kit and tinder sealed
- First aid kit in a waterproof pouch at the top
- Separate bag for wet things
- Spare buckle and patches in the repair kit
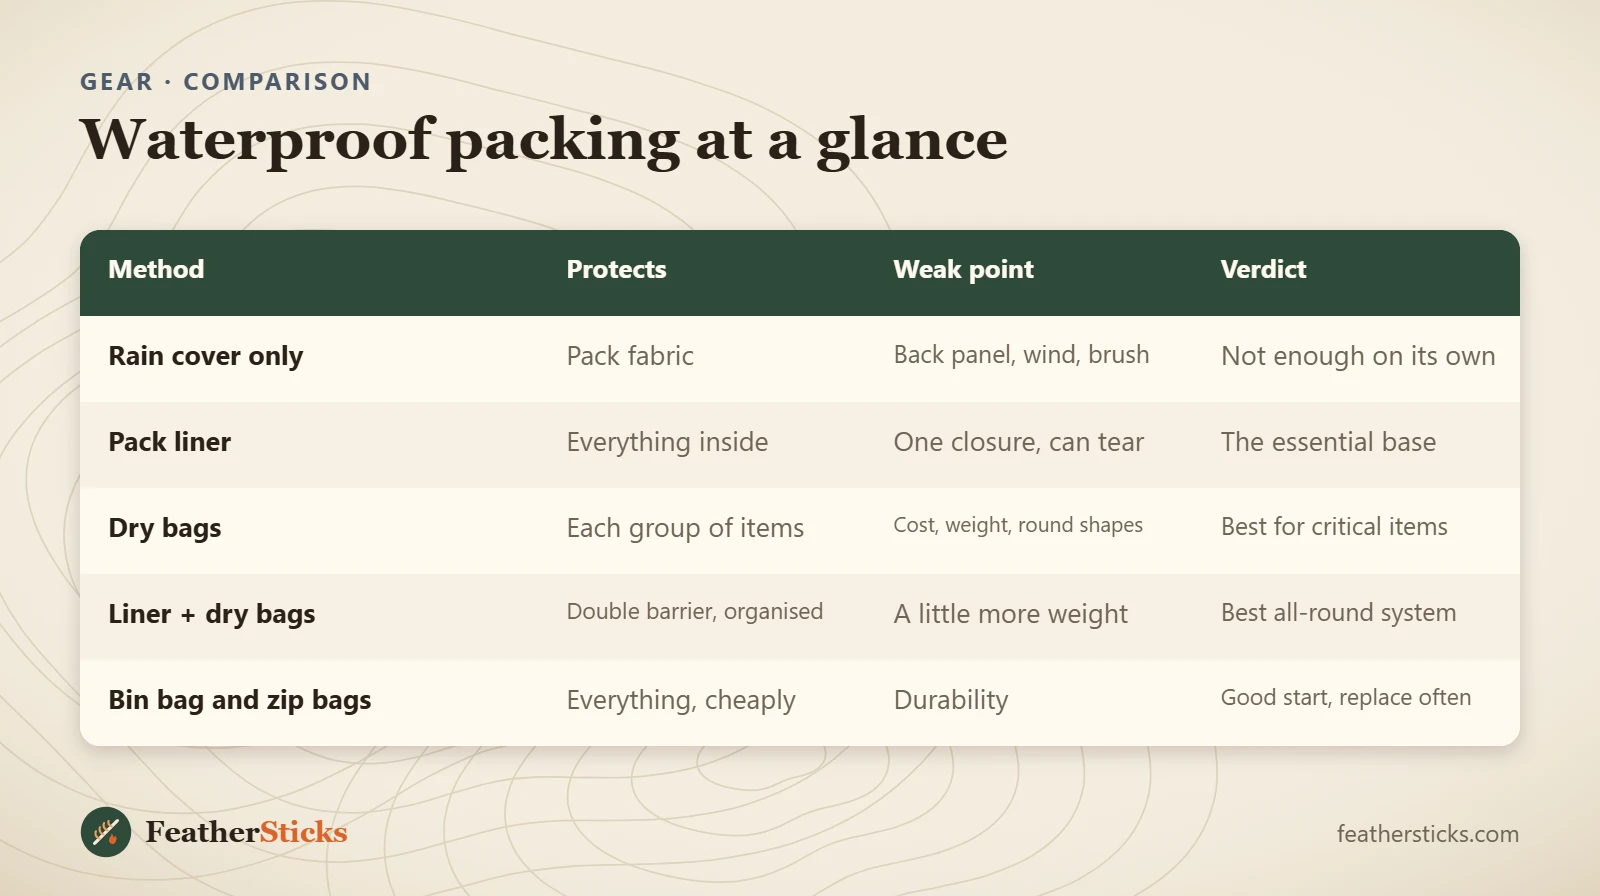
| Method | Protects | Weak point | Verdict |
|---|---|---|---|
| Rain cover only | Pack fabric | Back panel, wind, brush | Not enough on its own |
| Pack liner | Everything inside | One closure, can tear | The essential base |
| Dry bags | Each group of items | Cost, weight, round shapes | Best for critical items |
| Liner + dry bags | Double barrier, organised | A little more weight | Best all-round system |
| Bin bag and zip bags | Everything, cheaply | Durability | Good start, replace often |
Common mistakes
- Relying on a rain cover alone – water enters through the back panel.
- Rolling a dry bag only once or twice, or overfilling it so it cannot be rolled.
- Putting wet clothes or the wet tarp inside the liner with the dry kit.
- Opening the dry set during the day for a quick warm layer.
- Packing the closure facing down into the bottom of the pack.
- Storing dry bags damp and closed until the next trip.
- Trusting a "waterproof" phone bag without a second zip bag on river crossings.
What you need
- Pack liner (heavy-duty bag or dedicated liner)
- 3–5 roll-top dry bags in different colours
- Compression dry bag for the sleeping bag (optional)
- Zip bags for phone, documents and first aid dressings
- Separate stuff sack for wet things
- Rain cover or poncho (optional)
- Spare buckle and round patches
FAQ
Do I need dry bags if I have a pack liner?
Is a pack liner better than a rain cover?
How many times should you roll a dry bag?
Are dry bags fully waterproof?
What size dry bag do I need for a sleeping bag?
Can I use a bin bag as a pack liner?
How do I keep my phone dry when hiking?
Check yourself
Completed6 quick questions from this guide. Nothing is sent anywhere.
Related step-by-step guides
-
 1
-
 1
-
 1