Sleeping Bag Care: How to Wash a Down Sleeping Bag, Dry It and Store It
Knowing how to wash a down sleeping bag matters less than knowing how rarely you need to. Good sleeping bag care is mostly daily habits: air the bag every morning, keep it dry, sleep in a liner and store it loose at home instead of in its stuff sack. When it finally needs a wash, use a large front-loader, a special down wash, a gentle cycle at the low temperature on the label, and dry it for hours on low heat with dryer balls until no clumps are left.
This guide covers the differences between down and synthetic care, storage, washing, drying, restoring loft, small repairs and mould prevention. It builds on our sleeping gear guide and belongs to the bushcraft gear guides. One rule sits above everything here: follow the manufacturer's care label.
Step by step
-
1

Air it every morning
Turn the bag inside out and hang it in sun or breeze while you eat breakfast, so the night's moisture escapes before you pack.
-
2

Keep it dry, use a liner
Pack it in a dry bag, breathe out of the hood and sleep in a liner – it keeps body oils off the bag and means fewer washes.
-
3

Store it loose at home
Hang it in a cupboard or keep it in a large cotton or mesh sack. The small stuff sack is for trips only.
-
4

Wash rarely and gently
Large front-loader, special down wash or mild detergent, gentle cycle at the label temperature, extra rinse. No fabric softener.
-
5

Dry low and long
Tumble on low heat with two or three clean dryer balls for hours, break up clumps by hand, then air it another day.
-
6

Patch small holes at once
Push escaping down back in, never pull it out, and cover the hole with a round-cornered self-adhesive patch.
Down vs synthetic: why the care is different
Every sleeping bag keeps you warm the same way: its fill traps still air, and still air insulates. Care is about protecting that ability to puff up, called loft (see the glossary entry on loft). What damages loft differs between the two fill types, which is why the care differs too. If you are still choosing a bag, the comparison in down vs synthetic sleeping bags explains warmth, weight and price; here we look only at what each needs to last.
Down is a natural material: soft clusters with thousands of fine filaments. Kept dry and stored loosely, down recovers its loft again and again and can last many years. Its enemies are moisture, dirt and body oils. Wet down collapses into clumps, dries slowly and can start to smell if it stays damp. Oils from skin and hair slowly coat the clusters, so they loft less and the bag gets colder over the seasons – one reason why a careful wash can make an old down bag noticeably warmer again.
Synthetic fill is made of polyester fibres, either long continuous sheets or short staple fibres. It copes with damp far better, dries faster and is less fussy to wash. Its enemy is long-term compression and heat: fibres that are squashed for months, or exposed to high dryer temperatures, slowly lose their spring and never fully recover. A synthetic bag therefore forgives a wet trip, but not a hot dryer or years in a compression sack.

| Care point | Down | Synthetic |
|---|---|---|
| Biggest enemy | Moisture, body oils, dirt | Long compression, high heat |
| Daily care on trips | Air every morning, protect from damp | Air every morning; tolerates some damp |
| Washing | Special down wash, gentle cycle, extra rinse | Mild detergent or wash for synthetics, gentle cycle |
| Typical wash temperature | Usually 30 °C – follow the label | Usually 30–40 °C – follow the label |
| Drying | Low heat, several hours, dryer balls, clumps checked | Low heat or air dry; faster than down |
| Storage | Loose, dry; recovers loft well | Loose, dry; compression damage is lasting |
Temperatures are typical label values, not rules. The sewn-in care label of your bag always decides.
Daily sleeping bag care on trips
Most of a bag's life is decided outdoors, not in the washing machine. Every night your body releases water vapour, and some of it condenses in the fill. One night hardly matters; a week without airing can leave a down bag noticeably flatter and colder. Three habits keep this under control.
Air it every morning
As soon as you get up, open the zip fully, turn the bag inside out if the design allows it and hang it over a line, a branch or the tarp ridgeline. In sun or a light breeze, the time it takes to make breakfast is usually enough to let the night's moisture escape. On grey, damp mornings, air it under the tarp and repeat at lunchtime if there is a dry spell. Short sun is fine; leaving it in strong sunlight for many hours on end is unnecessary and over time can weaken thin shell fabrics.
Keep it dry
Pack the bag in a waterproof dry bag or a pack liner, and stuff it rather than rolling it – the same advice our sleeping gear guide gives. Unpack it only under a finished roof. Keep it off the wet edges of the groundsheet and away from tarp walls and wet clothes, and do not try to dry damp socks or jackets inside it with your body heat. In a bivvy bag, leave the opening vented and breathe out into the air, not into the hood. How to manage all of this through a wet weekend is shown in keeping the sleeping bag dry in the rain.
Keep it clean
Sleep in a clean base layer, wash face and hands before bed when you can (see hygiene outdoors) and use a liner. Keep greasy food, sun cream and insect repellent away from the bag; some repellents can damage fabrics and coatings.
Sleeping bag liner: the easiest way to wash less
A sleeping bag liner is a thin inner bag you sleep in. It catches most of the sweat, skin oils and dirt that would otherwise go into your sleeping bag, and you can wash it after every trip like a bed sheet. That alone stretches the time between proper bag washes considerably, and every wash you avoid saves the fill and the shell some wear.
A liner also adds a little warmth. Our sleeping bag calculator counts about 2 °C for a typical liner; thin silk and synthetic liners add least, fleece liners most. On a warm summer night, a liner on its own can be enough on top of a pad.
| Material | Typical weight | Pros | Cons |
|---|---|---|---|
| Silk | ≈ 100–150 g | Very light and small, smooth, dries fast | Least warmth, more expensive, delicate |
| Thin synthetic | ≈ 150–250 g | Light, robust, dries fast, easy to wash | Can feel clammy on warm nights |
| Cotton | ≈ 300–450 g | Cheap, pleasant on skin, very easy to wash | Heavy, absorbs moisture, slow to dry |
| Merino or wool blend | ≈ 200–350 g | Comfortable over a wide range, resists odour | Higher price, needs a gentle wash |
| Fleece | ≈ 300–500 g | Most added warmth, cheap | Bulky and heavy |
Weights are typical ranges for adult mummy-shaped liners. Rectangular liners are roomier and heavier.
For a bushcraft kit, a thin synthetic or silk liner is the usual compromise: light, quick to dry and easy to wash at home after every trip.
How to store a sleeping bag: stuff sack vs storage sack
The small stuff or compression sack that came with your bag is a transport bag. It is perfect for a few days in a pack, and it is the worst place for the bag between trips. Fill that stays compressed for weeks and months slowly loses its ability to spring back. Down recovers better than synthetic, but both lose warmth if they live squashed. The rule in all our gear guides is the same: store your sleeping bag loose.
Good ways to store a sleeping bag at home
- Large storage sack: many bags come with a big cotton or mesh sack. The bag should sit in it loosely, not pressed in. A large cotton pillowcase or laundry bag works as well.
- Hanging: hang it full length in a wardrobe on a wide hanger or over a rail, with nothing pressing against it.
- Flat: laid flat under a bed or on top of a cupboard, with nothing stacked on it.
Avoid plastic bags and airtight boxes for long storage: any trace of moisture is trapped inside. The place matters as much as the sack: dry, cool, dark and airy. A damp cellar invites mildew, a hot attic or a car boot in summer is hard on fabrics and coatings, and a sunny window slowly bleaches the shell.
After the trip: from pack to cupboard
 1Unpack the same day
Take the bag out of the stuff sack as soon as you get home, even if you unpack nothing else. A damp bag left compressed for a few days is how mildew starts.
 2Dry it completely
Hang it loose in an airy room or outdoors in shade or breeze until it is dry through and through. A bag can feel dry outside and still be damp inside.
 3Big and loose
Put it loosely into a large cotton or mesh storage sack. If you have to push it in, the sack is too small.
 4Dry, cool, dark
Store it in a cupboard or under the bed – not in a damp cellar, not in a hot attic. Hanging full length is just as good as the storage sack.
Stuff sack vs storage sack
Stuff / compression sack
- For days in the pack
- Small, light, often waterproof
- Compresses the fill hard
- Never for storage between trips
Storage sack or hanging
- For weeks and months at home
- Large, breathable cotton or mesh
- Fill stays lofted
- Lets residual moisture escape
On a trip, compression is unavoidable, and that is fine. Packing tip: stuff the bag into the bottom of the pack first, so it fills the corners, as our backpack guide shows. Pads have their own rules: store self-inflating pads unrolled with the valve open. More about the whole sleep kit is in the bushcraft kit list.
How often should you wash a sleeping bag?
Rarely. Every wash stresses fill, baffles and shell, so most manufacturers recommend washing only when needed. With a liner and good daily habits, many users get by with a wash every few seasons rather than every year; heavy users without a liner need it more often. There is no fixed number of nights – look for the signs instead:
- The bag lofts noticeably less than it used to, even after a good shake and airing.
- It smells stale or sweaty and airing does not help.
- The shell is visibly greasy around the hood and collar, or the inside feels sticky.
- It got really dirty: mud, spilled food, or it was soaked in dirty water.
Small spots do not need a full wash. Spot-clean the shell with a damp cloth and a little of the same down or mild detergent, keeping the fill behind it as dry as possible: hold the shell away from the insulation while you dab. Let it dry fully before packing.
Wash, spot-clean or just air?
Is the loft noticeably lower after airing and shaking?
Yes → A full wash will likely help – follow the label.No → Next question.Does it smell even after a day of airing?
Yes → Wash it, then dry it completely.No → Next question.Is there only a small stain on the shell?
Yes → Spot-clean with a damp cloth and a little down wash.No → Just air it and store it loose.
How to wash a down sleeping bag: step by step
Washing a down sleeping bag is not difficult, but it takes time – mostly for drying – and some patience. Plan it for a day when you are at home for many hours. The method below is how most manufacturers typically describe it; where your label says something different, the label wins.
What you need
- A large front-loading washing machine without a central agitator. For a bulky winter bag, a drum of about 7 kg or more is a common rule of thumb; a laundrette's big machines are an easy solution if yours is small.
- A special down wash. Normal detergents and especially biological detergents and bleaching agents can strip the natural oils from the down clusters, so they loft less.
- A large, clean tumble dryer with a low heat setting (or a lot of time for air-drying) and two or three clean dryer balls or tennis balls.
Washing a down sleeping bag in the machine
 1Read the care label
The sewn-in label tells you the maximum temperature, whether tumble drying is allowed and at which heat, and that dry cleaning is not. If the label and this guide disagree, follow the label.
 2Close zips, loosen cords
Close the main zip and any hook-and-loop tabs so they cannot snag the fabric, loosen the drawcords at hood and collar, and empty the pockets. Some manufacturers advise turning the bag inside out – check the label.
 3Large front-loader and down wash
Put the bag into the drum on its own and press out the air gently. Add down wash in the dose the product states. Clean the detergent drawer first so no softener residue is left in it.
 4Gentle cycle, low temperature, extra rinse
Choose a gentle, wool or down programme at the label temperature – typically 30 °C – and a low spin. Add one or two extra rinse cycles: leftover detergent makes down clump and loft poorly.
 5Lift it out supported
A wet down bag is surprisingly heavy and the soaked baffles tear easily. Lift it out as one bundle with both arms into a basket – never pull it out by one end or hang it up dripping wet.

Washing by hand in the bathtub
If you have no suitable machine, a bathtub works. Fill it with lukewarm water at or below the label temperature, dissolve the down wash, and press the bag under the water until it is soaked. Knead it gently, let it soak as the product suggests, then drain and rinse by pressing in clean water until no foam appears – it takes more rounds than you expect. Press the water out in the empty tub; never wring it.
How to wash a synthetic sleeping bag
The basic method is the same: large front-loader, gentle cycle, low spin, extra rinse. Use a mild, non-biological detergent or a wash made for synthetic insulation – no fabric softener, no bleach. Typical labels allow 30 °C, some 40 °C. Heat is the main risk with synthetic fill, so never go above the label temperature, either in the wash or in the dryer.
Synthetic fill does not clump like down, so drying is quicker and simpler. Tumble drying on low with dryer balls works, as does air-drying: lay the bag flat on a drying rack or across several lines, turn it every few hours, and expect it to take roughly a day, depending on room temperature and airflow. Make sure it is completely dry before storing it.
How to dry a sleeping bag without clumps
Drying is where most down bags are saved or spoiled. Wet down lies in heavy clumps, and if it dries slowly in clumps it can stay flat and start to smell. The most commonly advised method is a tumble dryer on low heat with dryer balls: the gentle tumbling and the balls break the clumps apart while the low heat dries them without harming the shell.
Drying a down sleeping bag step by step
 1Press the water out – never wring
After the machine, a low extra spin does this job. After hand washing, press the water out with flat hands or by rolling the bag in the empty tub. Twisting and wringing tears the baffles.
 2Into the dryer with 2–3 clean balls
Put the bag into a large dryer on the lowest heat setting the label allows, with two or three clean dryer balls or tennis balls.
 3Take it out, shake, break clumps
Every 30–60 minutes, take the bag out, shake it and gently pull remaining clumps apart with your fingers. Check the foot box and the edges of the baffles, where clumps hide longest.
 4Feels dry? Air it another day
Down often feels dry on the outside while the core is still damp. When no clumps are left and the loft is even, hang or lay it loose for another day before you store it.
| Bag | Tumble dryer, low heat | Air drying | Watch out for |
|---|---|---|---|
| Summer down bag | Often 2–3 hours | Several days | Small clumps in the foot box |
| Winter down bag | Often 3–5 hours or more | Up to a week | Damp core, smell if it dries too slowly |
| Synthetic bag | Often 1–2 hours | About a day | Too much heat |
Times depend heavily on the dryer, the spin, the amount of fill and room conditions. "Dry" means no clumps and even loft everywhere, not a set number of hours.
Air-drying a down bag
Without a dryer, lay the bag flat on a large drying rack or several chairs in a warm, airy room – never hang a soaking-wet down bag by one end, the weight can tear the baffles. Turn it and break up clumps by hand several times a day. It can take days, and a slow, cool drying risks mildew and lasting clumps. Many owners with no dryer at home therefore use a laundrette for the drying part only.
In the field
A bag that got damp on a trip dries best in wind and sun at midday, opened fully and turned inside out, and a little body heat at night can push some moisture out through a breathable shell. A truly soaked down bag will not dry outdoors in cool weather – which is why keeping it dry matters so much. If a soaked bag is all you have on a cold night, treat it as an emergency; see surviving an unplanned night outdoors and the warning signs in hypothermia first aid.
What not to do with a sleeping bag
A few common household habits do lasting damage to sleeping bags.

| Don't | Why | Do instead |
|---|---|---|
| Use fabric softener | It coats down clusters and fibres, so they loft less | Special down wash or mild detergent, extra rinse |
| Dry-clean it | Solvents can strip the natural oils from down and damage coatings | Machine or hand wash – dry cleaning only if the label explicitly allows it |
| Wring or twist it | Tears the thin internal baffle walls | Low spin, or press the water out |
| Use a top-loader with an agitator | The central post pulls and twists the bag | Large front-loader or laundrette |
| Tumble on high heat | Can melt the shell and damage synthetic fibres | Lowest heat the label allows, for longer |
| Dry it on a radiator, stove or by the fire | Local heat melts or scorches the shell | Airy room, dryer on low, wind and sun outdoors |
| Store it damp or compressed | Mildew, smell, lasting loss of loft | Dry completely, store loose |
How to restore loft in a sleeping bag
A flat sleeping bag is not necessarily a worn-out one. Often the fill is just compressed, damp or dirty. Work through these steps from the simplest to the most effort:
Bringing back the loft
- Shake and air Take it out of any sack, hold it by the foot and shake it out firmly, then let it lie loose for a few hours. Compressed fill often comes back on its own.
- Redistribute the fill Hold the bag up to a window or lamp: thin spots show as bright patches. Gently shake or massage fill from thick areas towards thin ones within each chamber.
- A short dryer cycle Twenty to thirty minutes in the dryer on low heat with dryer balls lofts a dry bag nicely and drives out residual moisture – useful after storage or a damp trip.
- Wash it If loft stays poor, oils and dirt are the likely cause. A proper wash with down wash and careful drying usually restores much of the loft.
- Accept the end Synthetic fill that stays flat after washing has lost its spring for good. For down, a specialist cleaner or repairer can sometimes top up lost fill.
A bag whose loft cannot be restored is colder than its label says. Use it as a summer bag or inside a warmer one, and check your night with the sleep calculator.
Small repairs: holes, leaking down and zips
Small damage grows quickly in a sleeping bag: a spark hole leaks a few feathers on the first night and many more after a week in the pack. Repair it as soon as you notice it. A small self-adhesive patch kit belongs in every field repair kit.
Holes and tears in the shell
Push any escaping down back into the hole from the outside with a pin or your fingernail. Never pull a feather out: the quill drags more down with it and makes the hole bigger. Clean and dry the area, cut a patch that overlaps the hole generously on all sides, round the corners so they do not peel, and press it on firmly. Warm hands help the adhesive bond. A longer tear can be closed with a few small stitches first and then patched. At home, a matching fabric patch sewn on by a specialist repairer is the permanent solution.
Zips
Most zip problems are snags: the fabric of the zip baffle caught in the slider. Do not force it. Ease the slider back the way it came while pulling the fabric gently out of its jaws. A slider that no longer closes the teeth is worn and needs replacing by a repair service – see zip and strap repairs.
Smells, mildew and mould: prevention and what to do
A musty smell is the warning sign of moisture that stayed too long. Down in particular can smell when it stays damp for days. Mildew starts the same way: damp fabric and fill, warmth and no airflow – classically a bag forgotten in its stuff sack after a rainy weekend.
Prevention
Unpack and dry the bag completely on the day you come home, even if it only feels a little damp – see drying gear at home after rain. Store it loose in a breathable sack in a dry room, and wash the liner after every trip.
If it smells
A light stale smell often disappears with a day of airing in a breeze and shade. If it does not, wash the bag as described above and, above all, dry it thoroughly – a smell that comes back after washing usually means it was not completely dry. Visible mildew spots on the shell can be treated with a wash; stains may remain. If the fill itself smells mouldy throughout after washing and full drying, it is usually time to replace the bag rather than keep sleeping in it. People with allergies or respiratory conditions should be especially cautious and, if in doubt, ask a doctor.
Renting or buying a used sleeping bag: hygiene
Renting or borrowing a sleeping bag is a sensible way to find out what you need before buying, as our borrowing and renting guide explains. Rental shops typically clean bags between hires; ask how they do it. Either way, sleep in your own liner – it keeps the bag cleaner for the next person and you more comfortable.
A second-hand bag can be excellent value if the fill is healthy. Do the loft test from our second-hand checklist: squeeze it flat and let go – it should spring back to full height. Look at the label, check zips and seams, hold it against the light for thin spots and smell it. A stale or musty smell, flat clumps or a broken zip are reasons to walk away. Give a healthy used bag one careful wash and full drying before its first night with you.
Make your sleeping bag last longer: the budget view
A sleeping bag is one of the most expensive items in a bushcraft kit and one you should not save on, as the budget gear guide puts it. Good care is the cheapest way to make that money last. A well-treated down bag can serve for many years, a synthetic bag for a good number of seasons, while a neglected bag of either type can lose much of its warmth far sooner.
Use the Kit Builder to plan a sleep system per season, add a tarp or tent that keeps rain and dew off, and in deep winter consider an over-quilt so that moisture freezes in the cheaper outer layer, as described in winter camping. The same patience that keeps a knife in shape – see tool care – keeps a sleeping bag warm. And if you are new to sleeping outside, start with bushcraft for beginners and a first overnight close to home.
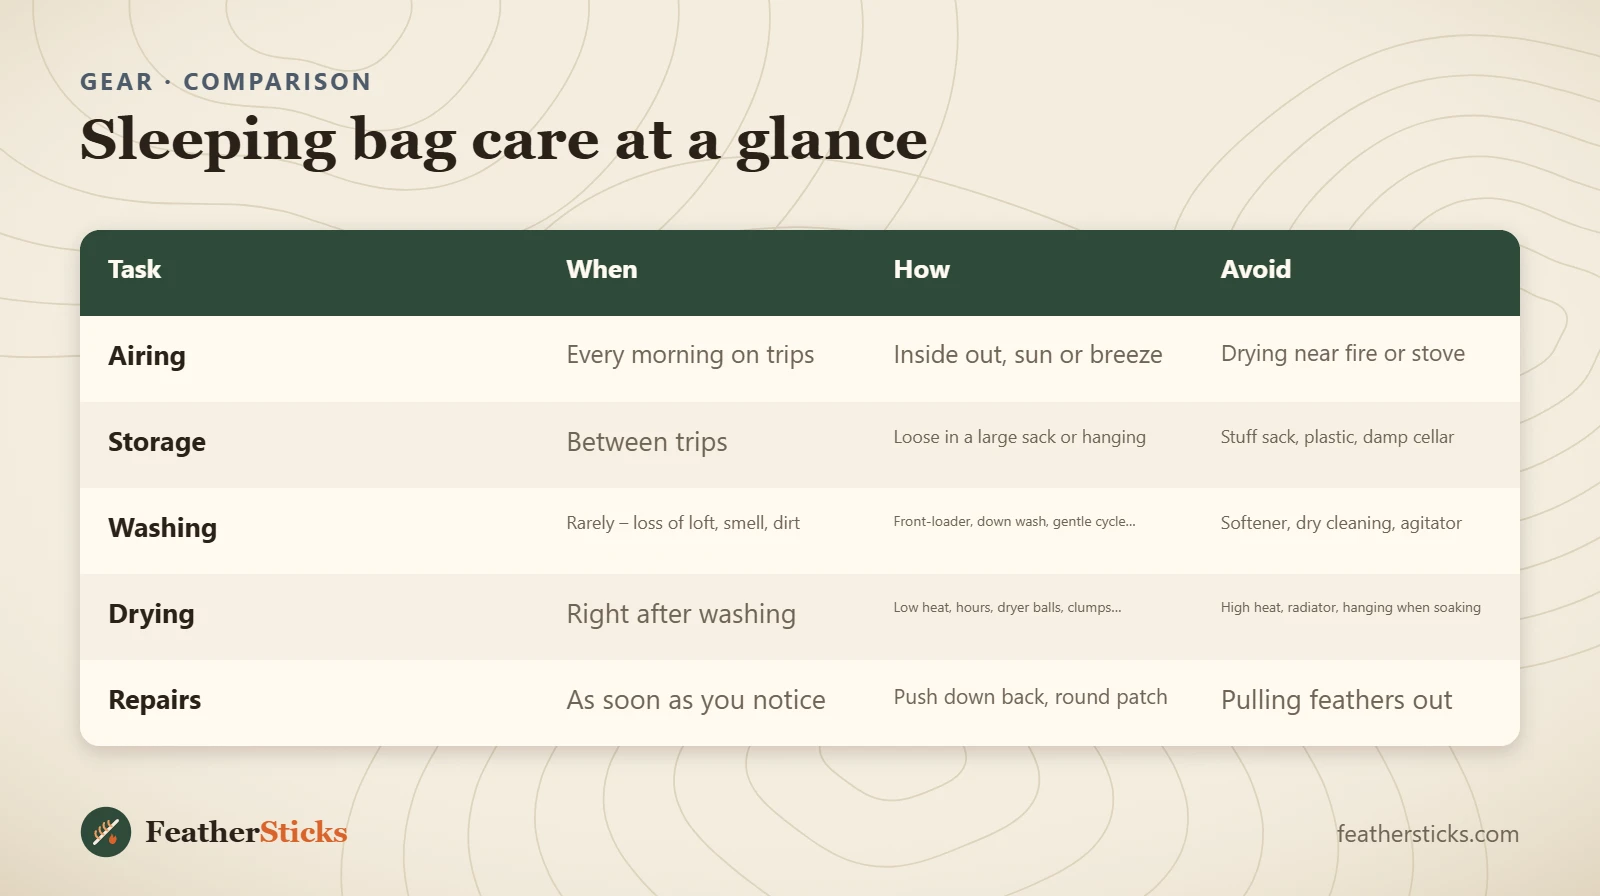
| Task | When | How | Avoid |
|---|---|---|---|
| Airing | Every morning on trips | Inside out, sun or breeze | Drying near fire or stove |
| Storage | Between trips | Loose in a large sack or hanging | Stuff sack, plastic, damp cellar |
| Washing | Rarely – loss of loft, smell, dirt | Front-loader, down wash, gentle cycle, extra rinse | Softener, dry cleaning, agitator |
| Drying | Right after washing | Low heat, hours, dryer balls, clumps checked | High heat, radiator, hanging when soaking |
| Repairs | As soon as you notice | Push down back, round patch | Pulling feathers out |
Common mistakes
- Storing the sleeping bag compressed in its stuff sack between trips.
- Leaving a damp bag packed for days after a trip.
- Washing too often – or with normal detergent and fabric softener.
- Using a top-loader with an agitator or wringing the bag out.
- Drying on high heat, on a radiator or close to the fire.
- Storing a bag that only feels dry on the outside.
- Pulling feathers out of a hole instead of pushing them back in.
What you need
- Sleeping bag liner (silk, synthetic or merino)
- Large cotton or mesh storage sack
- Waterproof dry bag or pack liner
- Special down wash or mild detergent for synthetics
- Two or three clean dryer balls or tennis balls
- Self-adhesive repair patches with rounded corners
- Light line or cord for airing in camp
FAQ
How do you wash a down sleeping bag?
How often should I wash my sleeping bag?
How should I store a sleeping bag?
Can I put a down sleeping bag in the dryer?
Is a sleeping bag liner worth it?
Can I use fabric softener or dry-clean a sleeping bag?
Why does my down sleeping bag smell after washing?
How do I dry a wet sleeping bag on a trip?
Check yourself
Completed6 quick questions from this guide. Nothing is sent anywhere.
Related step-by-step guides
-
 1
-
 1
-
 1