Refilling Water on the Trail: Where to Refill and What Is Safe
Knowing where to refill water hiking lets you carry less and drink more. In settled country such as Germany, the UK or the Alps, the best refills are rarely wild: public drinking fountains, mountain huts, cafés, churches and village taps often lie right on the route. The catch is that not every tap is drinking water, and a cold spring trough is not automatically safe.
This guide shows how to plan refill points on the map, what "drinking water" and "not drinking water" signs really mean, how to ask politely, how much to carry between sources and when to treat. For wild sources see how to find water in the wild; for everything else in the water chain, the complete water section.
Step by step
-
1

Plan refills on the map
Mark taps, huts, springs, villages and cafés along the route, note opening seasons and add a backup for every refill point.
-
2

Read the sign at every tap
"Drinking water" means a tested supply. "Not drinking water" means untested or not guaranteed: treat it like a wild source.
-
3

Ask at huts, farms and cafés
Ask politely before you use a tap that is not public. Most hosts help gladly; buying a drink or snack is a fair thank-you.
-
4

Carry enough to the next source
At 18 °C and moderate effort, plan about 1 L for 2 hours and 2 L for 4 hours, more in heat. Work out your figure with the water calculator.
-
5

Treat untested water
Springs, wells, troughs and streams can carry germs. Filter, disinfect or bring it to a rolling boil for 1 minute, 3 minutes from 2,000 m.
-
6

Keep containers clean
Never touch the spout with the bottle, keep raw and treated water in marked containers and cap bottles straight after filling.
Where to refill water hiking: plan before you go
Water is the heaviest thing you carry — one litre weighs one kilogram — so every reliable refill point on the route saves weight. Planning refills is part of planning a trip, just like daylight and campsites. Spend ten minutes with the map before you leave and you will know where you can top up, where you must carry, and how long the longest dry stretch is.
What to look for on the map
Hiking maps and outdoor map apps use slightly different symbols, but most show the same kinds of refill points. Check the legend of your own map — symbols vary by publisher and country.
- Drinking water taps and fountains: often a tap or water-drop symbol, usually in blue. In towns these are public drinking fountains; on long-distance trails, taps at shelters or trailheads.
- Springs: a small blue circle, often with a short tail. Springs are useful but usually untested — see below.
- Huts, inns and refuges: a house symbol. Staffed huts usually sell drinks and can fill bottles; unstaffed shelters rarely have taps.
- Villages, churches and cemeteries: every village is a potential refill — a café, a shop, a public fountain or a friendly front door.
- Campsites, sports grounds and car parks at trailheads sometimes have taps, often only in the season.
Apps that collect user reports can add recent notes — "tap switched off", "spring dry in August" — which are often more useful than the symbol itself. Treat them as hints, not guarantees: check the date of the last report and keep a backup. A phone that dies takes your plan with it, so carry a paper map or a screenshot and a charged power bank (power banks and batteries outdoors, navigation gear).
How to plan refill points
 1Mark every symbol
Go along the route and mark every tap, spring, hut, village, café and cemetery. Write the walking time between them next to the line — the hiking time calculator gives realistic figures.
 2Check recent notes
Look at recent reports in apps, trail forums or hut websites: seasonal taps, dry springs, closed huts. A note from last spring tells you little about late summer.
 3Plan a backup
For every refill, know the next one and carry enough to reach it if the first fails. If there is no backup, carry for the whole stretch.
| Refill point | Usually | Watch out for | Treat? |
|---|---|---|---|
| Public fountain marked "drinking water" | Tested mains or spring supply | Switched off in winter, sometimes in drought | No |
| Café, shop, inn, campsite | Mains tap water | Opening hours, rest days | No |
| Staffed mountain hut | Own spring or rainwater, sometimes mains | Huts often label taps "not drinking water" | Ask; if untested, yes |
| Cemetery or church tap | For flowers, often not drinking water | Stagnant pipes, wells, cisterns | Yes, unless signed as drinking water |
| Spring, well, trough | Untested | Grazing, farmland and paths above | Yes |
| Stream or lake | Untested | Everything upstream | Yes |
"Drinking water" vs "not drinking water": what the signs mean
Many taps outdoors carry a small sign. In Germany you will see "Trinkwasser" (drinking water) and "Kein Trinkwasser" (not drinking water); in the UK "drinking water" or "not drinking water"; in North America "potable" or "non-potable". Often there is only a pictogram: a tap with a glass, or the same symbol crossed out in red.
What "drinking water" means
A drinking-water sign means the operator supplies the water as drinking water — usually from the public mains or a supply that is monitored under drinking-water rules. You can fill up and drink without treatment. Two caveats: let the tap run for a few seconds first if it looks rarely used, and fill without touching the spout.
What "not drinking water" means
"Not drinking water" does not necessarily mean the water is contaminated. It means the operator does not guarantee drinking-water quality — usually because the water is not tested regularly, comes from a well, cistern or spring, or stands for long periods in old pipes. The water may be perfectly fine, or it may carry germs; you cannot tell by looking. Treat it exactly like water from a stream: filter, disinfect or boil.

| Sign | Where you see it | Meaning | What to do |
|---|---|---|---|
| "Trinkwasser" / "drinking water" / "potable" | Town fountains, campsites, huts | Supplied as drinking water | Drink; fill hygienically |
| "Kein Trinkwasser" / "not drinking water" / "non-potable" | Cemeteries, huts, beach showers, troughs | Not tested or not guaranteed | Treat like wild water |
| No sign at all | Old village pumps, troughs, garden taps | Unknown | Ask; if nobody knows, treat |
| Crossed-out tap pictogram | Toilets, car parks, trains, boats | Not drinking water | Treat or use another tap |
Public fountains, churches and cemetery taps
Villages and towns are the most reliable refill points in settled landscapes. If you want to know how to refill water when hiking in Germany, the short answer is: plan your route through villages, use public drinking fountains where they exist, ask in cafés and treat anything labelled "Kein Trinkwasser".
Public drinking fountains and refill initiatives
Many towns across Europe have installed public drinking fountains in squares, parks and station forecourts, and more are added each year. They are usually marked as drinking water and operate in the warm months; many are switched off in winter to protect them from frost, and some are paused in very dry periods. Refill initiatives go further: shops, cafés and public buildings that take part display a sticker in the window and fill your bottle with tap water free of charge. Look for these stickers in town centres and on refill maps.
Churches
Churches rarely have public taps, but parish halls, vicarages and the people around them often help when asked. Some village churches have a tap on the outside wall for the cemetery — that tap is usually not drinking water.
Cemetery taps
Almost every German village cemetery has a tap and watering cans for the graves, and hikers have long used them as refill points. Many of these taps are labelled "Kein Trinkwasser". Some are fed by wells or rainwater cisterns, others by mains pipes that stand still for days. Unless a sign says drinking water, treat cemetery water before drinking. Be respectful: fill quietly, do not wash, do not leave a puddle, and keep dogs on a lead.

Refill etiquette in villages
- Use public fountains and taps as intended — fill bottles, do not wash in them
- Ask before using a tap on private property or in a business
- Buy something in cafés and shops when you can
- Keep cemeteries and churchyards quiet and tidy
- Close taps fully and leave no puddles or rubbish
- Never use soap at fountains, troughs or springs
Asking at huts, farms and cafés
A friendly question is often the fastest way to clean water. Most people are happy to fill a bottle for a hiker; what matters is how you ask.
- Cafés, bakeries and inns: ask at the counter, ideally while buying something. Hand over clean bottles with the caps off. In Germany, "Könnten Sie mir bitte die Flasche mit Leitungswasser füllen?" ("Could you fill my bottle with tap water, please?") works everywhere.
- Staffed mountain huts: many huts in the Alps and low mountain ranges get water from their own spring or collect rainwater, and label their taps "kein Trinkwasser" because they cannot guarantee the quality. Ask the hut staff which tap is safe; some huts sell bottled water, tea or boiled water. Respect that water is scarce at many huts in dry summers.
- Farms: always ask before using a yard tap, trough or garden hose. Farm water may come from a private well that is not tested like the public supply, and garden hoses sit warm in the sun. If the farmer says "we drink it ourselves", that is reassuring but not a test result — when in doubt, treat.
- Campsites and sports grounds: ask at reception; most will let you fill bottles, some for a small fee.
Asking also gets you information: where the next spring is, whether the hut further up is open, or whether the stream below the pasture is used for cattle. Locals know more than any map.
Asking well vs asking badly
Good
- Ask first, then fill
- Clean bottles, caps off, ready to go
- Buy a drink or snack when you can
- Thank them and ask about the next source
Bad
- Helping yourself in a yard or garden
- Handing over a muddy bladder
- Washing at the tap or trough
- Arriving as a large group without warning
Is spring water safe to drink?
Spring water has filtered through soil and rock, so it is often clearer, colder and cleaner than stream water. But is spring water safe without treatment? Not reliably. Springs and wells in the countryside are usually untested, and shallow springs can be fed by surface water from just a few metres uphill. Grazing animals, deer, farmland, forest tracks and huts above a spring can all add germs or chemicals.
Many springs in German low mountain ranges are captured in stone troughs or pipes, sometimes with a bench and a name. Some carry a "Kein Trinkwasser" sign, others no sign at all. A spring that locals drink from may still cause problems for someone not used to it, and quality changes after heavy rain. Treat spring water by filtering, chemical disinfection or boiling — our guide to water purification methods compares the options.

Can I drink from this spring or well?
Is it signed as drinking water by an operator?
Yes → Drink it; fill hygienically.No → Treat it as untested — continue.Any pasture, farmland, track, hut or village above it, or a chemical smell?
Yes → Look for a better source; chemicals cannot be treated away.No → Continue.Is the water clear?
Yes → Filter, disinfect or boil it.No → Let it settle, prefilter through cloth, then boil or filter and disinfect.
Streams and lakes as backup sources
Streams are the backup when there is no tap. In hill country they are often plentiful, but in farmland most streams drain fields and pasture. Collect from fast, clear water above trails, bridges, huts and grazing; avoid water below roads, fields and settlements; and skip still, warm water with scum or algae. Our guide to finding water in the wild explains how to read terrain and choose the cleanest spot, and how to prefilter cloudy water with a DIY filter.
In rain, a tarp is a refill point too: 1 mm of rain on 1 m² gives about 1 litre — see collecting rainwater. Like stream water, rain run-off from a tarp should be treated.
How much water to carry between refills
How much you carry depends on the time to the next reliable source, the temperature and your effort. The water needs calculator works it out from your body weight, temperature, active hours, effort, altitude and the hours between sources, including a 20 % reserve. For a 75 kg adult with moderate effort at 18 °C, it gives the figures below; the same logic is explained in our guide to staying hydrated outdoors.
| Hours to next source | At 18 °C | At 28 °C |
|---|---|---|
| 2 h | ≈ 1 L | ≈ 1.5 L |
| 3 h | ≈ 1.5 L | ≈ 2 L |
| 4 h | ≈ 2 L | ≈ 2.5 L |
| 6 h | ≈ 3 L (incl. some cooking water) | ≈ 4 L (incl. some cooking water) |
Rules of thumb from the calculator; individual sweat rates vary a lot. Above a 4-hour gap the calculator adds part of your cooking water.
On the move, that is roughly 0.3 L per hour at 18 °C — a few good swallows every 20 minutes. Drink at the refill point itself: a "camel up" of half a litre before you leave a tap stretches what you carry. Then fill up and walk on with full bottles.
Capacity versus what you carry
Your capacity should cover the longest dry stretch of the trip, even if you rarely fill it. A typical setup is one or two 1 L bottles plus a collapsible 2–4 L bladder that weighs almost nothing when empty. In a well-watered landscape with taps every two hours, you may walk with only 1 L; before a long dry ridge or an evening camp without water, you fill everything. Our guide to water containers compares bottles, bladders and canteens.
Carry at once by gap and temperature (calculator, litres)
When in doubt, treat: boiling, filters and tablets
The rule is simple: tested tap water goes straight into the bottle; everything else gets treated. That includes "not drinking water" taps, springs, wells, troughs, farm hoses of unknown origin, streams and rain off a tarp.
- Boiling is the most reliable method against all germs. Bring the water to a rolling boil — big bubbles across the whole surface — and keep it there for 1 minute; from 2,000 m, 3 minutes. The boiling point and fuel calculator shows how much gas or wood that takes.
- Filters (hollow-fibre, ceramic) remove bacteria and protozoa and are fast at a tap or trough. Standard filters do not reliably remove viruses — near villages and huts, add chemical disinfection or boil.
- Chemical disinfection (chlorine dioxide, chlorine) is light and works against viruses; follow the contact time on the pack, and longer in cold water.
Clear tap water marked "not drinking water" is easy to treat: there is no mud to clog a filter, so filtering plus tablets or a short boil is enough. Cloudy water needs settling and prefiltering first.
How to boil untested water
 1Prefilter if cloudy
Let cloudy water settle, then pour the clearer top through a bandana or cloth into the pot. This removes silt, not germs.
 2Bring to a rolling boil
Heat until big bubbles rise across the whole surface and stirring does not stop them. A few small bubbles at the bottom are not enough.
 3Time it
Keep the rolling boil for 1 minute, or 3 minutes from 2,000 m where water boils at a lower temperature. Start timing when the boil is rolling.
 4Cool covered, fill clean
Let the water cool with the lid on, then pour it into a clean bottle marked for treated water. Do not refill it from a raw container.
| Source | Good choice | Why |
|---|---|---|
| "Not drinking water" tap, clear | Filter + tablets, or boil | Clear water, unknown germs |
| Spring or trough, remote | Filter or tablets | Mostly bacteria and protozoa |
| Spring below huts, villages, grazing | Boil, or filter + chemical | Viruses possible |
| Stream after rain, cloudy | Settle, prefilter, boil | Silt clogs filters and shields germs |
| Rain from a tarp | Boil or tablets | Droppings and dirt on the fabric |
Containers and hygiene at the tap
Clean water can be spoiled in seconds by a dirty bottle. Most stomach trouble on the trail comes not from the source but from hands, mouths and containers — see our guide to hygiene outdoors.
Filling a bottle cleanly at a tap
 1Read the sign first
Check whether the tap is drinking water. If there is no sign, ask; if nobody knows, fill a container marked for raw water and treat it.
 2Let it run
Let a rarely used tap run for a few seconds so the water that stood in the pipe flows away. Catch it in a can for the flowers rather than wasting it if you can.
 3Keep a gap
Hold the bottle under the spout without touching it. Spouts are touched by many hands and dog noses; your bottle mouth touches your lips.
 4Cap it and keep raw and clean apart
Close the bottle straight away. Keep raw water in a container with a red mark and treated water in one with a blue mark, and never pour between them.
Container tips
- Wide-mouth bottles fill faster under a weak tap or trough spout; narrow-neck bottles are easier to drink from on the move.
- Mark dirty and clean: coloured tape or a cord on the cap. With a squeeze filter, the dirty bag is always raw water.
- Clean bottles at home after every trip and dry them open. On longer trips, rinse with treated water and let them air out at camp.
- Carry one boil-safe metal bottle or pot so you can treat water even when the filter fails or freezes.
All of this is covered in depth in our guide to water containers. At camp, keep the water station away from washing and the camp kitchen dishes, and do your washing at least 60 m from any spring or stream.
Refilling in winter and in hot weather
Winter
Winter changes the refill map. Public fountains, cemetery taps and campsite taps are often drained to protect them from frost, many huts close outside the season, and springs may freeze or lie under snow. Assume seasonal taps are off and carry more, or plan to melt snow — our guide to water from snow and ice covers technique and fuel. Keep the water you have liquid: bottles upside down in the pack, in insulated sleeves and in the sleeping bag at night (keeping water from freezing). Thirst is weak in the cold, so drink on a schedule.
Hot weather
In heat, refill at every opportunity, even with half-full bottles, and drink at the tap before you leave. The calculator figure rises quickly: a 4-hour gap that needs about 2 L at 18 °C needs about 2.5 L at 28 °C. Above about 28 °C add electrolytes, walk in the cool morning and evening and rest in the shade at midday. Small streams and springs shown on the map may be dry in late summer, and some towns pause fountains in drought. Our guide to hiking in the heat explains heat illness and how to prevent it. Children and dogs dehydrate faster — offer water at every stop (bushcraft with kids, hiking with dogs).
Winter vs summer refills
Winter
- Fountains and cemetery taps often off
- Many huts closed
- Springs frozen or snowed in
- Carry more, melt snow, insulate bottles
Hot summer
- Higher need per hour
- Seasonal streams and springs dry
- Fountains may pause in drought
- Refill at every tap, add electrolytes
Coastal and brackish water: not drinkable
At the coast you are surrounded by water you cannot drink. Seawater and the brackish water of estuaries, lagoons and tidal creeks contain salt that makes your kidneys lose more water than you take in. Filters, tablets and boiling do not remove salt — only distillation does, and that is not a practical way to fill bottles. The lower reaches of coastal streams can be brackish at high tide too; if you must use a stream, collect well above the tidal reach and treat it.
Plan fresh-water refills before a coastal walk: harbours, campsites, cafés, beach kiosks and public toilets with drinking-water taps. Beach and foot showers are often labelled "not drinking water". Our guide to camping at the coast covers tides, wind and where to pitch.

Rules, water protection and leaving no trace
Taking a few litres to drink is tolerated almost everywhere, but springs feed village supplies, troughs belong to someone and drinking-water protection zones exist for a reason. In protection zones, near captured springs and at troughs, do not wash, camp, use soap or leave toilet waste. Camp, wash and dig latrines at least 60 m from any water. Rules differ by country and region — and in Germany by Bundesland — so check local signs; this is no legal advice. For where you may sleep near water, see wild camping rules, and for the wider principles, leave no trace in practice.
Refill planning is one of the quiet skills in our bushcraft for beginners guide: nothing dramatic, but it decides whether you walk with 4 kg of water or 1 kg, and whether you reach camp tired or thirsty.
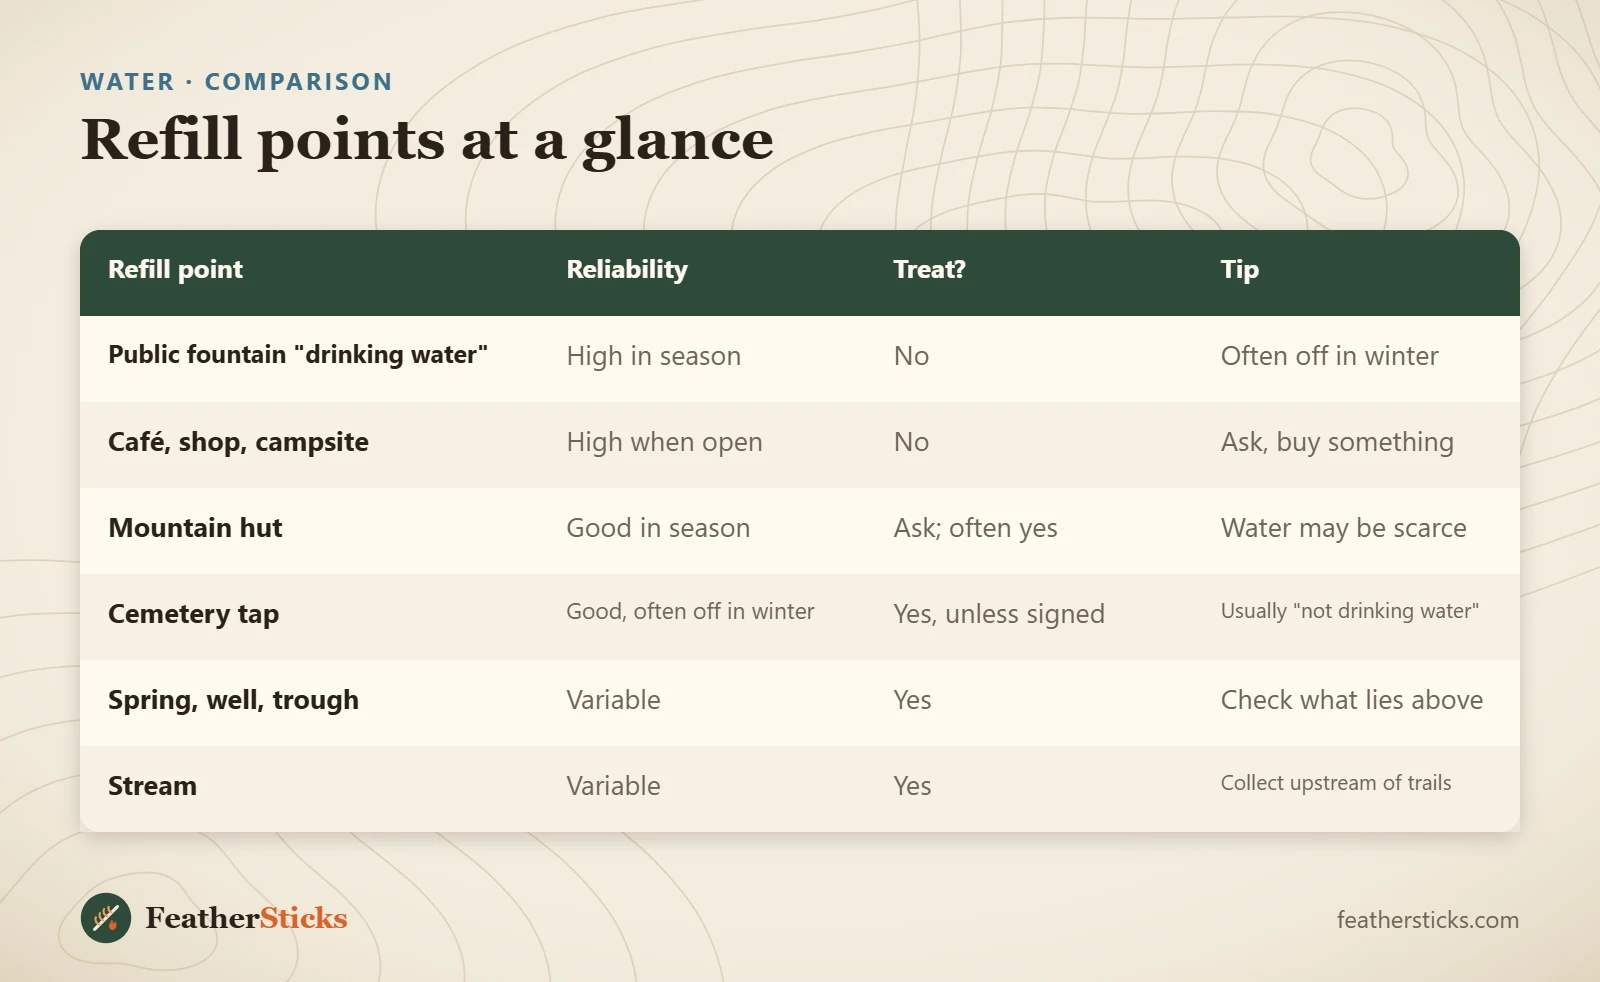
| Refill point | Reliability | Treat? | Tip |
|---|---|---|---|
| Public fountain "drinking water" | High in season | No | Often off in winter |
| Café, shop, campsite | High when open | No | Ask, buy something |
| Mountain hut | Good in season | Ask; often yes | Water may be scarce |
| Cemetery tap | Good, often off in winter | Yes, unless signed | Usually "not drinking water" |
| Spring, well, trough | Variable | Yes | Check what lies above |
| Stream | Variable | Yes | Collect upstream of trails |
Common mistakes
- Assuming "not drinking water" means poisonous — or ignoring it and drinking untreated.
- Trusting a cold, clear spring without treatment.
- Relying on a single tap or spring without a backup.
- Planning on seasonal fountains and huts in winter.
- Touching the tap spout with the bottle mouth.
- Mixing raw and treated water in the same container.
- Trying to filter or boil seawater or brackish water.
What you need
- Two 1 L bottles, at least one wide-mouth
- Collapsible 2–4 L water bladder
- Water filter and purification tablets as backup
- Metal pot or single-wall steel bottle for boiling
- Coloured tape to mark raw and treated containers
- Map with refill points marked, phone and power bank
FAQ
Where can I refill water when hiking?
What does "Kein Trinkwasser" mean?
Is spring water safe to drink without treatment?
Can I drink water from a cemetery tap?
How much water should I carry between refills?
Do I need to treat tap water in mountain huts?
How long do I boil water from an untested source?
Check yourself
Completed6 quick questions from this guide. Nothing is sent anywhere.
Related step-by-step guides
-
 1
-
 1
-
 1