Water Filter Care: How to Backflush, Clean, Dry and Store Your Filter
To backflush a water filter, you push clean, already treated water backwards through the clean-side outlet with the syringe or cleaning device that came with it, so the dirt trapped in the pores leaves through the dirty-side inlet and the flow recovers. That one habit, plus prefiltering muddy water, keeping the filter from freezing and drying it properly after the trip, decides whether a filter lasts a season or many years.
This guide covers care for hollow-fibre squeeze and gravity filters, ceramic and pump filters and activated-carbon stages: why flow slows, how to clean each type, how to check whether a filter still protects you, and when to replace it. Always follow your manufacturer’s instructions first. For choosing a filter, see how to filter water outdoors; for all treatment options, our water hub.
Step by step
-
1

Prefilter dirty water
Let muddy water settle for 30 minutes or more and pour it through a cloth before filtering. Less silt means a faster, longer-lived filter.
-
2

Backflush when flow slows
Push clean, treated water backwards through the clean outlet with the supplied syringe, two or three times, until the flow recovers.
-
3

Scrub ceramic, replace carbon
Scrub a ceramic element gently with the supplied pad and check it with the gauge. Carbon stages cannot be cleaned – replace them at their rated life.
-
4

Never let it freeze
Near or below 0 °C, carry the filter in a zip bag in an inner pocket and take it into your sleeping bag at night. If it froze wet, do not trust it.
-
5

Dry and store after the trip
Backflush, disinfect only if the manual says so, dry pouches open and store everything frost-free and crush-proof.
-
6

Check it before every trip
Do a test run with tap water, check flow, seals and pouches, and pack a backup treatment method.
Why water filter care matters
A mechanical water filter is a sieve with pores so small that protozoa such as Giardia and Cryptosporidium and almost all bacteria stay behind – typically 0.1–0.2 µm for hollow-fibre filters. Everything it catches stays in the element: silt, algae, organic slime and the germs themselves. Care has two jobs: keep the pores open so the water keeps flowing, and keep the element intact so the pores stay small enough to protect you.
It helps to remember what a standard filter does not do, because no amount of cleaning changes it. Viruses (about 0.02–0.1 µm) pass through ordinary microfilters, and dissolved chemicals pass through every one of them. Only products tested as purifiers deal with viruses. Where viruses are likely – near huts, villages, pasture or when travelling in countries with poor sanitation – add chlorine dioxide or boil the water. A clean filter is a reliable filter, but it is still only a filter.
The care routine depends on the element inside. Most outdoor filters use one of three:

| Element | Found in | How it is cleaned | Main enemies |
|---|---|---|---|
| Hollow fibre | Squeeze, inline, gravity, many pumps and straws | Backflushing with clean water | Freezing, silt, being dropped, drying out (some models) |
| Ceramic | Pumps, some gravity and bottle systems | Scrubbing off the outer layer; gauge shows wear | Impact, frost, oily or very silty water |
| Activated carbon stage | Combined with ceramic or fibre, some bottles | Not cleanable – replaced | Reaching rated capacity, storing it wet |
| Prefilter (foam, mesh) | Pump intakes, some gravity bags | Rinsed out in raw water | Tearing, being left off |
Care is a small part of the bigger skill of making water safe, which belongs to the core of bushcraft for beginners. The good news: the whole routine takes a few minutes a day on trips and an hour of drying at home.
Why does my water filter get slow?
A slow filter is almost always a clogged filter. Every litre leaves particles on the dirty side of the element. Coarse grains collect as a loose layer, while fine clay, glacial rock flour and organic slime lodge in or on the pores themselves. The result is the same: the open area shrinks and you need more pressure for less water.
As a rule of thumb, a fresh squeeze filter fills a litre bottle in about a minute with firm, steady pressure. When the same litre takes two or three times as long, it is time to clean the element – not to squeeze harder. Hard squeezing bursts pouch seams and strains the housing, and it does not clear the pores.

| Symptom | Likely cause | What to do |
|---|---|---|
| Flow gets slower day by day | Normal loading with sediment | Backflush or scrub; settle and prefilter the next batches |
| Flow drops sharply after one muddy source | Fine clay or rock flour | Backflush several times; prefilter that kind of water from now on |
| Flow stays slow after cleaning | Pores clogged for good or element worn out | Replace the cartridge; use boiling or tablets meanwhile |
| Flow suddenly faster than new | Fibres cracked by frost or impact | Treat as broken – stop using it and replace it |
| Gravity filter slows as the bag empties | Less water pressure, not dirt | Hang the bag higher before you blame the filter |
| Pump gets hard to push | Ceramic or fibre loaded, intake prefilter blocked | Rinse the intake, clean the element as the manual says |
Cold water also flows more slowly, because it is more viscous, so a filter seems sluggish on a frosty morning even when it is clean. That is a reminder to check for frost damage rather than a reason to clean – more on that in the frost section below.
Prefiltering: the best care happens before the filter
Every grain of silt that never reaches the element is a grain you never have to backflush out. Prefiltering is the cheapest way to extend filter life, and it also makes every other treatment work better, because cloudy water shields germs from UV and uses up chemical disinfectants.
- Collect well: fill your dirty pouch from the clearest spot of flowing water, below the surface but off the bottom. See finding water for choosing sources.
- Settle: let muddy water stand in a pot or bag for 30 minutes or longer, then pour off the clear top.
- Cloth: pour through a bandana, a buff folded several times or a coffee filter into the dirty pouch. This is a pre-filter, not a treatment.
- Intake screen: keep the foam or mesh prefilter on a pump intake, and keep it off the bottom.
- Very dirty water: an improvised sand-and-charcoal filter can clear it first – see our DIY water filter guide. It clears water but does not make it safe.
Routine for cloudy water
- CollectCalmest, clearest spot – not the bottom.
- Settle30 min or longer, then pour off the top.
- ClothBandana or coffee filter into the dirty pouch.
- FilterInto a clean, marked bottle.
Glacier streams, flooded rivers and water from puddles are the classic filter killers. If that is all you have, consider boiling instead and save the filter for clear water. The water needs calculator helps you plan how much you really need to treat per day.
How to backflush a water filter step by step
Backflushing reverses the flow: clean water goes in through the clean-side outlet, lifts the dirt layer off the fibres and carries it out of the dirty-side inlet. Most squeeze and inline filters come with a plastic syringe; some gravity systems use a cleaning coupling, a plunger or the clean bag itself, which you squeeze or raise to push water back. Use exactly the device and method your manufacturer describes – some housings and fibres have pressure limits.
Backflushing a hollow-fibre filter
 1Clean water only
Fill the syringe with water that is already filtered or otherwise treated, from your clean bottle. Raw water would push dirt and germs straight onto the clean side of the fibres.
 2Onto the clean outlet
Press the syringe firmly onto the clean-side outlet (the end you drink or pour from). The dirty inlet is the end that screws onto the pouch.
 3Push firmly
Hold the filter in one hand and push the plunger with the other in one strong, steady stroke. Brown water and flakes come out of the inlet – that is the dirt leaving.
 4Repeat, then discard
Two or three pushes usually restore much of the flow; repeat until it runs clear. Let the dirty water drain onto the ground, away from your clean bottles and the spot where you collect.
 5Test the flow
Filter a litre and time it. If it is back near the original speed, you are done. If it stays slow after several rounds, the filter is clogged for good – replace it.
Good habits around backflushing
- Do it early: backflush when the flow has slowed noticeably, not when it has stopped. A thin dirt layer comes off far more easily than a compacted one.
- On long trips: backflush at least every few days, and every evening with silty water.
- Keep the syringe clean: it touches the clean outlet, so it belongs with the clean gear. Never fill it from the stream.
- Do not improvise pressure: no blowing through the outlet with your mouth, no tap-hose pressure unless the manual allows it.
- Some filters can be shaken or tapped out as well – again, only where the maker describes it.
Cleaning ceramic filters and replacing carbon stages
Ceramic elements work differently from hollow fibre. Dirt collects on the outer surface of a thick porous wall, and you remove it by scrubbing off a very thin layer – the element literally gets smaller with every cleaning. That makes ceramic filters robust and long-lived, but only until the wall gets too thin. Most come with a scrubbing pad and a gauge for exactly this purpose.
Cleaning a ceramic element
 1Recognise the signs
A brown or greenish film on the element and a pump that gets hard to push tell you it is time. Take the element out as the manual shows, with clean hands.
 2Scrub gently with treated water
Rinse with treated water and rub with the supplied pad in light strokes, all round, until the original colour shows. Do not touch the clean outlet or the inside, and never use soap or a wire brush.
 3Check the wall
Slide the gauge over the element. If it fits over the wall, the ceramic has become too thin to protect reliably and must be replaced.
 4Dry fully and handle with care
Let the element air-dry completely before storage, standing on its cap. A ceramic element that was dropped hard can have hairline cracks – treat it as compromised.
Activated carbon: it expires
Many ceramic and some fibre filters have an activated-carbon stage that improves taste and smell and reduces some organic chemicals and chlorine. Carbon works by adsorption: molecules stick to its enormous inner surface until that surface is full. You cannot wash or backflush it clean. Once its rated capacity in litres or months is reached, it simply stops working – usually without any visible sign. Replace it as the maker specifies, and note the date or volume when you fit a new one.
Carbon is also not a germ barrier, and a wet carbon block stored for weeks can become a breeding ground for bacteria. Dry it as instructed or store the filter in the way the manual describes. If the water starts tasting stale or of chlorine again, the carbon is spent.
Ceramic vs hollow fibre care
Ceramic
- Scrubbed with a pad
- Gets thinner with every cleaning
- Gauge shows end of life
- Cracks from impact and frost
Hollow fibre
- Backflushed with clean water
- Pores can clog permanently
- End of life: flow does not recover
- Cracks from frost and impact, invisibly
Pumps, gravity bags, hoses and pouches
The element is only part of the system. Many filter failures in the field come from the parts around it: a pouch seam that bursts, a cracked hose, a missing O-ring, a pump valve that sticks.
- Pouches and dirty bags: roll them up from the far end when squeezing, never wring them. Rinse after the trip and dry them open. A spare pouch weighs little.
- Hoses: keep the dirty intake hose and the clean outlet hose apart and capped. Colour-code them if they look alike.
- O-rings and seals: check that they sit straight and are not cracked. Some pumps need occasional lubrication of seals with the grease the maker specifies – use only that.
- Pump valves: if a pump loses suction, the valve or intake screen is often blocked. Clean it as the manual shows.
- Threads: screw on straight and hand-tight; cross-threading damages the seal and lets raw water reach the outlet.
Quick system check on trips
- Pouch or dirty bag free of leaks at seams and thread
- O-rings present and seated
- Hoses capped, dirty and clean side clearly marked
- Intake prefilter on and clean (pumps)
- Syringe or cleaning device packed with the clean gear
- Clean bottle marked and never dipped into the source
A small repair kit with spare O-rings and a strip of tape covers most field repairs, and a spare pouch or a sturdy bottle that fits the thread replaces a burst bag. Pack the filter where it cannot be crushed – the lid pocket or a side pocket inside a hard bottle works well, and a dry bag keeps the dirty pouch away from your food.
Dirty side vs clean side: avoiding contamination
Every filter has a dirty side and a clean side, and good care keeps them strictly apart. A single drop of raw water on the clean outlet, the clean bottle’s thread or your cup undoes the whole filtering. This is the most common way a perfectly working filter still makes people ill.

- Mark dirty and clean containers clearly with tape or colour and never swap them.
- Cap the clean outlet whenever the filter is not in use, and never let it touch the pouch, the ground or the stream.
- Do not dip the clean bottle into the source “just to rinse it”.
- Wash or sanitise your hands after filling the dirty pouch and before handling clean bottles – see outdoor hygiene.
- When backflushing, the clean water goes in at the clean outlet; that is the only time anything is pushed into it, and only clean water.
Our guide to water containers shows bottle systems that make this easy, and refilling water on the trail covers routines at taps and huts.
Is my water filter still working? Testing integrity
Flow tells you whether a filter is clean, not whether it is intact. A cracked fibre bundle can flow faster than ever while letting bacteria and protozoa straight through. You cannot see germs, so judge integrity by what has happened to the filter and by the test your maker provides.
- Follow the maker’s test: some models come with a described integrity check – for example an air or pressure test, or an indicator. Do exactly what the manual says and nothing more.
- No test available: for many filters there is no reliable field test. Then the history decides: if it may have frozen wet, was dropped hard or shows cracks, treat it as damaged.
- Warning signs: cloudy output, a flow suddenly faster than new, cracks in the housing, leaks between inlet and outlet.
Can I still trust this filter?
Could it have frozen while wet, or was it dropped hard on rock?
Yes → Treat it as damaged. Switch to boiling or chemical treatment and replace the filter.No → Continue.Is the output cloudy, or is the flow suddenly faster than new?
Yes → Stop using it – the water is not reliably filtered.No → Continue.Does your manual describe an integrity test?
Yes → Do it exactly as described and follow the result.No → Check housing, seals and history; when in doubt, use a backup method.
Water filter freezing: why frost is the biggest threat
A wet hollow-fibre filter always holds some water, even after you shake it out. When that water freezes, it expands and can crack the fibre walls, creating openings far larger than the rated pore size. The filter looks normal and may even flow faster – but it no longer stops bacteria and protozoa. Most manufacturers say a hollow-fibre filter that may have frozen when wet can no longer be trusted, and there is often no reliable way to check it in the field. Ceramic elements can crack from frost too.
Frost routine for water filters
- Shake out loose water After use, shake or blow out as much water as the manual allows. Less water means less ice – but it does not make the filter frost-proof.
- By day: inner pocket Put the filter in a zip bag and carry it in an inner jacket pocket, close to your body. A pack lid or hip-belt pocket is not warm enough in frost.
- At night: sleeping bag On any night near or below 0 °C, the filter goes into your sleeping bag in its zip bag. See the sleeping gear guide for a warm system.
- Mind the forgotten moments An unheated car on the way to the trailhead, a tent porch while you cook, a cold shed at home, a parcel in winter post. All of them can freeze a wet filter.
- Might have frozen? Replace it Do not gamble. Switch to boiling or tablets until you have a new filter.
In hard frost, many winter campers leave the filter at home and rely on the stove: you heat water anyway to melt snow, and a rolling boil is unaffected by cold. Chemical tablets work in the cold but need longer contact times. Our guide to keeping water from freezing covers bottles, bladders and filters in detail, and winter camping the rest of the cold-weather system.
How to store a water filter after a trip
A filter put away wet and dirty in a stuff sack can grow mould and bacteria in the housing, the pouch and the hoses – and in the worst case it freezes in the garage over winter. Ten minutes of care after every trip prevents both. The details differ more between models here than anywhere else: some hollow-fibre filters must be dried completely, some must never dry out once used, some makers recommend a disinfection run before long storage. Read the manual and follow it.
After the trip: clean, dry, store
 1Final backflush
At home, backflush thoroughly with clean tap water until it runs clear. Rinse the dirty pouch, bag and hoses too.
 2Disinfect only as instructed
Some makers recommend running a weak disinfectant solution through the filter before long storage. Use their method and concentration only – the wrong chemical can damage fibres and seals.
 3Dry bags and pouches
Hang pouches and gravity bags open, upside down, somewhere airy and shaded until completely dry. Dry the filter itself only if and as the manual says.
 4Store frost-free and crush-proof
Keep it indoors in a box or bag where it cannot freeze or be crushed – not in the car, shed, garage or attic, where frost and heat both do damage.
| Do | Don’t |
|---|---|
| Backflush and rinse before storing | Pack it away dirty after the last stream |
| Follow the manual on wet or dry storage | Assume all filters should be dried |
| Dry pouches and bags open, in the shade | Leave them rolled up wet in a stuff sack |
| Store indoors, frost-free and away from heat | Leave it in the car or an unheated shed |
| Note date and litres for carbon stages | Guess how old the carbon is |
| Keep the manual with the filter | Lose the instructions for an expensive filter |
Many makers also warn against boiling, microwaving or heating a hollow-fibre filter, and against cleaning it with soap or other chemicals not listed in the manual. If your filter smells musty after storage, backflush it and follow the maker’s cleaning instructions; if in doubt, replace it. The same post-trip routine as for sleeping bag care or knife and axe care keeps your whole kit ready.
When is a water filter worn out?
Manufacturers rate filters for a certain number of litres, from a few hundred to many thousands depending on the type. Real life depends on how dirty the water was and how well you cared for it. These signs mean the end, whatever the rating says:
| Element | Replace when… |
|---|---|
| Hollow fibre | Flow does not recover after repeated backflushing; it may have frozen wet; it was dropped hard; housing cracked |
| Ceramic | The gauge fits over the wall; visible cracks; dropped hard or frozen wet |
| Carbon stage | Rated litres or months reached; taste and smell no longer improve |
| Any filter | Cloudy output; flow suddenly faster than new; leaks between dirty and clean side |
| Pouches, hoses, seals | Leaking seams, cracked hoses, brittle or flattened O-rings |
Keep a note with the filter – date of purchase, rough litres per trip, carbon changes. It takes seconds and turns a guess into a decision. Worn-out cartridges and housings go into household waste or recycling according to local rules.
Your backup plan: what if the filter fails?
Filters fail at the worst moment: a pouch bursts, a cold night catches you out, or the cartridge clogs in a silty valley. Care reduces the risk; a backup removes it. Never rely on a filter as your only way to make water safe.
A sensible backup set
- Day hikes
- A few chlorine dioxide tablets
- Overnight and weekend
- Tablets for every day out + spare pouch
- Long trips
- Tablets + stove and pot, or a spare cartridge
- Winter
- Stove and pot as main method, filter optional
- Groups
- Backup for the whole group, not one person
Boiling needs fuel; the boiling point and fuel calculator estimates how much. Tablets are light but need their full contact time, and longer in cold or cloudy water. Add your backup to your bushcraft kit list or build a weighted list with the Kit Builder, and plan water points with trip planning. If you ever drank untreated water by accident, see hydration for drinking enough and our first aid kit guide for oral rehydration salts.
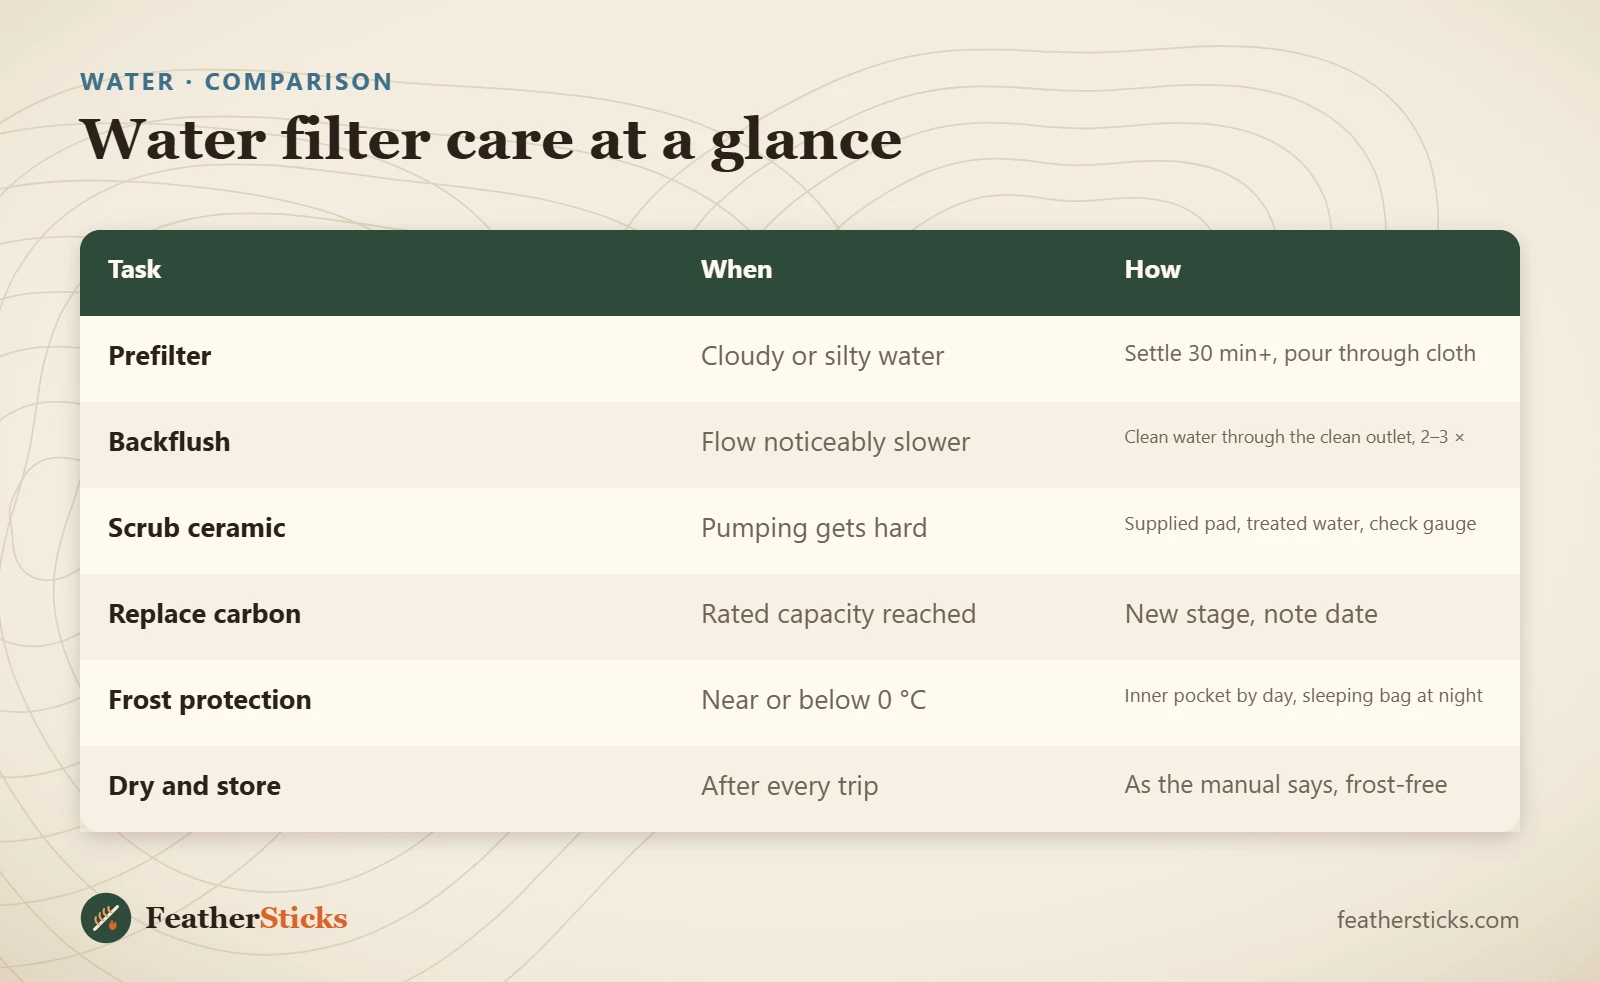
| Task | When | How |
|---|---|---|
| Prefilter | Cloudy or silty water | Settle 30 min+, pour through cloth |
| Backflush | Flow noticeably slower | Clean water through the clean outlet, 2–3 × |
| Scrub ceramic | Pumping gets hard | Supplied pad, treated water, check gauge |
| Replace carbon | Rated capacity reached | New stage, note date |
| Frost protection | Near or below 0 °C | Inner pocket by day, sleeping bag at night |
| Dry and store | After every trip | As the manual says, frost-free |
Common mistakes
- Backflushing with raw, untreated water.
- Squeezing harder instead of backflushing a slow filter.
- Letting a wet hollow-fibre filter freeze in the pack, tent porch or car.
- Storing the filter wet and dirty in a stuff sack.
- Drying or wet-storing against the manufacturer’s instructions.
- Expecting a clean filter to remove viruses or chemicals.
- Carrying no backup treatment.
What you need
- The filter’s own syringe or cleaning device
- Scrubbing pad and gauge (ceramic filters)
- Spare pouch and O-rings
- Bandana or coffee filters for prefiltering
- Zip bag for frost protection
- Chlorine dioxide tablets as backup
- The manufacturer’s manual
FAQ
How often should I backflush my water filter?
Can I backflush with stream water?
What happens if my water filter freezes?
How do I store a water filter for the winter?
Should I let my water filter dry out?
Can I clean a water filter with bleach or soap?
How do I know when to replace my water filter?
Check yourself
Completed6 quick questions from this guide. Nothing is sent anywhere.
Related step-by-step guides
-
 1
-
 1
-
 1