How to Keep Water from Freezing When Camping in Winter
To keep water from freezing when camping in winter, carry wide-mouth bottles upside down in insulated sleeves, fill them with warm water before you set off, keep your water filter close to your body day and night, and take a warm, tightly closed bottle into your sleeping bag. Water freezes first at the neck and cap — exactly where you need it to come out — so a few small habits decide whether you drink or chip ice.
This guide explains why bottles freeze where they do, how insulation, vacuum flasks and snow help, how to stop bladder tubes and water filters from freezing, and how to store water overnight. It is part of our water section and builds on water containers, water from snow and winter camping.
Step by step
-
1

Carry bottles upside down
Ice forms at the top of the water. With the cap down, the lid end freezes last. Use wide-mouth bottles in insulated sleeves.
-
2

Start the day with warm water
Fill bottles with warm water in the morning and carry a vacuum flask with a hot drink. Warm water takes far longer to freeze.
-
3

Keep the filter warm
Frost can destroy hollow-fibre filters invisibly. Carry the filter in a zip bag in an inner pocket by day and in your sleeping bag at night.
-
4

Blow water back out of the tube
After each sip, blow the water in a bladder tube back into the bladder. In deep cold, leave the bladder at home and use bottles.
-
5

Warm bottle in the sleeping bag
Fill a suitable bottle with hot, not boiling, water, close it tightly, put it in a sock and take it into your sleeping bag.
-
6

Stay off ice you cannot judge
Never walk onto lake or stream ice to fetch water unless it is certainly safe. In doubt, stay on shore and melt snow instead.
Why water bottles freeze at the neck and cap first
A bottle rarely freezes solid all at once. It starts where heat escapes fastest and where the smallest amount of water sits. Three things work together at the top of an upright bottle:
- Ice floats. Water is densest at about 4 °C. As the bottle cools, the coldest water and the first ice crystals rise and collect at the surface, so a layer of ice grows from the top down.
- Little water, lots of surface. The neck, the thread and the inside of the cap hold only a thin film of water but are surrounded by cold air and thin plastic or metal. That film freezes in minutes and glues the cap shut.
- The air pocket is cold. The air above the water is a poor heat store and lets the surface cool quickly.
The result is familiar to anyone who has hiked in frost: the bottle still sloshes, but the cap will not turn, or a plug of ice blocks the mouth. Narrow-necked bottles suffer most, because a few millimetres of ice close them completely. The bottom of the bottle, where most of the water is, is usually still liquid at that point.

How fast this happens depends on air temperature, wind, how warm the water was, the bottle material and how it is carried. A single-wall steel bottle in a side pocket in wind can grow an ice crust within an hour or two in hard frost; the same water inside your pack, wrapped in a fleece, may stay liquid all day. There is no fixed time — what matters is that you slow every one of those heat losses.
| Factor | Freezes faster | Freezes slower |
|---|---|---|
| Position | Upright, cap at the top | Upside down, cap at the bottom |
| Opening | Narrow neck, sports cap, valve | Wide mouth, simple screw cap |
| Insulation | Bare bottle in an outside pocket | Insulated sleeve, inside the pack or jacket |
| Start temperature | Cold water straight from a stream | Warm water from the stove |
| Wind | Exposed on the outside of the pack | Sheltered in the pack, wrapped in clothing |
| Volume | Small or half-empty bottle | Full, larger bottle |
Carrying bottles upside down — and which bottles work best
The simplest trick costs nothing: turn the bottle upside down. Ice still forms at the top of the water — but the top is now the base of the bottle. The cap end sits at the bottom, covered by liquid water, and stays usable much longer. When you stop, you open the cap and drink while the ice builds up harmlessly at the other end.
This only works with a cap that really seals. Before every winter trip, fill the bottle, close it, hold it upside down and squeeze or shake it. Not a single drop may appear — a leaking bottle upside down in a pack soaks your insulation, and wet insulation is a fast route to cold, as our clothing layers guide explains.
Wide-mouth vs narrow-neck bottles in winter
Wide mouth
- A thin ice crust can be broken with a spoon
- Easy to fill with snow or from a pot
- Simple screw cap with few small parts
- Works with most insulated sleeves
Narrow neck / sports cap
- A few millimetres of ice block it completely
- Valves and push-pull caps freeze shut
- Hard to fill from a pot
- Fine in summer, poor in frost
Material matters less than insulation
Metal feels icy and conducts heat away from the water; plastic is a slightly better insulator but can crack if the water freezes solid. Neither will keep water liquid on its own. A single-wall steel bottle has one big advantage in winter: if it does freeze, you can thaw it at the edge of embers or on a stove with the cap removed. Never heat a closed container, a lined aluminium bottle or a double-wall vacuum bottle — they can burst. The boil-safe containers section explains which bottles can go near heat.
Insulated bottle sleeves and vacuum flasks for winter hiking
An insulated bottle slows down every heat loss at once. You have three levels of protection, and many winter hikers combine all three:

| Option | Protection | Weight | Best use |
|---|---|---|---|
| Bare bottle | Little | Lightest | Mild days just below freezing, short trips |
| Spare fleece, hat or sock around the bottle | Moderate | Nothing extra | Improvised sleeve, inside the pack |
| Foam or padded bottle sleeve (often with a lid cover) | Good | Light | Daily drinking water in hard frost |
| Double-wall vacuum flask | Very good | Heavy (roughly 300–550 g) | Hot drinks all day, emergency warmth |
Weights are typical ranges, consistent with our container guide. No insulation stops freezing for ever — it buys time.
Where you carry the bottle
- Inside the pack, wrapped in clothing and close to your back, is warmer than an outside pocket in the wind.
- Inside your jacket — a small flat bottle or soft flask in an inner pocket stays liquid in almost any cold, warmed by your body. It is ideal for a small drinking supply and for seed water when you melt snow.
- Side pockets are handy for drinking, but only with a sleeve and only upside down.
The vacuum flask: hot drinks, not just liquid water
A vacuum flask filled with hot tea in the morning gives you warm drinks at every break. That matters for more than comfort: people drink more when the drink is warm, and a warm drink at the right moment helps keep your energy and spirits up. Pre-warm the flask with a little hot water, empty it, then fill it to the top — less air means less heat loss. As the container guide stresses, a vacuum flask must never be put on a stove or in a fire.
Hydration bladder tubes freezing: blow back, insulate or leave it at home
A hydration bladder is the first part of a water system to fail in the cold. The bladder itself sits warm against your back, but the drinking tube hangs outside in the wind, holds only a thin column of water and ends in a bite valve. That column freezes long before the bladder does — and once it is blocked, the water in the bladder is out of reach.
Stopping a bladder tube from freezing
 1After a sip, the tube is full
Every time you drink, the tube fills with water. Left like that, it freezes within minutes in hard frost, starting at the bite valve.
 2Blow the water back
After each sip, blow gently into the tube until you hear or feel bubbles in the bladder. The tube is now empty and cannot freeze shut.
 3Insulate tube and valve
An insulated tube cover and a valve cap help. Route the tube under your shoulder strap and tuck the valve inside your jacket collar.
Some packs and bladders allow the tube to run inside the shoulder strap or under the jacket. Sip often; regular flow brings slightly warmer water from the bladder into the tube. At camp, empty the tube and keep the bladder inside your sleeping bag or the pack.
All of this helps on cool and moderately cold days. In deep, sustained frost, or when you will be outside for many hours without a warm break, the honest advice is: leave the bladder at home and carry bottles. A frozen tube cannot be fixed on the move without taking off your pack and warming it inside your jacket, and you lose sight of how much you have drunk. The comparison of systems in our hydration guide covers the trade-offs.
Bladder or bottles on a winter day?
Will it stay below freezing all day?
Yes → Go to the next question.No → A bladder with an insulated tube is fine — blow the water back after each sip.Is it deep frost, windy, or a long day without warm breaks?
Yes → Leave the bladder at home; use insulated bottles and a vacuum flask.No → Bladder possible, but carry one insulated bottle as backup.
Frozen water filter: why frost can destroy hollow-fibre filters
A frozen water filter is a hidden danger rather than an inconvenience. Many squeeze, gravity and pump filters use hollow fibres — thin tubes with tiny pores. Once wet, they always hold some water. When that water freezes, it expands and can crack the fibre walls. The filter looks the same and may even flow faster, but bacteria and parasites can now slip through. Most manufacturers say that a filter which may have frozen when wet can no longer be trusted, and there is often no reliable field test. Ceramic elements can crack from frost too.
Protecting a water filter from frost
 1Shake out loose water
After filtering, shake or blow out as much loose water as the manual allows. Less water inside means less to freeze — but it does not make the filter frost-proof.
 2By day: zip bag, inner pocket
Put the filter in a zip bag and carry it in an inner jacket pocket, close to your body. A pack lid or side pocket is not warm enough in frost.
 3Might have frozen? Replace it
If the filter was wet and left in the cold — in the car, the tent porch or the pack overnight — treat it as damaged. Boil or use tablets until you can replace it.
At night the filter goes into your sleeping bag, in its zip bag, next to your body — the same rule our filter guide gives for any night near or below 0 °C. Remember the cold moments people forget: the drive to the trailhead in an unheated car, a filter left in the tent porch while you cook, or a frosty morning before you pack up.
Because you heat water anyway in winter to melt snow, many winter campers simply leave the filter at home in hard frost and rely on boiling, with tablets as backup. A rolling boil for 1 minute (3 minutes above 2,000 m) is unaffected by cold.
Chemical treatment is slower in cold water
Tablets and drops cannot freeze or crack, which makes them an excellent winter backup. Their weakness is time: chemical disinfection is a reaction, and cold slows it down. In water near 0–5 °C, contact times typically need to be doubled compared with room temperature, and melted snow or cloudy water makes it worse. Our contact time table gives these typical values — your product label always takes precedence:
| Method | Clear water, ≈ 20 °C | Cold (≤ 5 °C) or cloudy |
|---|---|---|
| Boiling | 1 min rolling boil | Same (3 min > 2,000 m) |
| Chlorine dioxide | 15–30 min (bacteria, viruses), 30 min (Giardia), up to 4 h (Crypto) | Often double |
| Chlorine (NaDCC, bleach) | 30 min | 60 min or double dose |
| Iodine | 30 min | 60 min or longer |
| UV pen | ≈ 60–90 s per 0.5–1 L | Same, but batteries weaken |
| Microfilter | No wait | Risk of frost damage |
- Start counting only when the tablet has dissolved. In very cold water this takes longer; crush it in the cap if needed.
- Keep the treated bottle warm while it works — inside your jacket or pack. Still use the cold-water time unless the label says otherwise.
- Treat in the evening for the next morning, so the long contact time runs while you sleep.
- UV pens and batteries weaken in the cold; carry both inside your jacket and keep tablets as backup.
Night storage: sleeping with bottles and burying them in snow
The night is the coldest and longest stretch for your water. Left in the tent porch, bottles are often solid by morning — and then you have to melt ice before you can make breakfast. A simple routine prevents this.
The hot water bottle trick
Fill a single-wall steel bottle, or a plastic bottle that is rated for hot liquids, with hot but not boiling water: let freshly boiled water stand a few minutes first. Close it tightly, check the seal upside down, wrap it in a sock and take it into your sleeping bag. Between your thighs it warms the blood flowing to the rest of your body; at your feet it warms cold toes. By morning you have liquid water instead of ice. Never leave a hot bottle directly against bare skin for long, especially with children or when you are very tired. Our guide to sleeping warm explains the rest of a warm sleep system.
A night routine that keeps water liquid
 1Hot, not boiling
Let freshly boiled water stand a few minutes, then pour it carefully into a single-wall steel bottle or a bottle rated for hot liquids. Spills scald, so pour slowly.
 2Close tightly, test upside down
Screw the cap on firmly and hold the bottle upside down. Not a single drip may appear — a leak in a down sleeping bag is a serious problem.
 3In a sock, into the bag
Slide the bottle into a sock or wrap it in clothing and take it into the sleeping bag. Filter, gas canister and the next day’s water can go in too.
 4The rest: buried in the snow
Extra bottles go upside down into the snow, typically 30 cm deep or more, and the spot is marked with a pole or ski so you find it in the morning.
Why snow keeps water from freezing
Snow is mostly trapped air, which makes it an excellent insulator — the reason snow shelters are warmer than the air outside. Below the surface, a snowpack changes temperature much more slowly than the air above it, and on a very cold night it is often considerably warmer than the air. Water buried deep in the snow therefore cools much more slowly than in a tent porch. Rules of thumb:
- Dig a hole typically 30 cm deep or more, away from paths and the toilet area.
- Bottles upside down, caps tight, ideally in their sleeves or wrapped in a stuff sack.
- Cover them with snow and do not compact the top layer too hard — loose snow insulates better.
- Mark the spot with a pole, ski or stick. Fresh snow or drifting can hide a cache within hours.
Burying works well for extra water and a pot of water for breakfast. It does not replace the warm bottle in your sleeping bag and it is not suitable for filters, which must stay above freezing. A bottle at the foot end of the sleeping bag, together with tomorrow’s clothes, is part of every good winter sleep system.
Evening water checklist
- Melt and boil enough water for dinner, a hot drink, the warm bottle and breakfast
- Fill the vacuum flask for the morning
- Warm bottle closed, tested and in a sock in the sleeping bag
- Filter in a zip bag inside the sleeping bag
- Gas canister in the sleeping bag or inside your jacket
- Spare bottles upside down in the snow, spot marked
- Pot with water covered and buried or kept in the vestibule — never a running stove in a closed tent
Melting snow vs open water: what costs less fuel?
Every litre you keep liquid is a litre you do not have to melt. Melting snow roughly doubles the fuel you need, because turning snow into water takes almost as much energy as heating that water to boiling. Using the same stove model as our boiling point and fuel calculator, our snow guide arrives at these estimates for a canister stove with a lid:
| Task | Calm / windscreen | Breeze |
|---|---|---|
| Boil liquid water (8 °C start, 1 min boil) | ≈ 17 g | ≈ 22 g |
| Melt snow (−10 °C) to cold water | ≈ 15 g | ≈ 22 g |
| Melt snow (−10 °C) and boil 1 min | ≈ 32 g | ≈ 44 g |
Real consumption varies with stove, pot, altitude and cold. Water that has frozen in your bottle costs the same melting energy again.
Open water is therefore worth looking for. Springs often keep flowing all winter, and fast stream sections freeze last — our guide to finding water shows where to look. Collect from solid ground at the edge, with a pot or bottle on a cord if needed. If you do have to melt snow, start with a little seed water in the pot so it does not scorch, and choose dense old snow or ice chips for the best yield. Keeping your bottles from freezing is the cheapest fuel saving of all: water that freezes overnight has to be melted again.
Fuel and stoves in the cold
Your stove is the heart of the winter water system, and it has its own cold problem. Gas canisters lose pressure below about 0 °C, and plain butane hardly vaporises near freezing — the flame becomes weak just when you need it most. Our camp stove guide compares stove types; for water in winter, these points matter:
- Keep the canister warm in your jacket during the day and in the sleeping bag at night, and stand it on a piece of foam, not directly on snow.
- Use winter gas mixtures with propane or isobutane; in real cold, stoves that run the canister inverted or liquid-fuel stoves cope much better.
- Windscreen and lid are the biggest savings — but never fully enclose a canister stove, as the canister can overheat.
- Carry enough fuel: plan roughly double your summer amount if you have to melt snow, and check your figure with the fuel calculator.
Drinking enough in the cold
Keeping water liquid only helps if you actually drink it. Cold air is dry and takes moisture with every breath, cold makes the body pass more urine, and thirst is weak — so people drink least exactly when they lose most. Dehydration then makes you colder, more tired and clumsier.
The water needs calculator still gives a real need at low temperatures: for a typical hiker at 0 °C with five hours of light effort, it gives about 3.1 litres per day in total, of which about 2.3 litres is drinking; hard days, altitude and cooking add more. The cold-weather section of our hydration guide explains the signs to watch for.
Habits that keep you drinking in winter
- Start the day with a hot drink and warm water in your bottles
- Drink at every break, not only when thirsty
- Keep one small bottle inside your jacket for quick sips
- Use the vacuum flask for warm tea or broth at longer stops
- Check your urine colour: dark yellow means drink more
- Do not eat snow when you are cold — melt it first
A winter day of water
- MorningWarm bottle from the sleeping bag, hot drink, bottles filled warm, flask filled hot.
- On the moveBottles upside down in sleeves, filter in an inner pocket, sips at every stop.
- CampMelt and boil in one session: dinner, hot drink, warm bottle, breakfast water.
- NightWarm bottle and filter in the bag, extra bottles buried upside down in the snow.
Ice on lakes and streams: do not risk it for water
A frozen lake can look like an easy water source: chop a hole and fill up. In reality, ice is the most dangerous place to get water in winter. Its thickness can change within a few metres — near inflows and outflows, reeds, springs, currents and snow-covered patches it can be thin even after weeks of frost. Snow on top insulates the ice and hides weak spots.
The rule is simple: do not go onto ice for water unless you are certain it is safe — for example where the ice has been checked locally and is used routinely. Even then, stay close to shore and never go alone. Snow bridges over streams are equally treacherous; they are thinnest exactly where the water flows.

Cold, wet hands at a water hole are a hazard too: wet gloves lose their insulation and fingers can quickly become numb. Fill bottles with a pot on a cord, keep a dry pair of gloves for afterwards, and know how quickly wind makes cold dangerous — the wind chill calculator shows it.
Bottle already frozen? Thawing and troubleshooting
Even with good habits, a bottle sometimes freezes. Do not force the cap with a knife or bang the bottle on rocks — plastic cracks and threads break. Instead:
- Body heat: put the bottle inside your jacket for a while; a thin ice plug in the cap thaws surprisingly fast.
- Warm water over the cap: a little hot water from the flask poured over the cap and neck often frees it.
- Single-wall metal only: remove the cap and set the bottle at the edge of embers or on a low stove flame. Never heat a closed bottle, a plastic bottle, a lined aluminium bottle or a vacuum flask.
- Wide-mouth bottles: break a surface crust with a spoon and pour the liquid water underneath into a pot.
| Symptom | Likely cause | Fix |
|---|---|---|
| Cap frozen shut | Bottle carried upright, water in the thread | Thaw at body heat; carry upside down next time |
| Bite valve blocked | Water left in the tube | Warm the valve inside your jacket; blow back after every sip |
| Bottles solid in the morning | Left in the tent porch | Warm bottle in the sleeping bag, others buried in snow |
| Filter flows faster than new | Possible frost damage | Stop using it; boil or use tablets and replace it |
| Tablet will not dissolve | Very cold water | Crush it, shake longer, count from when it has dissolved |
| Weak stove flame | Cold canister losing pressure | Warm the canister; winter gas mix or liquid fuel |
Practise the whole routine on a cold night close to home or the car before a longer winter trip, as we recommend in bushcraft for beginners. You will quickly learn how fast your own bottles freeze — and how much easier the morning is when the water is still liquid. For more winter skills, see bushcraft in winter and moving through snow.
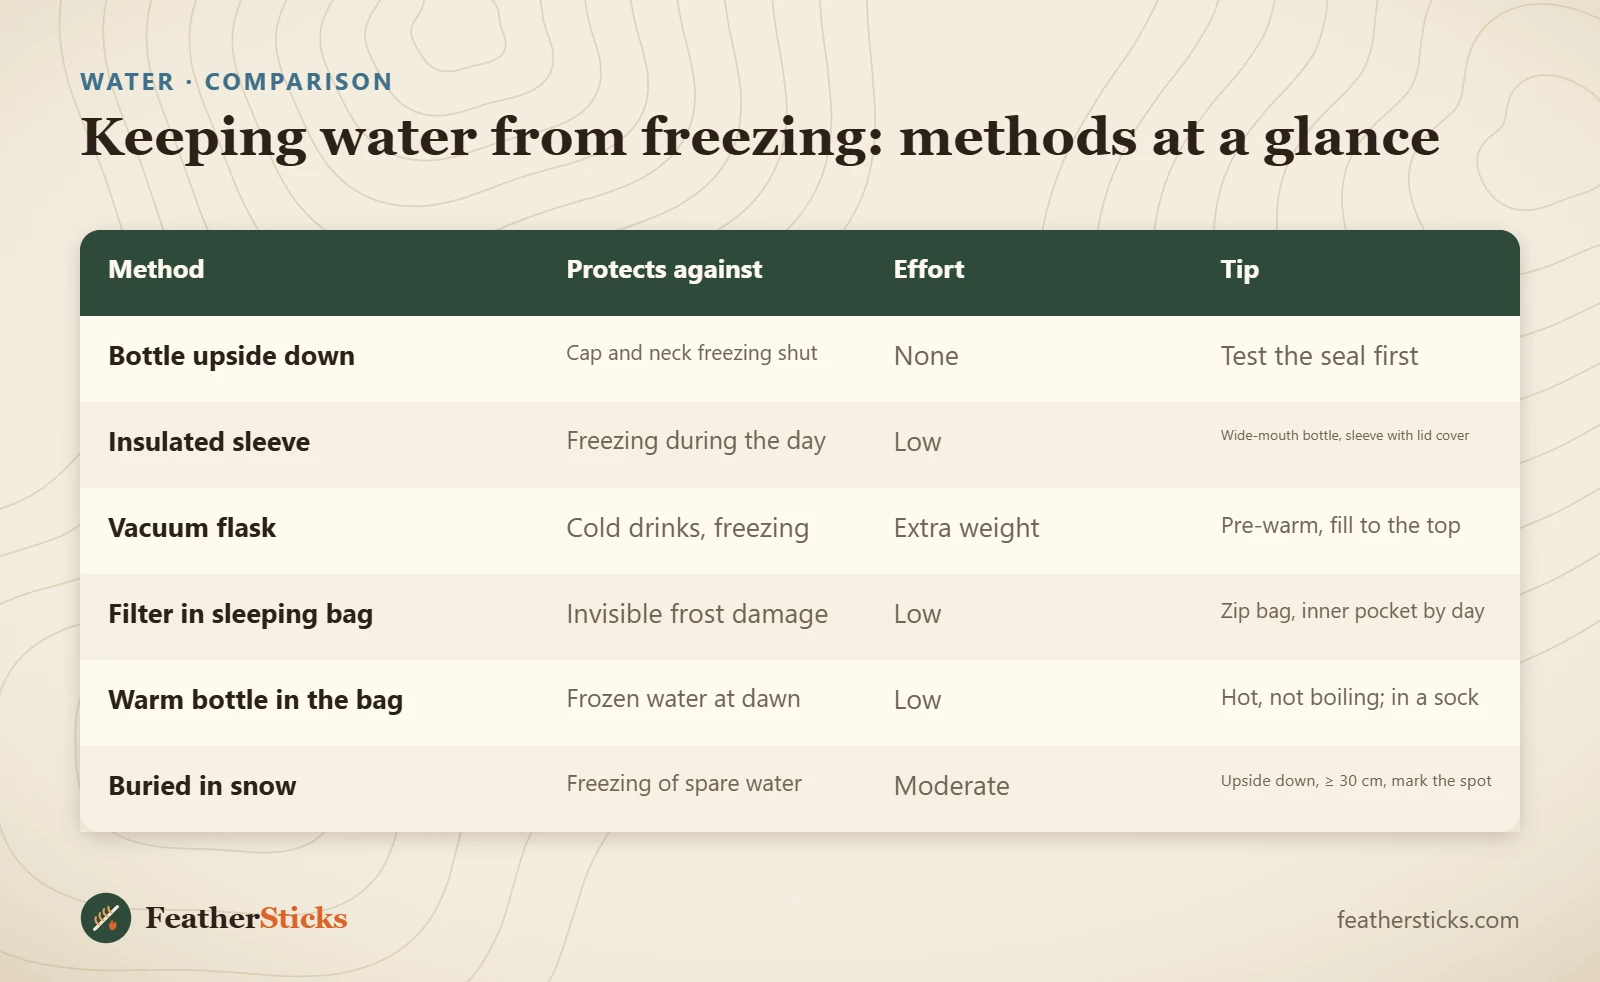
| Method | Protects against | Effort | Tip |
|---|---|---|---|
| Bottle upside down | Cap and neck freezing shut | None | Test the seal first |
| Insulated sleeve | Freezing during the day | Low | Wide-mouth bottle, sleeve with lid cover |
| Vacuum flask | Cold drinks, freezing | Extra weight | Pre-warm, fill to the top |
| Filter in sleeping bag | Invisible frost damage | Low | Zip bag, inner pocket by day |
| Warm bottle in the bag | Frozen water at dawn | Low | Hot, not boiling; in a sock |
| Buried in snow | Freezing of spare water | Moderate | Upside down, ≥ 30 cm, mark the spot |
Common mistakes
- Carrying bottles upright in an outside pocket in frost.
- Using narrow-neck bottles or sports caps in deep cold.
- Leaving a wet hollow-fibre filter in the pack or tent porch overnight.
- Leaving water in a bladder tube after drinking.
- Filling the sleeping bag bottle with boiling water or using a bottle that leaks.
- Cutting chemical contact times short in cold water.
- Walking onto lake ice to fetch water.
What you need
- Wide-mouth bottles with a reliable seal
- Insulated bottle sleeves
- Vacuum flask (0.5–1 L)
- Single-wall steel bottle for hot water and thawing
- Zip bag for the filter
- Chlorine dioxide tablets as backup
- Stove with winter gas mix or liquid fuel, windscreen
FAQ
How do I keep my water from freezing while winter hiking?
Why should you carry a water bottle upside down in winter?
Can a water filter freeze?
How do I stop my hydration bladder tube from freezing?
Do purification tablets work in cold water?
Is it safe to put a hot water bottle in a sleeping bag?
Does burying water in snow stop it from freezing?
Check yourself
Completed6 quick questions from this guide. Nothing is sent anywhere.
Related step-by-step guides
-
 1
-
 1
-
 1