How to Collect Rainwater When Camping (and Dew, Honestly)
To collect rainwater when camping, pitch a tarp taut under open sky, drop one corner so everything drains to a single point, let the first few minutes of rain rinse the fabric, then lead the run-off down a short cord into a clean pot. The arithmetic is simple: 1 mm of rain on 1 m² is 1 litre, so even a shower can fill your bottles. Rain caught cleanly is one of the lowest-risk wild water sources, but it is not sterile — treat it by boiling, filtering or disinfecting before you drink.
This guide shows five tarp catchment setups, the drip line, realistic yields, natural catches, dew collection and an honest look at transpiration bags and solar stills. It is part of our water section; for the days without rain, see how to find water. Camping through a wet spell anyway? Camping in the rain covers the rest of the routine.
Step by step
-
1

Pitch in the open, one corner low
Set the tarp up taut under open sky, not under dripping trees, and drop one corner so the whole sheet drains to a single point.
-
2

Let the first rain rinse the tarp
Let the first 5–10 minutes of steady rain run off onto the ground. It carries away dust, pollen, needles and bird droppings.
-
3

Lead the water into the pot
Tie a short drip cord to the low tie-out and hang its weighted end in a clean pot, so the water follows the cord instead of blowing past.
-
4

Decant into clean, closed bottles
Pour through a clean cloth into bottles you keep only for water, close them and store them in the shade. Swap pots before they overflow.
-
5

Treat it before you drink
Cleanly caught rain is low-risk but not guaranteed clean. Hold a rolling boil for 1 minute, 3 minutes above 2,000 m, or filter and disinfect.
How to collect rainwater camping: the short version
Rain is the only wild water that comes to you. You do not have to walk downhill to a stream, dig, or read the landscape — you need a surface, a slope and a container. Everything in this article is a variation of the same four ideas: a large, clean surface, one low point, a guided drip and a clean, closed container.
The surface you already carry: the tarp, poncho, bivvy bag, pack liner or rain jacket in your pack. If you sleep under a tarp anyway, collecting water costs you a cord, a pot and two minutes of attention when the rain starts.
From cloud to bottle
- CatchTaut tarp under open sky, one low point.
- RinseFirst 5–10 minutes of run-off go to waste.
- GuideDrip cord from the low tie-out into the pot.
- StoreThrough a cloth into clean, closed bottles.
- TreatBoil, filter or disinfect before drinking.
Why rain is the easiest wild water source — and where it lets you down
A stream has flowed past pastures, paths and dead animals before it reaches you. A puddle has been standing for days. Rain, by contrast, was distilled by the sun a short time ago and has only touched the air and whatever you caught it with. That is why cleanly caught rainwater usually starts with far fewer germs, far less sediment and less of the brown, tea-like colour that forest water takes on.
It also arrives exactly where water is otherwise hardest to find: on ridges, plateaus, sandy pine forest and limestone country, where the surface is dry because everything drains away underground. And it saves weight — every litre you catch at camp is a kilogram you did not carry uphill.
The limit is obvious: you cannot order rain. A forecast is a probability, showers miss a valley by a few kilometres, and a dry front can leave you with a wet tarp and an empty pot. Rain collection is therefore an excellent supplement and a poor plan. Read the sky with our guide to reading the weather, but pack and route as if no rain were coming.
Rainwater as a camp water source
Strengths
- Comes to your camp — no walk to a stream
- Usually clear, soft and low in germs when caught cleanly
- Works on ridges and dry ground without any surface water
- Needs only gear you already carry
- Saves carried weight on wet trips
Limits
- Unreliable: no rain, no water
- Picks up whatever is on the tarp and in the pot
- Still needs treatment before drinking
- Light drizzle yields little without a large surface
- Pooled water puts heavy loads on a tarp
How much rainwater can you collect with a tarp?
Rainfall is measured in millimetres for a practical reason: 1 mm of rain on 1 m² is exactly 1 litre of water. A layer one millimetre deep over a square metre is 1,000 cm³. So the possible catch is simply:
litres = catchment area in m² × rainfall in mm
What counts is the footprint — the ground area the tarp shades from the rain — not the size of the fabric. A 3 × 3 m tarp laid almost flat has a footprint of about 9 m². Pitched at 30°, the same tarp covers roughly 3 × 2.6 m, or about 7.8 m². Rain driven sideways by wind changes the picture again. The tarp size calculator shows the covered area for common pitches.

| Catchment (footprint) | 1 mm of rain | 5 mm | 10 mm | 20 mm |
|---|---|---|---|---|
| Poncho, ≈ 3 m² | 3 L | 15 L | 30 L | 60 L |
| Tarp 2 × 3 m, 6 m² | 6 L | 30 L | 60 L | 120 L |
| Tarp 3 × 3 m, 9 m² | 9 L | 45 L | 90 L | 180 L |
| Tarp 3 × 4.5 m, 13.5 m² | 13.5 L | 67.5 L | 135 L | 270 L |
This is geometry, not a promise. It assumes the tarp is nearly flat, all the water reaches one point and nothing is spilled. Count on clearly less.
How fast it comes depends on the intensity. Weather services describe rain of up to about 2.5 mm per hour as light, roughly 2.5–10 mm per hour as moderate and more than about 10 mm per hour as heavy; the exact category limits differ slightly between services. On a 9 m² footprint that means:
| Rain | Intensity | Litres per hour | Time for 1 litre |
|---|---|---|---|
| Drizzle | 0.5 mm/h | 4.5 L | ≈ 13 min |
| Light rain | 1 mm/h | 9 L | ≈ 7 min |
| Moderate rain | 5 mm/h | 45 L | ≈ 80 s |
| Heavy shower | 10 mm/h | 90 L | ≈ 40 s |
In a heavy shower your limit is not the rain but the number of containers you have.
Where the litres go: catchment losses
In practice you never bottle the full sum. The usual losses are:
- The first flush: the first minutes are deliberately run to waste to rinse the tarp.
- Wetting and soaking: the fabric has to get wet before water runs; older or uncoated fabric soaks up more.
- Several drip points: a tarp that is not tilted cleanly drips from every edge, and only one of them has a pot under it.
- Wind and splash: gusts blow the stream past the pot and shake pooled water off the fabric.
- Overflow: a 1-litre pot under a 9 m² tarp fills in little more than a minute of moderate rain. What you do not swap, you lose.
A sensible planning habit is to halve the arithmetic — and to treat even that as a bonus rather than something your trip depends on.
Collect rainwater with a tarp: five setups
Every setup below creates one low point and sends the water there. Which one you use depends on what is already standing: a dedicated catchment tarp, the shelter you sleep under, or just a poncho and no trees. The basic pitching skills — ridgeline, tensioning and guylines — are covered in how to set up a tarp shelter; if you have no trees, two cut poles joined with simple lashings or a pair of trekking poles do the job.
Five ways to catch rain with a tarp or poncho
 1Low corner
Pitch the tarp nearly flat on three high points and guy the fourth corner down to about knee height. The whole sheet drains diagonally to that corner. This is the simplest and most productive dedicated catchment; put the pot under the low corner and add a drip cord.
 2V-fold funnel
Lift all four corners and let the centre line hang lower, with the front of the fold lower than the back. The tarp becomes a gutter that carries the water to the front edge. It is less sensitive to wind direction and useful with long, narrow tarps.
 3Weight in the centre
Tie the four corners at about hip height and place a smooth, clean stone in the middle. The tarp becomes a basin that holds the water. Scoop it out with a cup often — every litre is a kilogram hanging on the tie-outs.
 4Ridge-line drip
Under a normal shelter pitch, water runs along the ridgeline towards the tarp. A drip line tied to the cord just outside the tarp stops it — and if you hang its end in a pot, the same line that keeps your bed dry fills your bottle.
 5Poncho or bivvy bag in a hollow
No trees and no poles: line a natural hollow in the ground with a poncho, bivvy bag or pack liner and weigh the edges down with stones. Use an existing dip instead of digging. Scoop the water out before it gets stirred up.
| Setup | Needs | Yield | Watch out for |
|---|---|---|---|
| Low corner | 3 high points, 1 guyline, pot | Highest — whole tarp to one point | Tarp must be taut, or it pools halfway |
| V-fold funnel | 4 high points, pot | High | Fold must slope to one end |
| Weight in the centre | 4 tie-outs, stone, cup | High, stored on the tarp | Load on tie-outs; empty often |
| Ridge-line drip | Your shelter, a cord, pot | Low to medium, no extra tarp | Only the ridgeline water, plus the edges |
| Poncho in a hollow | Poncho or bivvy bag, stones | Medium | Dirt from the rim; do not dig in protected ground |
Using the shelter you already have
You do not need a second tarp. The drip edge of an A-frame or lean-to is a ready-made gutter: tension the low edge so that one corner sits a hand's width lower than the other, and nearly all the water from that panel leaves at that corner. Stand your pots there in a row, largest first. With a hammock tarp the same works at the corner tie-outs. What you must not do is lower the shelter so far for water that it stops protecting you — in cold rain, a dry sleeping place matters more than a full bottle. The choice of pitch and position is covered in choosing a campsite.
What it should look like
- One steady stream (or a fast string of drops) at one place — not a row of drips along every edge.
- No pools standing on the fabric, unless you built the basin on purpose.
- Fabric drum-tight: the surface does not flap or belly between gusts.
- Pot rim below the drip by a hand's width or less, so wind has no room to deflect the stream.
The drip line: getting water from the tarp into the pot
Water prefers to cling to a surface. Left alone, the run-off at a tarp corner breaks into drops that the wind throws around; given a cord, it runs down the cord as if on rails. This is the same effect that carries water along a ridgeline into a hammock — here you use it on purpose.
Any thin cord works: a spare guyline, a bootlace, a strip of cloth, or natural cordage. About 50 cm is enough for a knee-high corner. Tie it with any knot you can undo with cold fingers — a slipped hitch or a simple loop from our knot guide is plenty.
Setting up the drip cord
 1Tie the cord to the lowest tie-out
Knot about 50 cm of cord to the tie-out loop of the low corner, right where the water leaves the fabric. If the water leaves somewhere else, the corner is not the lowest point yet — re-tension first.
 2Check that the water follows it
With a cord, the water runs down into the pot even in gusts. Without one, drops fall free and the wind carries them past the rim. A wet cord works immediately; a dry or waxy one needs a moment to get going.
 3Weight the end, swap the pots
Tie a small clean pebble to the end so the cord stays in the pot. Swap to the next container before the first overflows, and put a lid on the full one straight away.
No cord at hand? A peeled stick leaning from the corner into the pot does the same, as does a long leaf-free twig hooked through the tie-out. On tarps without a tie-out at the low point, a clean clothes peg or a small smooth stone twisted into the fabric and tied off gives you an attachment without damaging the tarp.
Let the first minutes rinse the tarp
A tarp that has been pitched for a day is not clean. It carries dust and pollen, needles and leaf fragments, insects, resin spots, the dirt from your pack and occasionally a bird dropping. The first run-off washes most of that down — which is exactly why you do not want it in your pot.
Let the first 5–10 minutes of steady rain run onto the ground. In drizzle, wait longer; what matters is that the surface has been rinsed, not the clock. You can see it: the first run-off is often faintly cloudy or carries specks, then it turns clear. If the tarp has just come out of its bag after a muddy trip, wipe the catchment panel down with a wet cloth first.
The second half of a clean catch is where the tarp stands. Under trees, the rain reaches you as canopy drip: it has washed over leaves, bark, lichen and everything that lives up there, and arrives tinted brown, with bits in it. In the open, it arrives as rain.

Checklist for a clean catch
- Tarp under open sky, not under branches
- Catchment side free of mud, resin, soot and food
- Upwind of the fire — smoke and ash settle on wet fabric
- First 5–10 minutes of run-off not collected
- Pot and drip cord rinsed with the first clean water
- Pot standing on a stone or log, not in splashing mud
Does the tarp itself matter?
Slightly. Common tarp fabrics are polyester or nylon with a silicone or polyurethane coating, or polyethylene sheet. A brand-new coated tarp can give the first water a noticeable chemical taste, which fades with use and rinsing; taste alone, however, tells you nothing reliable about safety in either direction. Do not collect drinking water from fabric that has been treated with insect repellent or re-proofing sprays, from mouldy canvas, or from anything that has stored fuel or chemicals. An emergency blanket, a clean bin liner or a pack liner are perfectly good catchment surfaces. More on fabrics in our tarp buying guide.
Clean containers and storing rainwater
Most of the contamination in caught rainwater does not fall from the sky — it comes from the pot that had dinner in it and the hands that held the bottle neck. Rainwater is only as clean as the last thing it touched.
From pot to bottle, cleanly
- Rinse the pot with rain Let the first clean run-off swirl through the pot and throw it away. A pot with a greasy film from dinner needs a proper wash first.
- Keep the pot off the ground Stand it on a flat stone or a split log. Rain splashing off bare soil throws dirt straight over a low rim.
- Pour through a cloth A clean bandana over the bottle mouth holds back needles, insects and grit. It does not remove germs.
- Close and mark Screw the lid on at once. Mark untreated water — a strip of tape or a fixed "raw" bottle — so it is never confused with treated water.
- Store cool and dark Shade, not sun. Light and warmth let algae and bacteria grow in untreated water within days.
Wide-mouth bottles, folding buckets and water bags are easiest to fill from a drip; narrow necks need the pot as an intermediate step. Dry bags and pack liners hold many litres in an emergency but are awkward to pour from. Which materials suit which use is covered in water containers, and the pots themselves in cookware.
How long does it keep? Treat rainwater as a short-term supply. Untreated in a closed bottle, use it within a day or two and treat it before drinking anyway. Boiled or disinfected water in a clean, closed container keeps for days. If stored water smells musty, is slimy at the neck or has turned green, use it for washing up at most.
Natural catches: rock hollows, tree forks and puddles
After rain, the landscape collects water for you. Hollows in bedrock and boulders, the forks of old beeches and oaks, hollow stumps and the dimples in a slab can hold anything from a cupful to several litres. On dry ridges these are sometimes the only water for kilometres.
But this is no longer rainwater in the sense of this article. It is standing water that has collected leaves, insects, bird droppings and whatever drinks there. Tree-fork water is typically dark with tannins and rich in microbial life; rock pools warm up in the sun and are visited by birds and other animals. The fresher the rain, the better — a hollow that filled last night is very different from one that has been stewing for two weeks.

How to use them: take the water out with a cup, a syringe, a length of tube or by soaking it up with a clean cloth and wringing it into a pot — without stirring up the bottom. Pre-filter through cloth; a improvised filter helps with colour and particles. Then treat it fully: boil, or filter and disinfect. Do not take water from hollows with dead animals, oily films, heavy droppings or in places where chemicals could have been used.
Collecting dew: how it works and what it really yields
Dew forms on clear, calm nights when grass and leaves cool below the dew point of the air. In open meadows after such a night, the vegetation is soaked at dawn even though no rain fell. Collecting dew means wiping that water off with something absorbent and wringing it out.
The method is old and simple: tie clean cotton cloths, a bandana or a T-shirt round your shins and walk slowly through tall, wet grass, or drag a cloth across it by hand. When the cloth is saturated, wring it into a pot and repeat.
Collecting dew with a cloth
 1Go at dawn
Dew is heaviest around sunrise and gone soon after the sun reaches the grass. Tie clean, absorbent cloths round your shins and walk slowly through tall grass in the open. Clear, still nights give the most; windy or overcast nights give almost none.
 2Wring it out over the pot
When the cloth is heavy and dripping, twist it over a clean pot. Cotton and microfibre take up a lot; thin synthetic fabric holds little. Rinse sand and seeds out of the cloth now and then.
 3Be honest about the yield
Expect mouthfuls and cups, not litres — and a good deal of walking for them. The water has touched soil, plants and your boots, so treat it like any surface water.
Is dew worth the effort?
As an emergency supplement on a dry, exposed route: yes, because it costs little sweat in the cool of the morning. As a way to cover a day's needs: no. Compare the cup or two you can wring out with the two to three litres an adult typically needs to drink per day in mild weather, more in heat or on hard days — the water calculator gives your own figure. Dew also soaks your trousers and boots, which matters in cold weather.
Three cautions: avoid meadows that are grazed, fertilised or sprayed, and verges next to roads. Do not wipe dew from plants you cannot rule out as poisonous. And in tick season, walking bare-legged through tall grass is an invitation — see ticks and insects.
A tarp also collects dew: a taut sheet pitched in the open is often wet on top in the morning. Tap it from below so the drops run to the low corner and into the pot. It is rarely more than a few mouthfuls, but it is free.
Transpiration bags and solar stills — honestly
Both methods appear in almost every survival manual, and both work in principle. The question that matters is how much they give for the effort.
A transpiration bag is a clear plastic bag tied over a leafy branch in full sun. The leaves give off water vapour, it condenses on the inside of the bag and runs to the lowest corner. A solar still is a pit covered with a clear sheet: moisture evaporating from the soil condenses on the underside of the sheet, runs to a low point weighted with a pebble and drips into a cup.

Transpiration bag vs solar still
Transpiration bag
- No digging, almost no sweat
- Needs strong sun and a leafy, living branch
- A few mouthfuls to a cup per bag on a hot, sunny day
- Only on plants you know to be non-poisonous
- Several bags at once make it worthwhile at all
Solar still
- Needs a pit, a clear sheet and a cup
- Digging usually costs more sweat than the still returns
- Yield depends on moist soil and strong sun
- Close to nothing on cool, cloudy days
- Digging is not permitted in many forests and reserves
The honest summary: in a temperate climate, with a few hours of sun between clouds, both produce little — often less than you would lose in sweat building them. They are last-resort techniques, not a plan. Their one real strength is the principle behind them: the water is distilled, so a still can in theory make drinkable water from brackish or dirty sources. If you ever depend on one, set up several bags early in the day, stay in the shade and move as little as possible.
On a normal trip, the same two hours are far better spent walking to a mapped stream. The decision tree in finding water is the tool to reach for first.
Is rainwater safe to drink?
Generally low-risk when caught cleanly — but not guaranteed safe, so treat it. Rain itself contains very few germs. The risk comes from what it meets on the way to your mouth: the air it falls through, the surface it lands on and the container it ends up in.
Public-health bodies take the same line. The CDC points out that rainwater can carry germs and chemicals and should be treated before drinking; the WHO treats harvested rainwater as a source that needs a clean catchment, a first flush and safe storage; and Germany's Umweltbundesamt advises against using untreated rainwater as drinking water. None of that is about a pot under a tarp specifically — but the mechanisms are identical.
| Source | What it adds | What helps |
|---|---|---|
| Air | Dust, soot, pollen; near industry and cities also pollutants | First flush; collect away from roads and chimneys |
| Tarp surface | Dust, bird droppings, insects, resin, coating residues | Open sky, first 5–10 minutes to waste, wipe the panel |
| Trees above | Leaf debris, tannins, droppings from the canopy | Pitch in the open |
| Camp | Smoke, ash, cooking splashes, dirty hands | Catch upwind of the fire; clean hands |
| Pot and bottle | Food residue, biofilm, old untreated water | Rinse, dedicated water containers, lids |
| Storage | Growth of bacteria and algae over days | Cool, dark, closed; use soon; treat before drinking |
How to treat rainwater
- Boiling is the most certain answer to germs: a rolling boil for 1 minute, 3 minutes above 2,000 m. Details and fuel figures are in how to boil water safely and the boiling point and fuel calculator; stove options in camp stoves.
- Filtering with a hollow-fibre filter removes bacteria and protozoa quickly and is ideal for clear rainwater, which hardly clogs a filter — see filtering water.
- Chemical disinfection or UV works well precisely because rainwater is clear; follow the contact time on the label. See water purification methods.
None of these removes dissolved chemicals. That is the reason for collecting away from roads, industry, sprayed fields and smoky fires in the first place. Researchers have also reported persistent industrial chemicals in rain even in remote regions; that is a question of long-term exposure and a reason not to live on untreated rain for months — not a reason to fear a weekend's worth.
Which treatment for caught water?
Fresh rain, caught on a rinsed tarp in the open, into a clean pot?
Yes → Lowest risk. One treatment step is enough: boil, or filter, or disinfect.No → Go to the next question.Caught under trees, or standing in the pot or bottle for more than a day?
Yes → Pre-filter through cloth, then boil — or filter and disinfect.No → Go to the next question.From a rock hollow, tree fork or puddle, or wrung from dew cloths?
Yes → Treat as surface water: pre-filter, then boil, or filter plus disinfect.No → Roadside, farmland or oily film? Do not drink it.
Planning with rain: a bonus, not a plan
Work out what you need first, then decide what rain may replace. The water calculator gives a figure for drinking and cooking water by body weight, temperature and effort. Plan your route so that this amount is available from reliable sources or carried — and treat every litre from the tarp as weight you may pour out or a refill stop you may skip.
- Forecast says rain overnight: pitch the catchment before dark, containers in place, drip cord tied. You will not want to do it at 3 a.m.
- Showery days: keep a poncho and a pot at the top of the pack. A ten-minute shower on 3 m² of poncho is enough for a hot drink.
- Dry ridge camps: carry your water up as planned; let rain be the surprise that saves you the morning descent.
- Winter: when precipitation falls as snow, the method changes completely — see water from snow and ice for melting with seed water and the fuel it takes.
Rain collection fits naturally into an orderly camp routine with fixed places for clean and raw water, described in setting up camp. If you are new to all this, start with bushcraft for beginners and practise the low-corner pitch in the garden with a watering can: it shows you in a minute where your tarp really drains.
Troubleshooting and practice
| Symptom | Likely cause | Fix |
|---|---|---|
| Drips along every edge, little in the pot | No clear low point | Lower one corner further, tension the rest |
| Water pools in the middle | Slack fabric, slope too shallow | Re-tension; raise the high corners or add a centre lift |
| Stream blows past the pot | No drip cord, pot too far below | Tie a weighted cord; raise the pot on a stone |
| Cord stays dry, water drips beside it | Cord not at the lowest point | Move it to where the water actually leaves the fabric |
| Brown or cloudy water | Canopy drip, dirty tarp, no first flush | Move into the open; wipe the panel; discard the first run-off |
| Chemical or plastic taste | New coating or new container | Rinse and air; taste fades with use — treat as usual |
| Grit and soil in the pot | Splash from bare ground | Stand the pot on a stone or log; raise the rim |
| Pot overflowed overnight | Container too small for the catch | Larger bucket or bag; several pots in a row; smaller catchment |
Three short practice drills
- Watering-can test: pitch the low-corner setup at home and pour a can of water over the high side. Count the places where water leaves the tarp. The goal is one.
- Two-minute rig: from a normal shelter pitch, time how long you need to lower a corner, tie a drip cord and place a pot. With practice it is done before the first shower has finished rinsing the fabric.
- Measure a shower: note how long a real shower took to fill a 1-litre pot and compare it with the arithmetic for your footprint. It gives you a feel for your own losses.
In persistent rain you will also want fire and hot food; lighting a fire in wet weather picks up where this guide ends.
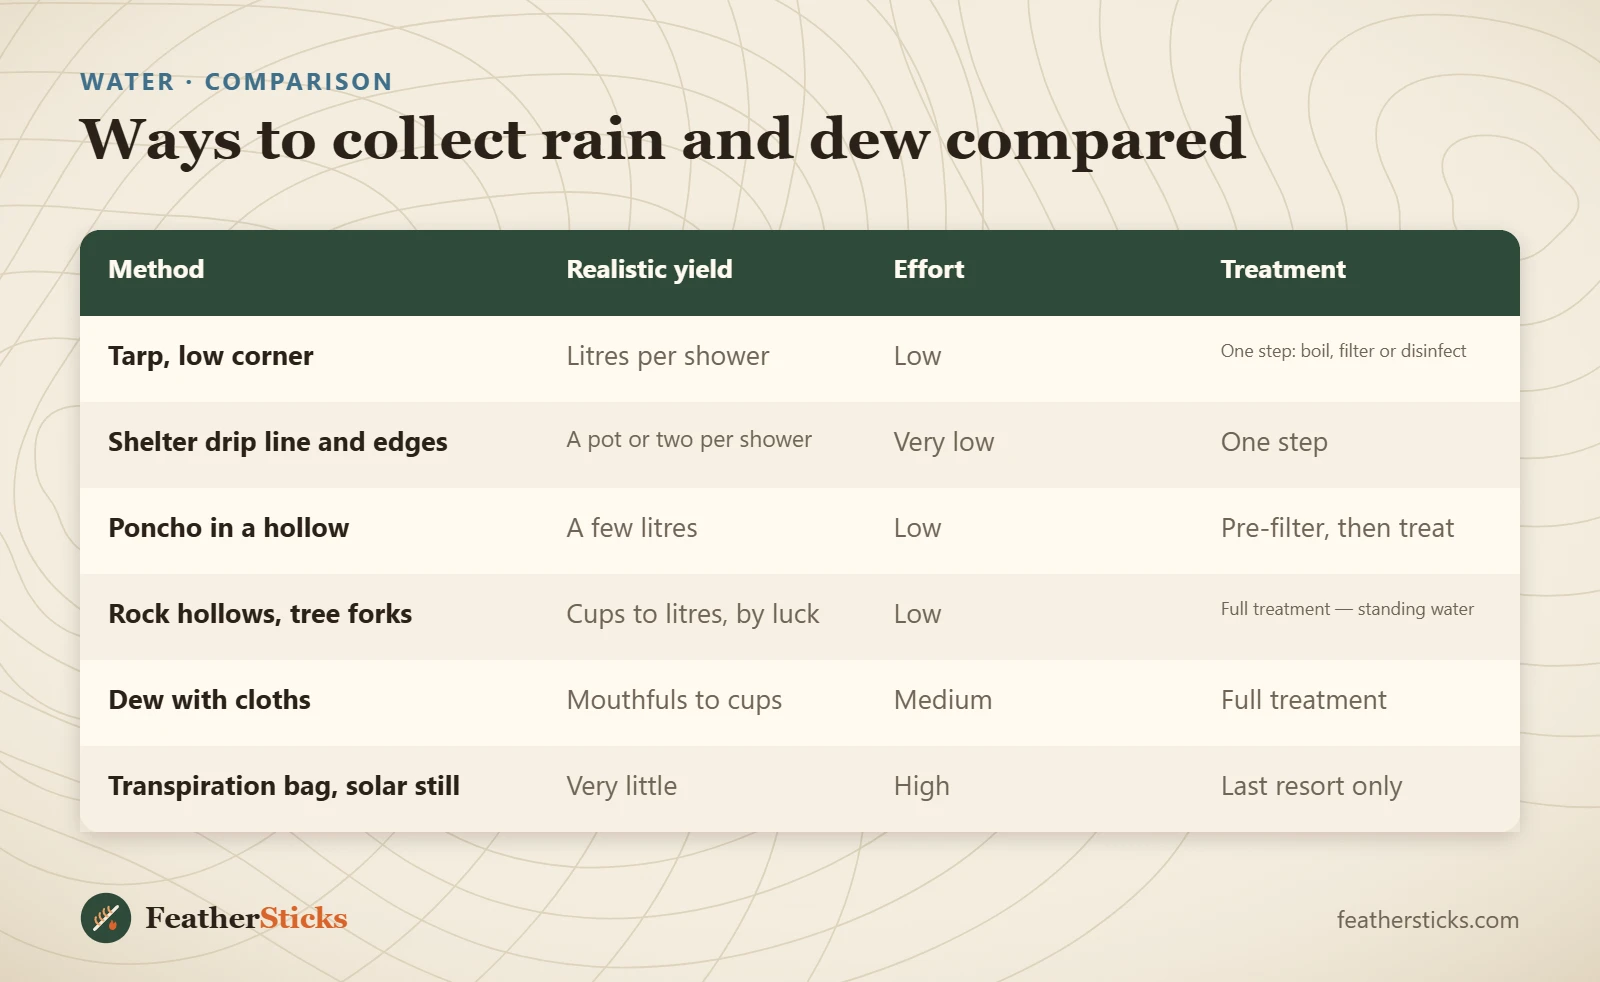
| Method | Realistic yield | Effort | Treatment |
|---|---|---|---|
| Tarp, low corner | Litres per shower | Low | One step: boil, filter or disinfect |
| Shelter drip line and edges | A pot or two per shower | Very low | One step |
| Poncho in a hollow | A few litres | Low | Pre-filter, then treat |
| Rock hollows, tree forks | Cups to litres, by luck | Low | Full treatment — standing water |
| Dew with cloths | Mouthfuls to cups | Medium | Full treatment |
| Transpiration bag, solar still | Very little | High | Last resort only |
Common mistakes
- Counting on rain instead of carrying or mapping reliable water.
- Collecting under trees and getting brown canopy drip full of debris.
- Catching the first run-off with all the dust and droppings from the tarp.
- No clear low point — the tarp drips from every edge except over the pot.
- Letting water pool in a slack shelter tarp until a tie-out rips.
- Using the unwashed dinner pot and then storing the water for days.
- Drinking it untreated because rain "is clean anyway".
What you need
- Tarp or poncho with corner tie-outs
- Cord: guylines plus about 50 cm for the drip line
- Pot with lid, or a folding bucket
- Wide-mouth bottles or a water bag kept only for water
- Clean cotton cloth or bandana for pre-filtering and dew
- Water filter or purification tablets, and a stove for boiling
Calculators for this topic
FAQ
Is rainwater safe to drink?
How do you collect rainwater with a tarp?
How much rainwater can I collect when camping?
Do I need to boil rainwater?
Can you drink dew?
Does a solar still really work?
Can I collect rainwater from my tent or hammock tarp?
How long can I store collected rainwater?
Check yourself
Completed6 quick questions from this guide. Nothing is sent anywhere.
Related step-by-step guides
-
 1
-
 1
-
 1