Camp Kitchen Setup: Layout, Zones, Furniture and Hygiene
A good camp kitchen setup splits cooking into four zones – fire or stove, prep, washing and storage – and places them downwind of the tents, with the fire at least 5 m from tents and hammocks and any synthetic tarp at least 3 m from the flames and never above them. Washing happens at least 60 m from water, and food lives in a cool, sealed store away from the beds.
This guide shows the camping kitchen layout step by step, from reading the wind to a lashed work table, a hand-wash station, the cool chain and the tear-down. It works for a solo overnight and for a group base camp alike. For the cooking itself see campfire cooking; for everything else in the outdoor cooking hub, and for the big picture the bushcraft basics guide.
Step by step
-
1

Read the wind and pick the spot
Put the kitchen downwind of the tents, on level, bare ground, with the fire at least 5 m from tents and hammocks.
-
2

Mark the four zones
Lay out a fire or stove zone, a prep area, a washing spot and a food store, linked by short, clear paths.
-
3

Set up the fire and stove zone
Clear 3 m around the fire, add a windbreak and a pot hanger, shield the stove on the windward side and keep water ready.
-
4

Build the table, rig the tarp
Lash a work table with a pot shelf and pitch the tarp over the prep area, at least 3 m from the fire and never above it.
-
5

Hand-wash station and cool store
Hang water and soap for 20-second hand washing, and keep perishables sealed in a shaded cool box at 4 °C or below.
-
6

Run routines, leave no trace
Share kitchen jobs, wash up away from water, then take every structure down, drown the fire cold and pack out all rubbish.
What makes a good camp kitchen?
A good camp kitchen is safe, clean and quick to work in. Safe means fire, hot pots and fuel are separated from beds, fabric and children. Clean means raw food, dirty dishes and hands never meet ready-to-eat food. Quick means you can reach everything you need for a meal in three or four steps. All three come from the same trick: dividing the kitchen into zones with a job each, instead of piling everything around the fire.
The four zones of a classic outdoor kitchen in bushcraft and scouting are:
- Fire or stove zone – where heat happens: the fire with its pot hanger, or a stove behind a windscreen.
- Prep zone – a clean work surface for cutting and mixing, ideally under a tarp, with the pots on a shelf.
- Washing zone – hand washing, washing-up and grey water, well away from streams and lakes.
- Storage zone – food, cool box and rubbish, shaded, sealed and away from the sleeping area.
On a one-night solo trip these zones may be only a few steps apart on a groundsheet. On a group camp they become separate areas with their own tables and paths. The logic stays the same, and it fits into the wider camp plan described in camp setup and, for longer stays, setting up a base camp.
The four kitchen zones, from heat to storage
- Fire ≥ 5 m from tents and hammocks, 3 m cleared around it, windbreak, pot hanger, water and shovel in reach.
- Work table and pot shelf under a tarp; the synthetic tarp ≥ 3 m from the fire and never above it.
- Hand-wash station, washing-up bowls, grey water scattered ≥ 60 m from any water.
- Cool box in the shade, sealed food, rubbish bag – away from the tents.
Where should the camp kitchen go? Wind, distances and water
Put the camp kitchen downwind of the tents, on level and preferably bare ground, close enough to the fire to cook but far enough from the beds that smoke, sparks and food smells drift away from them. Check the wind before you unpack: wet a finger, watch smoke from a match or note how grass and leaves move. If the wind is unsteady, use the slope instead – sleep higher, kitchen in the middle, washing and latrine lower and well away.
Before anything else, make sure a fire is allowed at all. Rules differ by country, region and landowner, and in dry periods fire bans often cover whole areas; then the kitchen runs on a stove, if stoves are permitted. The campfire safety guide explains danger levels and what counts as an open fire.
Laying out the kitchen in four moves (plan view, not to scale)
 1Find the wind, place the tents
Decide where the wind comes from and put the sleeping area upwind. Everything that smokes, smells or sparks goes on the other side.
 2Fire downwind, 5 m from the tents
Place the fire at least 5 m from tents and hammocks, clear the ground in a radius of about 3 m and stack firewood 2–3 m away on the upwind side.
 3Prep area under a tarp, 3 m from the fire
Set the work table under a tarp beside the fire zone, keeping the synthetic tarp at least 3 m from the flames. The cooking spot itself stays at the fire.
 4Washing, storage and paths
Put the washing spot at least 60 m from water and the food store in the shade, away from the tents. Link all zones with short paths that never cross the fire.
| What | Distance | Why |
|---|---|---|
| Fire to tents and hammocks | at least 5 m, more in wind | Sparks melt synthetic fabric; smoke stays out of the beds |
| Fire to synthetic tarp | at least 3 m, never above the fire | Nylon and polyester melt or burn from heat and single sparks |
| Cleared ground around the fire | about 3 m radius, 3 m open air overhead | No leaves, needles or low branches to catch |
| Firewood pile | 2–3 m from the fire, upwind | Close enough to feed, too far for sparks |
| Washing spot, grey water | at least 60 m from lakes and streams (60–70 m in the hygiene guide) | Keeps soap and food scraps out of the water |
| Kitchen and food store in bear country | 60–100 m downwind of the sleeping area | Smells lead animals to the kitchen, not to the tents |
Distances are minimums. Local rules and landowners can require more; the camp as a whole should also sit about 60 m from water.
Ground, shade and drainage
Choose firm, level ground that does not turn to mud in rain and is not a natural water channel. A slight slope is fine for the washing spot, but pots and tables need flat ground. Light shade is welcome for the food store; deep forest litter, peat and roots under the fire are not, because heat can creep underground. Look up too: no dead branches over the kitchen. The criteria for the whole site are in choosing a camp site.
Water supply
A kitchen eats water. Plan a "water station" with clearly separated containers for raw and treated water, and fetch it in daylight. The water calculator covers drinking and cooking water; add washing water on top – roughly 0.5–1 L per person per day for a careful cook. More on carrying it in water containers, on treatment in water purification and on topping up along the way in refilling water on the trail.
Setting up the fire and stove zone
The fire zone is the hot heart of the kitchen, and the first rule is that nothing in it should surprise you. Use an existing fire ring where there is one, or build on mineral soil, sand or a properly built fire pit. Clear leaves and needles in a radius of about 3 m. Before you strike a match, put a full water container and a small shovel within reach; they belong to the fire zone like the pots do.
Wind shelter for fire and stove
Wind steals heat, scatters sparks and makes flames lick sideways out of the fire ring. A low wall of logs or dry stones on the windward side calms the fire without boxing it in. Stoves need the same care: a light breeze can double the boiling time of a gas or alcohol stove. Stand the stove on a flat stone or bare soil, put a windscreen on the windward side and turn your back or pack into the wind as well. Details per stove type are in stove base and windscreen.

Pot hangers and the cooking spot
A crane of two forked sticks with a green crossbar, a tripod or a simple dingle stick lets you hang a pot over the fire and adjust its height. The pot hanger guide shows each one with dimensions. Keep the cooking spot compact: the cook stands on the upwind side, with a flat stone or log next to the fire to set down a hot lid, and a pair of leather gloves and long tongs on it. That spot, one or two metres beside the fire, is where hot food is handled – not the prep table under the tarp.
Fuel and the woodpile
Sort wood by thickness – tinder, kindling, wrist-thick fuel – and stack it 2–3 m upwind of the fire, under a corner of tarp if rain threatens. Stove fuel bottles and spare canisters live in the storage zone, never next to the fire. How much wood an evening of cooking needs depends on the meal and the weather; the firewood guide has rules of thumb.
A tarp over the prep area – but never over the fire
A tarp turns a rainy evening from miserable into comfortable: dry hands, dry food, dry matches. Pitch it over the prep zone, with the low edge towards the wind and the high edge open, so smoke and steam escape and you can stand upright at the table. Two poles or two trees, a ridge line and four guylines are enough; see tarp setups for pitches and choosing a tarp for sizes and materials.
The fire stays outside. Nylon and polyester tarps melt from rising heat and from single sparks, and a burning tarp can drop molten fabric onto people. Keep a synthetic tarp at least 3 m from the fire and never directly above it, and remember that hot air rises – a tarp several metres above a fire is still in the heat plume. Only special cotton or poly-cotton setups designed as fire reflectors can go closer, and even then not above the flames.

Cooking in rain
In steady rain, a stove under the open tarp is often the easiest kitchen. If you cook on the fire, set it just downwind of the tarp edge at the safe distance, keep the woodpile and kindling under cover and work quickly at the fire with a lid on the pot. Rig a drip line on guylines so water does not run along them into the prep area. More rain tactics are in camping in the rain.
Camp furniture: a lashed work table and pot shelf
Working on the ground means sand in the food, aching knees and pots that tip over. A simple work table at hip height changes that, and a lower shelf keeps pots, the water bag and the board off the ground. Both can be built from straight poles and cord with lashings – no nails, no cuts into living trees. Use dead poles you are allowed to take, poles you bring, or a folding table if the camp is close to the car.
A typical camp table is two end frames of two uprights each, joined by two long rails, with a top of thin poles laid across. A diagonal brace on each side stops the frame from racking. Square lashings join the crossbars to the uprights; the top poles are lashed on or woven with one continuous cord.
Building a lashed work table
 1Two end frames
Join two uprights with a crossbar near the top and one lower down, using square lashings. Make two identical frames. Shallow notches where poles cross stop them rolling.
 2Long rails and a brace
Stand the frames up and lash a long rail along each side at top height and a second one lower down. Add one diagonal brace per side – it makes the table rigid.
 3Top of thin poles
Lay straight, thumb-thick poles across the top rails, side by side, and lash or weave them on. Gaps under a finger wide stop small items falling through.
 4Pot shelf and height check
Lay three or four poles across the lower rails as a pot shelf. A typical working height is 75–90 cm. Load the table gently and wobble it before you trust it with hot pots.
| Item | Poles | Cord | Notes |
|---|---|---|---|
| Work table | 4 uprights about 1.1 m, 4 rails 1.2–1.5 m, 2 braces, 10–15 thin top poles | Several lengths of 3–5 m | Uprights 4–6 cm thick; dead, sound wood |
| Pot shelf | 3–4 thin poles on the lower rails | Short lengths or woven on | Keeps pots and water bag off the ground |
| Wash stand | 3 poles about 1.5 m for a small tripod | One tripod lashing, plus a hanging cord | Water bag at the apex, basin below |
| Pot hanger | Crane, tripod or dingle stick | Metal chain or wire near the fire | See pot hangers |
Sizes are typical values; pick pole lengths to suit the people using the table. Cord types and lengths are in the lashings guide.
A cord under the tarp with a few hooks holds ladle, tongs and the drying cloth. The camp structures section shows racks, tripods and A-frames, and every structure comes down again at the end of the trip.
Hygiene and hand washing in the camp kitchen
Most stomach trouble outdoors comes from hands, not from exotic germs. Fingers that touched wood, soil, raw meat or the latrine trowel go straight into the food. A hand-wash station next to the kitchen, set up before cooking starts, is the single most effective hygiene measure; health agencies recommend washing with soap and water for at least 20 seconds. Hand sanitiser helps, but works poorly on hands greasy with soot or soil.
A hand-wash station in four steps
 1Hang water, put soap out
Hang a water bag with a tap, or a bottle with a small hole in the cap, from a tripod or branch at chest height, with a basin underneath. Put biodegradable soap beside it.
 2Wet your hands
Open the tap just enough for a thin stream. Wet hands and wrists; the basin catches the water so the ground around the kitchen stays dry.
 3Soap and scrub for 20 seconds
Rub palms, backs, between the fingers, thumbs and fingertips for at least 20 seconds, then rinse and let your hands air-dry or use your own towel.
 4Empty the basin far from water
Carry the grey water at least 60 m from lakes and streams, strain out bits and scatter it widely. Never tip it into a stream.
When to wash
- before handling food and before eating;
- after handling raw meat, fish or eggs;
- after the latrine, after handling rubbish and after fetching or treating water;
- after handling firewood, ash or the stove, before going back to the prep table.
The background – and why hands matter more than anything else – is in the hand hygiene section of the outdoor hygiene guide.
Raw and ready-to-eat
Keep two boards and knives: one for raw meat and fish, one for everything else. Use separate tongs for raw and cooked items and never put cooked food back on a plate that held raw meat. Wipe the prep table with hot water after raw meat. Safe core temperatures for meat are listed in campfire food safety.
Washing up
Scrape pots and plates into the rubbish bag first, then wash with hot water and a drop of soap at the washing spot, at least 60 m from water. For groups of six or more, the three-bowl system – wash, rinse, hot rinse – is fast and hygienic; it uses roughly 4–6 L of water per meal for six people, while a solo cook with one scraped pot needs about 0.5 L. Step by step in the three-bowl washing line and the rest of the camp dish washing guide. For drinking and rinse water, a rolling boil of 1 minute (3 minutes above 2,000 m) is enough – see boiling water, and estimate fuel with the boil time calculator.
Food safety and the cool chain at camp
Bacteria multiply fastest between roughly 5 °C and 60 °C, the range food-safety agencies call the danger zone. The kitchen's job is to keep perishables out of it: cold food cold, hot food hot. Keep raw meat, fish, dairy and leftovers in a cool box at 4 °C or below (up to about 7 °C is a common European fridge guideline), and do not leave them out of the cold for more than two hours – one hour when the air is above about 32 °C.

Making the cool box last
- Shade first: place it in the storage zone in full shade, off hot ground, covered with a blanket or sleeping mat.
- Two boxes: drinks get opened all day; food should not. A separate drinks box keeps the food box cold much longer.
- Frozen, not just cold: freeze water bottles or the first dinner as ice blocks. Raw meat goes sealed at the bottom so it cannot drip onto other food.
- Check with a thermometer: if the inside stays above about 7 °C for hours, cook the fresh food at the next meal or discard it.
Without a cool box, plan the menu around shelf-stable food and keep fresh items for the first day; a frozen first dinner in an insulated pouch is usually fine for about 24 hours. Keeping food cold in streams, how long different foods last and how to pack them is all in keeping food cold without a fridge. The food and calorie planner helps plan quantities, and meal planning turns them into a menu.
Dry food and packaging
Dry food – pasta, rice, oats, bread, spices – lives in sealed bags or boxes in the storage zone. Repack at home into portion bags to cut rubbish and handling at camp. Waterproof dry bags protect food and matches from rain and condensation.
Wildlife and smells: keeping animals out of the kitchen
To an animal, a camp kitchen is a smell with a signpost. Mice, foxes, martens, crows, wild boar and raccoons quickly learn that people mean food, and in bear country the stakes are much higher. A clean kitchen protects both the animals and you.
- Nothing smelly in the tents: no food, toothpaste, rubbish or cooking clothes in the sleeping area.
- Sealed and off the ground: food and rubbish in closed boxes or bags, hung or stored in the storage zone overnight and whenever you leave camp.
- Clean as you go: wipe spills, strain dishwater, pack out food scraps. Do not burn leftovers in the fire – they rarely burn completely and attract animals.
- Never feed wildlife, not even birds at the table.
In Central Europe, sealed and stored food is usually enough. In areas with bears, the kitchen and food store move 60–100 m downwind of the sleeping area and food goes into canisters, lockers or proper hangs as local rules require; see bear-country storage. What to do when animals come anyway is covered in a clean camp and the rest of the wildlife safety guide.
Group camp kitchen: roles, routines and flow
A group camp kitchen for six to twenty people works only with clear jobs. Without them, three people crowd the fire, nobody fetches water and the washing-up waits until dark. Name the roles, write a rota and rotate daily, as described in base camp roles.
| Role | Job | Safety point |
|---|---|---|
| Cook (one per fire or stove) | Handles pots, pans, coals and the timing of the meal | Only the cook works at the hot zone; gloves and tongs ready |
| Prep crew | Washes, cuts and portions food at the table | Hands washed first; raw meat on its own board |
| Water crew | Fetches and treats water, keeps raw and treated containers apart | Two people at the water, never alone in the dark |
| Fire keeper | Lights, feeds and later drowns the fire; keeps the woodpile tidy | Never leaves a burning fire unattended |
| Washing-up crew | Heats water, runs the three-bowl line, scatters grey water | Hot rinse with tongs, not bare hands |
A meal in a group kitchen
- BeforeHand-wash station filled, water fetched, fire lit or stove checked.
- PrepPrep crew cuts and portions under the tarp; raw food goes from the cool box straight to the cook.
- CookOne cook at the fire; helpers bring food to the edge of the hot zone, not into it.
- ServeServe from the pot at the cooking spot; leftovers cooled fast and stored, or binned.
- CleanScrape, wash, hot-rinse, dry; table wiped, food stored, rubbish sealed.
Routines that keep it running
- Morning check: cool box temperature, water stock, fuel, and whether animals visited overnight.
- Allergies and diets: ask before the trip, cook the special portion first and give it its own spoon.
- Kitchen boundary: mark the hot zone with a log line; children walk, never run, near it and help with supervised tasks. Ideas in bushcraft with kids.
- First aid at the kitchen: burns are the classic kitchen injury – cool under running water for 20 minutes and keep burn dressings in the first aid kit.
For quantities, pot sizes and shopping lists for groups, see meal planning and camp cookware.
The solo minimalist camp kitchen
Alone or as a pair, a camp kitchen can be a sit pad and a square metre of ground. The zones shrink but do not disappear: stove on a flat stone on the downwind side of you, so smoke and sparks drift away from you and your gear, with its windscreen on the windward side; you, the food bag and the rubbish bag stay upwind, water bottle and mug within reach, and the washing done later at the washing spot. A small groundsheet keeps spoons and lighters out of the leaves.

Minimal solo kitchen kit
- Stove with fuel, or a small fire kit where fires are allowed
- One pot with lid, which doubles as a bowl
- Mug, long spoon and a small knife
- Food bag and a sealable rubbish bag
- Water bottle or folding bag for kitchen water
- A drop of biodegradable soap, a small sponge and a cloth
- Headlamp with a red mode
Solo cooking favours one-pot meals and foil packets that create no washing-up. Weigh the kit with the Kit Builder if you count grams.
Lighting the camp kitchen after dark
Most camp meals end in the dark, and firelight is too flickery for knives and boiling water. Hang a lantern or a headlamp on a cord above the prep table, pointing down, so it lights the work surface without dazzling anyone. Each person carries a headlamp; a red mode keeps night vision and does not blind the person opposite. A small dim light at the washing spot and the latrine path prevents falls. Placement tips and runtimes are in camp lighting.
Tear-down and leave no trace
A camp kitchen is only well run if nobody can tell where it stood. Plan the tear-down as part of the last meal: stop adding wood 45–60 minutes before you leave, so the fire burns down to ash, and wash up before you strike the tarp.
Striking the kitchen
- Put the fire out cold Drown, stir and drown again until the ashes are cold to the back of your hand. Scatter cold ash where permitted and restore the ground, following campfire safety.
- Last washing-up Strain all bowls and scatter grey water widely at least 60 m from water. Food scraps go into the rubbish bag, not into the bushes.
- Untie and return Untie every lashing, coil the cord and return poles to the forest floor where they came from, or pack them out if the owner asks.
- Final sweep Walk the kitchen area in a line and pick up micro-rubbish: twist ties, foil, rice grains, tea bags. Fluff up flattened grass.
- Pack out Carry out all rubbish, including food leftovers and foil.
The principles behind this are explained in Leave No Trace, and the camp setup guide covers breaking camp as a whole.
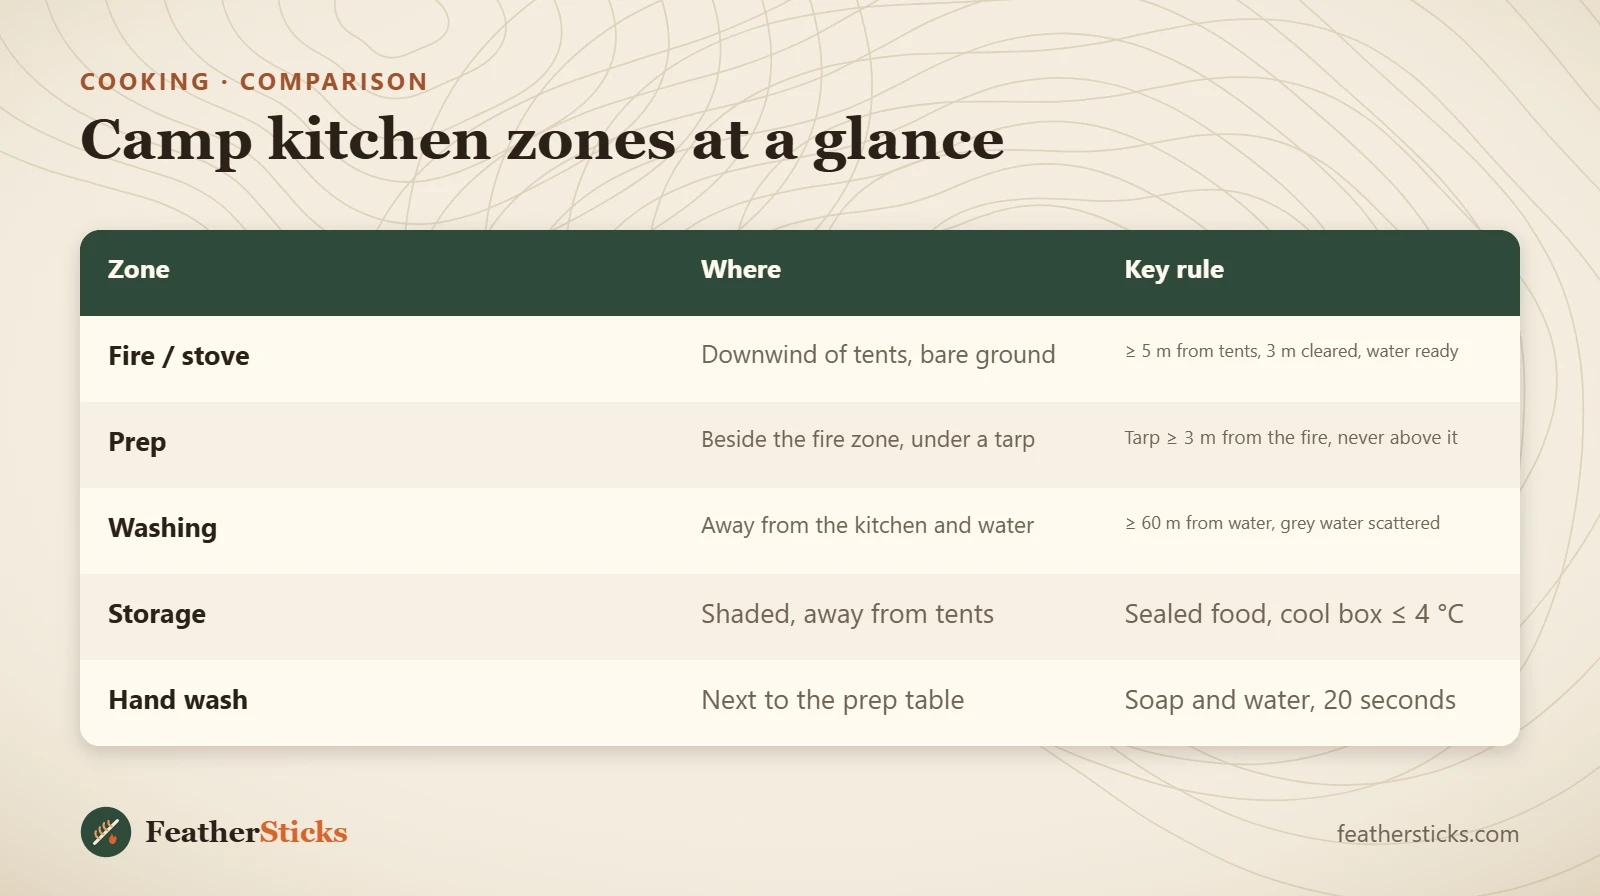
| Zone | Where | Key rule |
|---|---|---|
| Fire / stove | Downwind of tents, bare ground | ≥ 5 m from tents, 3 m cleared, water ready |
| Prep | Beside the fire zone, under a tarp | Tarp ≥ 3 m from the fire, never above it |
| Washing | Away from the kitchen and water | ≥ 60 m from water, grey water scattered |
| Storage | Shaded, away from tents | Sealed food, cool box ≤ 4 °C |
| Hand wash | Next to the prep table | Soap and water, 20 seconds |
Common mistakes
- Putting the kitchen upwind of the tents, so smoke and food smells drift into the beds.
- Stretching a synthetic tarp over the fire or closer than 3 m to it.
- Washing pots in or next to the stream instead of at least 60 m away.
- Opening the food cool box all day for drinks instead of using a separate drinks box.
- Skipping the hand-wash station because "there is sanitiser".
- Leaving food, rubbish or toothpaste in the tents overnight.
- Leaving lashings, poles and micro-rubbish behind after tear-down.
What you need
- Tarp with guylines and pegs for the prep area
- Cord for lashings and a utensil line
- Water containers for raw and treated water
- Cool box with ice blocks and a small thermometer
- Washing-up bowls, strainer, biodegradable soap
- Water bag with tap for a hand-wash station
- Two cutting boards, leather gloves and long tongs
- Lantern or headlamp with red mode
FAQ
How far should the camp kitchen be from the tents?
Can I put a tarp over a campfire?
Where should I wash dishes at camp?
How do I keep food cold at a camp kitchen?
What do I need for a group camp kitchen?
How do I build a camp table without nails?
Can I cook under a tarp with a stove?
Check yourself
Completed6 quick questions from this guide. Nothing is sent anywhere.
Related step-by-step guides
-
 1
-
 1
-
 1