Building a Fire Pit: A Safe Campfire Pit Without a Trace
Knowing how to build a fire pit for camping starts with a rule that surprises many people: the best pit is one you do not build. Where an existing fire ring, a fire bowl or a designated fire place exists, use it. Only where fires are allowed and nothing exists do you make a small, temporary pit on bare mineral soil, with the sod lifted and saved so the ground can be put back exactly as it was.
This guide covers whether a fire is allowed at all (see campfire safety and wild camping rules), how to pick the spot, the four basic types of campfire pit, the step-by-step leave-no-trace pit, the right size for cooking or warmth, a keyhole layout, windbreaks and reflectors, fire on snow, and how to put the fire out and restore the site. It is part of the fire pillar and builds on bushcraft for beginners.
Step by step
-
1

Check rules, use existing sites
Find out if fire is allowed today. Use an existing ring, bowl or designated place before you build anything.
-
2

Pick the spot, clear 3 m
Choose open ground without roots, peat or overhead branches. Clear a radius of about 3 m down to bare soil.
-
3

Lift the sod, dig to mineral soil
Cut and lift the sod in one piece, store it damp and shaded, then dig 15–20 cm down to mineral soil.
-
4

Build small, keep water ready
Ring the pit with dry stones if you have them, keep the fire small and keep water and a shovel within reach.
-
5

Drown, stir, feel, restore
Put the fire out until the ash is cold. Scatter or pack out the ash, fill the pit and lay the sod back.
The first rule: use existing fire sites and bowls
Every new fire scar stays in the landscape for years. A black patch of sterile soil, a ring of blackened stones and a heap of half-burnt wood tell the next visitor that this is a good place for a fire, and so another ring appears a few metres away. That is how a forest edge ends up with a dozen of them. Leave No Trace guidance therefore asks you to concentrate impact: use an established fire ring or designated fire place where one exists, and do not build a second one beside it.
In practice, work through this order of preference before you pick up a shovel:
- A designated fire place or campsite fire pit. Often it has a grate or a fixed ring, sometimes wood is even supplied. Use it as it is.
- An existing fire ring in a sensible spot. Clear old ash to one side, keep the fire inside the ring and do not widen it. Check the surroundings with the rules below, because old rings are sometimes badly placed under branches.
- A fire bowl or fire pan that you carry. It lifts the fire off the ground, leaves no scar and makes the ash easy to pack out, which is why many land managers allow it where ground fires are not allowed.
- A temporary pit on mineral soil, only where fires are permitted and none of the options above exist, built so that nothing remains afterwards.
A fourth idea deserves a mention: do you need a fire at all? For a quick meal or a hot drink, a camp stove is faster, safer and leaves nothing behind. A fire earns its place when you want warmth, light, company or the cooking that only coals give, as in campfire cooking and grilling over a campfire.
Is a campfire pit allowed here? Check before you dig
Whether you may light a fire at all depends on the country, the region, the land type, the season and the current weather, and the answer can change from one day to the next. This guide gives general principles, not legal advice. Rules differ by country and, in federal countries, by state; always check the official information for the exact place and day.
- Fire bans and danger levels. In dry, hot or windy spells, authorities restrict or ban open fires, sometimes including stoves and charcoal. A ban applies to a bowl just as it does to a ground fire. The details are in campfire safety and leave no trace.
- Landowner permission. On private land you need the owner's consent. In public forests fires are often limited to marked places.
- Protected areas. National parks and nature reserves frequently allow fire only in designated rings or not at all.
- Digging. Even where a fire is allowed, digging may not be. Some sites forbid breaking the ground, which leaves a bowl or surface fire on bare soil as the only option.
Overnight camping rules matter in the same way; the overview of wild camping rules explains why a fire is often not the first question but the last one. If you find no clear answer, treat it as a no and use a stove. In an emergency, the number in the European Union is 112.
Choosing the spot: radius, roots, branches and wind
A good pit is mostly a good location. The same checks apply to a ring you only borrow, and they are the same checks as in camp site selection. Walk the area and look in four directions: down, up, around and upwind.
Down: mineral soil, roots and peat
Fire needs fuel, and the forest floor is full of it. Leaf litter, needles and humus burn, and peat or deep humus can smoulder underground for days and come back to the surface metres away. Tree roots carry heat the same way. Look for bare mineral soil, sand or gravel, and dig only where the sod is thin and free of thick roots. If the soil under the turf is dark, spongy and crumbly, or you hit a net of roots at a few centimetres, choose another place.
Up: nothing overhead
Rising heat and sparks dry out and ignite branches above the fire. Look straight up from the planned spot. You want open air above the fire, at least 3 m of vertical clearance for a small fire and more for a bigger one, and no dead limbs that a gust of wind or heat could bring down.
Around: the cleared radius and your camp
Clear a circle of about 3 m radius around the fire down to bare soil, as described in campfire safety. This is a rule of thumb, not a guarantee, but it stops creeping ground fire and gives you room to move. Keep tents and hammocks at least 5 m from the fire and synthetic tarps at least 3 m, never directly downwind of sparks. Only a cotton or poly-cotton tarp in a deliberate reflector setup may sit closer, with constant attention. Stack firewood 2–3 m away on the upwind side.

Upwind: wind direction and shelter
Wind decides where sparks and smoke go. Place the pit so that the main wind carries them away from your tent, your firewood and any dry vegetation, and use natural cover such as a rock or a bank on the windward side. A fire in a hollow full of dry leaves is not sheltered, it is a trap. If the wind is strong enough to move small branches constantly, do not light a fire; see the wind section of campfire safety. For the signs that conditions are about to change, read weather basics.
Types of campfire pits: surface, bowl, dug pit and stone ring
There are four basic ways to hold a campfire. Which one is best depends on the ground, the rules and how much you want to carry. None of them is allowed everywhere, so check the rules first.
Surface fire on mineral soil
A small fire on bare mineral soil, sand or gravel, such as a gravel bar. No digging, no equipment, but only where nothing flammable is under or near it. Afterwards scatter the cold ash and brush the spot over.
Fire bowl, fire pan or fire blanket platform
A metal bowl or pan on legs keeps heat away from the soil and makes clean-up trivial. If you set it on grass or needles, the base can scorch the vegetation, so stand it on bare soil, sand or flat stones. A pad of mineral soil or sand 15–20 cm thick on a groundsheet or fire blanket gives a similar result without a metal bowl; this is the mound fire from campfire safety. A platform of sticks is the usual answer on wet ground, see fire in wet weather.
Dug pit with the sod replaced
Where fires are allowed and digging is not forbidden, a shallow pit gives some wind protection and contains embers and ash. The sod is lifted in one piece and put back afterwards, which is what makes it a leave-no-trace method. The next sections show it step by step.
Stone ring
A ring of stones marks the fire, holds the fuel together and keeps children and pets from stepping into the embers. It is only a good idea when a ring already exists or when the stones are dry and go back where they came from. Stones can also crack, see below.

| Type | Effort | Impact on the ground | Wind protection | Best when |
|---|---|---|---|---|
| Surface fire on mineral soil | Very low | Low if bare soil; a patch of ash | None | Gravel bar, bare clearing, short stop |
| Fire bowl or pan | Carry the weight | Almost none | Low | Rules favour a bowl; fragile ground |
| Platform or mound on a sheet | Medium | Very low | None | Wet or sensitive ground |
| Dug pit, sod replaced | Medium, 20–30 min | Low if restored well | Good | Digging and fire both allowed |
| Stone ring | Low if stones are at hand | Scar if stones stay blackened | Some | An existing ring; dry stones only |
Stone ring: which stones are safe and which can burst?
Stones are not fireproof. Rock that contains moisture can crack or burst when it is heated quickly, because water in the pores turns to steam and the pressure has nowhere to go. Pieces can fly with force. The risk is highest with wet or river stones and with stones taken from beside or below the waterline, such as smooth rounded pebbles from a stream. Dense, smooth, fine-grained river stones are the classic warning case.
- Use dry stones from above the waterline or from dry ground, and prefer rough, angular rock.
- Avoid stones that are wet, flaky, layered or visibly cracked. They crumble or pop.
- Never use stones from the water or from a damp stream bed, and do not throw cold water onto hot stones.
- Keep your face and children back when a fire has just been lit, especially if you are not sure about the stones.
- Put the stones back where you found them when the fire is out, unless it is an established ring.

If you are unsure about a stone, leave it out: a pit without a ring is fine, and stones never cure a wrong spot.
How to build a leave-no-trace fire pit step by step
Only build this pit where a fire and digging are both allowed and no existing site is available. The idea is to borrow the ground for a few hours and give it back unchanged. Prepare your tools first: a shovel or sturdy trowel, a groundsheet to put soil on, a bucket or collapsible container and several litres of water. A pocket knife helps to cut through roots, but a spade does the sod job much better.
Size and depth of the pit
Typical values: a pit about 40–60 cm wide and about 15–20 cm deep is enough for a small cooking or evening fire. The top layer, the sod with its grass and roots, is usually 5–10 cm thick. Digging deeper does not help; it only means more soil to put back. Beyond about 20 cm you risk hitting roots and the fire can spread to them.
Digging the pit: five checkpoints
 1Cut a square of sod
Cut a square about 50 cm wide, deep enough to take the whole turf layer, typically 5–10 cm. Cut straight down on all four sides first, then slide the spade under it.
 2Lift it in one piece
Slide the blade under the sod and carry it as one piece, roots included. If it breaks, keep the pieces together like a puzzle. Never pull it apart or throw it.
 3Keep it damp and in the shade
Put it grass side up on the ground in the shade, away from the fire and from spark paths. Water it lightly. A dry, hot sod dies within hours and will not take root again.
 4Dig to mineral soil
Dig into the pale, mineral layer under the dark humus, to about 15–20 cm below the surface. Put the soil on a groundsheet, not on the grass, so it can be returned cleanly.
 5Edge it with dry stones, if any
Set a single ring of dry, angular stones around the rim if you have them. Keep water and the shovel within arm's reach before the first match is lit.
Light the fire
Keep it small from the start. Gather the wood first (the firewood calculator helps), sorted by thickness as in fire lays, and start with proper tinder, feather sticks or fatwood; DIY fire starters also work. Never use petrol or other accelerants. Stand the fire in the middle of the pit, clear of the sod pile and of overhanging branches.
Never leave the pit unattended
One person stays at the fire from the first spark until it is cold. Wind can rise within minutes, and a pit does not make a fire safe by itself. Children and dogs keep to a marked safety circle; more about this in bushcraft with kids and camping with dogs.
Size and shape: a fire pit for cooking or for warmth
Bigger is not better. A small fire uses less wood, is easier to control and is much more pleasant to cook on. Most bushcraft tasks need a fire no wider than about 50–60 cm. The shape of the pit and of the fire lay depends on the job.
| Purpose | Pit or ring width | Fire size | Suitable lay | Notes |
|---|---|---|---|---|
| Boil water, one pot | 30–40 cm | 25–30 cm | Teepee, then coals | Quick and economical; see boil calculator |
| Cooking for 2–4 | 40–60 cm | 30–50 cm | Log cabin, keyhole | Work on a bed of coals; see campfire cooking |
| Evening warmth for a small group | 60–80 cm | 50–60 cm | Log cabin, star fire | Sit about 2 m back; feed small pieces |
| Group meal and company | 60–80 cm round plus slot | 50–60 cm | Keyhole | Round part for light, slot for pots |
The fire lay picker suggests a lay for your job; the firewood calculator estimates how much wood you need.
Cooking
Cooking needs coals, not flames. Build a lay that collapses into an even bed of coals, such as a log cabin, and keep the pit narrow enough that the pot reaches the heat. Heat control comes from separating a flame zone from a coal zone, which is exactly what the keyhole layout does. For warmth, a compact fire plus a reflector (below) beats a big one: you can sit closer and it uses less wood.
The keyhole layout: a campfire and a kitchen in one
The keyhole fire is shaped like an old-fashioned keyhole. The round part holds the main fire for light and warmth. A narrow slot attached to it takes coals, and the pot sits over the slot. You get a steady heat for cooking without waiting for the main fire to die down, and the cook stays away from the circle where everyone else sits. It works well in a stone-lined pit, in a large existing ring, or on bare mineral soil.
Typical measurements: a round part of about 60–80 cm across, with a slot about 30 cm wide and 40–50 cm long that opens toward the downwind side. These match the keyhole description in fire lays.
Building and using a keyhole fire
 1Mark the shape
Outline a circle of about 60–80 cm and a slot of about 30 cm by 40–50 cm. Point the slot downwind so the wind does not push flames toward the pot or the cook.
 2Set dry stones along the edge
Place a single row of dry stones around the circle and along both sides of the slot, with one at the end. They hold the pot up and keep the coals in the slot.
 3Light the main fire and rake coals
Burn the fire in the round part. As coals form, pull them into the slot with a stick. Keep adding small pieces to the circle and moving coals across.
 4Cook over the slot
Put the pot or pan on the stones over the coals. Slide the pot toward the hot end to boil, away to simmer. See cookware for suitable pots.
A larger keyhole needs more clearance than a round pit, so measure the 3 m radius from the nearest edge of the slot. Never leave a pot unattended on the coals: a spilled pot can scald someone.
Windbreak and reflector: control the fire without enlarging it
Wind makes a small fire flare, throws sparks and takes heat away from the cook. A low wall solves two problems at once: on the windward side it breaks the wind, and on the far side of the fire, behind you, it works as a reflector that sends heat back toward the people sitting there.
The simplest wall is two stakes driven into the ground with logs stacked between them, about knee to chest high depending on its job. Use green logs or stones, because dry wood next to the flames burns and becomes part of the fire. Keep the wall about 40–50 cm from the fire so that it does not catch, and use only a wall you can build from fallen wood where this is allowed. Do not cut live trees for it.

Rules for reflectors
- Keep the wall out of the spark path of tents, tarps and hammocks. The minimum distances from the choosing-the-spot section still apply.
- Take it apart when the fire is out and scatter the wood where you found it, in line with leave no trace.
For a fire in front of a shelter, for example under a tarp, a reflector is the traditional solution; the tarp rules are in tarp shelter. Keep the 3 m rule for synthetic tarps.
Fire pit on snow and frozen ground
On snow you cannot dig a pit and you must not light a fire directly on the surface: the fire melts the snow beneath it and sinks into a wet hole. Build a platform instead: a base of green logs laid side by side, topped with a layer of dry sticks, wide enough that the fire never reaches the edge. It insulates the fire from meltwater and is the winter version of the pit. The full method, including how to keep tinder and fingers warm, is in fire in snow and cold.
Two points are specific to a fire pit: first, put the platform where no snow can fall from branches onto it; second, after the fire, scatter the cold ash on the snow or pack it out, because melted-out ash lies on the ground in spring. On frozen ground you cannot lift sod at all, so a bowl or a platform is the only low-impact option. For cold-weather safety read hypothermia and winter camping.
Putting the fire out and restoring the site
A pit that is not restored is just a hole. The extinguishing method is the same as for any campfire, and it is described in detail in how to put out a campfire: drown, stir, feel. Only when the ash is cold to the touch do you go on to restore the ground.
Plan this before you light: the fire should burn down to ash about an hour before you leave or sleep, and you want daylight for the clean-up. In autumn, the daylight calculator tells you when it gets dark.
Extinguish and restore in four steps
 1Drown and stir
Pour water slowly over all the embers, not just the red ones, then stir the ash to the bottom with a stick or shovel. Typically about 5 litres for a small cooking fire and 10–20 litres for a bigger evening fire.
 2Feel for heat
Hold the back of your hand close to the ash first, then touch it. If anything is warm, drown and stir again. Check under the stones and the pit edge too.
 3Cold ash: scatter or pack out
Scatter cold ash thinly and widely only where this is allowed and the spot is not near water, or pack it out in a non-flammable container. Pack out every half-burnt piece, charcoal that is not burnt through and anything that is not wood.
 4Fill, lay the sod back, water
Return the soil from the groundsheet, tamp it down, lay the sod on top with the seams tight and water it. Put the stones back where you found them and brush the cleared ground over with leaves.
What "no trace" looks like
- The sod sits flush with the surrounding grass, with no gaps and no mounds.
- No foil, packaging, food scraps or burnt rubbish; foil and similar are packed out as in foil packet cooking.
Never bury a hot fire under soil to save time. Embers under soil can smoulder for hours, burn the roots of the sod you just replaced and start a fire later. The comparison is in the figure on buried embers in campfire safety.
Fire pit checklist
Before you light
- Fire and digging are allowed here today; no ban, acceptable danger level
- No existing ring, bowl or designated place that I could use instead
- No roots, peat or overhanging branches; about 3 m radius cleared to bare soil
- Tents and hammocks at least 5 m away, synthetic tarps at least 3 m, upwind
- Sod lifted in one piece, stored damp and in the shade; soil on a groundsheet
- Dry stones only, if any; no wet or river stones
- Water (several litres), shovel and a fire keeper at hand
Before you leave
- Fire drowned, stirred and felt: the ash is cold everywhere, including under the stones
- Cold ash scattered where allowed or packed out
- Pit refilled, soil tamped, sod laid back and watered
- Stones and wood put back; no foil, litter or half-burnt wood left
- Cleared radius covered with leaves; no sign that a fire burned here
Troubleshooting: problems with a fire pit and how to fix them
| Problem | Likely cause | What to do |
|---|---|---|
| Pit fills with water | Low spot, wet ground, rain | Abandon the pit; use a platform or a bowl on higher, drier ground |
| Smoke everywhere, fire sulks | Wet wood, too deep a pit, no air | Use drier, thinner wood; open the side facing the wind; check air gaps |
| Sparks fly out of the pit | Wind, resinous wood, too big a fire | Make the fire smaller, add a windbreak or put it out |
| Stones pop or crack | Wet or river stones | Step back, let the fire die down, remove the stones later when cold |
| Ground smoulders at the pit edge | Roots or humus under the rim | Drown and dig out the smouldering material; do not leave; use another spot next time |
| Ash will not go cold | Thick logs burned late, little water | Split or roll logs, soak them on all sides, add more water and stir again |
Common mistakes when building a fire pit
For further help on lighting and building the fire itself, see fire starting basics, fire lays and fire in wet weather. For navigation to a legal site and an escape route, navigation gear helps, and for a longer stay setting up a base camp covers where the fire place fits into the camp layout. Seasonal patterns of fire danger are covered in camping through the seasons.
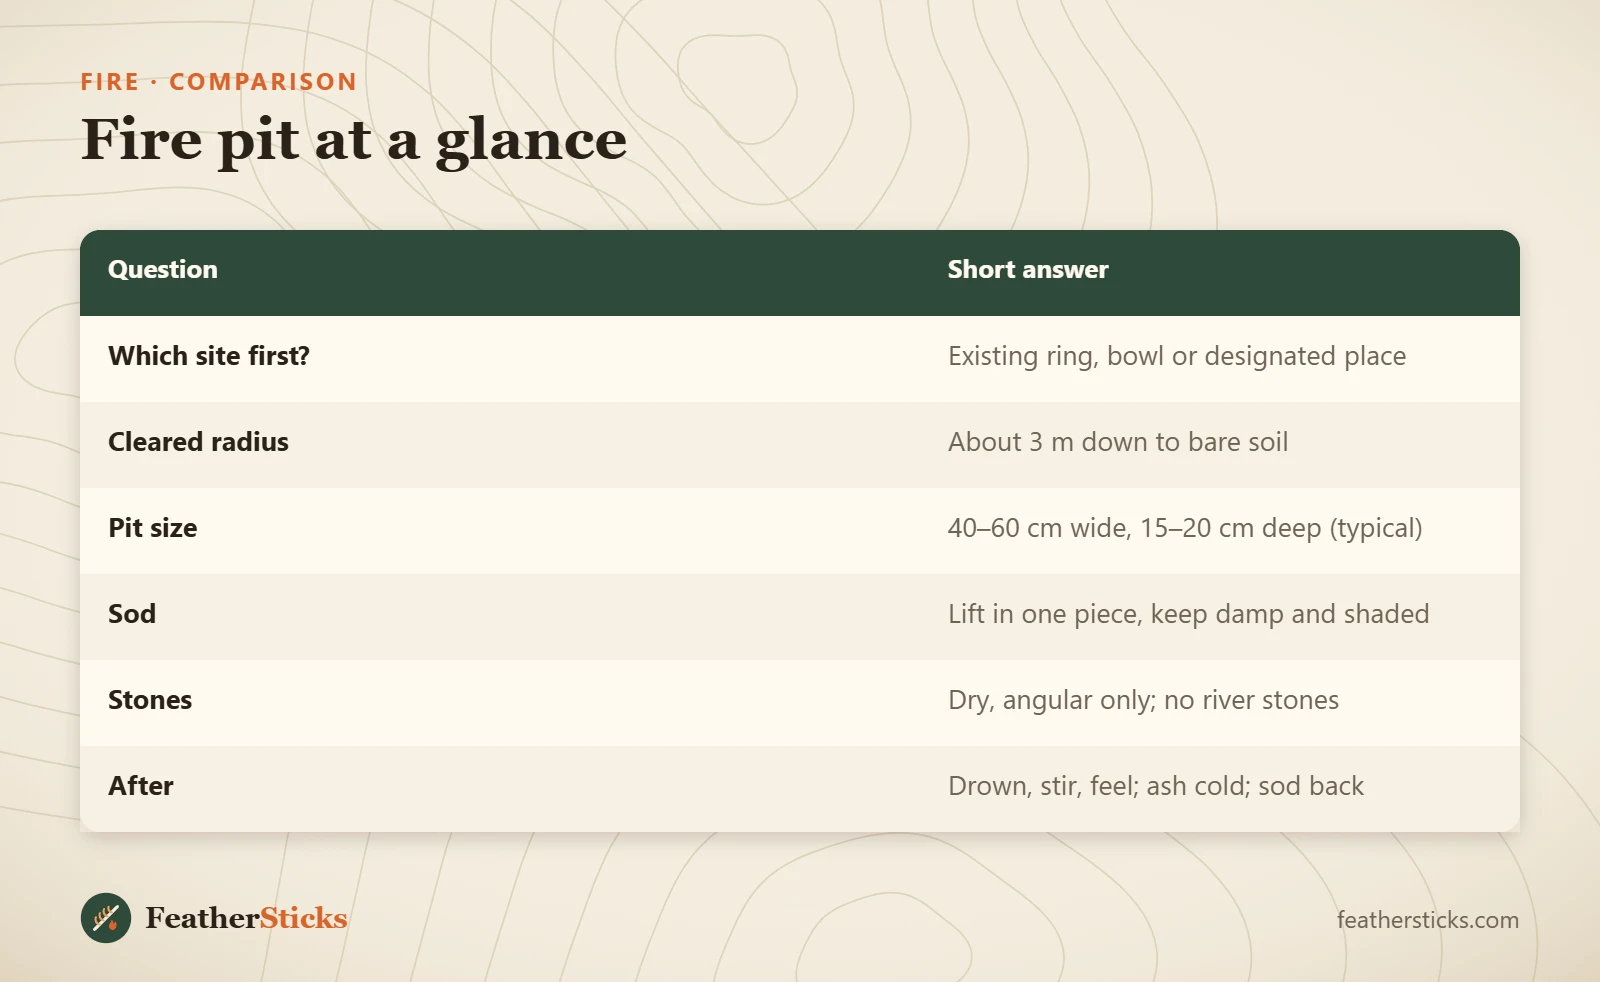
| Question | Short answer |
|---|---|
| Which site first? | Existing ring, bowl or designated place |
| Cleared radius | About 3 m down to bare soil |
| Pit size | 40–60 cm wide, 15–20 cm deep (typical) |
| Sod | Lift in one piece, keep damp and shaded |
| Stones | Dry, angular only; no river stones |
| After | Drown, stir, feel; ash cold; sod back |
Common mistakes
- Building a new ring next to an existing fire site.
- Digging among roots or on peat and humus.
- Throwing the sod away or letting it dry out.
- Using wet or river stones that can burst.
- Making the fire bigger than the job requires.
- Burying hot embers under soil instead of drowning and stirring.
- Leaving without checking that the ash is cold.
What you need
- Shovel or sturdy trowel
- Groundsheet or tarp piece for the soil
- Collapsible bucket or two large water bottles
- Fire bowl or fire pan where ground fires are not allowed
- Leather gloves
- Container or bag to pack out ash and charcoal
- Stove as a fallback during fire bans
FAQ
How do you build a fire pit for camping?
How deep and wide should a fire pit be?
What is a safe campfire pit?
Can river rocks explode in a fire?
How do you leave no trace after a campfire?
Can I make a fire pit in the forest?
How far should a fire pit be from a tent?
Can I build a fire pit on snow?
Check yourself
Completed6 quick questions from this guide. Nothing is sent anywhere.
Related step-by-step guides
-
 1
-
 1
-
 1