How to Use Trekking Poles: Length, Straps, Technique and Tarp Pitching
How to use trekking poles comes down to four things: set the length so your elbow is at about 90° on flat ground, put your hand up through the strap from below, plant the tips beside your feet in rhythm with your steps, and shorten them uphill and lengthen them downhill. Done that way, poles take some load off your knees on descents, give you two extra points of contact on rough ground and in streams, and turn into tent or tarp poles at camp.
This guide covers the types of pole and their trade-offs, length and straps, technique for every kind of terrain, tips and baskets, pitching a tarp on two poles, improvised uses, care and repair, and when to put them away. It belongs to our bushcraft gear guides and works hand in hand with boots and foot care and a well-fitted backpack.
Step by step
-
1

Set the length: elbow at 90°
Stand upright on flat ground, tip beside your foot, and adjust until your forearm is roughly level and the elbow bent at about 90°.
-
2

Hand up through the strap
Slide your hand up through the loop from below, then grip the handle so the strap runs under your palm and takes some of the push.
-
3

Walk: opposite arm, opposite leg
Plant the left pole as the right foot steps forward and vice versa. The tip lands about level with your feet, angled slightly back.
-
4

Shorter uphill, longer downhill
Shorten both poles by about 5–10 cm for long climbs and lengthen them by about 5–10 cm for long descents.
-
5

Cross streams on three or four legs
Open the hip belt, face upstream, keep the poles wide and move only one pole or one foot at a time.
-
6

Pitch your tarp on them at camp
Set both poles to the same length, stand them at the ends of the ridge and guy each one out along the ridge line.
Why use trekking poles? What they do – and what they do not
Trekking poles are not just for alpine hikers. On a bushcraft trip with a heavy pack, muddy forest tracks, steep riverbanks and the odd stream, they do several useful jobs at once.
- Less load on the knees on descents. When you plant the poles ahead of you going downhill, your arms and shoulders take part of each step. Many walkers with sensitive knees notice the difference most on long descents with a full pack. How much load poles take off depends on technique, slope and pack – there is no reliable single figure, so be wary of anyone quoting one.
- Balance. Two extra points of contact help on wet roots, loose stones, ice, snow and narrow paths, and when you are tired at the end of the day.
- Rhythm and pushing power uphill. Arms help to push you up a climb and keep a steady pace.
- Stream crossings. With two poles you always keep two or three points on the riverbed while you move the others.
- Camp uses. They replace tent poles in a trekking-pole tent or two trees under a tarp, probe snow and water depth, push branches aside and help you get up from a low seat.
Poles also have downsides. Your hands are not free for maps, a camera or your carving knife, they catch in dense undergrowth, they make a clicking noise on rock, and the carbide tips scratch rock and wear paths. If you rely on poles for every step, your balance training suffers – it is worth walking without them on easy sections.
Trekking poles in bushcraft: pros and cons
Pros
- Take some load off knees and legs on descents
- Better balance on wet, loose or icy ground
- Safer stream crossings
- Double as tarp and tent poles
- Help to keep a steady rhythm with a heavy pack
Cons
- Hands are not free
- Catch in dense undergrowth and thicket
- Extra weight and something more to carry
- Get in the way when scrambling
- Tips scratch rock and damage soft paths
For many bushcrafters the answer is "it depends on the trip". On a short walk to a base camp in flat woodland, a single pole or a walking staff cut on site (see below) is often enough. On a multi-day route with steep descents, two adjustable poles pay for their weight. The pack weight calculator helps you see how heavy your load really is – the heavier it gets, the more useful poles become.
Types of trekking poles: telescopic or folding, aluminium or carbon
All trekking poles have the same parts: a grip, a wrist strap, a shaft in two or three sections, one or two locks, a basket and a tip. They differ in how they collapse, how they lock and what they are made of.

Telescopic or folding?
Telescopic poles have two or three sections that slide into each other. Their main advantage is a wide adjustment range: you can change the length on every climb and descent, and they can be set to the exact height you need for a tarp. Folding poles (Z poles) work like tent poles: the sections are connected by a cord inside and fold into a short bundle. They pack smaller and are often lighter, but usually adjust only over a short range at the top, or not at all. For bushcraft – where poles often double as tarp poles – an adjustable model is the more versatile choice.

Lever lock or twist lock?
Lever locks (clamp or flick locks) close with a lever around the shaft. You can see at a glance whether they are closed, they work with gloves and the clamping force can usually be adjusted with a small screw. Twist locks use an expanding plug inside the shaft: you turn the sections against each other to tighten them. They are slim, but can slip when dirty or wet, and can be hard to open with cold hands. Many walkers find lever locks easier to use in the field.
Aluminium or carbon?
Aluminium shafts are a little heavier, but they tend to bend before they break – a bent pole can often be straightened enough to get you home. Carbon shafts are lighter and dampen vibration, but they can break suddenly under a sideways load, for example when a pole is trapped between rocks, and a scratch or notch can weaken them. For rough bushcraft use, river crossings and tarp pitching in wind, many people choose aluminium; for long, fast walks on good paths, carbon saves weight.
| Type | Adjustment | Pack size | Strength | Best for |
|---|---|---|---|---|
| Telescopic, aluminium | Wide | Medium | Bends before it breaks | All-round bushcraft, tarp poles, heavy packs |
| Telescopic, carbon | Wide | Medium | Light, can snap under side load | Long walks on good paths |
| Folding (Z), aluminium or carbon | Little or none | Small | Good along the axis | Fast walking, travel, packing into a bag |
| Wooden walking staff | None | Long | Depends on wood | Short walks near a base camp |
Weights and prices vary widely between models; compare the specifications of the poles you are considering rather than relying on general claims.
Grips and other details
Grips are made of foam, cork or rubber. Foam and cork stay comfortable on warm days and absorb sweat; rubber is durable and better in cold, wet conditions. An extended foam section below the grip lets you hold the pole lower on short climbs and traverses without changing the length. Whatever you choose, check that the poles can be set to the length you need for your tarp setup as well as for walking.
How long should trekking poles be? Setting the right length
The classic rule of thumb for trekking pole length: on flat ground, with the tip on the ground beside your foot, your elbow should be bent at about 90° and your forearm roughly level. Another rule of thumb you will often see is about two-thirds of your body height. Both are starting points, not exact formulas – arm length, shoe sole and personal preference all play a part, so adjust from there.
Setting the length of telescopic poles
 1Open the lock
Flip the lever open (or turn a twist lock anticlockwise) on the section you want to adjust. Start with the lower section on three-section poles.
 2Respect the stop mark
Pull the lower section out to near its stop mark, never past it. Beyond the mark the overlap inside the shaft is too short and the pole can bend or slip.
 3Set your length on the scale
Fine-tune with the upper section using the printed scale. Note your number for flat ground – then you can set both poles the same in seconds.
 4Close and test
Close the lock and lean your weight on the pole. If it slides, open the lever and tighten its adjustment screw a little, or turn the twist lock more firmly.
Adjusting for hills
On long climbs, shorten both poles by about 5–10 cm so you can push without lifting your shoulders. On long descents, lengthen them by about 5–10 cm so you can plant them ahead of you without bending forward.
Trekking pole length at a glance (rules of thumb)
- Flat ground
- Elbow at about 90°, forearm roughly level
- Long climb
- About 5–10 cm shorter than on the flat
- Long descent
- About 5–10 cm longer than on the flat
- Traverse
- Uphill pole shorter, downhill pole longer – or hold the uphill pole lower
- Tarp pole
- Set by the pitch height – often about 1.2–1.4 m
How to use trekking pole straps correctly
The wrist strap is not just there to stop you dropping the pole. Used correctly, it carries part of the push, so you do not have to grip hard all day. The trick is to put your hand up through the loop from below, then close your hand over the grip and the strap together. The strap then runs between your palm and the grip, and you can push down on it with a relaxed hand.
Putting your hand in the strap
 1Let the loop hang
Hold the pole in front of you and let the strap hang open. Adjust it so the loop is just big enough for your hand – with gloves on in winter.
 2Hand up from below
Push your hand up through the loop from underneath, so the strap lies over the back of your wrist.
 3Grip over the strap
Close your hand around the grip with both strap ends between palm and grip. Now you can push down on the strap and keep a loose grip.
Adjust the strap so your hand sits on the grip without your wrist being pulled. A strap that is too long makes you squeeze the grip; one that is too short pinches the wrist. Keep a relaxed hand – a tight grip all day tires your forearms and can cause numb fingers.
When to take your hands out of the straps
Straps hold the pole to your wrist. That is useful on normal paths, but a risk wherever a pole can get stuck: between rocks, roots or in a stream bed. If you fall with your hand locked in the strap, the pole can twist your wrist or shoulder. Take your hands out of the straps on scrambles, boulders, steep descents through roots, stream crossings and in deep snow, and hold the poles by the grip only. Many walkers also leave the straps off in dense woodland, where poles catch on branches.
Trekking pole technique: flat, uphill, downhill and traverses
On flat ground
Use the natural rhythm of walking: opposite arm, opposite leg, as when you swing your arms without poles. As your right foot steps forward, plant the left pole, and the other way round. The tip lands roughly level with your feet, angled slightly backwards, so you can push off it. Do not reach far forward with the poles on the flat – that only slows you down and puts the load on your wrists. Some walkers plant both poles at once (double poling) on easy terrain to stretch the back or to push up a short step.
Uphill
Shorten the poles a little, lean slightly forward and plant the tips close to your feet or just behind them. Push down and back through the straps as you step up – the arms help the legs. On steep steps, plant both poles together on the step above and push yourself up. Keep your steps short and the pace steady; the hiking time calculator shows why climbs take longer than you think.
Downhill
This is where poles help most. Lengthen them, keep your knees slightly bent and your weight over your feet, and plant the poles ahead of you before you step down. On steep sections, plant both poles together, then step down between or next to them. Do not lean back on the poles – that pushes your feet forward and makes you slip. Short steps and a heel lock in your boots (see lacing techniques) protect the toes.
Traverses and sidehills
When the path runs across a slope, the uphill pole needs to be shorter than the downhill one. Either adjust the two poles to different lengths for a long traverse, or simply hold the uphill pole lower down on its grip. Plant the downhill pole a little further out for support, and keep your weight over your feet rather than leaning into the slope.
Snow, ice and mud
In snow, fit snow baskets so the poles do not sink, and lengthen them a little. On icy forest tracks the carbide tips grip well, but they do not replace traction devices on your boots. In deep mud, plant the poles on firmer ground at the edge of the track and test before you put weight on them – a pole that sinks suddenly can throw you off balance. In winter conditions also read moving through snow and the winter camping guide.
| Terrain | Pole length | Where the tips go | Watch out |
|---|---|---|---|
| Flat path | Elbow about 90° | Beside the feet, angled back | Do not reach far forward |
| Uphill | About 5–10 cm shorter | Close to or behind the feet | Push through the straps, short steps |
| Downhill | About 5–10 cm longer | Ahead, on firm ground | Do not lean back on the poles |
| Traverse | Uphill pole shorter | Downhill pole further out | Keep weight over the feet |
| Snow | A little longer | Wide, with snow baskets | Hands out of the straps in deep snow |
| Roots and boulders | As on the slope | Into gaps, then test | Hands out of the straps |
Crossing streams with trekking poles
For a small stream, poles turn you from two legs into a stable three- or four-legged walker. The rules for any crossing still apply: do not cross water that is fast, cloudy, above the knee or rising after rain. Walk up- or downstream to a wider, calmer section, or turn back. When in doubt, do not cross.
A safe stream crossing with two poles
 1Prepare on the bank
Open the hip belt and chest strap so you can get out of your pack if you fall. Take your hands out of the pole straps. Keep your boots or closed camp shoes on – never cross barefoot.
 2Face upstream, poles wide
Stand facing into the current, slightly angled, with the poles planted wide on the upstream side. You lean into the water on a broad base.
 3Move one point at a time
Move only one pole or one foot at a time, so two or three points always stay on the bottom. Shuffle sideways in small steps and test each placement before you put weight on it.
 4Out, close up, dry off
On the far bank, close the belt again and change into dry socks at the next stop. Cold water chills feet and legs quickly – keep moving to warm up.
Use a pole to probe the depth and the bottom ahead of you – a pole that disappears much deeper than expected, or that is pushed sideways hard by the current, tells you to stop.
Pole tips and baskets: carbide, rubber, trek and snow baskets
Most poles come with a carbide tip: a hard metal point that grips on rock, ice and hard ground. On asphalt, in towns and on hard paths, a rubber cap (rubber tip, pad) reduces noise, protects the tip and grips better on smooth surfaces. Rubber caps also protect tarp fabric when you use the pole as a tarp pole tip-up, and stop the tips scratching rock on popular paths.

| Tip or basket | Use it on | Note |
|---|---|---|
| Carbide tip | Rock, ice, hard forest paths, roots | Wears over time; replaceable on many poles |
| Rubber cap | Asphalt, hard tracks, towns, tarp pitching | Remove on ice and wet rock – it slips |
| Small trekking basket | Mud, soft forest floor, between stones | Stops the pole sinking and getting stuck |
| Snow basket | Snow | Large diameter, so the pole does not sink deep |
Baskets screw or click onto the shaft above the tip. Keep the spares in your repair kit – a lost basket in snow makes the pole almost useless. On rock or ice, take rubber caps off: they slip on wet stone.
Trekking poles as tarp poles: pitching an A-frame without trees
One of the best reasons to carry trekking poles in bushcraft: they replace trees. On open ground, on moorland, above the tree line or where the trees stand in the wrong place, two poles hold up the ridge of a tarp – the classic A-frame pitch. Set both poles to the same length, often about 1.2–1.4 m depending on your tarp and pitch, and guy each one out along the ridge line. The tension of the guylines and the tarp holds the poles upright.
Tarp A-frame on two trekking poles
 1Set both poles to the same length
About 1.2–1.4 m is typical for an A-frame; lower in wind and rain, higher for more headroom. Many people stand the pole on its grip and put the tip – with a rubber cap – into the tarp's ridge loop.
 2Guy each pole out along the ridge
Run a guyline from each pole top outwards along the ridge axis to a stake at roughly 45°. Add a second line in a V for more stability in wind.
 3Peg the edges
Stake the corners and the middle of each side. Peg opposite corners in turn so the tarp stays centred over the poles.
 4Check: upright and taut
Both poles should stand vertical and the ridge should be straight and taut. If a pole leans, adjust its guyline rather than the tarp edges.
For a single-pole pitch such as a plow point or a half pyramid, one pole at the front corner is enough; for an asymmetric pitch, combine one tree and one pole. The full range of pitches, angles and ridge heights is explained in the tarp shelter guide, and the Tarp Planner calculates the height for your tarp size. In wind, pitch low and turn the narrow end into the wind – more in camping in wind. A taut ridge depends on good tensioning knots.
Many lightweight tents are designed to be pitched with trekking poles instead of their own poles, as described in the tent guide. Check the required pole length before you buy either one: some folding poles are too short or cannot be set to the exact height. For a quick shelter on a bivouac, poles and a small tarp are often all you need.
Trekking poles in an emergency: splints and other improvised uses
Poles are among the most useful items you carry when something goes wrong, but only if you know your limits. A first aid course teaches you what to do; the poles just give you material.
- Padded splint support: a pole can stiffen a padded splint made from a rolled foam mat for a suspected lower-leg or forearm injury. Pad it well with clothing, immobilise the joints above and below, tie it on firmly but not tightly, and check circulation beyond the splint regularly. Follow the guidance in improvising first aid in the field and get help rather than walking out on a suspected fracture.
- Shelter: a tarp pitched low on poles protects a casualty from wind and rain while you wait for help. Insulation from the ground matters even more – see hypothermia.
Care and repair: keeping your poles working
Poles need little care, but dirt and water in the sections are the main cause of slipping locks and stuck sections.
- After wet or muddy trips: pull the sections apart completely, rinse off grit, and let them dry separately at room temperature.
- Locks: check that lever locks clamp firmly; tighten their small adjustment screw by hand or with a coin or small tool. Do not oil twist locks – they need friction to work.
- Tips and baskets: check the carbide tips for wear and replace them before they are worn down to the plastic holder; replace lost baskets.
- Straps and grips: wash sweaty straps and foam grips with water and a little mild soap now and then.
Field repairs
A bent aluminium section can often be carefully straightened by hand, supported over the knee – go slowly and accept that it will be weaker. A cracked or broken section can be splinted like a tent pole: a repair sleeve or a straight stick lashed along the break with tape or cord, as shown in how to repair a broken tent pole. A slipping twist lock sometimes grips again after the sections are cleaned and dried. If a lever lock has lost its screw, a cable tie can hold it shut for the rest of the trip.
| Problem | Likely cause | Fix |
|---|---|---|
| Pole slides shorter under load | Lever too loose, or twist lock dirty | Tighten the lever screw; clean and dry the twist lock |
| Sections stuck together | Grit, corrosion or dried mud inside | Rinse with warm water, twist gently; never use pliers on carbon |
| Bent lower section | Trapped between rocks | Straighten carefully, or swap with a spare section |
| Cracked carbon section | Side load or impact | Splint for the walk out, then replace |
| Tip slips on rock | Rubber cap on, or carbide worn | Remove the cap; replace the tip |
When to leave trekking poles behind – or pack them away
Good pole technique includes knowing when to put them away. Stow them on your pack – collapsed and strapped to the side or in the pole loops, tips down and covered – in these situations:
- Scrambling: as soon as you need your hands on rock, poles get in the way and can lever you off balance. Collapse them before the scramble, not halfway up.
- Thunderstorms: do not carry poles raised above your head or strapped upright so they stick out above your pack. Getting off ridges and summits early matters far more than the poles, but once the storm is within reach – under 30 seconds between flash and thunder – collapse the poles and lay them on the ground a few metres away from you. Read lightning safety and thunderstorm warning signs.
- Navigation stops: poles held near a compass can deflect the needle – lay them aside, as explained in navigation gear.
Poles out or poles away?
Do you need your hands on the rock?
Yes → Collapse the poles and stow them on the pack before you start.No → Go on to the next question.Is there thunder or a storm building nearby?
Yes → Leave exposed ground now; collapse the poles, never hold them above your head, and lay them a few metres away when the storm is close.No → Go on to the next question.Is the path blocked by dense thicket?
Yes → Carry both poles in one hand or on the pack.No → Poles out, hands in the straps on normal paths.
A natural walking staff: the bushcraft alternative
Before adjustable poles, walkers used a wooden staff – and it still has a place in bushcraft. A single staff gives you a third point of contact on slopes and in streams, pushes brambles aside, can serve as a ridge pole support or a measuring stick, and costs nothing. It does not adjust, it is heavier than a pole, and one staff does not take as much load off the knees as two poles.
Choosing and making a staff
- Wood: straight, tough and elastic hardwoods such as hazel, ash or rowan; the tree identification guide helps you recognise them. Avoid dead, rotten or brittle wood.
- Length: roughly shoulder to chin height for a single staff, or cut it to your trekking pole length if you want to use it like a pole.
- Finishing: remove side shoots and smooth the grip area with a knife, round the top, and leave the bottom end blunt and slightly chamfered so it does not split. The basic cuts are in our carving guide and the whittling guide.
Only cut living wood with the landowner's permission – in many places it is not allowed. A fallen, sound branch or a staff from your own garden is the safe option. Rules vary by country and region; check locally.
Trekking poles vs wooden staff
Trekking poles
- Adjustable for climbs, descents and tarps
- Two points of support
- Light and pack small
- Need care and spare parts
Wooden staff
- Fixed length
- One point of support
- Heavier and does not pack
- Free, repairable, made on site
Many bushcrafters combine both: poles on the way in with a heavy pack, a staff around a base camp. New to all this? Start with bushcraft for beginners and add poles once you know your terrain. The Kit Builder helps you decide what goes in the pack and what stays at home.
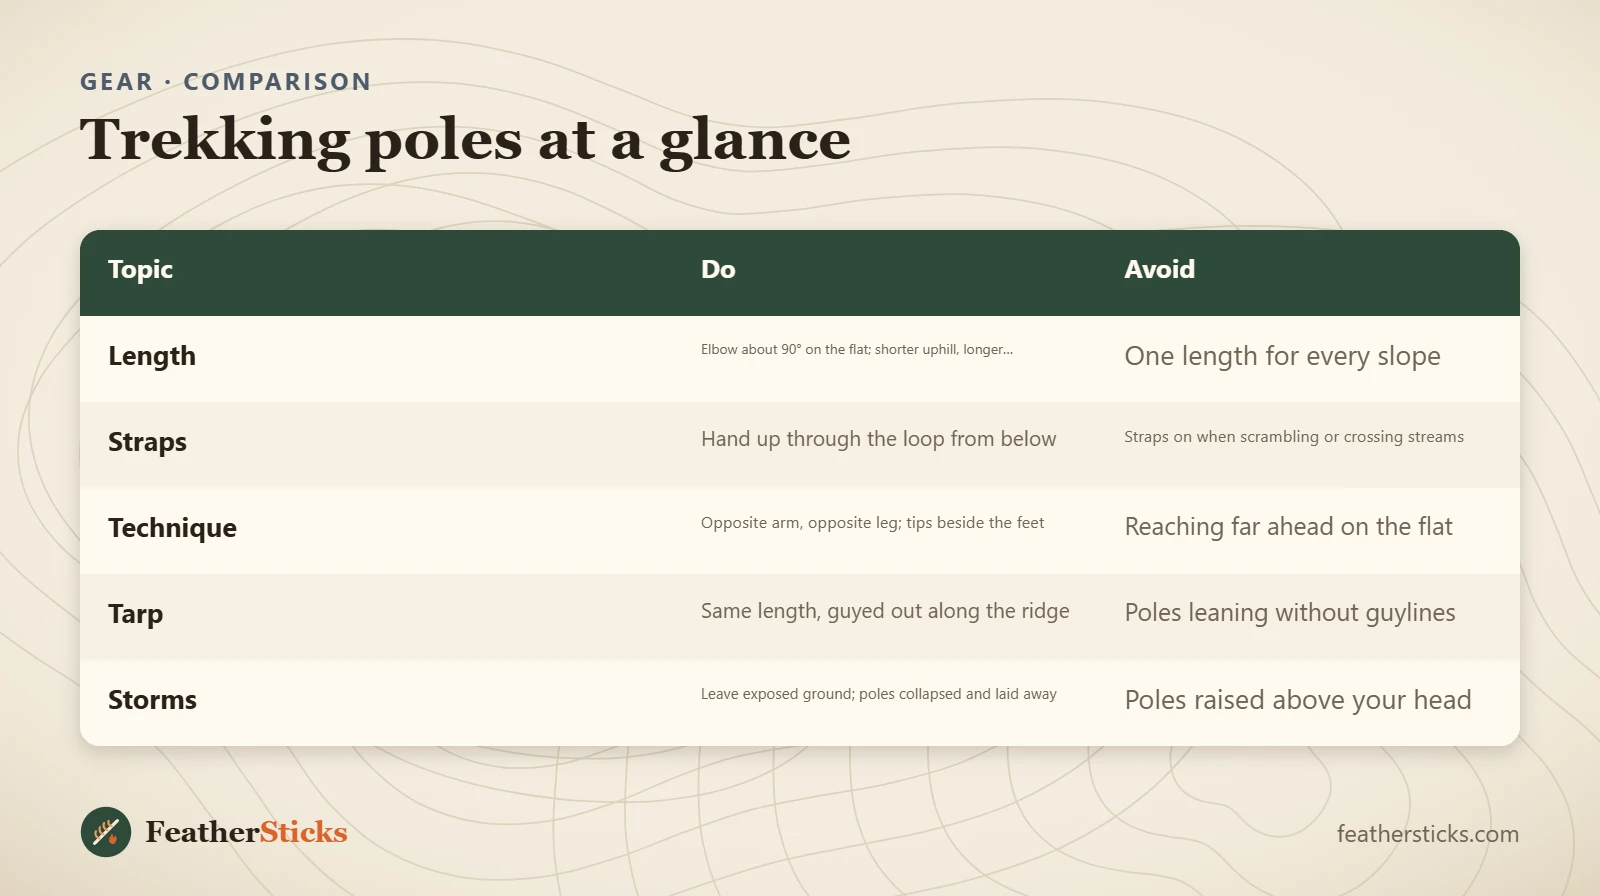
| Topic | Do | Avoid |
|---|---|---|
| Length | Elbow about 90° on the flat; shorter uphill, longer downhill | One length for every slope |
| Straps | Hand up through the loop from below | Straps on when scrambling or crossing streams |
| Technique | Opposite arm, opposite leg; tips beside the feet | Reaching far ahead on the flat |
| Tarp | Same length, guyed out along the ridge | Poles leaning without guylines |
| Storms | Leave exposed ground; poles collapsed and laid away | Poles raised above your head |
Common mistakes
- Setting the poles too long, so the shoulders rise and the arms tire.
- Putting the hand into the strap from above, so it carries no load.
- Keeping the hands in the straps on scrambles and in stream crossings.
- Pulling a section past its stop mark.
- Leaning back on the poles on a steep descent.
- Leaving rubber caps on for wet rock and ice.
- Pitching a tarp on poles without guying them out along the ridge.
What you need
- Pair of adjustable trekking poles with wrist straps
- Rubber caps for hard paths and tarp pitching
- Small trekking baskets and snow baskets for winter
- Coloured tape to mark your settings (doubles as repair tape)
- Spare tip and basket in the repair kit
- Two guylines and stakes for a pole-pitched tarp
FAQ
How long should my trekking poles be?
How do you use trekking pole straps correctly?
Do trekking poles really help your knees?
One pole or two?
Are carbon or aluminium trekking poles better?
Can I pitch a tarp with trekking poles?
Should I use trekking poles in a thunderstorm?
Check yourself
Completed6 quick questions from this guide. Nothing is sent anywhere.
Related step-by-step guides
-
 1
-
 1
-
 1