Carving a Bushcraft Mallet and Wooden Splitting Wedges
A bushcraft mallet is a one-piece wooden club with a thick head and a carved handle, and carving a wooden mallet takes one sound hardwood log, a folding saw, a knife and an hour or two. With it you drive tent pegs without splitting them, tap chisels and gouges, and, together with two or three wooden splitting wedges, open rounds and long logs that are too thick for a knife and baton.
This guide covers choosing the wood, rule-of-thumb sizes, the stop cut that makes the handle, round versus flat striking faces, carving wedges, splitting a round, tent pegs as a bonus project, drying, safety and doing it with children. It builds on whittling projects for beginners and the grips in carving basics. New to all this? Start at bushcraft for beginners or browse all bushcraft skills.
Step by step
-
1

Choose dense, sound hardwood
Beech, hornbeam, oak or maple, 10–12 cm thick, dead but not rotten, or wood you have permission to cut. No fungus, no soft spots.
-
2

Saw a blank of 45–55 cm
Mark 15–20 cm for the head and 30–35 cm for the handle. Saw both ends square.
-
3

Stop cut, then the handle
Saw a stop cut all round at the head line, about 4 cm deep. Baton off the waste and carve the handle to about 3 cm.
-
4

Chamfer and smooth the grip
Chamfer the end edges of the head, leave a small swell at the handle end and check the shoulder for cracks.
-
5

Carve two or three wedges
Split blanks of green hardwood without pith, 15–25 cm long, with a long taper of 10–15° and a chamfered head.
-
6

Split with wedges and mallet
Set a wedge in a drying check, tap it in, then strike square. Stand to the side and wear eye protection.
Why carve a mallet? Baton vs mallet
A baton is any straight club of wood you pick up to strike a knife spine. A mallet is a tool you make on purpose: a heavy head for mass, a slimmer handle for grip and control. Both strike wood with wood, which is the point. Steel hammers and rocks chip blade spines, mushroom axe polls and send splinters flying, so in bushcraft every blow on an edge tool or a wooden part comes from wood.
A mallet earns its place in a base camp or on a longer trip for four jobs:
- Driving pegs and stakes. Carved tent pegs, tarp stakes and the uprights of a sawbuck go in straight without crushed heads.
- Batoning. For batoning with a knife a light baton is usually better, but a small mallet drives a hatchet through a stubborn piece, struck on the poll, never on the edge.
- Splitting with wedges. Wedges turn a mallet into a splitting tool for rounds that are too thick to baton. This is the main reason to make one.
- Carving with chisels and gouges. Wooden-handled chisels and gouges for bowls are tapped with a wooden mallet; see carving tools. Never use your knife as a chisel under a mallet: a knife is not made for it, and the blade can snap or skid.
Baton or mallet?
Baton
- Straight hardwood club, 40–50 cm × 5–8 cm
- Made in a few minutes
- Light: precise taps on a knife spine
- Wears out fast on wedges and pegs
Mallet
- Head Ø 10–12 cm, handle about 3 cm thick
- 1–2 hours of carving
- Heavy head: fewer blows on wedges and pegs
- Lasts many seasons if dried slowly
The baton figures come from our batoning guide. If you only split kindling on short trips, a baton is enough. If you camp in one place, build structures, carve bowls or split bigger rounds, the mallet pays for its carving time within a day.
Which wood is best for a mallet and wedges?
A mallet head needs dense, tough hardwood that does not crush or split under blows. Wedges need the same, plus straight grain so they do not break across the taper. The species below are the ones our tree identification guide names for mallets, wedges, handles and batons. If you cannot identify a tree, you can still judge the wood: heavy, hard under the thumbnail, and clean when cut.
| Wood | Mallet head | Wedges | Notes |
|---|---|---|---|
| Beech | Very good | Very good | Dense and even; the classic choice in Central Europe. Old beeches drop heavy limbs: do not work under them |
| Hornbeam | Excellent | Excellent | Extremely hard, which also makes it hard to carve and split |
| Oak | Good | Good | Heavy and durable; tannins stain steel and hands, so clean the knife afterwards |
| Maple, sycamore | Good | Good | Pale, even wood that carves cleanly |
| Ash | Good (handle-quality wood) | Fair | Tough and springy; ash dieback makes crowns brittle, keep away from dying ash |
| Birch | Fair | Fair | Works for a first mallet; dead birch rots fast inside sound-looking bark |
| Spruce, pine | Poor | Poor | Soft; crushes and splinters quickly |
Dead but sound, or green with permission
Dead but sound hardwood is the best start for a mallet: it is already dry, so it will not shrink or crack much later. It is harder to carve, which is why a saw does most of the work. Green wood from a freshly fallen tree or from permitted forestry or garden work carves far more easily, but a thick piece with the pith inside will check (crack) as it dries. Green wood is the easy choice for wedges, which are thin enough to dry without serious cracks. Wood you collect for firewood follows the same logic; see processing firewood.
How to spot rot
- Push a knife tip into the end grain: sound wood resists, rotten wood lets the tip sink in easily.
- Knock two pieces together: a clear knock means sound and dry, a dull thud means wet or rotten.
- Look for bracket fungi, soft or stringy fibres, white or brown crumbly patches and a heavy, sour smell.
- Bark that slides off a birch log often hides rotten wood inside.
How big should a bushcraft mallet be?
There is no standard size. The figures below are rules of thumb that balance weight against control; adjust them to your hand, your strength and the job. A head that is too heavy tires the wrist and makes blows inaccurate. A handle much thicker than about 3 cm is hard to grip, and a thinner one can snap at the shoulder.
| Type | Head Ø | Head length | Handle | Use |
|---|---|---|---|---|
| Light carving mallet | 8–10 cm | 12–15 cm | 25–30 cm × 2.5–3 cm | Chisels, gouges, small pegs |
| Camp mallet | 10–12 cm | 15–20 cm | 30–35 cm × about 3 cm | Pegs, stakes, wedges: the all-rounder |
| Heavy splitting mallet | 12–15 cm | 20–25 cm | 35–45 cm × 3.5–4 cm | Long logs and big rounds with wedges |

The camp mallet is the version this guide makes. Its blank is 45–55 cm long, so a log of 10–12 cm diameter and about half a metre is all you need. The same figures appear for the mallet project in our whittling guide.
How to carve a wooden mallet with a saw and knife
The one-piece mallet is the bushcraft design: head and handle come from the same log, so the grain runs unbroken from the knob into the head and there is no joint to work loose. You need a folding saw, a sturdy fixed-blade knife (see choosing a bushcraft knife), a baton and a chopping block or stump.
1. Mark and saw the blank
Saw both ends of the log square. Measure 15–20 cm from the better end (fewest knots, no cracks) for the head and mark the line all round with a pencil or a shallow knife score. The rest, 30–35 cm, becomes the handle.
2. Saw the stop cut
The stop cut is a saw kerf all round the log at the head line. It decides where the head ends and stops every split you make on the handle side from running into the head. Its depth follows a simple rule: (head diameter − handle diameter) ÷ 2. For a 11 cm log and a 3 cm handle that is (11 − 3) ÷ 2 = 4 cm. Saw a few centimetres, turn the log, saw again, and keep the kerf at even depth all the way round. Stop slightly short of the line: you can always clean up the shoulder with the knife, but a kerf that is too deep leaves the handle thin exactly where it takes the most strain.
From blank to mallet after the stop cut
 1Baton off the waste
Stand the blank on its head on a block. Set the knife on the end grain outside the handle line and baton it down; the slab breaks off at the stop cut. Work round the handle in slabs, never cutting inside the dashed line.
 2Carve the handle
Rest the handle end on the block and carve with long strokes away from your body and from the hand holding the head. Turn the mallet after each few strokes to keep the handle round.
 3Clean the shoulder
Take small cuts towards the stop cut to tidy the corner where handle meets head, the blade moving away from your holding hand. Leave a tiny rounded fillet rather than a sharp inside corner.
 4Test the grip
Leave a small swell at the handle end so the mallet cannot slip out. The handle should fill your fist comfortably. Check the shoulder for cracks before the first blow.
3. Remove the waste
Splitting the waste off is faster and safer than carving it all away. Use knife and baton or a hatchet struck with the baton: place the edge on the end grain a little outside the handle line, drive it down, and the slab parts at the stop cut. In knotty or twisted wood the split may wander towards the handle; take thinner slabs or saw a few extra relief kerfs down to the stop cut and chop the waste out between them.
4. Carve the handle round
Now shave the octagonal handle round with long, controlled strokes. Use the chest-lever and push-cut grips from carving basics, and keep the blade moving away from your body and holding hand. Thin shavings, a sharp edge and frequent stropping matter more than strength; see sharpening a knife. Aim for about 3 cm, slightly oval if that suits your hand, and leave the last 2–3 cm a little thicker as a swell.
5. Finish
Chamfer the sharp edges of both end faces of the head so they do not splinter, round over the end of the handle and smooth any hot spots where your palm rubs. Leave the bark on the head if it is tight; peel it if it is loose, because loose bark traps moisture and insects. If the wood was green, dry it slowly as described further down.
Round or flat striking face?
On a one-piece mallet you strike with the side of the head, the long-grain surface of the log, not with its end. Long grain is tough; end grain struck hard tends to open drying checks and split along them. That leaves one choice: keep the round side as it is, or flatten one or two faces.

Round vs flat face
Round face
- No extra work: the log as it grows
- Hits squarely at any rotation
- Classic for chisels and gouges
- Narrow contact: off-centre blows can glance
Flat face
- Flatten one or two sides with knife or hatchet
- Broad, predictable contact on peg heads and wedges
- Edges must be chamfered or they splinter
- You must keep the face square to the target
For a first mallet, keep it round: it is forgiving and finished sooner. If you mainly drive pegs and wedges, a single flat face of about 3–4 cm width on the striking side is a good compromise. Whichever you choose, a mallet that is used often develops a slightly flattened, crushed spot; that is normal wear, not a defect.
Carving wooden splitting wedges
Wooden wedges, sometimes called gluts, do what a knife does in batoning, without risking the knife. They open a split further than any blade, they can be driven deep into the side of a crack, and they are free. Make two or three, because splitting is a relay: one wedge opens the crack, the next one goes in further along.
Wood and blank
Carve wedges from green hardwood such as beech, hornbeam, oak or maple: it is far easier to carve than dry wood. Dense, dead but sound hardwood works too, as our batoning guide notes. Split the blank out of a round rather than sawing it, so the grain runs straight from head to tip. Take it from beside the pith, never through it, and avoid knots.
Sizes and taper
As a rule of thumb, wedges are 15–25 cm long, 4–6 cm wide and about 3–4 cm thick at the head, tapering to a blunt edge of a few millimetres. That gives an included angle of roughly 10–15°. A steeper wedge splits with fewer blows but tends to jump out of the crack; a longer, slimmer one holds better but needs more blows. Make the tip blunt rather than knife-sharp, because a thin tip crushes.
Carving a wedge
 1Split a clean blank
Split a radial piece from beside the pith, straight-grained and free of knots, about 15–25 cm long. A board that contains the pith will crack.
 2Carve an even taper
Hold the thick end and carve towards the tip, away from your holding hand. Take the same amount from both faces so the tip stays on the centre line, at about 10–15° included angle.
 3Chamfer and dry
Chamfer the head all round so blows do not split it into splinters. Let green wedges dry slowly in the shade for a few days before heavy use; they become harder as they dry.
Wedges wear out. When the head mushrooms or splits, saw off the damaged part and re-chamfer it; when the wedge is too short to grip a crack, it becomes kindling. A small bundle of spare wedges is worth carving on a rainy afternoon.
Splitting a round with wedges and a mallet
Splitting with wedges is slower than with an axe but calm, quiet and possible with a lightweight kit of saw, knife and mallet. Saw the wood to rounds of 25–35 cm first, the usual length for fire pits in our firewood guide, and use the firewood calculator to estimate how much you need for an evening.
Splitting a round, wedge by wedge
 1Set the wedge in a check
Stand the round on a block or firm ground. Find a drying check that runs through the centre and set the wedge tip into it with light taps until it stands by itself. No check? Baton your knife a few centimetres into the end grain, remove it and set the wedge in that slot.
 2Drive it with square blows
Now strike full, square blows on the wedge head with the side of the mallet. Watch the crack run down the side of the round.
 3Add a second wedge
If the first wedge sinks in before the round opens, drive a second wedge into the widest part of the crack, beside or below the first. The first one loosens and can be used again.
 4Two halves, then quarters
When the halves fall apart, put the mallet down before you pick up wedges or wood. Split the halves into quarters the same way, or baton the smaller pieces.
Long logs and boards
Wedges really shine on long pieces that no axe can split in one blow, such as a 1 m log for a bench, a shelter ridge or blanks for spoons. Lay the log on the ground, start a crack at one end with a wedge and work along the log, leapfrogging: each new wedge goes into the open crack a little further on, and the one behind falls out. If the crack drifts to one side, put the next wedge on the opposite side of the log to steer it back.
| Symptom | Likely cause | Fix |
|---|---|---|
| Wedge bounces out | Taper too steep, wedge too dry and smooth, or glancing blows | Use a slimmer wedge, set it deeper with light taps, strike square |
| Wedge sinks in, nothing opens | Tough or twisted grain, knot in the line | Add a second wedge in the crack; split through the knot or turn the round over |
| Wedge head splits | No chamfer, cross grain, knot in the wedge | Chamfer the head; carve a new one from straight grain |
| Crack runs off to one side | Spiral grain or off-centre start | Next wedge on the opposite side; on short rounds start again in another check |
| Halves held by fibres | Green or stringy wood | Cut the last fibres with saw or knife, never by pulling with the wedge still in |
Bonus project: tent pegs for the mallet
The first thing most people do with a new mallet is drive pegs, so carve a set from the offcuts. As in whittling projects for beginners: thumb-thick to 4 cm hardwood, 20–25 cm long, with a point of 5–6 cm and three or four facets, a chamfered head so it does not split under the mallet, and a ramp notch 3–5 cm below the top for the line.

Start the peg with a few light taps while you steady it low with one hand, then take that hand away before you strike harder. In stony ground, wooden pegs split; make longer ones or use a deadman buried crosswise. Pegs for a tarp shelter and the larger stakes for a tipi go in the same way, and a mallet also drives the legs of camp structures made with lashings.
Drying the mallet and checking for cracks
Wood shrinks as it dries, more around the growth rings than across them. A thick head with the pith inside therefore almost always develops a few radial checks in the end grain. Small checks are cosmetic. What matters is where they run.
- Dry slowly: in the shade, out of the sun and away from the fire, for weeks rather than days. A paper bag or a loose wrap of shavings slows drying further.
- Seal the end grain of the head with wax or oil if you have some; end grain loses water much faster than the sides.
- Do not dry it by the fire. Fast drying turns small checks into deep cracks.
- Use it lightly while it is still green: driving pegs is fine, heavy wedge work is better after drying.
Is this mallet still safe to use?
Is there a crack at the shoulder, where the handle meets the head?
Yes → Retire it. A crack there can let the head break off mid-swing.No → Check the head next.Does a crack run along the head and through to the striking face?
Yes → Use it only for light taps, or carve a new one; heavy blows can split the head.No → Check the handle.Is the handle cracked, soft or splintering?
Yes → Retire it, or carve the handle thinner only if sound wood remains.No → Small end-grain checks are fine: keep using it.
Inspect the mallet before each session, the same way you check an axe head; tool care has the routine for all camp tools. Store it dry and off the ground. A cracked mallet makes good firewood, and the next one will be quicker to carve.
Mallet and wedge safety
A mallet looks harmless next to an axe, but it causes its own injuries: crushed fingers, sore wrists, and wedges or splinters that jump out of a crack. Carving it involves the usual knife risks. The rules:
- Knife rules first. Keep a clear blood circle, sit or kneel steadily, work beside the knee and never over the thigh, cut away from your body and holding hand, and stop when you are tired or cold. Details in carving basics.
- Strike square. Glancing blows make wedges spring out sideways and send the mallet towards your shins or the other hand. Look at the wedge head, not at the mallet.
- Hands away. Steady a peg or wedge only for the first light taps, holding it low, then take the hand away. Never hold anything for another person to strike.
- Protect your eyes. Wear safety glasses for wedge work: a wedge or chip can pop out of a crack with force. Stand to the side of the wedge's line, never lean over it, and keep others at least two tool lengths away and out of line, as when splitting with an axe.
- Save your wrist. Let the weight of the head work. Short, controlled swings beat hard, wild ones; switch hands or rest when the wrist aches. A head that is too heavy for you is a reason to carve a lighter mallet.
- Check the tool. No cracks at the shoulder, handle dry and not slippery.

A mallet project with children
Driving pegs with a mallet is one of the best first "tool" jobs for children, because there is no blade involved. Making the mallet is a good project for older children with an adult directly beside them. Match the job to the child, not only the age; the bands below follow our guide to bushcraft with kids.
| Age | Can do | Adult does |
|---|---|---|
| 6–8 years | Drive pegs and stakes with a light mallet, collect and sort wood | All saw and knife work; holds nothing for the child to strike |
| 9–11 years | Saw the blank and stop cut with gloves, peel bark, carve the handle with a kids' knife while seated | Batons off the waste, checks every cut position, stays within reach |
| 12–14 years | Make the whole mallet and simple wedges with instruction | Supervises closely; one-to-one instruction for wedge splitting with eye protection |
Keep sessions short, use soft green wood for the handle where possible, and let children finish something in one sitting, even if it is only a peg. Rules that work: seated for every knife cut, blood circle checked, mallet down before hands go near wood, glasses on for wedges. The adult keeps the knife between sessions.
Carrying your tools and what to make next
A camp mallet is heavy, so most people carve one on site and leave it as firewood, or keep it at a regular camp. The knife and saw you carry there are a different matter: carry them sheathed and packed away, not on the belt in town, and check the rules where you are. See knife laws overview; this is not legal advice.
Next projects that use the mallet: a bowl hollowed with gouges (spoon and bowl carving), a sawbuck for firewood, or a new handle for an old axe head. Add a saw, a sturdy knife and safety glasses to your Kit Builder list if you plan to split with wedges.
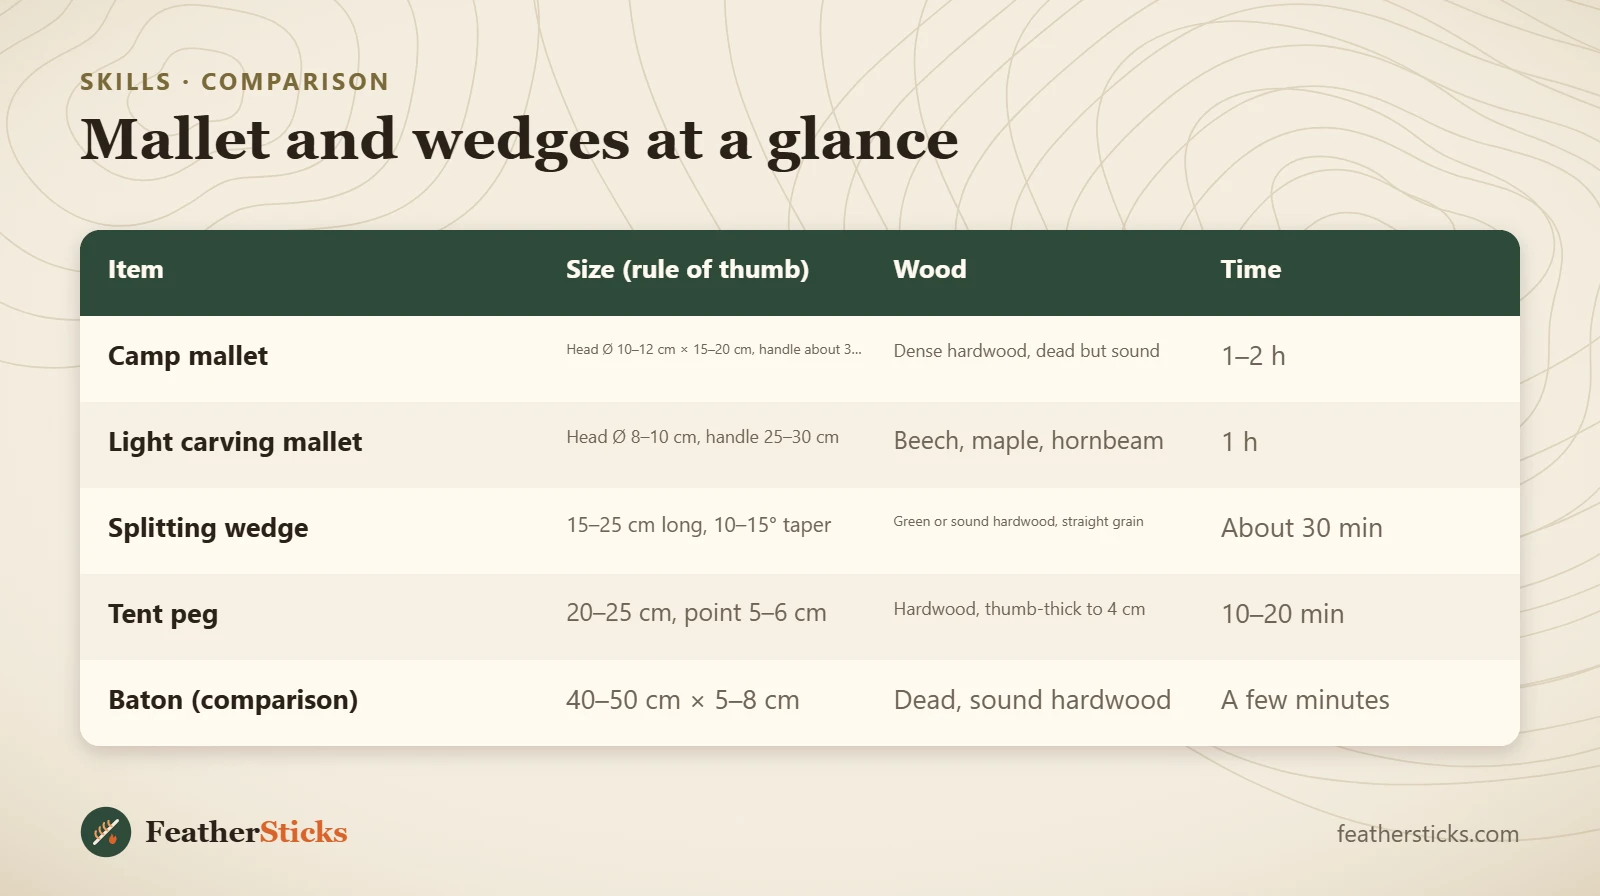
| Item | Size (rule of thumb) | Wood | Time |
|---|---|---|---|
| Camp mallet | Head Ø 10–12 cm × 15–20 cm, handle about 3 cm × 30–35 cm | Dense hardwood, dead but sound | 1–2 h |
| Light carving mallet | Head Ø 8–10 cm, handle 25–30 cm | Beech, maple, hornbeam | 1 h |
| Splitting wedge | 15–25 cm long, 10–15° taper | Green or sound hardwood, straight grain | About 30 min |
| Tent peg | 20–25 cm, point 5–6 cm | Hardwood, thumb-thick to 4 cm | 10–20 min |
| Baton (comparison) | 40–50 cm × 5–8 cm | Dead, sound hardwood | A few minutes |
Common mistakes
- Using rotten or softwood that crushes after a few blows.
- Sawing the stop cut too deep, which leaves the handle thin at the shoulder.
- Carving the handle towards the hand that holds the head.
- Striking with the end grain of the head instead of its side.
- Glancing blows on wedges, without eye protection, while leaning over the wedge.
- Drying a green mallet next to the fire until it cracks.
- Using a knife as a chisel under the mallet.
What you need
- Folding saw with a coarse blade for green wood
- Sturdy full-tang fixed-blade knife and a strop
- Baton for removing the waste
- Pencil or marker for the head line
- Safety glasses for wedge work
- Gloves for sawing
- First aid kit with pressure bandage
FAQ
What is the best wood for a bushcraft mallet?
How big should a wooden mallet be?
Baton vs mallet: what is the difference?
How do you make wooden splitting wedges?
Can you split wood without an axe?
Why did my mallet crack?
Is carving a mallet a good project for kids?
Check yourself
Completed6 quick questions from this guide. Nothing is sent anywhere.
Related step-by-step guides
-
 1
-
 1
-
 1