How to Make Charcoal at Camp: The Tin Can Method Step by Step
To make charcoal at camp, you pack dry hardwood pieces into a steel can with a tight lid and one small vent hole, set it in the embers and wait until the gas burning at the hole dies away. Then you plug the hole and let the can cool completely before you open it. What comes out is black, light charcoal that burns hot without flame and is the raw material for pine pitch glue, a DIY water filter and simple drawings.
It is the same process that turns cotton into char cloth, only with wood, and the same one charcoal burners used in their great earth-covered clamps for centuries. This guide explains what happens inside the can, which wood to use, how to read the gas jet, what charcoal is good for in camp and how to stay safe. It fits neatly into our bushcraft basics and the wider fire skills hub.
Step by step
-
1

Cut dry hardwood pieces
Saw dry, dead hardwood into pieces about 1.5–3 cm thick and a little shorter than your can. No painted, treated or glued wood.
-
2

Pack the can, one vent hole
Stand the pieces upright in a steel can, snug but not jammed. Press on a lid with a single hole of about 3–5 mm.
-
3

Set it into the embers
Push the can into a bed of hot embers with a stick, hole facing up, and keep a fire going around it.
-
4

Watch the gas jet
Steam, then smoke and gas stream from the hole, and the gas often burns as a jet of flame. Keep your face away and wait, typically 20–60 minutes.
-
5

Plug the hole, cool it closed
When no more gas comes out, lift the can out, plug the hole with a twig and let it cool completely. Opened hot, the charcoal can reignite.
-
6

Check it and store it dry
Good charcoal is black right through, light and clinks when tapped. Store it cold and dry in a closed tin or bag.
What is charcoal? Wood heated without enough air
Charcoal is what remains when wood is heated strongly while too little air reaches it to burn. Nothing is added. Heat alone drives out the water and most of the substances that make wood burn with a flame, and what stays behind is a light, black, brittle material that is mostly carbon and still shows the grain of the original piece.
Pyrolysis in plain words
When wood gets hot, the first thing it gives off is water vapour: that is the white smoke you see at the start. As it gets hotter, the wood itself begins to break down. It releases flammable gases and tar vapour, the stuff that normally burns as the flames of a campfire. In an open fire, those gases meet oxygen and burn, and in the end the charcoal burns too, leaving only ash. In a closed can there is almost no oxygen. The gases are simply pushed out through the vent hole, and the carbon skeleton of the wood is left behind. This breaking down by heat without burning is called pyrolysis.

Why charcoal burns differently
Because the gases are already gone, charcoal burns with little or no flame and very little smoke. It glows and gets hotter than ordinary wood, which is why it fuelled smiths, smelters and glassmakers for centuries. The same quality makes it treacherous: glowing charcoal looks harmless, is very hot and gives off carbon monoxide (see the safety section).
From wood to charcoal
- Dry woodDead hardwood cut into thumb-thick pieces.
- SteamRemaining water is driven out first.
- Wood gasFlammable gas and tar leave through the hole.
- CharcoalBlack carbon skeleton, cooled without air.
Char cloth, charred punk wood and the charred tinder from a tinder fungus are all relatives of charcoal, made the same way. Cloth is thin and catches a spark from flint and steel; wood is dense and is better for fuel, glue and filters.
What is homemade charcoal good for at camp?
A small batch from a can will not run a forge, and it does not need to. For camp, a few handfuls of good charcoal cover several useful jobs.

Pine pitch glue
The best-known bushcraft use. Conifer resin alone is brittle when cold; mixed with finely ground charcoal it becomes a tough, waterproof glue that sets hard. A common starting point is about one part charcoal to four parts resin by volume. The whole process, from collecting resin without harming trees to building a pitch stick, is in our guide to making pine pitch glue. Charcoal from your own can is ideal, because you know it is clean and fully charred.
A layer in a DIY water filter
In an improvised sand-and-gravel filter, a layer of crushed, rinsed charcoal traps fine particles and can reduce some taste, smell and colour. Be clear about the limits: campfire charcoal is not the activated carbon used in commercial filters, and an improvised filter only clears water, it does not make it safe. Afterwards the water must be boiled — a rolling boil for 1 minute, 3 minutes from 2,000 m — or disinfected. Build details are in our DIY water filter guide, and the treatment step in boiling water.
Drawing, marking and teaching
A charcoal stick draws well on birch bark, flat stones and wood. Use it to mark cuts before sawing, to draw a target on a chopping block for axe practice, to sketch a route or simply to draw. Thin twigs of soft wood such as willow make the traditional, softer drawing charcoal. Children love it, and it is a calm, knife-free activity; see bushcraft with kids.
Fuel
Once glowing, charcoal burns hot and almost smokelessly. A handful added to a small cooking fire gives an even ember bed for a pan or for campfire baking.
Which wood makes the best charcoal?
Dry hardwood offcuts are the best choice. Dense woods such as beech, oak, hornbeam, ash and maple give hard, heavy, long-burning charcoal; birch gives good charcoal too. These are the same woods our tree identification guide recommends for a lasting ember bed. Softwoods such as pine and spruce char faster but give lighter, softer, more crumbly charcoal, and resinous pieces produce a lot of tar.
Dryness matters more than species. Green or damp wood first has to boil off its water inside the can, which makes the batch slow, spits a lot of steam and tends to crack the pieces. Use dead wood that snaps cleanly, or seasoned offcuts. Where and what you may collect is explained in where to collect firewood.
| Wood | Charcoal | Good for | Notes |
|---|---|---|---|
| Beech, hornbeam | Hard, dense, long-burning | Fuel, pitch powder | The classic charcoal wood in Central Europe |
| Oak, ash, maple | Hard, dense | Fuel, pitch powder, filter | Oak takes longer to char through |
| Birch | Good, medium-hard | All camp uses | Peel off thick bark; it is very tarry |
| Pine, spruce | Light, soft, crumbly | Pitch powder, fire practice | Resinous pieces give much tar and smoke |
| Willow twigs | Soft, light | Drawing | Traditional artist's charcoal; thin, peeled twigs |
| Painted, treated, glued wood, pallets, plywood | Never | – | Toxic fumes and residues |
| Yew | Never | – | All parts are poisonous |
Species ranking follows the firewood guidance in our tree identification guide. Dry wood of any species beats damp hardwood.
Size and shape of the pieces
Pieces about 1.5–3 cm thick, roughly thumb to two-fingers thick, are a good rule of thumb for a food-sized can. They char through in a reasonable time and give handy sticks. Thicker pieces take much longer and often keep a brown core; very thin twigs char fast but leave little behind. Cut them a little shorter than the can is tall, so that the lid closes easily. A small saw makes neat, square ends; see our guide to camp saws and how to keep them cutting in saw care. Split pieces char more evenly than round sticks with bark.
Charcoal in a tin can: choosing and preparing the container
Making charcoal in a tin can is the small-scale method that suits camp. The can does two jobs: it keeps air away from the wood, and it lets the gas out. Any clean steel container with a lid that closes snugly will work. Practical choices are an empty steel paint tin with a press-on lid, a biscuit or tea tin, or a food can of roughly 0.5–1 litre with a second, slightly larger can pushed over it upside down as a lid.
Avoid aluminium cans and drinks cans: they soften and burn through in the embers. Never use a container that held fuel, solvents or chemicals, and never use an aerosol can.
The vent hole
Wood gives off a lot of gas. Without an exit, pressure builds until the lid pops off, air rushes in and the batch burns. With a hole that is too large, air gets in as soon as the gas stream weakens. One hole of about 3–5 mm in the lid is a good rule of thumb for a can of this size: a little larger than the 2–3 mm used for a pocket char cloth tin, because a can full of wood produces more gas. A loose-fitting lid that leaks a little also works, but a deliberate hole is easier to read and to plug.
Charcoal can at a glance
- Material
- Steel (tinplate); no aluminium, no plastic or rubber parts
- Size
- Typically 0.5–1 litre for a camp batch
- Lid
- Press-on or slip-over, closes snugly
- Vent hole
- One hole, about 3–5 mm, in the lid
- First use
- Burn off paint and coatings empty, outdoors
- Plug
- A green twig that fits the hole
Preparing a new can
Most tins are painted or lacquered. Remove any rubber seal or plastic insert, then burn the coating off once: set the empty, closed can in the fire outdoors and stay out of the smoke. Punch the hole with a nail on a block of wood, holding the nail with pliers, and flatten the burr. Dry the can after use, or it rusts.
How to make charcoal from wood: the full method
The method is simple; the skill lies in patience and in reading what comes out of the hole. Plan it for a time when you have a good fire anyway, for example after cooking over the campfire, because the can needs a hot bed of embers and a fire around it for a while.
Making charcoal in a tin, step by step
- Prepare everything first Have the filled can, a long stick or tongs, a twig that fits the hole, leather gloves and a safe place for the hot can, such as a flat stone or bare mineral soil.
- Pack the can Stand the pieces upright, close together but not jammed, with a little room under the lid. Upright pieces let the gas rise and escape easily.
- Close the lid firmly Press it on all round. If it tends to spring off, weigh it down with a small stone or twist a loop of wire around the can.
- Set it into the embers Push the can into a hot ember bed with the hole facing up and keep a modest fire burning around it, so the can is heated from below and from the sides.
- Watch the hole Steam comes first, then denser smoke and gas, which often catches fire and burns as a jet. Feed the fire around the can, but leave the can alone.
- Wait until the gas stops When the flame at the hole goes out and no more smoke appears, give it a few more minutes, then lift the can out.
- Plug and cool Push the twig into the hole, set the can on stone or soil and leave it closed until you can hold it comfortably in your bare hand.
How long does it take?
For a can of 0.5–1 litre with thumb-thick hardwood in a good fire, 20–60 minutes is typical. A small can of thin, dry softwood can be done in a quarter of an hour; a large tin packed with thick oak may need well over an hour. Wind, rain and a weak ember bed slow it down further. The clock is only a rough guide; the vent hole tells you when the batch is finished.
Reading the gas jet: when is the charcoal done?
You cannot look inside, and you must not open the can to check. The vent hole is your gauge, and the sequence is always the same.
What the vent hole tells you
 1White smoke
After a few minutes, white, damp-looking smoke streams out. This is mostly water vapour from the wood. Charring has not really started yet.
 2A burning jet
The smoke thickens and turns yellowish, and the gas often ignites into a roaring little flame at the hole. That is normal: it is wood gas burning outside the can. Keep your face away and leave the can where it is.
 3The jet weakens
The flame shrinks, flickers and goes out, and only a thin thread of smoke remains. Most of the gas has gone, but the cores may still be charring. Do not take the can out yet.
 4Nothing comes out
When neither smoke nor flame appears, typically after 20–60 minutes, the batch is done. Give it a few more minutes in the embers, then lift the can out and plug the hole.
Why you cool it closed
Fresh charcoal is hot and extremely eager to react with air. If you open the can while it is still hot, oxygen rushes in and the charcoal can glow up again and burn away, sometimes with sparks. Plugging the hole stops air being drawn in as the can cools and the gas inside contracts. Leave it closed until it is cold to the touch: for a food-sized can that typically takes half an hour to an hour or more. If in doubt, leave it overnight.
Taken out too early, the pieces keep brown cores; simply char them again next time. A little too long in a well-sealed can does little harm, so if in doubt, wait longer.
The quick method: charcoal from a burnt-down campfire
You do not always need a can. Every hardwood campfire leaves charcoal behind if you rescue it before it turns to ash. This is how the charcoal for a DIY filter or a small batch of pitch glue is often gathered: pick out the black, glowing pieces when the fire has burned down, and cut off their air.
Rescuing charcoal from the fire
 1Lift out glowing pieces
When a hardwood fire has burned down to embers, lift out pieces that are black and glowing all over with tongs or two sticks. Leave the grey, crumbling ones.
 2Smother them at once
Drop them into a steel tin and close the lid straight away, with the hole plugged or none at all. Without air they go out and cool as charcoal instead of burning on to ash.
 3Sort the result
Once cold, break a piece. Black right through is charcoal. A brown core is only charred wood: fine for the next fire, not for glue or a filter.
Some people douse the glowing pieces with water instead. That works, but the charcoal must then dry thoroughly before use or storage, and dousing produces a cloud of hot steam and ash. Smothering in a tin is cleaner. Either way, the fire itself still has to be put out properly: drown, stir, feel, as described in how to put out a campfire.
Checking, crushing and preparing charcoal
Open the cold can and tip the batch onto a clean surface. Good charcoal is black right through, matt to slightly silvery, and much lighter than the wood it came from. Pieces shrink a little and often show fine cracks across the grain. Knock two pieces together: well-charred charcoal gives a bright, clinking sound, while half-charred wood sounds dull. Break one: the inside should be black, with no brown core.

| What you see | Likely cause | Fix |
|---|---|---|
| Brown core, smoky when lit | Taken out too early, heat too low, pieces too thick | Char again; use thinner pieces and a hotter ember bed |
| Only grey ash | Lid came off, or opened while hot | Weigh the lid down; plug the hole and cool it closed |
| Outer pieces ash, middle fine | Hole too large or lid leaking | Use one 3–5 mm hole and a snug lid |
| Sticky tar on the pieces | Resinous wood, gas could not escape | Clear the hole; use less resinous wood, stand pieces upright |
| Lid blown off | No vent hole, or hole blocked by ash | Keep the hole clear and facing up |
Preparing it for use
For most uses the charcoal has to be broken up. Wrap it in a scrap of cloth or bark and crush it between two stones; this keeps the black dust from blowing about. How fine you go depends on the job.
From charcoal sticks to the right grain size
 1Crush between stones
Lay the pieces on a flat stone, cover them with cloth and crush them with a hand stone. Work outdoors and keep the dust out of your face.
 2Flour-fine for pitch glue
For glue, grind on until you have a fine, flour-like powder; coarse grit makes lumpy, weak pitch. About one part charcoal to four parts resin by volume is a common start, see pine pitch glue.
 3Pea-size for a filter
For a filter, stop at pieces from pea-size down to coarse grit, then swirl them in water and pour off the black water until it runs only faintly grey. The layer order is in the DIY water filter guide.
How much charcoal do you need — and how big a batch?
Charcoal is far lighter than the wood it came from and shrinks a little, so a full can gives a smaller heap than you expect: as a rough guide, one to two good handfuls from a can of 0.5–1 litre.
| Purpose | Amount | Notes |
|---|---|---|
| Pitch glue for a pitch stick | A spoonful or two of powder | At about 1 part charcoal to 4 parts resin |
| Filter layer in a bottle filter | A layer of about 5–8 cm | Crushed and rinsed, see the filter guide |
| Drawing and marking | A few thin sticks | Willow twigs or thin splits |
| Small cooking ember bed | One or more full cans | Usually easier with a hardwood fire |
Bigger is not better at camp. A large drum takes far longer, needs a much bigger fire and is hard to handle when hot. Several small batches over several evenings are safer, easier to judge and let you compare wood species. Large-scale kilns and retorts are a different craft and beyond the scope of this guide.
Charcoal burners and the charcoal clamp: a short history
Before coal and coke took over in the industrial age, charcoal was one of the most important fuels in Europe. Iron smelting, smithing, glassmaking and many other crafts depended on it, and charcoal burners worked in forests across the continent. In Germany the trade is called Köhlerei, and its traces are still everywhere: in family names, in place names and in the forest itself.
How a charcoal clamp worked
The charcoal burner built a clamp (German Meiler): lengths of wood, often beech, stacked upright and close together around a central shaft into a large dome. The dome was covered with a layer of grass, leaves or moss and then sealed with earth, leaving the clamp almost airtight. It was lit through the central shaft, and the burner then controlled the slow charring for days, opening and closing small air holes in the cover. He read the smoke exactly as you read the jet from your can: thick, pale, moist smoke at first, thin bluish smoke when a section was done.

The huge demand for charcoal contributed to heavy overuse of forests in many regions, one of the reasons modern sustainable forestry developed.
Traces in the forest and the craft today
In many wooded hills of Central Europe you can still find old charcoal platforms: flat, round areas a few metres across on a slope, with black soil full of charcoal crumbs. They are archaeological features, so look but do not dig. A small number of charcoal burners still build clamps in the traditional way, often for demonstrations and local festivals. In Germany the charcoal burner's craft, together with traditional tar making, is listed in the national inventory of intangible cultural heritage.
The tin can on your fire is the same process in miniature: wood, heat and too little air. It also connects naturally with other old fire crafts such as char cloth and amadou.
Safety: carbon monoxide, burns and fire bans
Making charcoal is a small job, but it combines a very hot can, flammable gas and a material that keeps glowing quietly. Three risks deserve particular respect.
Carbon monoxide
Glowing charcoal and the gas leaving the can both contain carbon monoxide (CO), an odourless, colourless gas that can cause unconsciousness and death in enclosed spaces. Never make charcoal indoors, in a tent, a vehicle, a snow shelter or under a low tarp, and never bring a hot can, a bucket of embers or glowing charcoal into a tent to keep warm. The details are in carbon monoxide and fires near tents.
Burns
The can is far hotter than it looks and stays hot long after the fire has died. Use a stick, tongs or leather gloves, and set the can down only on stone, sand or bare soil. If someone is burned, cool the burn with cool or lukewarm clean water for about 20 minutes — no ice, butter or creams — and cover it loosely. Get medical help for larger, deep or facial burns and for burns on children; in Europe call 112. See first aid for burns.
Fire rules and putting it out
A can in the embers is an open fire in the eyes of the law. Rules differ between countries and regions, and many areas ban open fires in or near forests for all or part of the year; some bans also cover charcoal and barbecues. Check the local rules and the current fire danger level before you light anything (see fire bans and danger levels), use established fireplaces or a safe fire pit, and keep water to hand. In Germany wild camping and fire rules are summarised in wild camping in Germany. This is general information, not legal advice.
Safety checklist
- Outdoors only — never in tents, vehicles or under a low tarp
- Fire at least 5 m from tents and hammocks, 3 m from synthetic tarps
- Fire allowed here today? Check local rules and fire danger
- Stick, tongs or leather gloves for the can; face away from the hole
- Water and a place on stone or bare soil for the hot can
- Can plugged and cooled closed before opening
- Fire drowned, stirred and cold to the hand before you leave
- Children watch from a distance; an adult handles can and fire
Storing charcoal dry
Charcoal soaks up moisture and smells from the air. Damp charcoal is hard to light, spits and smokes, and damp powder clumps in pitch glue. Fresh charcoal can also hide a glowing spot for a surprisingly long time. So store it only when it has been completely cold for some hours — overnight in the closed can is a good habit — and never bag charcoal that is still warm.
A closed tin is the best container: it keeps out moisture, protects the fragile pieces and cannot catch fire. A zip bag or dry bag around the tin keeps the black dust off the rest of your kit. Label powder for glue separately from coarser filter charcoal. Charcoal keeps for years if it stays dry; if it has become damp, dry it in the closed tin near the fire. A small tin of charcoal powder earns its place in the repair section of a bushcraft kit list alongside a pitch stick.
Making charcoal combines well with other evening fire jobs. The firewood calculator tells you how much wood to gather for the evening, the fire lay picker suggests a lay that gives a good ember bed, and our overview of fire lays explains how to build it.
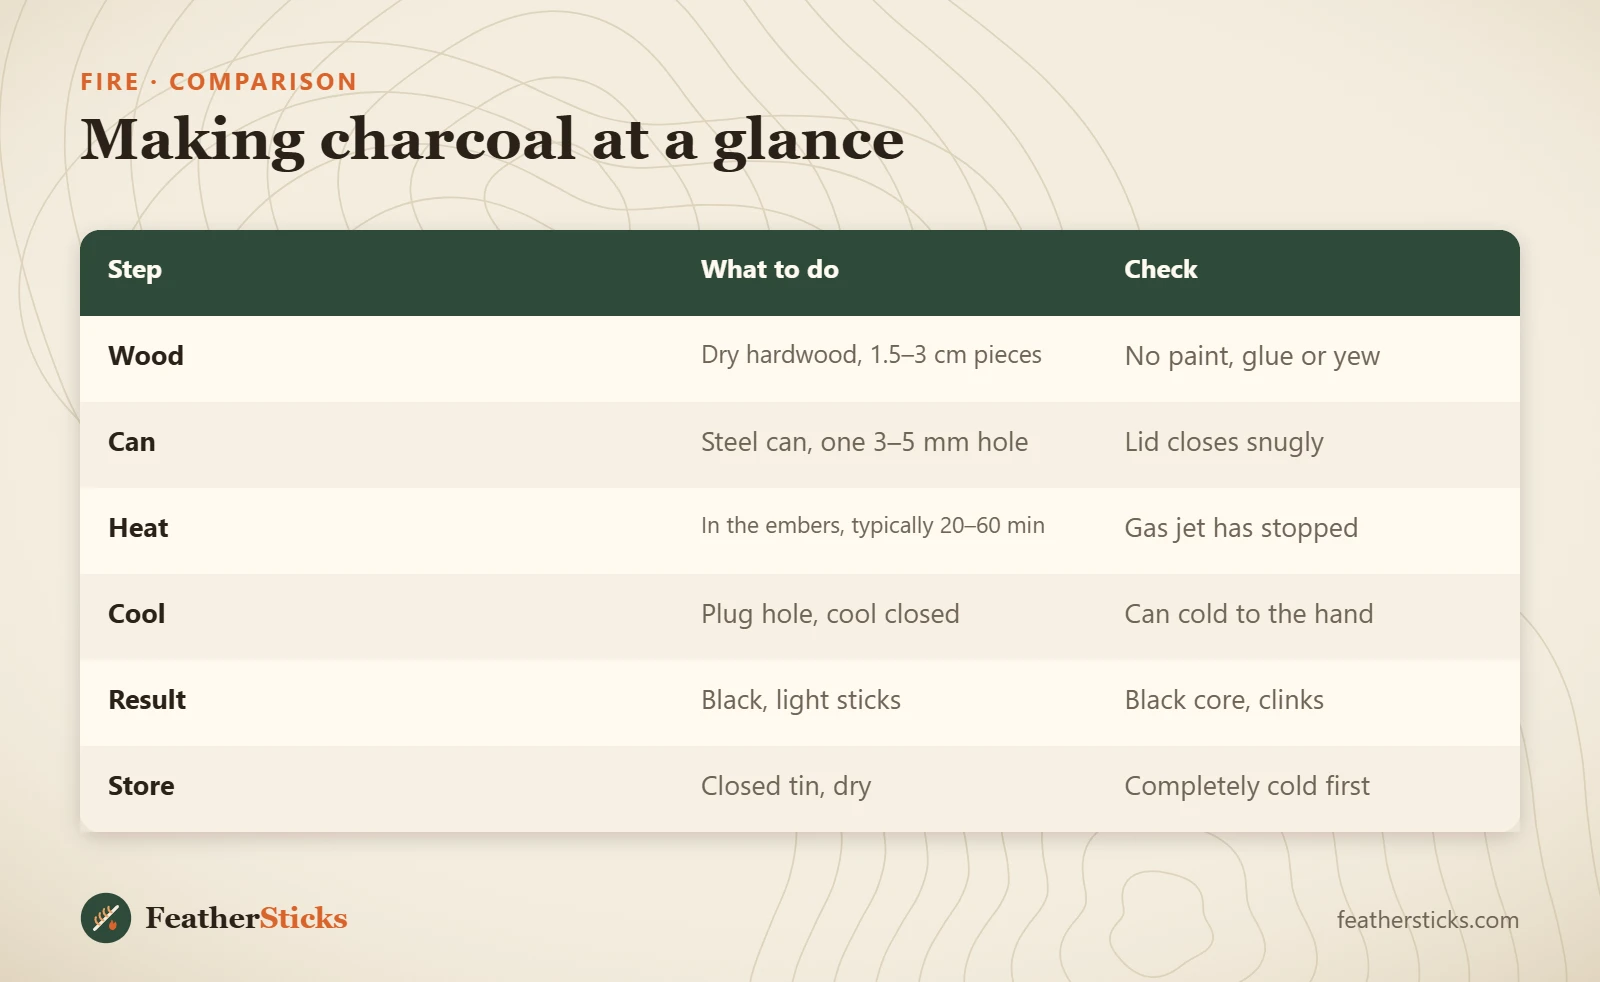
| Step | What to do | Check |
|---|---|---|
| Wood | Dry hardwood, 1.5–3 cm pieces | No paint, glue or yew |
| Can | Steel can, one 3–5 mm hole | Lid closes snugly |
| Heat | In the embers, typically 20–60 min | Gas jet has stopped |
| Cool | Plug hole, cool closed | Can cold to the hand |
| Result | Black, light sticks | Black core, clinks |
| Store | Closed tin, dry | Completely cold first |
Common mistakes
- Using painted, treated or glued wood, or pallets, whose fumes and residues end up in the charcoal.
- Making the can airtight with no vent hole, so the lid blows off and the batch burns.
- Taking the can out while gas is still burning at the hole, leaving brown cores.
- Opening the can while it is hot, so the fresh charcoal glows up and burns to ash.
- Using thick, damp wood that takes hours and still stays brown inside.
- Making charcoal in a tent porch or bringing glowing charcoal inside for warmth.
- Bagging charcoal that is still warm or storing it where it gets damp.
What you need
- Steel can or tin with a snug lid and a 3–5 mm vent hole
- Dry hardwood offcuts
- Small saw for cutting the pieces
- Nail and pliers for punching the hole
- Stick, tongs or leather gloves
- Green twig to plug the hole
- Two stones and a cloth for crushing
- Closed tin and zip bag for storage
FAQ
How do you make charcoal in a tin can?
What is the best wood for making charcoal?
Why does the can need a hole?
Why did my charcoal turn to ash?
Can you use homemade charcoal to purify water?
How long does homemade charcoal take to cool?
Check yourself
Completed6 quick questions from this guide. Nothing is sent anywhere.
Related step-by-step guides
-
 1
-
 1
-
 1