Birch Bark Uses: Fire Starter, Containers and Crafts from One Tree
The most useful birch bark uses fall into three groups: fire, containers and small crafts. The papery white outer bark lights from a spark, keeps burning when damp, folds into a watertight box without a single cut and flattens into sheets that last for years in a pack. All of that comes from bark you collect from fallen or felled birch, never from a living tree.
This guide shows you how to recognise birch, where you may take bark, how to peel it, how to turn it into a birch bark fire starter, how to fold a birch bark container, how to flatten and store it, and what birch tar was used for. It belongs to our bushcraft skills and builds on tree identification and natural tinder. New to the outdoors? Begin with bushcraft for beginners.
Step by step
-
1

Identify a birch
Look for white, papery bark with short dark dashes and black cracks at the base. Check leaves or twigs if unsure.
-
2

Take bark only from dead wood
Use fallen trunks, loose pieces or freshly felled logs with the owner's permission. Never peel a living tree.
-
3

Score and peel the outer bark
Score a shallow line through the outer bark along the log, then lift the sheet off by hand.
-
4

Turn it into tinder
Tear thin strips, scrape fine dust with the knife spine and put the dust on top to catch a spark.
-
5

Fold a container
Warm the sheet in water, press fold lines, fold the walls up, pinch the corners and clip the rim.
-
6

Flatten and pack it
Weight soft sheets flat for a day or two, then carry a few dry pieces in a bag in your kit.
What makes birch bark so useful?
A birch trunk is wrapped in two very different layers. On the outside sits the outer bark: thin, white, papery sheets lying on top of each other like pages. It is flexible when warm, tough, light and it repels water. Underneath lies the inner bark, a thin reddish-brown living layer that carries sugars from the leaves to the roots. Inside that is the wood.
Almost every use in this guide needs only the outer bark. It is what burns, what folds and what keeps water out. The inner bark of a living tree is its supply line: damage it and the tree loses that part for good; strip a ring all the way round and everything above it dies. That is why the harvesting rules below are not a formality.

Outer bark vs inner bark
Outer bark (white)
- Thin papery layers, white outside, tan inside
- Burns hot, even when damp
- Folds and holds water
- Use: tinder, containers, wraps, crafts
Inner bark (red-brown)
- Living layer on a standing tree
- Fibrous, moist, does not light from a spark
- Peeling it damages or kills the tree
- Leave it on living trees, always
How long does birch bark last?
Kept dry, outer bark lasts for years. It is one of the few natural materials that resists rot well: on the forest floor you often find a birch log whose wood has already turned soft and crumbly inside an intact tube of white bark. That durability is exactly what makes old fallen birch such a good source.
How to identify a birch tree
Birch is one of the easiest trees to recognise, which makes it a good first species for beginners. Look for:
- Bark: white to cream, peeling in thin horizontal bands, with short dark horizontal dashes (lenticels). Older trunks turn black and deeply cracked into diamond shapes near the base.
- Leaves: small, triangular to diamond-shaped, with a double-toothed edge, on a thin stalk.
- Twigs: thin, dark, often hanging; slim catkins at the tips in winter and spring.
- Site: a pioneer on clearings, heaths, sandy and boggy soils and along woodland edges.
Beware of look-alikes at a distance: some poplars and aspens have pale bark, but it is smooth and does not peel in paper-thin sheets. The full key, with leaves, buds and bark of a dozen common trees, is in how to identify trees.
| Species | Where | Bark | Notes for bark use |
|---|---|---|---|
| Silver birch | Europe, Britain, western Asia | White with dark dashes, black diamond cracks at the base, hanging twigs | Thin sheets; very good tinder, fine for small boxes |
| Downy birch | Northern and wetter parts of Europe | Whiter and smoother, fewer cracks at the base, twigs not hanging | Similar uses; common on boggy ground |
| Paper birch | Canada and northern USA | Chalk-white, peels in large sheets | The classic bark for containers and canoe skins in the north |
| Yellow birch | Eastern North America | Golden to bronze, peels in fine curls | Curls make good tinder; sheets are small |

Harvesting birch bark: ethical and legal rules
The one rule that matters most: take bark only from dead wood. That means fallen trunks and branches, loose pieces lying on the ground, logs in a firewood stack, or freshly felled trees where the owner or forester has agreed. Peeling a living birch leaves black scars that do not grow back as white bark, opens the tree to fungi and, if the inner bark is damaged all round, kills it. In most forests it is simply not allowed.
All wood has an owner, including dead wood. Rules on collecting differ by country, region and land type, and nature reserves and national parks are usually strict. In Germany, forest and nature conservation laws of the federal states apply; in the UK, US and Canada rules vary between private land, public forest and parks. Ask the landowner or local forest office, and treat this guide as orientation, not legal advice. The same applies to camping and fires on wild sites: see wild camping.

Before you take any bark
- The tree is fallen, dead or felled, not standing and alive
- You have permission from the owner, or collecting is clearly allowed there
- You are not in a nature reserve or national park core zone
- The log is not a habitat you would destroy (woodpecker holes, nests, fungi you would rip off)
- You take only what you will use, and leave some for others and for wildlife
Good sources of birch bark
- Storm-felled and fallen trunks: the bark often comes away in a whole tube once the wood inside has started to rot.
- Forestry work and thinning: freshly felled birch peels best, especially in late spring and early summer when the sap runs. Ask before you take any.
- Firewood: birch logs from your own woodpile or a supplier carry plenty of bark. See firewood for how to store it.
- Loose curls: thin curls that have peeled off naturally can be picked off the ground or a dead trunk without any tool.
How to peel birch bark from a log
On a fallen or felled log the outer bark comes off in sheets if you cut only through the papery layers. A sharp bushcraft knife is all you need.
Peeling a sheet from a felled or fallen log
- Choose a section Pick a smooth stretch between knots and branch stubs, at least as long as the sheet you want. Knots split sheets.
- Score one line Draw the knife along the log, cutting only through the white outer bark, not into the wood. Cut away from your body and your other hand.
- Lift an edge Work a thumbnail or a flat wooden wedge under the edge of the cut and ease the bark up.
- Peel round the log Pull the sheet gently round the log by hand. If it sticks, help with the wedge rather than the knife.
- Keep it flat Lay the sheet inner side down under something flat until you get home, or it rolls up as it dries.
Bark that has sat on a log for a long time can be stiff and crack along the dark dashes. That is fine for tinder; for containers look for supple sheets from freshly felled or recently fallen wood. Thick, rough bark from the base of old trees is poor for folding but still burns well. A dull knife slips; keep the edge keen as shown in sharpening a knife.
Birch bark as a fire starter: strips, curls and dust
Birch bark is one of the best natural tinders in temperate and northern forests. The key is preparation: a flat piece of bark rarely catches a spark, but the same bark torn, scraped and fluffed lights from a ferro rod and burns long enough to light kindling. Think of it in two jobs, as explained in natural tinder: fine dust that catches the spark, and strips that carry the flame.
From bark to burning tinder
 1Tear thin strips
Hold the sheet flat and tear thin strips along the dark dashes; the bark tears easily that way. Aim for strips the width of a matchstick to a pencil.
 2Scrape fine dust
Hold the knife at 90° to the bark and drag the square spine across it. A small pile of pale dust and tiny curls builds up. Using the spine keeps your edge sharp.
 3Crumple the strips
Twist and crumple a handful of strips between your hands so air can get between them. A tight bundle smothers the flame.
 4Dust on top, then strike
Set the strips on a platform of sticks, never on wet ground, put the dust in the middle and aim the sparks into it. Feed the flame with feather sticks and thin kindling.
| Form | How to make it | Job | Lights from |
|---|---|---|---|
| Dust and tiny curls | Scrape with the knife spine at 90° | Spark-catcher | Ferro rod sparks, a match |
| Shaved curls | Shave the edge of a thick piece with the blade at a low angle | Spark-catcher and early flame | Ferro rod, match, lighter |
| Thin strips | Tear along the dashes | Flame-extender | A flame from the dust, a match |
| Whole sheets and rolls | Roll a sheet loosely and light one end | Extender, torch for the first kindling | An existing flame |
How long does it burn? Typical thin strips burn for roughly half a minute to two minutes, which matches what we give for birch bark in fire in wet weather. That is longer than most dry grass and enough to get pencil-thin kindling going if the fire lay is built before you strike. If you are unsure how much kindling to prepare, the fire lay planner helps.
Birch bark burns with a bright, sooty flame and thick dark smoke. That is normal: it blackens pots, so light the fire under the pot, not on it, and keep the bark away from tarps and tents. Usual rules apply: fire at least 5 m from tents and hammocks and 3 m from synthetic tarps, local fire bans first, see campfire safety.
Why does birch bark burn when wet?
Birch outer bark is rich in natural oily and waxy substances, among them betulin, the compound that gives the bark its white colour. These substances burn readily and repel water, so rain beads off the surface instead of soaking in. The bark also consists of many thin layers: when the outside is wet, the inner layers are often still dry.
That does not make wet bark as good as dry bark. Surface water has to be driven off before the bark lights, and a soaked, rotten piece from the bottom of a log may not light at all. What works:
- Shake off water and wipe the sheet on your clothing.
- Peel off the outer, wet layers; the inner layers of the same sheet are usually dry.
- Tear it finer than you would in dry weather and scrape plenty of dust.
- Light with a match or lighter if sparks fail; a ferro rod needs finer material in rain.
- Prepare everything under a tarp before you strike, as described in lighting a fire in the rain.
Will this piece of bark work?
Is it white outer bark from dead or felled birch?
Yes → Good start. Check how wet it is.No → Do not take bark from living trees. Look for a fallen log.Is it soaked through and soft?
Yes → Peel off the outer layers, use the drier inner layers, or dry it in your pocket.No → Tear strips and scrape dust as usual.Do sparks fail to catch?
Yes → Scrape finer dust, shield from wind, or use a match and add fatwood.No → Feed the flame with thin, dry kindling straight away.
How to fold a birch bark container
A folded box is the classic birch bark container. The trick is that you never cut through the corners: you fold the excess bark into triangular "ears" and lay them against the walls. With no cut, there is no seam to leak. A sheet of about 30 × 20 cm gives a small box for berries, tinder or a cup of water; larger sheets give larger boxes.
Folding a box without a single cut
 1Make the bark pliable
Soak the sheet in warm (not boiling) water for a few minutes, or warm it gently near embers, never in flames. Cold, dry bark cracks when folded.
 2Press the fold lines
Lay the sheet inner (tan) side up. Press a rectangle for the base with a blunt stick or the knife spine, and the diagonals from the base corners outwards. Do not cut.
 3Fold the walls up
Fold the long walls up along the base lines, then the short walls. The bark should bend, not crack; warm it again if it resists.
 4Pinch the corners
At each corner, push the bark in along the diagonal so it forms a triangular ear, then lay the ear flat against the short wall.
 5Clip the rim
Hold each ear with a split-stick clip at the rim, or stitch it with cord or split spruce root. Let the box dry in shape.
Folding a cone cup
Even quicker is a cone: roll a warmed square of bark into a cone with the white side out, so that the tip is closed by the overlap, and pin the open side with one split-stick clip. It holds water long enough to drink from a spring or to catch drips. Clips are carved from a green twig split halfway along, as in simple whittling projects.
Is a bark container watertight?
Folded without cuts and clipped tight, it usually is, at least for a while. Small leaks at the folds close up as the bark swells. Traditionally, seams on larger vessels were sealed with tree pitch or birch tar. Do not put a bark container on the fire or on embers: dry bark burns readily. Water from streams still needs treatment before drinking, see water purification, and water containers compares bark vessels with carried bottles.
| Container | Time | Holds | Notes |
|---|---|---|---|
| Cone cup | 5–10 min | A few sips, berries | One clip; the easiest first craft |
| Folded box | 30–45 min | Berries, tinder, small items, some water | No cuts at the corners; 2–4 clips |
| Stitched box or basket | Several hours | Gear, food, stored tinder | Needs cord or root lacing; see natural cordage |
Bark sheath, wraps and other uses
The same flexible sheets solve many small problems at camp:
- Knife sheath: wrap a warmed sheet twice round the blade with the white side out, fold the bottom up and bind it with two turns of cord. It is a temporary cover for carrying a blade in the pack, not a replacement for a real sheath; see making a leather sheath and check knife law for carrying rules.
- Handle wrap: a strip wound round a knife or tool handle gives grip and some insulation.
- Kindling wrapper: roll dry tinder and thin twigs in a sheet to keep them together and dry until you light the fire.
- Funnel and scoop: a cone of bark makes a quick funnel to fill a bottle, or a scoop for sand and ash.
- Labels and notes: the inner tan side takes pencil and charcoal well.
- Waterproof cover: a large sheet on top of a small woodpile keeps the top dry for a night.
Many traditional crafts go much further, from woven boxes to canoe skins. They need skill, large sheets and a lot of bark, so for most people the folded box, the cone and the tinder bag are the useful core.
How to flatten and store birch bark
Bark rolls up as it dries, with the white side out. Rolls are fine for tinder, but containers and crafts need flat sheets. Flatten bark soon after you collect it; once old and brittle, it cracks.
Flattening curled bark
 1Warm it
Put curled bark into warm water for a few minutes until it relaxes. Very stiff pieces can take longer; do not boil them, or the layers come apart.
 2Stack and weight it
Stack the sheets flat between two boards and weight them with stones or books. As a rule of thumb, leave them for a day or two until dry.
 3Store dry
Keep the flat sheets in a paper folder or a bag in a dry place. Dry bark keeps for years; damp bark can go mouldy.
Storage at a glance
- Flatten
- Warm water, then weighted for about 1–2 days
- Dry
- Air-dry at room temperature, away from the stove
- Store
- Flat in a folder, box or bag, away from damp
- Shelf life
- Years when dry; check for mould before use
Birch tar: the oldest glue
Birch tar is a black, sticky substance made from birch bark by heating it without air. Archaeological finds show that it was used as glue in the Stone Age, including by Neanderthals, to fix stone points to wooden shafts. Later it sealed vessels, waterproofed leather and was used as a lubricant.
Making it needs a closed container so the bark heats without catching fire, and a way to collect what drips out. It produces very hot material, flammable gases and strong smoke, so it is a project for experienced makers at a safe workshop or fire site, not something to improvise on a camp trip. We mention it here for the history and do not give a recipe.
What about the fungus on birch?
The pale, cushion-shaped birch polypore and the grey hoof-shaped tinder fungus grow on birch too, but they are a separate topic and not part of bark crafts. How to recognise and prepare them is in tinder fungus. Do not eat or use any fungus internally based on a web guide.
Birch bark crafts for kids
Birch bark is ideal for children: it is clean, light, soft when warm and does not need a knife for most crafts. Collect naturally fallen pieces together on a walk and explain why you never peel living trees: that lesson is worth as much as the craft.
Bark ideas for children
- Cone cup with one clip (an adult carves the clip)
- Small folded box for treasures, berries or pine cones
- Name tags and pictures drawn with pencil on the tan inner side
- Little boats with a twig mast and a leaf sail on a pond
- Napkin rings, bracelets and tree decorations from strips
- A "fire bag" of dry strips to bring to the next campfire
An adult handles knives, warm water and all fire lighting with younger children. Older children can learn to scrape bark dust with the knife spine under supervision. Age guidance and knife rules are in bushcraft with kids.
Carrying birch bark in your kit
Birch bark is light and keeps for years, so it is worth carrying a small supply even if you plan to find tinder on the way. A typical amount is a loose handful of strips plus one or two hand-sized flat sheets. Pack it in a zip bag or small dry bag with your ferro rod, or keep a few strips in a jacket pocket where body heat keeps them dry.
- Top up whenever you pass a fallen birch, so you always arrive at camp with dry tinder.
- Flat sheets slip into a map pocket or behind the back panel of a pack.
- In areas without birch, such as pure beech or pine forests, carried bark is especially useful; fatwood is the other long-lasting natural option.
Add birch bark to your list in the Kit Builder or compare it with the rest of your fire kit in the bushcraft kit list.
Troubleshooting birch bark
| Symptom | Likely cause | Fix |
|---|---|---|
| Sparks do not catch | Bark too coarse or flat, too little dust | Scrape more dust with the spine, fluff strips, shield from wind |
| Flame dies before the kindling lights | Too little bark, kindling too thick | Use a bigger bundle of strips, prepare pencil-lead twigs first |
| Bark cracks when folded | Cold, dry or old bark | Warm it in water or near embers; use fresher sheets for containers |
| Box leaks at a corner | Corner was cut or the ear is loose | Never cut corners; clip the ear tighter, let the bark swell |
| Sheet will not come off the log | Cut too shallow, or bark dry and stuck | Score again through the outer layers only; use a wooden wedge |
| Stored bark is mouldy | Stored damp | Dry fully before storing; discard mouldy pieces |
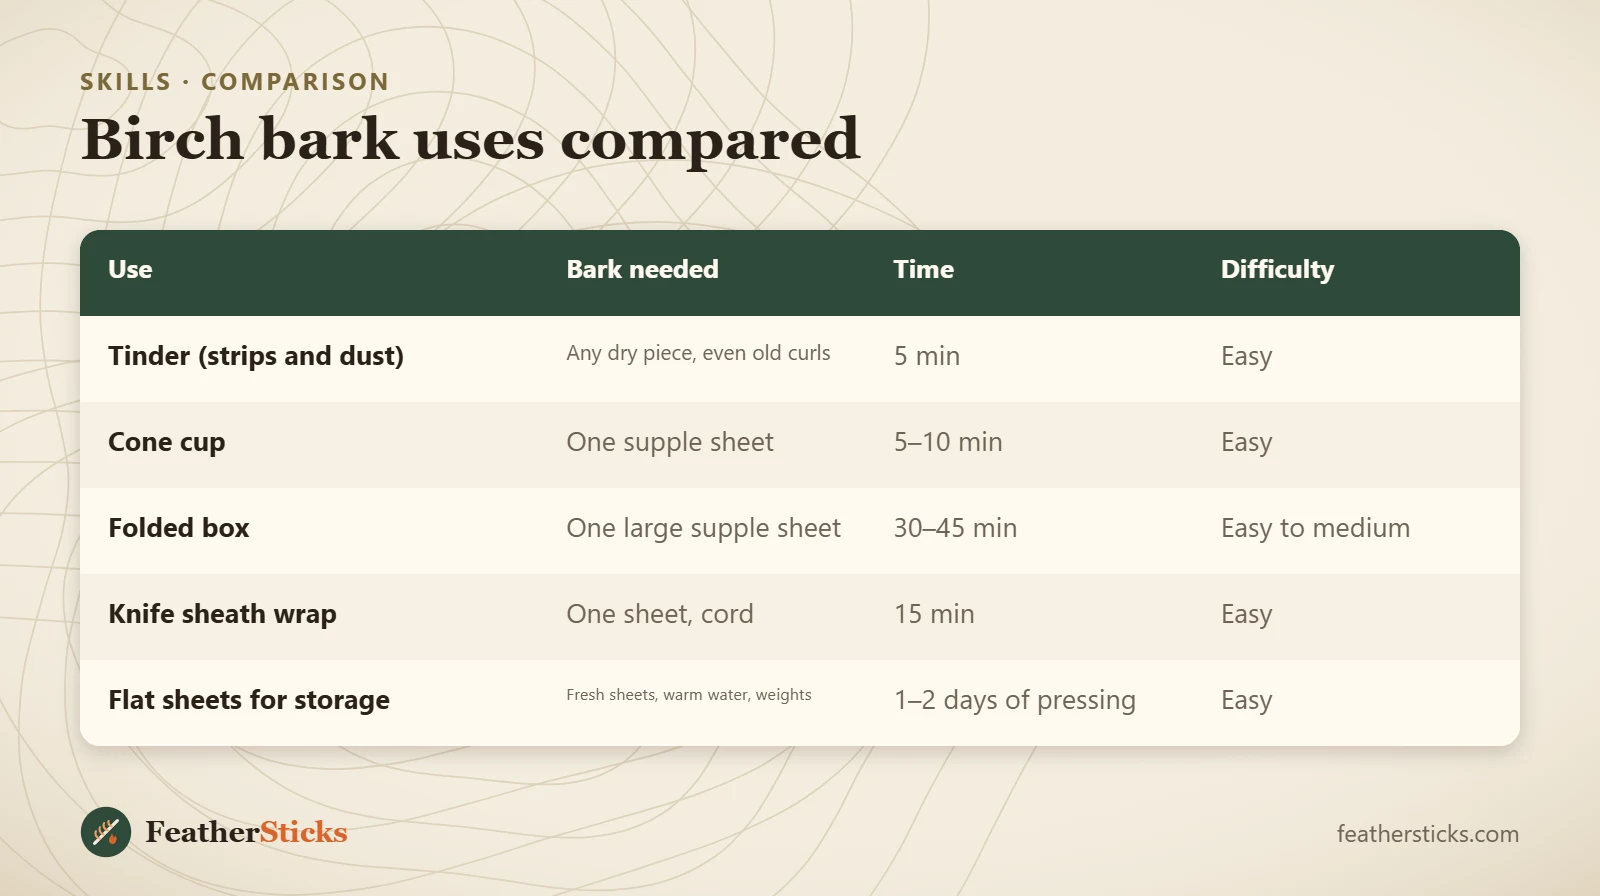
| Use | Bark needed | Time | Difficulty |
|---|---|---|---|
| Tinder (strips and dust) | Any dry piece, even old curls | 5 min | Easy |
| Cone cup | One supple sheet | 5–10 min | Easy |
| Folded box | One large supple sheet | 30–45 min | Easy to medium |
| Knife sheath wrap | One sheet, cord | 15 min | Easy |
| Flat sheets for storage | Fresh sheets, warm water, weights | 1–2 days of pressing | Easy |
Common mistakes
- Peeling bark from a living birch, even "just a small piece".
- Collecting in nature reserves or without the landowner's permission.
- Trying to light a flat sheet with a ferro rod instead of scraping dust first.
- Cutting the corners of a container instead of folding them into ears.
- Folding cold, dry bark and cracking it.
- Putting a bark container directly on the fire.
- Heating a sealed container to make tar.
What you need
- Sharp fixed-blade knife with a square spine
- Ferro rod or matches for testing your tinder
- Cord or split-stick clips for containers
- Small zip bag or dry bag for carried bark
- Two flat boards and stones for pressing sheets
- Pencil for marking fold lines and labels
FAQ
Can you take bark from a living birch tree?
Why does birch bark burn even when wet?
How do you use birch bark as a fire starter?
How do you make a birch bark container?
How do you flatten birch bark?
When is the best time to harvest birch bark?
What is birch tar used for?
Check yourself
Completed6 quick questions from this guide. Nothing is sent anywhere.
Related step-by-step guides
-
 1
-
 1
-
 1