Tinder Fungus & Amadou: Finding, Processing and Using Horse Hoof Fungus for Fire
The tinder fungus (Fomes fomentarius), also called horse hoof fungus, is a grey, hoof-shaped bracket on beech and birch whose soft inner layer catches a spark and then smoulders slowly and stubbornly. Cut out, dried and worked into a felt called amadou, that layer was the standard spark catcher for flint and steel long before char cloth was common. It gives you an ember, not a flame; the flame comes from the tinder bundle you blow the ember into.
This guide covers fire use only: how to recognise the bracket well enough for fire craft, how to harvest it with restraint, the quick field method, how to make amadou the traditional way, which form catches which kind of spark, and how to carry an ember. It fits into our overview of natural tinder and the wider bushcraft basics.
Step by step
-
1

Find a bracket on dead wood
Look on dead or dying beech and birch for grey, hoof-shaped brackets. Take one where collecting is allowed and leave the others: they are habitat.
-
2

Check that it is tinder fungus
Hard as wood, grey crust with bands, flat brown pore surface underneath, typically 10–30 cm wide. This check is for fire use only, never for eating.
-
3

Cut off the crust
Set the bracket pore-side down on a block. Shave off the hard grey crust in thin cuts, always away from the hand that holds it.
-
4

Slice out the trama
Under the crust lies the soft, cinnamon-brown trama. Slice it off in pieces about 5 mm thick and stop where the hard tubes begin.
-
5

Dry it, then scrape it to fluff
Dry the pieces until they are bone dry. Scrape the surface with the knife edge held at 90° until you have a small heap of fine fluff.
-
6

Catch a spark, feed the nest
Throw sparks onto the fluff until a dot glows and spreads. Lay the glowing piece in a dry tinder nest and blow it into flame.
What is the tinder fungus?
The tinder fungus is a perennial bracket fungus. It lives in the wood of weakened or dead broadleaved trees, above all beech and birch, and forms woody fruiting bodies on the trunk that grow a little every year. The shape gives it its other common names: horse hoof fungus, hoof fungus, tinder conk or tinder polypore. In Britain it is common on birch in Scotland and the north and has been spreading on beech further south; across Central and Northern Europe, and in North America, it is one of the most frequent large brackets on dead beech and birch.
The fungus is a decomposer. It causes white rot, softens the trunk and eventually brings it down; the brackets then keep growing on the fallen log for years. A trunk covered in hoof fungi is therefore almost always dead or dying, which matters for harvesting: you do not need to touch a healthy tree to find it.
A very old fire material
Before matches, people made fire with sparks, and sparks need something that will glow from a tiny point of heat. Prepared tinder fungus was that material across much of Europe for a very long time. The best-known example is the Iceman, the Copper Age mummy found in the Ötztal Alps in 1991: he is commonly reported to have carried pieces of tinder fungus in his belt pouch, together with traces of pyrite, which researchers interpret as a fire-making kit. In later centuries amadou was produced as a trade good and sold alongside steels and flints; the word "tinder" in the fungus's name is meant literally.
Amadou also had other craft uses: it was made into felt-like caps and bags in parts of Eastern Europe, and fly fishers still use small patches to dry their flies. Those uses share the property that matters for fire: a soft, absorbent, fibrous felt.
Tinder fungus at a glance
- Scientific name
- Fomes fomentarius
- Common names
- Tinder fungus, horse hoof fungus, hoof fungus, tinder conk
- Grows on
- Mainly beech and birch; dead, dying or fallen trunks
- Shape and size
- Hoof-shaped, woody, typically 10–30 cm wide, sometimes larger
- Useful part
- The trama: a soft brown felt layer under the crust
- What it does
- Catches a spark or takes an ember and smoulders for a long time
From bracket to flame
- BracketOne old, dry fruiting body from dead wood.
- TramaCrust off, soft brown layer sliced out.
- Fluff or amadouDried and scraped, or boiled and pounded into felt.
- EmberA spark makes it glow and spread.
- FlameBlown up in a nest of fine tinder.
Identifying tinder fungus for fire use
For fire craft you need to answer one practical question: does this bracket contain a thick, soft, brown layer that will smoulder? The features below are the ones that matter for that. They are not a full mycological identification, and they do not need to be: if you pick a look-alike, the worst that happens is poor tinder.
- Shape: like a horse's hoof stuck to the trunk, taller towards the tree, with a flat underside. Young brackets are rounder, old ones stack several growth bulges on top of each other.
- Crust: hard, dull, pale to dark grey, with concentric bands and furrows that follow the rim. The newest zone at the lower edge is often brownish or ochre.
- Underside: a flat, fine-pored surface, cream-grey to brown, which darkens where you press or scratch it.
- Hardness: the whole bracket feels like wood. You cannot dent it with a thumb, and it does not bend.
- Host: beech or birch in most regions, less often other broadleaved trees. If you are unsure about the tree, our guide to identifying trees and their wood helps.
- Inside: under a crust only a millimetre or two thick lies cinnamon-brown, suede-like felt. This is the decisive feature, and you see it as soon as you cut.
Look-alikes that matter for tinder
Several other brackets grow on the same trees. None of them is a problem for fire lighting, but most of them simply do not work as well, so it saves time to tell them apart before you cut.

| Bracket | Outside | Flesh when cut | Use as tinder |
|---|---|---|---|
| Tinder fungus (Fomes fomentarius) | Grey hoof with bands; brownish pore surface; beech, birch | Thick cinnamon-brown felt under a thin crust | The one you want: catches sparks when prepared, smoulders long |
| Birch polypore (Fomitopsis betulina) | Smooth, pale brown cushion with a rounded rim; white underside; birch only; annual | White, corky to rubbery, no felt layer | Dry slices can hold an ember from a fire; poor spark catcher |
| Red-belted conk (Fomitopsis pinicola) | Dark crust, orange-red band, cream margin; cream pores; often on conifers | Pale, wood-coloured, hard | No useful felt layer; the resinous crust softens in a flame |
| Artist's bracket (Ganoderma applanatum) | Flat, wide shelf, brown and lumpy; white underside that scratches brown | Dark brown but thin, mostly tubes | Smoulders when dry, yet yields little workable material |
| False tinder fungus (Phellinus igniarius) | Dark grey to black hoof, cracked; rusty-brown pores; often willow | Rusty brown and hard as wood throughout | Very hard to cut; dry pieces can carry an ember, no soft felt |
Colours change with age, weather and algae. The cut decides: thick, soft, brown felt directly under a thin grey crust.
If the cut shows white or cream flesh, or dark material that is hard all the way through, you are holding something else. Leave it, and do not cut a second and third bracket to make sure; look for the grey hoof on the next dead beech instead.
Inside the bracket: crust, trama and tubes
A tinder fungus consists of three parts that behave very differently, and only one of them is good tinder. Knowing where each one lies tells you where to cut.

The layers from top to bottom
- A hard grey shell, only a millimetre or two thick. It does not catch sparks and has to come off.
- Soft, cinnamon-brown and fibrous, like thick suede. Usually between a few millimetres and about 2 cm thick; that range is a rough guide and varies from bracket to bracket.
- Hard, layered and darker, with fine vertical tubes; one layer is added each growing season. Too hard to make felt from, but dry pieces smoulder and can extend an ember.
- The flat underside where the tubes open. Not useful as a spark catcher.
At the point where the bracket is attached to the tree there is also a pale, marbled, crumbly core. It is not the trama and does not make felt, though dry crumbs of it will glow.
The practical consequence: large, old brackets are not automatically better. What you want is a bracket with a thick trama, and that is something you only see after the first cut. Medium-sized, well-developed hoofs often give more usable felt for their size than huge, flat ones that consist almost entirely of tubes.
Harvesting tinder fungus responsibly
Bracket fungi are not just growths on a dead tree. Their fruiting bodies are home to specialised beetles, moths and flies, some of them rare, and the dead wood they sit on is among the most valuable habitats in a forest. A single bracket yields enough tinder for many fires, so there is no reason to take more than one.

Before you take a bracket
- Collecting is allowed here: not a nature reserve, national park or other protected site
- You have the right or the landowner's permission to take it
- The trunk is dead: standing dead wood or a fallen log, not a living tree
- Several brackets are present and you take only one
- It is an old, dry, loose bracket rather than a fresh, growing one
- You remove it cleanly without tearing bark or wood from the trunk
Old and dry or fresh?
A fresh, actively growing bracket is heavy with water. It is easier to cut, and its trama is supple, which is an advantage if you plan to make amadou straight away. It then needs days to dry. An old bracket that has been dead for a while is lighter, harder to cut and often dry enough inside that the field method works the same day. Very old brackets riddled with insect holes crumble and contain little usable felt; leave them for the insects that are living in them.
How to remove it
Old brackets on rotten wood often come off with a firm push of the hand from above. A stuck one can be freed with a few strokes of a folding saw along the trunk. Do not hammer at it with the back of an axe near your hands, and do not lever with the tip of your knife; that is how tips break. Standing dead trees shed branches without warning, so look up before you step under one, and never try to push over a dead trunk to reach a bracket.
Horse hoof fungus fire: the simple field method
The quickest way from bracket to ember needs no pot and no ash, only a knife and dry weather. You cut out the trama, dry it thoroughly and scrape it into fluff. The result is less sensitive than true amadou, but it catches the hot sparks of a ferro rod readily and is all you need to extend an ember from a bow drill or a dying fire.
The knife work is the risky part. A tinder fungus is as hard as seasoned wood on the outside and rounded, so the blade wants to skate off. Work on a stable surface, not on your knee, and keep the cuts thin. A sharp edge is safer than a dull one here because it bites instead of slipping; see how to sharpen a knife if yours needs attention.
Field method in detail
- Set the bracket down firmly Place it pore-side down on a log or chopping block. The flat underside keeps it from rocking. Hold it at the back, on the side that was attached to the tree.
- Shave off the crust Starting at the top, take off the grey crust in thin, shallow cuts that run away from your holding hand and away from your body. Stop as soon as brown felt shows. If the crust is too hard, saw the bracket in half first and work from the cut face.
- Slice out the trama Cut the brown layer off in slabs about 5 mm thick. You will feel the blade meet much harder material when you reach the tubes: stop there. Trim away any grey crust or dark tube material left on the slabs.
- Dry it completely Lay the slabs in the sun and wind, on a warm stone near the fire or carry them in an inside pocket. They must be dry all the way through. A slab that feels cool or leathery is still damp.
- Scrape it to fluff Pin a dry slab on the block and scrape its surface with the knife edge held at 90°, moving away from the pinning hand. Collect the fine brown fluff in a small heap about the size of a large coin.
- Test it Throw sparks into the heap. A glowing dot that spreads by itself means the batch is ready. Put the test ember out completely before you pack up.
How to make amadou: the traditional method
Amadou is trama that has been turned into a thin, soft felt. The traditional process has three aims: to wash out substances that hinder smouldering, to break up the dense fibre so that it becomes loose and fuzzy, and to increase the surface that a spark can land on. Old recipes differ in the details, and there is no single correct method. What they share is soaking or boiling, pounding, stretching and drying.
Water, wood ash and other recipes
Plain water already softens the trama enough to pound it. Many traditional recipes add sieved wood ash to the water, which makes a weak lye; the alkaline solution is said to open up the fibres further and to leave salts in the felt that help it keep glowing. Historical sources also mention soaking the finished felt in a solution of saltpetre. That is not needed for a working spark catcher and is not recommended here: well-made amadou from water or ash water is entirely sufficient.
Recipes also disagree on time. Some simmer the slices for well under an hour, others soak them for days. As a rough starting point, about an hour of gentle simmering softens 5 mm slices thoroughly; judge by feel rather than by the clock. The slices are ready when they are evenly dark, swollen and pliable like wet leather.
Making amadou step by step
 1Cut clean slices
Slice the trama into slabs about 5 mm thick and trim off every bit of crust and tube. Hard remnants do not turn into felt and tear holes when you pound.
 2Simmer in ash water
Stir a handful of sieved wood ash into an old steel pot of water, add the slices and keep it at a gentle simmer. Wear gloves and eye protection: the liquid is caustic. Plain water works too, just less thoroughly.
 3Pound it flat
Press the liquid out with gloved hands. Lay a slice on a smooth log and pound it with a wooden baton, working from the middle outwards. It spreads to several times its original area.
 4Stretch and knead
Pull the damp sheet gently in every direction, roll it between your hands and pound again. Stop when it is thin, even and soft as suede. Pulling too hard tears it.
 5Dry and rough up
Dry the sheet completely in air and sun or at a safe distance from the fire. Then rub or scrape the surface until it is fuzzy: the raised fibres are what catch the spark.
What good amadou looks and feels like
Finished amadou is light, tan to cinnamon brown, a millimetre or two thick and flexible like soft leather or thick felt. You can fold it without cracking it, and the surface looks slightly woolly. If it is stiff and board-like, it was not pounded enough or dried without being worked; dampen it and knead it again.
Optional: charring amadou
Amadou and plain dry trama can be charred exactly like cotton: packed loosely in a closed tin with a small vent hole and heated on coals until the smoke stops, then cooled closed. The method is described in full in how to make char cloth. Charred fungus takes even the weakest spark at once, like char cloth, and still smoulders longer than cloth. It is more fragile than uncharred amadou, so many people char only a few small pieces and keep the rest as felt.
Raw, scraped, amadou or charred: which form catches which spark?
This is where expectations and reality most often part ways. "Tinder fungus catches a spark" is true, but it depends heavily on the form of the material and on the kind of spark.
The sparks from flint and a steel striker are small and comparatively cool. Untreated trama usually does not catch them from a smooth cut face; it has to be very dry and scraped to a fine fluff before it has a chance, and even then it is unreliable. Well-made, fuzzy amadou takes those sparks properly, and charred material takes them easily. A ferro rod is a different matter: its sparks are far hotter and more numerous, and dry, fluffed trama catches them readily. Whatever the form, once the fungus glows it keeps glowing for a long time, and that is its real strength.

| Form (always dry) | Flint and steel | Ferro rod | Ember, coal or lens | Smoulder |
|---|---|---|---|---|
| Raw trama, smooth cut face | Rarely | Sometimes, after several strikes | Takes an ember readily; lens slow | Long |
| Raw trama scraped to fluff | Possible when bone dry, unreliable | Readily | Readily | Fluff short; it lights the piece beneath |
| Amadou (boiled, pounded, fuzzy) | Well, with practice | Readily, often first strike | Readily | Long |
| Charred trama or amadou | Easily, like char cloth | Instantly | Within seconds | Long, but fragile |
| Tube layer, dry pieces | No | Rarely | Takes an ember from a coal | Long: useful as an extender |
| Any form, damp | No | No | Hardly | – |
A practical guide, not a measurement: results vary with the bracket, the dryness and the quality of the sparks.
How does that compare with other spark catchers? Char cloth is easier to light than uncharred amadou and can be made in minutes, but a small square burns out in about a minute and it falls apart in a damp pocket. Amadou is tougher, glows much longer, and a piece that has been snuffed out can be lit again. If you strike with flint and steel and want certainty, carry both: a few squares of char cloth to catch the spark, and fungus to keep the ember alive.
Amadou or char cloth?
Amadou
- Takes flint and steel sparks when well made and dry
- Smoulders long; can be snuffed and relit
- Tough felt that survives a pocket
- Takes an afternoon to make, plus drying
- Needs a bracket you are allowed to collect
Char cloth
- Takes the weakest spark at once
- A small piece glows for about a minute
- Fragile, crumbles when crushed
- Made in minutes from old cotton
- Raw material is always available
Amadou fire starting: from spark to flame
Fungus gives you an ember, and an ember is not yet a fire. Before you strike a single spark, build the rest: a tinder nest of about two fists of fine, dry fibre, pencil-thin kindling, thicker fuel, and a fire lay ready to receive the burning bundle. Our guides to starting a fire and fire lays cover that part, and the fire lay picker suggests a lay for your weather.
Catching a spark and blowing it into flame
 1With flint and steel
Pin a strip of amadou on top of the stone with your thumb, its fuzzy edge 2–3 mm behind the sharp edge, and strike the steel down past it. The grip and the stroke are explained in our flint and steel guide.
 2With a ferro rod
Put a heap of scraped fluff on a piece of bark, plant the tip of the rod next to it and pull the rod back under the striker. Aim the sparks into the heap; a hard forward strike scatters it.
 3Into the nest
Wait until the glow is the size of a coin. Then lay the glowing piece in the hollow of the nest and fold the fibres loosely over it. Fungus glows slowly, so there is no need to rush.
 4Blow it into flame
Lift the nest to chest height with the wind at your back and blow long, steady breaths into it. The smoke thickens and turns yellowish, then the nest flames. Place it under your kindling at once.
What to look for
- The dot spreads by itself. A spark that lands and dies within a second means damp or too dense material. Dry it and fluff it more.
- Thin blue-grey smoke with a faintly sweet, smoky smell shows that the fungus is glowing properly.
- Contact matters. The ember must touch fine fibres. Press the nest gently around it; an ember lying in a hollow with air all round will glow for minutes and light nothing.
- The nest must be finer than you think. A fungus ember is not very hot. Dry grass rubbed soft, shredded inner bark or the fibres left from making natural cordage work; coarse leaves do not.
Once the bundle burns, the usual rules apply: thin, dry kindling first, for example feather sticks, then thicker wood. The firewood calculator tells you how much to gather before you start.
Carrying an ember and extending a coal
The property that made tinder fungus famous is not that it lights easily. It is that it smoulders slowly, evenly and persistently without bursting into flame. That makes it useful in two ways: as a coal extender, and as a way to take fire from one place to another.
As a coal extender
The dust ember from a bow drill, a glowing scrap of char cloth or the last coal in a dying fire are all small and short-lived. Press a piece of dry trama or a chip of the tube layer against them and blow gently: the glow moves into the fungus, and you now have a robust ember that gives you minutes instead of seconds to prepare a better nest. This works with the raw, untreated material; no boiling is needed for it.
Carrying fire
A larger piece, or a whole dry bracket lit at one edge, keeps smouldering for a long time. How long cannot be stated honestly as a number: it depends on the size and density of the piece, how dry it is and how much air it gets. As a very rough orientation, a thumb-sized piece glows for minutes rather than seconds, and a large dry piece with restricted air can last for hours. Test your own material before you rely on it.
Carrying an ember from one fire to the next
 1Light one edge
Hold one edge of a dry piece against a glowing coal until it glows by itself. It should smoulder with a thin thread of smoke and no flame. Do not light the whole piece.
 2Carry it where you can see it
Put the piece in a small steel tin with a few air holes and carry the tin in your hand or on a wire handle. Little air slows the glow. Never put it in a pack, pocket or anywhere out of sight.
 3Wake it up or put it out
At the new fire site, blow on the glowing edge and press it into a tinder nest. Whatever is left afterwards is drowned in water until it is cold all the way through.
Chaga tinder, cramp balls and other fungi for fire
The tinder fungus is the classic, but it is not the only fungus that holds an ember. Two others are worth knowing, again strictly as fire materials.
Chaga, the "true tinder conk"
Chaga (Inonotus obliquus) is not a bracket at all but a black, cracked, charcoal-like mass that bulges out of the trunk of living birches in cold regions. Inside it is rusty orange-brown and corky. Dried thoroughly and scraped or crumbled fine, that inner material can take a spark directly, which is why it is known as true tinder conk in North America; charred, it is far more reliable. It also smoulders long and makes a good coal extender. Because it grows on living trees, removing it wounds the tree, and it has been heavily over-collected in some areas: take none from living trees without clear permission, and prefer pieces from fallen birch.
Cramp balls or King Alfred's cakes
In Britain and Ireland the best-known ember carrier is Daldinia concentrica, called cramp balls or King Alfred's cakes: hard, black, rounded lumps a few centimetres across, mostly on dead ash. Broken open, they show silvery-grey and black concentric rings. Only old, dry, black, lightweight ones are useful; brown or heavy ones are still fresh. A dry one takes a spark from a ferro rod on its broken inner face and then glows slowly through its layers like a charcoal briquette, with a sharp smell. It is an ember carrier and extender, not a flame maker.
| Fungus | Where | Preparation | Strength |
|---|---|---|---|
| Tinder fungus (Fomes fomentarius) | Dead beech and birch | Cut out trama; dry and scrape, or make amadou | Durable spark catcher, long smoulder |
| Chaga (Inonotus obliquus) | Birch, cold regions | Dry, scrape or crumble; better charred | Catches sparks, long smoulder |
| Cramp balls (Daldinia concentrica) | Dead ash, mainly UK and Ireland | Use old dry ones, break open | Carries an ember for a long time |
| Birch polypore (Fomitopsis betulina) | Dead birch | Slice and dry | Holds an ember from a fire; weak spark catcher |
Fire use only. None of this is advice on eating or medicinal use.
Soft, rotten "punk" wood belongs in the same family of materials even though it is wood, not fungus: charred in a tin, it catches sparks like char cloth. It is described together with other natural tinders.
Storing tinder fungus and amadou
Dry fungus draws moisture from the air, and damp fungus will not take a spark. Storage is therefore simple but not optional.
- Dry it fully first. Trama or amadou packed away while still slightly damp goes mouldy. Give it several days in a dry, airy place before it goes into a container.
- Airtight on the trail. A small tin inside a zip bag keeps amadou dry and uncrushed. Charred pieces get their own tin because they shed black dust.
- Breathable at home. For long storage, a paper bag or cloth pouch in a dry room is better than sealed plastic, where residual moisture cannot escape.
- Check for insects. Brackets often contain beetle larvae. Processing removes most of them; storing whole brackets indoors can bring them into the house. Process a bracket soon rather than keeping it on a shelf.
- Refresh before use. A few hours in an inside pocket or on a warm stone drive off the damp it has picked up. Rough up the surface again before you strike.
Kept dry, amadou lasts for years. A strip the size of two fingers is enough for many fires because you use only a small piece each time and can snuff out the rest. Add it to the fire kit on your bushcraft kit list or in the Kit Builder, next to a lighter and a ferro rod.
Troubleshooting: when the fungus will not catch
Most failures come down to moisture, density or the wrong part of the bracket. The table sorts the common problems by what you observe.
| What you see | Likely cause | Fix |
|---|---|---|
| Sparks land and die at once | Material still damp inside | Dry longer: sun, warm stone, inside pocket; test again |
| Dry, but sparks still do not take | Surface too smooth and dense | Scrape to fluff or rough up the amadou; offer a fuzzy edge |
| Flint and steel never works, ferro rod does | Untreated trama is not sensitive enough | Make proper amadou or char a few pieces |
| Hardly any brown layer under the crust | Thin-trama bracket or a look-alike | Use the tubes as extender only; look for a different bracket |
| Flesh is white, cream or hard throughout | Not a tinder fungus | Leave it; compare with the look-alike table |
| Amadou is stiff as cardboard | Too little pounding, or dried unworked | Dampen, pound and knead again, then dry |
| Sheet tears while pounding | Crust or tube remnants, or blows too hard | Trim slices clean; pound lightly from the middle outwards |
| Glows, but the nest does not flame | Nest too coarse or damp, poor contact | Use finer, drier fibre and press it around the ember; blow longer |
| Ember goes out in the carrying tin | Too little air, or piece too small | Add or enlarge air holes; use a larger piece |
| Mould on stored pieces | Packed away damp | Discard; dry the next batch for days before storing |
No ember — find the cause
Is the material soft, brown felt from under the crust?
Yes → Go to the next question.No → Crust and tubes do not catch sparks. Cut out the trama.Is it dry all the way through?
Yes → Go to the next question.No → Dry it longer. Cool or leathery means damp.Is the surface fluffy or fuzzy?
Yes → Go to the next question.No → Scrape it to fluff or rough up the felt.Are you using flint and steel?
Yes → Raw trama is rarely enough. Use real amadou or charred pieces, and check the edge of your flint.No → Bring the ferro rod closer and aim the sparks into the heap; scrape off any coating on a new rod.
Safety: knife, lye and live embers
Working with tinder fungus combines three hazards. Each is easy to control if you respect it.
Knife work on a hard, round object
- Put the bracket on a block or log, flat side down. Never hold it in your palm or brace it on your thigh while you cut.
- Cut away from the holding hand and away from your body, in thin, shallow passes. Forcing a deep cut through the crust is how the blade slips.
- Keep a clear space around you and sit or kneel stably. The basic grips and the safety triangle are explained in carving basics.
- Use a sturdy fixed blade and keep it sharp; advice on choosing one is in bushcraft knives. If the crust defeats the knife, use a saw. Carrying rules for knives differ by country; see knife laws.
- Have a dressing within reach. Our first aid kit guide covers cuts.
Hot ash water
Treat the pot of ash water as what it is: a hot, caustic liquid. Gloves, eye protection, a stable pot on a stable fire or stove, and nobody small nearby. Do not use your cooking pot, and do not tip the liquid into a watercourse.
Embers and fire rules
Smouldering fungus is live fire. Test pieces, leftovers and anything you have carried must be extinguished completely: drown them in water and crush them until they are cold to the touch, because a piece that only looks dead can glow on inside. Never drop one on the forest floor.
Fire bans and seasonal restrictions apply to embers, test sparks into tinder and charring tins just as they do to campfires. Rules vary by country and region; check the current fire danger level, use established fireplaces and read campfire safety and Leave No Trace before you light anything. With children, an adult does the cutting and handles the ember; ideas for suitable tasks are in bushcraft with kids.
More fire skills are collected in the fire hub.
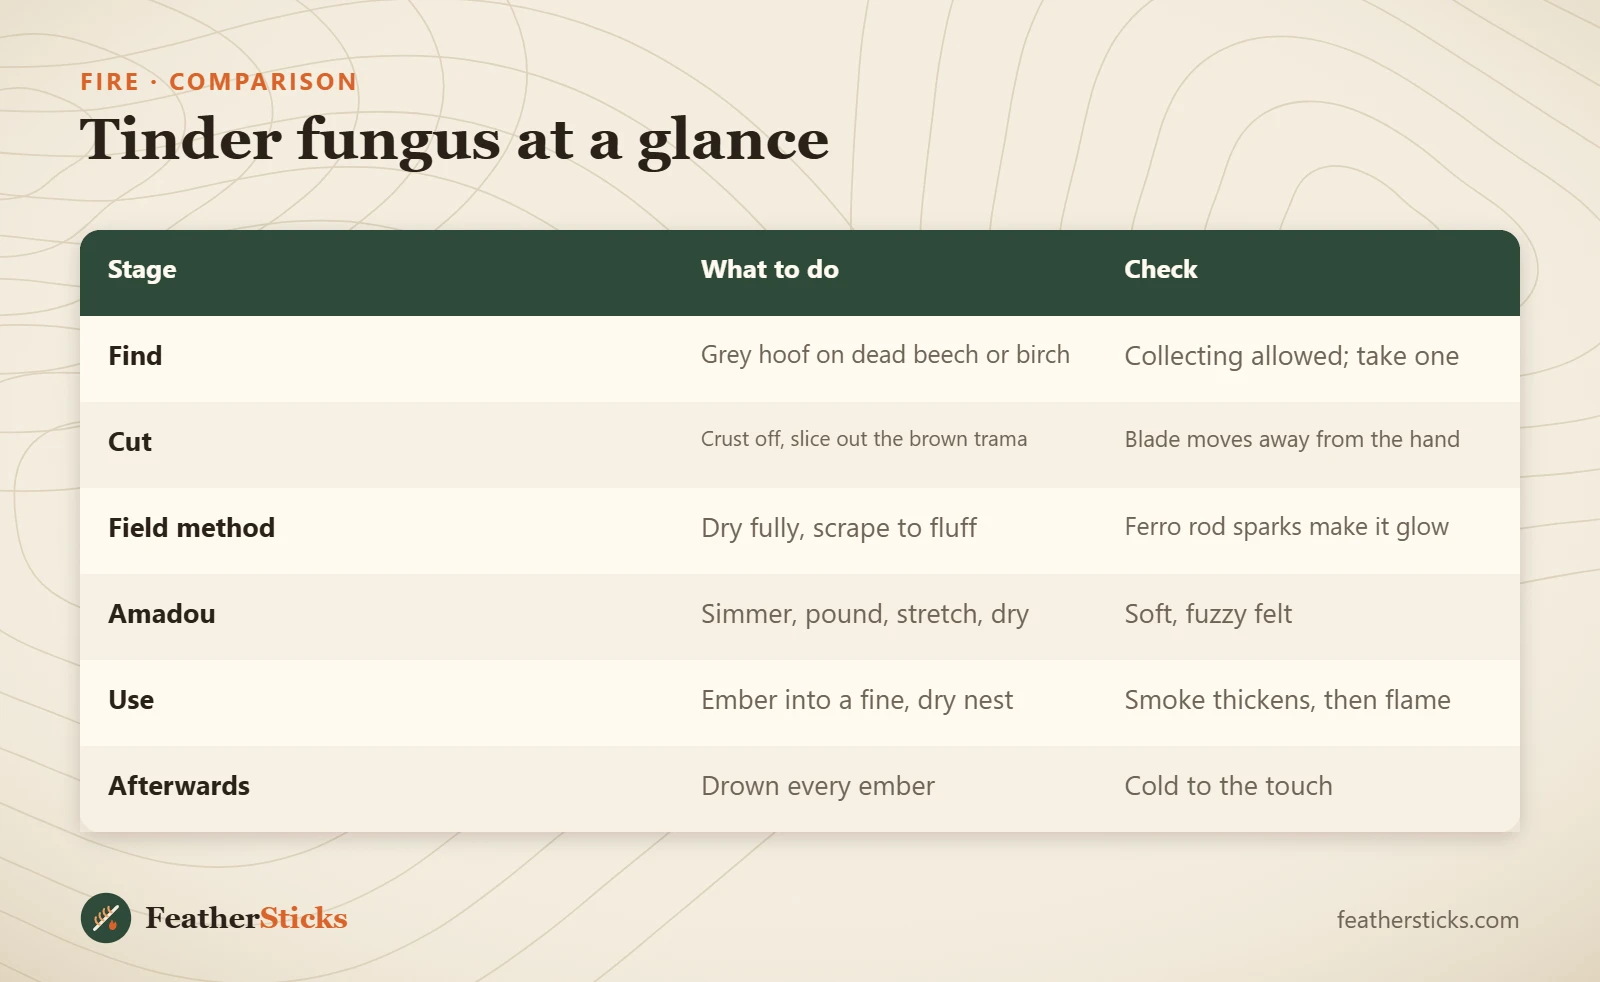
| Stage | What to do | Check |
|---|---|---|
| Find | Grey hoof on dead beech or birch | Collecting allowed; take one |
| Cut | Crust off, slice out the brown trama | Blade moves away from the hand |
| Field method | Dry fully, scrape to fluff | Ferro rod sparks make it glow |
| Amadou | Simmer, pound, stretch, dry | Soft, fuzzy felt |
| Use | Ember into a fine, dry nest | Smoke thickens, then flame |
| Afterwards | Drown every ember | Cold to the touch |
Common mistakes
- Trying to catch sparks on the grey crust or the hard tube layer instead of the trama.
- Striking sparks onto trama that feels dry outside but is still damp inside.
- Expecting raw, smooth trama to take flint and steel sparks without scraping, pounding or charring.
- Cutting towards the holding hand, or holding the bracket in the palm while slicing.
- Taking every bracket from a trunk, or cutting brackets off living trees and in protected areas.
- Handling hot wood-ash lye without gloves and eye protection, or boiling it in a cooking pot.
- Putting a "dead" piece back in the pocket or pack when it is still smouldering inside.
What you need
- Sturdy, sharp fixed-blade knife
- Folding saw for stubborn brackets
- Log or chopping block as a work surface
- Old steel pot, sieved wood ash, gloves and eye protection (for amadou)
- Wooden baton for pounding
- Spark tool: ferro rod, or flint and steel striker
- Small tin and zip bag for storage
- Water to put out test embers
FAQ
Can you start a fire with horse hoof fungus?
What is amadou?
Do you have to boil tinder fungus before using it?
Does tinder fungus work with a ferro rod?
How long does tinder fungus smoulder?
Where does tinder fungus grow?
Is chaga the same as tinder fungus?
Is it legal to collect tinder fungus?
Check yourself
Completed6 quick questions from this guide. Nothing is sent anywhere.
Related step-by-step guides
-
 1
-
 1
-
 1