How to Start a Fire with a Magnifying Glass (Sun Fire)
To start a fire with a magnifying glass, hold the lens square to the sun, move it up and down until the light shrinks to the smallest, brightest dot, and keep that dot still on dark tinder such as char cloth until it glows. Then you blow the ember into flame inside a tinder bundle, just as with any other ember method. It is quiet, needs no fuel and never wears out, but it works only in strong, direct sunlight.
This guide explains how a burning glass focuses light, which lenses work (and how well a water bottle or an ice lens really does), how sun angle and season decide your chances, which tinder catches fastest, and what to do when nothing happens. It ends with the safety rules and a backup plan, because a lens is a fair-weather tool. If you are new to fire lighting, start with the fire starting basics and our guide to bushcraft for beginners.
Step by step
-
1

Check the sun
You need strong, direct sunlight, ideally around midday. If your body casts a sharp shadow, the sun is strong enough to try.
-
2

Prepare tinder and nest first
Lay char cloth or other dark tinder on a piece of bark, and have a tinder bundle and kindling ready before you start focusing.
-
3

Hold the lens square to the sun
Tilt the lens until it faces the sun directly. Its shadow on the ground should be round, not stretched.
-
4

Find the smallest dot
Move the lens slowly up and down until the patch of light shrinks to its smallest, brightest dot on the tinder.
-
5

Hold steady until it glows
Brace your hands and keep the dot still. Char cloth smokes within seconds; wait until a glowing spot spreads by itself.
-
6

Blow the ember into flame
Put the glowing tinder into the nest, fold it loosely, blow long steady breaths and set the flaming bundle under your kindling.
How does a magnifying glass start a fire?
A magnifying glass is a convex lens: thicker in the middle than at the edge. Light rays from the sun arrive almost parallel. As they pass through the curved glass, each ray is bent towards the middle, and at one particular distance behind the lens they all meet. That meeting point is the focal point, and the distance from the lens to it is the focal length.
All the sunlight that falls on the lens is squeezed into a tiny dot at the focal point. A lens with a diameter of 6 cm collects light over an area of about 28 cm²; concentrate that onto a dot of 2 mm and the light is several hundred times stronger than plain sunshine. That is enough to char wood, scorch paper and set dark, dry tinder glowing within seconds.

Why the dot must be as small as possible
The amount of light the lens gathers stays the same whether the dot is the size of a coin or a pinhead. What changes is how concentrated it is. A dot half as wide covers a quarter of the area, so each square millimetre gets four times the energy. That is why finding the exact focal point matters more than anything else: a slightly blurred dot can stay warm for minutes without ever lighting the tinder.
Why a bigger lens is hotter
The collecting area grows with the square of the diameter. A lens of 10 cm gathers roughly four times as much light as one of 5 cm. For the same focal point, more light means more heat. Small lenses, such as the one in a compass or a tick card, can still work with char cloth on a clear summer day, but they leave little margin.
How far away is the focal point?
Every lens has its own focal length, and you find it by moving the lens, not by measuring. As a rough rule of thumb for magnifiers, the focal length is about 25 cm divided by the magnification: a 2× reading magnifier focuses at roughly 12 cm, a 5× pocket loupe at about 5 cm. Reading glasses are labelled in dioptres; the focal length in metres is 1 divided by that number, so +2.5 dioptres focus at about 40 cm.
Which lenses work: magnifier, Fresnel card, glasses, bottle, ice
Any clear object that bulges outwards can focus light, but how well it works depends on its size, its curvature and how clean the glass or plastic is. A proper magnifier is by far the most reliable; improvised lenses are worth knowing about, but expect them to fail more often than they succeed.
Lenses compared in the field
 1Magnifying glass
A glass or acrylic hand magnifier of about 5–10 cm is the reference tool. It is robust, easy to aim and gathers enough light to light char cloth in seconds. Keep it in a soft pouch so the surface does not scratch.
 2Fresnel card
A credit-card-sized sheet of thin plastic with fine circular grooves that act like a flat lens. It weighs a few grams and fits a wallet. It is a little less efficient than glass of the same size and scratches easily, but it is the lightest backup there is.
 3Reading glasses
Only glasses for long-sightedness (plus dioptres) focus light; glasses for short-sightedness (minus) spread it. The lenses are small and the focal point is far away, so expect a weak dot that may light char cloth on a clear summer day and little else.
 4Water bottle
A round, clear, completely full bottle bends light like a cylinder, so it makes a bright line rather than a dot, only a few centimetres behind the bottle. With char cloth and high summer sun it sometimes works; with natural tinder it rarely does.
 5Ice lens
A disc of perfectly clear ice, shaped thicker in the middle and polished with warm hands, can focus light. It needs bubble-free ice, a bright winter sun and a lot of patience. Treat it as a demonstration, not a fire plan.
| Lens | Typical focal distance | How well it works | Notes |
|---|---|---|---|
| Hand magnifier, 5–10 cm | Around 10–25 cm | Very well | The bigger the lens, the hotter the dot |
| Fresnel card | Varies; find it by moving the card | Well | Flat, light, scratches easily; keep the grooved side clean |
| Pocket loupe or compass lens | A few centimetres | Weak to moderate | Small area; char cloth only, strong sun |
| Reading glasses (+2.5 to +3 dioptres) | About 33–40 cm | Weak | Minus lenses for short sight do not work at all |
| Clear water bottle, full | A few centimetres | Poor | Gives a line, not a dot; no air bubble |
| Ice lens | Depends on the shape | Rarely | Needs very clear ice and patient shaping |
Distances are typical rules of thumb. Every lens is different: always find the focal point by moving the lens until the dot is smallest.
Fresnel lens fire: what to know
A Fresnel lens is a flat lens with its curvature cut into thin concentric rings. Card-sized versions are sold as reading aids and are a popular addition to a survival kit, and larger page magnifiers made the same way are very powerful in sunlight. The grooved side usually faces the tinder; try both sides and keep the one that makes the smaller dot. Plastic Fresnel cards bend, so hold them flat by the edges, and store them in a rigid wallet or the lid pocket of your pack.
Improvised lenses: realistic expectations
Water bottles, water-filled plastic bags or an ice lens are often presented as easy survival tricks. They can work, but only in near-perfect conditions: high summer sun, dry dark tinder and calm air. Carry a proper magnifier or Fresnel card if you want a lens method at all. The ice lens is a fun experiment on a bright day in winter and snow, not something to depend on when you are cold.
Sun angle, time of day and season
The lens can only concentrate the light that reaches it. When the sun is low, its light passes through much more air, haze and dust before it arrives, and less energy reaches the ground. The same lens that lights char cloth in three seconds at noon in June may struggle for a minute in the late afternoon, and may fail completely at noon in December.

Best time of day
The most reliable window is around solar noon, when the sun is highest, and roughly two to three hours either side of it in spring and summer. Solar noon is not the same as 12 o'clock on your watch: with summer time and depending on where you are in your time zone, it often falls between about 12:30 and 13:30. The sunset and daylight calculator helps you plan the hours of good light on a given date and place.
Seasons and latitude
In the UK, central Europe and similar latitudes, sun fire is a late spring to early autumn method. On a clear winter day it may still light char cloth with a large lens, but slowly. Further south and at altitude, where the air is thinner and drier, the sun is stronger; in the far north the winter sun barely clears the horizon and a lens is of little use for months.
| Season | Midday sun | Chances with a good magnifier and char cloth | With natural dark tinder |
|---|---|---|---|
| Late spring and summer | High | Good from mid-morning to mid-afternoon | Possible around midday |
| Early spring and early autumn | Medium | Good around midday | Slow, often fails |
| Late autumn and winter | Low | Possible at noon, slow | Rarely |
| Any season, thin cloud or haze | Diffuse | Unreliable | Usually fails |
Rules of thumb only. Altitude, dry air and snow-free ground help; humidity, haze and wind make it harder.
Clouds, haze and the shadow test
A lens needs direct sunlight. Diffuse light under thin cloud comes from every direction at once and cannot be focused into a sharp point. The quick test: look at your own shadow. If it has crisp edges, the sun is direct enough to try. If it is soft or missing, use another method. Under passing clouds, keep the tinder ready and use the bright gaps. Our guide to reading the weather helps you judge whether a clear spell will last.
The best tinder for sun fire
A focused dot of sunlight behaves like a tiny, very hot ember: it creates a glowing spot, not a flame. The best tinder for a burning glass is therefore material that catches an ember easily and keeps smouldering by itself, ideally dark and dry. Pale, fine fibres such as cotton wool or dry grass are excellent for a ferro rod, but they reflect too much light for a lens.
| Tinder | Catches the light | Smoulders | Notes |
|---|---|---|---|
| Char cloth | Within seconds | About a minute per small piece | The best choice; black and already charred |
| Amadou or charred tinder fungus | Quickly | Long | Can be put out and reused |
| Charred punk wood | Quickly | Several minutes | Char it in the same tin as char cloth |
| Dry, dark punk wood (uncharred) | Slowly | Long once lit | Must be bone dry and crumbly |
| Charred ends from an old fire | Quite quickly | Moderate | Scrape the black charcoal into a small heap |
| Dry cattail fluff, rubbed with charcoal | Moderate | Short | Darken pale tinder with a pinch of charcoal |
| Pale dry grass, cotton wool, white paper | Very slowly or not at all | – | Reflects most of the light; use as the nest, not the target |
Making pale tinder darker
Without char cloth, rub charcoal from an old fireplace into a pinch of fine tinder or use the dark heart of a piece of punk wood. Dark does not replace dry, though: damp material wastes the heat on evaporating water.
The target and the nest are two different things
The lens lights a small target, about the size of a fingernail. That target then goes into a bundle of fine, dry fibre, the tinder bundle, where your breath turns the ember into flame. Dry grass, shredded inner bark, birch bark shavings and the fine fibres described in natural tinder all make good nests. The birch bark guide shows how to shred bark into fluffy fibre.
How to start a fire with a magnifying glass, step by step
The method is simple, but most failures come from rushing the preparation or holding the lens slightly out of focus. Work through it in this order.
The full procedure
- Choose a safe spot Use an established fire place or bare mineral soil, out of the wind, at least 5 m from tents and hammocks and 3 m from synthetic tarps. Clear away dry leaves and grass around it.
- Build the fire lay first Set up a small teepee or lean-to of kindling with an opening facing you. Our overview of fire lays and the fire lay picker help you choose one.
- Prepare the nest Form a tinder bundle about the size of two fists, with a hollow in the middle, and keep it dry beside you.
- Place the target Lay a piece of char cloth, about 2 × 2 cm, or another dark tinder on a flat piece of bark or a stone. Shield it from the wind with your body or a log.
- Get comfortable Kneel or sit so that your shadow does not fall on the tinder. Rest your forearm on your knee or on a log; a steady hand matters more than a strong lens.
- Aim and focus Point the lens straight at the sun, then lift or lower it until the light forms the smallest, brightest dot on the target.
- Hold and wait Keep the dot still. Smoke appears first; then a glowing spot spreads by itself. Keep the dot on the edge of the glow until it is the size of a coin.
- Transfer and blow Move the ember into the nest, fold the fibres loosely around it and blow until it flames. Put it straight into the fire lay.
Finding the focal point
Start with the lens close to the tinder and slowly lift it. The bright patch first shrinks and gets brighter, reaches its smallest size at the focal point, and then grows again once you go past it. Go back and forth a few times until you can feel where the sharpest point is, then hold that height. A small, almost white dot with crisp edges is what you want; an orange, fuzzy patch means you are out of focus.
Moving the lens to the focal point
 1Too close
Near the tinder the lens makes a large, dim patch of light. It feels warm but will never light anything. Lift the lens slowly.
 2Getting closer
As the lens rises the patch shrinks and brightens. Keep going, in small steps, and watch the edge of the spot.
 3Focal point
At the focal length the light is a tiny, brilliant dot and smoke rises almost at once. Hold exactly this height and keep the lens square to the sun.
 4Too far
Past the focal point the rays cross and spread again, so the patch grows. If smoke stops, check whether you have drifted too far and come back down.

Keeping the lens square to the sun
A lens tilted away from the sun turns the dot into a long, weak oval. The easiest check is the lens's own shadow: when the lens faces the sun squarely, its shadow on the ground is round. Over half a minute the sun moves noticeably across the sky, so make small corrections to keep the dot on target.
Hold still and be patient
Brace both elbows and keep watching the target rather than the lens. With char cloth in strong sun, a glowing spot usually appears within a few seconds and rarely takes more than half a minute. Darker natural tinder may need a minute or more. If nothing smokes after 30 seconds on char cloth, something is wrong: check the focus, the angle and the sky before carrying on.
From ember to flame
A lens gives you an ember, never a flame. From here on, the technique is the same as with flint and steel or a bow drill ember.
From light spot to burning nest
 1It has caught
A thin, steady wisp of smoke rising from the dot shows that the tinder is smouldering. Keep the dot on the edge of the glowing area for a few more seconds.
 2Let the glow grow
Let the ember spread until it is about the size of a coin. A tiny spot can die when you move it; a larger one survives the transfer.
 3Into the nest
Lift the bark and tip the glowing cloth into the hollow of the tinder bundle. Fold the fibres loosely over it, without squeezing out the air.
 4Under the kindling
Blow long, steady breaths until the bundle bursts into flame, then put it straight under the kindling of your fire lay, with the flames reaching the thinnest sticks first.
Keep the wind at your back, hold the bundle in front of you at about chest height and blow gently and steadily into it from below; turn your face away as it flares up. If the bundle only smokes, it is either too tightly packed, too coarse or slightly damp; open it a little and keep blowing gently. Have feather sticks or slivers of fatwood ready as the next stage, and gather enough fuel beforehand: the firewood calculator tells you how much you need for the evening.
Troubleshooting: why will the tinder not light?
When a lens fire fails, the reason is almost always one of four things: weak sun, a blurred dot, the wrong tinder or an unsteady hand. The table sorts problems by what you see.
| What you see | Likely cause | Fix |
|---|---|---|
| Warm patch, no smoke | Out of focus | Move the lens slowly up and down to find the smallest dot |
| Dot is an oval | Lens tilted | Turn the lens to face the sun; its shadow should be round |
| Smoke, but no glow | Tinder too pale, too coarse or damp | Use char cloth or darken the tinder with charcoal |
| Glow appears, then dies | Dot moved away too soon, or the piece is too small | Hold the dot on the glowing edge until coin-sized |
| Dot keeps wandering | Unsteady hands | Brace elbows on knees or a log; rest the lens hand on the other |
| Works at noon, fails later | Sun too low | Plan lens fire for the middle of the day, or use another method |
| Never gets hot | Thin cloud, haze or a scratched, dirty lens | Wait for direct sun; clean the lens with a soft cloth |
Nothing happens: find the cause
Does your shadow have sharp edges?
Yes → Go to the next question.No → The sun is not direct enough. Wait for a clear gap or use a ferro rod or lighter.Is the dot small, round and almost white?
Yes → Go to the next question.No → Refocus by moving the lens up and down and turn it square to the sun.Is the target dark and completely dry?
Yes → Go to the next question.No → Switch to char cloth or darken the tinder with charcoal; dry it in a pocket first.Does smoke appear but the glow dies?
Yes → Hold the dot longer, shield the tinder from wind and use a larger piece.No → Check the lens: scratches, dirt or a small diameter may simply not gather enough light.
Safety: eyes, forgotten lenses and wildfire
A burning glass is a real fire tool, and it has some hazards that matches and lighters do not.
Protect your eyes
Never look at the sun through a lens, not even for a moment. The lens concentrates the sunlight inside the eye just as it does on tinder, and this can cause permanent damage to the retina. The focal dot itself is also extremely bright: don’t stare at it – glance at it only briefly to aim, and wear sunglasses if you have them. Keep fingers and skin out of the dot; it burns within seconds. Children should only use a lens under close adult supervision, and the rules in bushcraft with kids apply. For burns, follow first aid for burns, and in an emergency call 112 in the EU or your local emergency number.

Lenses left in the sun
Any lens keeps working when you put it down. A magnifier on a car dashboard, a clear water bottle on a car seat, a crystal ball on a windowsill or a lens lying on a tent or in dry grass can focus the sun onto a flammable surface. Fire services in many countries warn about exactly this. After use, put the lens away in a pouch or cover, keep bottles out of direct sun in the car, and never leave a lens lying around at camp.
Wildfire danger and fire bans
The days when a lens works best, hot, dry and cloudless, are the same days when the risk of wildfire is highest. Check the current fire danger rating and any bans before you light anything; in many places open fires are forbidden in or near forests for all or part of the year, and some restrictions include stoves. Rules differ by country and region, and this is not legal advice. Use established fire places, keep water at hand, and read campfire safety and Leave No Trace and our guide to building a fire pit. In Germany, see wild camping in Germany for the legal background.
A backup plan: the lens only works when the sun shines
A magnifying glass has real strengths: it never runs out, it works when wet once it is wiped dry, and it costs nothing to use. But it fails at night, in shade, under cloud, in the morning and evening, and for much of the winter. That makes it a supplementary method, never the only one.
Lens versus ferro rod
Lens
- Needs strong, direct sun
- Silent, no fuel, never wears out
- Lights dark tinder, not pale fluff
- Useless at night, in shade or under cloud
Ferro rod
- Works in any weather, day or night
- Hot sparks light fine pale tinder directly
- Works wet; slowly wears down
- Needs a good striker and some practice
A sensible fire kit combines at least two independent methods: a lighter or storm matches for speed, a ferro rod for any weather, and a lens or Fresnel card as a fuel-free extra on sunny days. Add a small tin of char cloth, which works with all three. Our bushcraft kit list shows where the fire kit fits, and the Kit Builder adds up the weight; a Fresnel card adds almost nothing. In wet weather the lens is the first tool to fail, so read fire in wet weather for the methods that keep working.
A fire kit with a lens
- Hand magnifier or Fresnel card in a protective pouch
- Small tin of char cloth or charred punk wood
- Ferro rod with striker
- Lighter or storm matches in a waterproof bag
- A few pieces of fatwood or a homemade fire starter
- Sunglasses for working with the focal dot
How to practise lens fire
Lens fire is quick to learn, and a few sessions make you much faster at finding the focal point. Practise on a calm, sunny day at a safe fire place with water nearby.
- Focus drill: with the lens over a dark stone, find the smallest dot as fast as you can, ten times in a row. Note roughly how far the lens is from the surface.
- Tinder test: try char cloth, charred punk wood, raw punk wood and a pinch of charcoal-darkened grass, and compare how long each takes.
- Time-of-day test: repeat the char cloth test at mid-morning, noon and late afternoon to learn how the sun angle affects your lens.
- Full sequence: five fires from lens to flame, each with a tinder bundle and a small fire lay, and each one put out completely.
More fire methods, from friction to flint, are collected in the fire hub. If you ever need to attract attention rather than light a fire, sunlight is useful in another way too: see distress signals for how a signal mirror works.
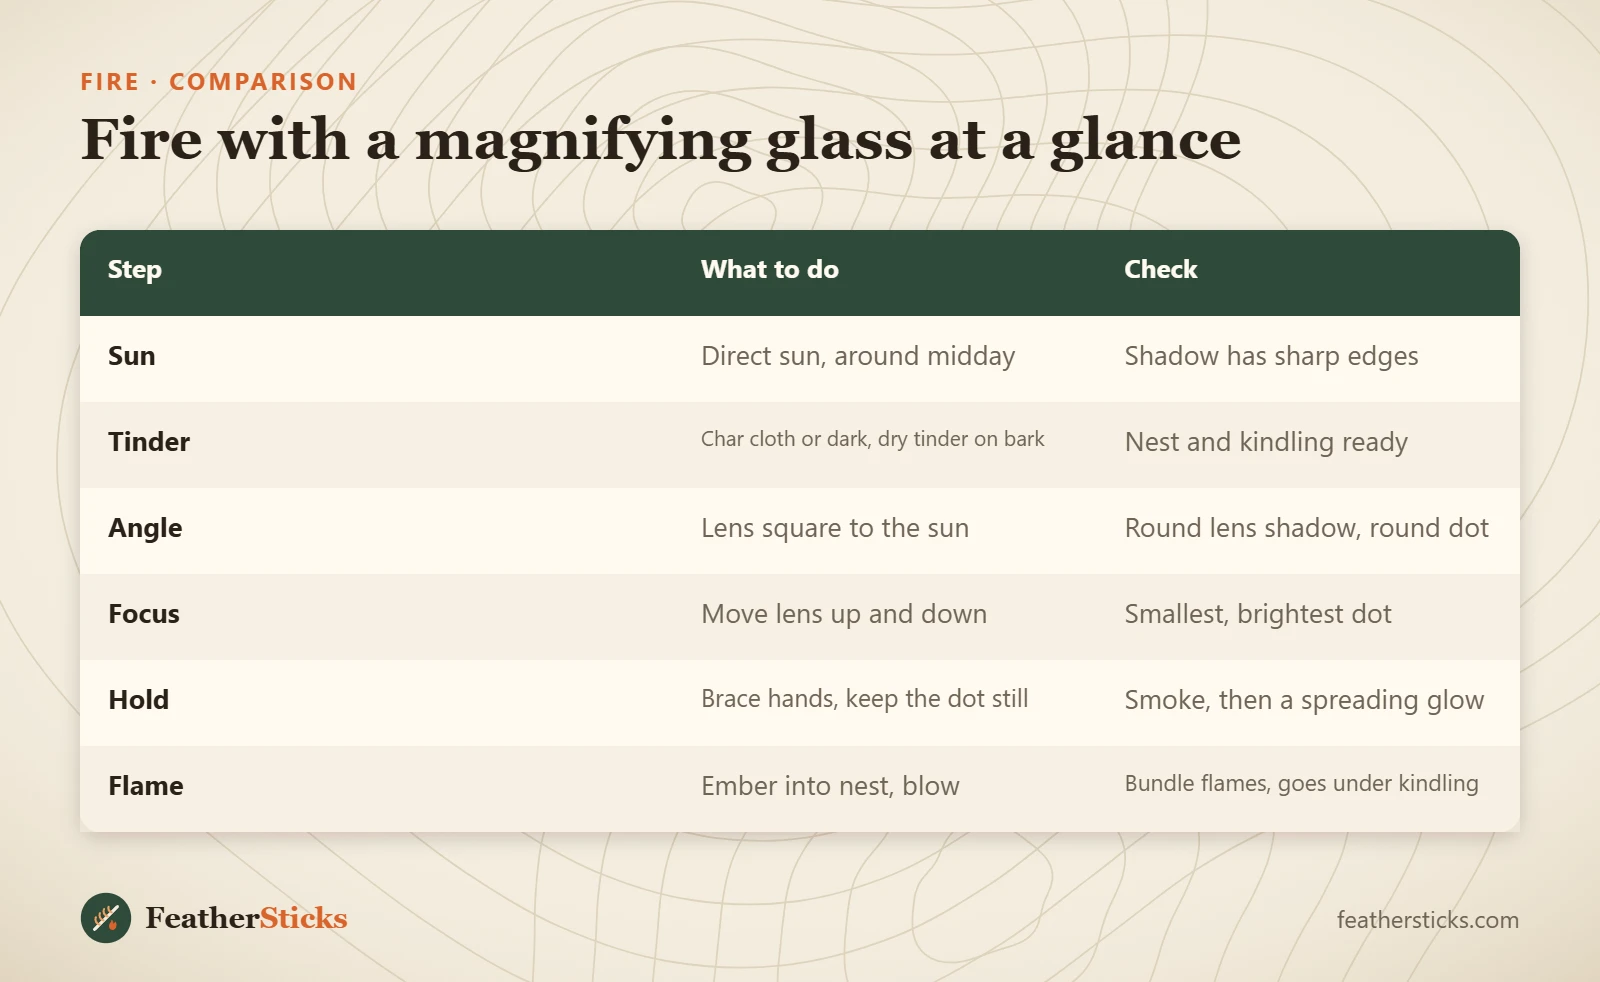
| Step | What to do | Check |
|---|---|---|
| Sun | Direct sun, around midday | Shadow has sharp edges |
| Tinder | Char cloth or dark, dry tinder on bark | Nest and kindling ready |
| Angle | Lens square to the sun | Round lens shadow, round dot |
| Focus | Move lens up and down | Smallest, brightest dot |
| Hold | Brace hands, keep the dot still | Smoke, then a spreading glow |
| Flame | Ember into nest, blow | Bundle flames, goes under kindling |
Common mistakes
- Trying in haze, thin cloud or low evening sun, when there is too little direct light.
- Holding the lens slightly out of focus, so the dot is a warm orange patch instead of a tiny white point.
- Aiming at pale tinder such as cotton wool or dry grass that reflects most of the light.
- Tilting the lens away from the sun, which stretches the dot into a weak oval.
- Looking at the sun through the lens or staring at the bright dot instead of glancing briefly.
- Leaving a lens or water bottle lying in the sun in a car, a tent or on dry grass.
- Relying on a lens as the only fire method and carrying no ferro rod or lighter.
What you need
- Hand magnifier of 5–10 cm or a Fresnel card
- Soft pouch or rigid wallet to protect the lens
- Char cloth, amadou or charred punk wood in a tin
- Piece of bark or a flat stone as a base
- Material for a tinder bundle
- Sunglasses
- Ferro rod and lighter as backup
FAQ
Can you really start a fire with a magnifying glass?
How long does it take to start a fire with a magnifying glass?
What is the best tinder for a magnifying glass?
Does a Fresnel lens work for starting a fire?
Can you start a fire with reading glasses or a water bottle?
Does a magnifying glass work in winter?
Is it dangerous to look at the focal point?
Check yourself
Completed6 quick questions from this guide. Nothing is sent anywhere.
Related step-by-step guides
-
 1
-
 1
-
 1