Fire Reflector Walls: Build a Campfire Reflector That Sends the Heat Back
A fire reflector wall is a low wall of stacked logs or dry stones built on the far side of a campfire, so that heat which would otherwise radiate into the forest comes back towards you. Built about 60–90 cm high and 0.5–1 m behind a long, low fire, a campfire reflector makes a small fire feel noticeably warmer, shields it from wind and catches some of the sparks. It is the classic partner of an open lean-to with a cotton or poly-cotton roof.
This guide explains why reflectors work, the main setups, how to build a log wall between stakes step by step, when rock reflectors are safe (never river stones), cooking, baking and drying with a reflector, combining it with a lean-to, wind direction, and how to take it all down without a trace. It builds on the fire lays guide and campfire safety; for the wider picture see bushcraft for beginners.
Step by step
-
1

Check rules, wind and the site
Only build a fire where it is allowed and the fire danger is low. Pick a calm spot and clear about 3 m around the fire to bare mineral soil.
-
2

Plan shelter, fire and wall
Put the shelter with its back to the wind, the long fire 1.5–2 m in front of it and the reflector wall 0.5–1 m behind the fire.
-
3

Drive two pairs of stakes
Drive two pairs of stout stakes 25–30 cm deep with a baton, 1–2 m apart. Each pair stands about one log thickness apart.
-
4

Stack green or thick logs
Stack green, damp or thick logs between the stakes to 60–90 cm, thickest at the bottom, no gaps, with a slight lean towards the fire.
-
5

Light a long, low fire
Build a long fire parallel to the wall, 0.5–1 m in front of it. Keep it small: the wall does the work, not a big blaze.
-
6

Put it out and take it down
Drown, stir and feel until everything is cold. Then scatter the logs, pull the stakes, fill the holes and leave no trace.
How does a fire reflector wall work?
A campfire gives off heat in two ways. Hot gases rise straight up as convection, which mostly warms the air above the fire and is lost to the sky. The warmth you feel on your face and hands while sitting beside a fire is radiant heat: infrared radiation that travels in straight lines from flames and glowing coals and warms whatever surface it hits, much like sunshine. It does not depend on warm air, which is why you feel it even in a cold breeze.
Radiant heat leaves the fire in every direction. If you sit on one side, most of it goes past you into the forest behind the fire. A reflector wall puts a solid surface in the way. The wall absorbs much of that heat, warms up and radiates part of it back towards the fire and towards you. A log wall is not a mirror and does not return everything, but the difference is easy to feel: the same small fire warms you more, so you burn less wood for the same comfort.

A reflector does three more useful things at once:
- It breaks the wind on its side of the fire, so flames stay steadier and the fire burns more evenly.
- It catches sparks and embers that would otherwise blow into dry ground cover behind the fire.
- It makes an outdoor "room". Combined with an open shelter, the wall and the roof enclose a warm pocket where you can sit, dry clothes and sleep.
The effect is strongest at short range. Radiant heat falls off quickly with distance, so a reflector 3 m behind a fire achieves very little, while one 0.5–1 m behind it works well. Height matters for the same reason: a wall that stands about as high as the flames and the space above them returns the most heat. Taller than about 90 cm, it mainly traps smoke.
Reflector wall at a glance (rules of thumb)
- Distance behind the fire
- 0.5–1 m
- Height (warmth, lean-to)
- 60–90 cm, not much above 90 cm
- Height (cooking wall)
- 30–50 cm, 20–30 cm behind the embers
- Length
- At least as long as the fire, often 1–2 m
- Material
- Green, damp or thick logs; dry stones from dry ground
Reflector setups: wall behind the fire, wall behind you, or both
There are three common ways to arrange people, fire and reflector. They all follow the same idea: put a solid surface on the side where heat would otherwise be lost.
Wall behind the fire
The standard campfire reflector. You sit or sleep on one side of the fire and the wall stands on the far side, 0.5–1 m behind the flames. Heat that passes the fire towards the forest comes back to you. This is the setup for a long fire in front of a sleeping area and for evening warmth around a small group sitting on one side.
Wall behind you
Here you sit between the fire and a wall at your back, such as a log wall, a dry rock face or a fallen trunk. The front of your body is warmed directly by the fire, and the heat that passes you is partly returned to your back. This is quick when a natural wall already exists, and it is how many people warm up at a midday fire: back to a big rock, fire in front.
Both: the lean-to sandwich
The traditional northern night camp combines both. A lean-to with a sloping roof stands behind you, the long fire burns in front of its opening, and a reflector wall stands behind the fire. Heat comes straight from the fire, bounces back from the wall, and the sloping roof catches rising heat and reflects it down onto the sleeper. The overnight fire guide covers how to keep such a fire going safely through the night.

| Setup | How it is arranged | Best for | Watch out for |
|---|---|---|---|
| Wall behind the fire | You · fire · wall 0.5–1 m behind | Evenings, cooking, one-sided groups | Wall must not catch fire |
| Wall behind you | Wall · you · fire | Short stops, natural rock or trunk | Only your back gains, smoke can pool |
| Lean-to + wall | Lean-to · long fire · wall | Cold nights with light gear | Cotton or poly-cotton roof only, fire watch |
| Two walls, group in a ring | Wall · fire · group · wall | Large group camps | More wood, more smoke in still air |
How to build a log reflector wall between stakes
A log wall is the most versatile campfire reflector. It needs a saw, a baton or mallet, four stakes and enough logs to stack 60–90 cm high along the length of the fire. With material close by, it takes one person about 30–60 minutes.
Which wood for a reflector?
The wall stands very close to a fire for hours, so it should be hard to ignite. Green wood works best because its moisture keeps it from catching. In practice that means fresh windfall, fresh logs from thinning work you are allowed to use, or thick, damp dead logs lying on the ground. Never cut living trees for a reflector: most landowners and forest laws do not allow it, and a few hours of warmth do not justify the damage. Dry, thin, dead wood is the worst choice, because the wall simply becomes part of the fire.
Logs of 10–20 cm diameter stack well and are still manageable for one person. Cut them to length with a folding saw; an axe helps to sharpen the stakes. For stakes, take four straight pieces of sound wood, about wrist thick, sharpened at one end.
Building a log reflector wall step by step
 1Choose the logs
Collect green windfall, damp or thick logs of 10–20 cm diameter, cut to the length of the fire. Leave living trees alone; dry, thin sticks belong in the fire, not in the wall.
 2Drive the stakes
Drive each stake 25–30 cm into the ground with a baton or a log, never with the back of an axe. Each pair stands about one log thickness apart, the two pairs 1–2 m apart.
 3Stack tight
Lay the thickest logs at the bottom and stack upwards with no gaps, alternating thick and thin ends so the wall stays level. Gaps let heat and wind through.
 4Tie and lean
Tie each stake pair together at the top with cord or a green withy so they cannot spread. A slight lean towards the fire helps throw the heat forwards and keeps the wall stable.
Height, length and distance
For warmth while sitting, about 50–80 cm is enough. For a lean-to, build 60–90 cm, so the wall covers the flames and the space just above them. Do not go much higher than about 90 cm: a tall wall traps smoke, which then rolls back over the fire into your face or your shelter. Make the wall at least as long as the fire, for a long fire roughly one body length.
Keep 0.5–1 m between the wall and the edge of the fire. Closer, the wall dries out, smoulders and may catch; farther, the effect fades. Check the wall every so often with the back of your hand: if the logs facing the fire get too hot to touch for a moment, or start to char and smoke, move the fire 20–30 cm away from it.
| Use | Height | Distance to fire | Length |
|---|---|---|---|
| Sitting at an evening fire | 50–80 cm | 0.5–1 m | As long as the fire |
| Lean-to with long fire | 60–90 cm | 0.5–1 m | About one body length or more |
| Cooking wall behind embers | 30–50 cm | 20–30 cm behind the embers | As long as the ember bed |
| Windbreak only | As high as the fire | On the windward side | Slightly longer than the fire |
Rules of thumb consistent with the fire lays guide, the lean-to guide and spit cooking. Wind, fuel and terrain change the ideal figures.
Rock reflectors: when stones are safe and when they burst
Stones store heat well and do not burn, which makes them tempting reflector material. But stones are not automatically safe near a fire. Rock that contains water can crack or burst when it heats up quickly, because the water in its pores turns to steam and the pressure has nowhere to go. Fragments can fly with force.
That is why the site-wide rule is simple: never use river stones, and no stones from stream beds, lake shores, wet meadows or the bottom of a ditch. Smooth, rounded stones that have lain in water are the most likely to be soaked through. Porous and layered rock, such as some sandstones and slates, is also risky. The fire pit guide explains the same risk for fire rings.
Using stones and rock as a reflector
 1Only dry stones
Take dry, angular stones from dry, higher ground. Leave river stones and anything wet or layered where it is: they can crack or burst in the heat.
 2Low, stable wall
Stack flat stones into a low, wide wall 0.5–1 m behind the fire, bigger stones at the bottom. Keep it below knee height so nothing can topple into the fire.
 3Use a dry boulder
A large, dry boulder or rock face is a ready-made reflector. Build a small fire 0.5–1 m in front of it and sit on the other side.
Stone walls have a second drawback: they are heavy, and moving many stones damages the ground and the small creatures living under them. A log wall is usually the better choice in a forest. Use a stone wall where there is no suitable wood, for example above the tree line or on bare rock. A natural rock face also has a leave-no-trace downside: soot marks on rock last for years, so keep the fire small, avoid rock with lichen or moss, and use an existing fire site where one is available. Overhangs and caves bring their own risks, covered in rock shelters.
Combining a reflector with a lean-to or tarp
The reflector fire was made for open shelters. The roof of a lean-to slopes down behind you, the opening faces the fire, and the reflector wall stands on the far side of the fire. The usual layout is a long fire about 1.5–2 m in front of the opening and a wall 0.5–1 m behind the fire.
That close distance has one strict condition: only a cotton or poly-cotton roof may be that close to a fire. Nylon and polyester tarps melt from radiant heat and single sparks long before they burn, and molten fabric can drip onto people. A synthetic tarp stays at least 3 m from the fire and never directly downwind; tents and hammocks stay at least 5 m away. If you only own a nylon tarp, pitch it as a rain roof at 3 m or more and accept less warmth, or skip the fire.

| What | Distance from the fire | Why |
|---|---|---|
| Cotton or poly-cotton lean-to | About 1.5–2 m | Natural fabrics char rather than melt; still keep watch |
| Synthetic tarp (nylon, polyester) | At least 3 m, never downwind | Melts from radiant heat and sparks |
| Tents and hammocks | At least 5 m, more downwind | A single ember can melt a hole |
| Reflector wall | 0.5–1 m behind the fire | Close enough to return heat, far enough not to catch |
| Woodpile | 2–3 m, upwind side | Within reach, out of spark range |
| Water | Next to the fire | For flare-ups and putting it out |
Even a canvas or poly-cotton roof is not fireproof. Keep the fire small, burn hardwood that throws few sparks and never leave the fire unattended while people sleep: a reflector fire at night needs a fire watch, as described in the overnight fire guide. Cotton tarps that have been treated for water repellency can behave differently; check the manufacturer's information, and see reproofing outdoor gear for what treatments do. For pitching the roof itself, a ridgeline between two trees gives a clean, adjustable front edge.
Sleeping bags, bivvy bags and mats are usually synthetic, so they need protection too. A raised camp bed of logs at the front of the lean-to keeps you off the cold ground and marks a clear edge between bed and fire zone. Wear wool or cotton outer layers around the fire, because fleece and synthetic jackets melt from sparks; see bushcraft clothing.
Wind direction: where to put the shelter, fire and wall
Wind decides whether a reflector camp is cosy or miserable. The basic rule: the shelter's back faces the wind. Wind then flows over the roof, past the fire and away from you, taking smoke and sparks with it. The reflector wall on the far side catches part of those sparks before they reach the forest floor.
If the wind blows from the reflector side into the open front of the shelter, smoke and sparks are driven straight at you. The wall makes this worse, because it forms an eddy that rolls smoke over its top. Turn the whole setup instead. Light crosswinds are workable; then make the fire a little shorter and lower the wall. Before you start building, check the forecast with reading the weather, and the wind camp checker helps judge whether a site is too exposed.

Is this a good spot for a reflector fire?
Is a fire allowed here and is the fire danger low?
Yes → Go to the next question.No → No fire. Use your sleep system and warm clothing instead.Is the wind light, with no strong gusts forecast?
Yes → Go to the next question.No → Skip the fire, or keep a very small one in a sheltered fire site without a wall.Can the shelter face away from the wind with the fire in front?
Yes → Go to the next question.No → Turn the camp or choose another site.Is there bare ground about 3 m around the fire and no overhanging branches?
Yes → Build the wall and fire as planned.No → Clear the ground to mineral soil or move the fire.
In a steady wind, the reflector also works as a windbreak for the fire itself, but that only makes sense when the wind blows from the wall towards the open field, not towards a shelter or tent. Wind chill adds up fast in an open camp; the wind chill calculator shows how cold it will really feel.
Using a reflector for cooking, baking and drying
The same principle that warms your back also cooks food from the side. A small reflector wall behind the embers concentrates heat on whatever stands between you and the fire: a fish on a plank, meat on a spit, a twist of dough on a stick or a reflector oven. Cooking with radiant heat from the side is gentler than holding food in the flames and burns less.
Cooking, baking and drying with a reflector
 1Low cooking wall
Stack green logs 30–50 cm high, 20–30 cm behind the embers. Food on a plank or a spit in front of the embers is now heated from both sides; see spit cooking.
 2Reflector oven
A metal reflector oven stands about 20–30 cm in front of tall, steady flames, with its open side facing the fire. A log wall behind the fire pushes more heat forwards; details in campfire baking.
 3Drying gear
Hang wool socks, gloves and hats on a stick rack at least 1 m from the flames, on your side of the fire. Check every few minutes and turn the items. Never dry anything on top of the wall.
Baking in front of a reflector
A reflector oven needs flames rather than embers, ideally about as high as the oven. A reflector wall behind the fire turns more of the fire's output towards the oven and steadies the flames in a breeze. Turn the tray halfway through baking, because the side facing the fire browns first. Without an oven, a pan propped upright facing the fire browns the top of bannock, and twist bread on a stick bakes evenly when you rest the stick in front of a reflector wall and turn it now and then. For flatbread on hot stone, see stone cooking, where the same rule applies: no river stones.
Drying clothes and boots safely
A reflector camp is the best place to dry damp gear on a cold evening, but heat damages things faster than you think. Synthetic fabrics melt, leather cracks when dried too quickly and membranes in boots can be harmed. Dry boots slowly, open and away from direct heat, as in drying boots at camp. Never leave drying gear unattended, never hang it above the fire and never on the reflector wall itself, where it is out of sight and close to the heat.
| Use | Fire | Reflector | Tip |
|---|---|---|---|
| Plank fish, string roast | Steady ember bed | Low wall 20–30 cm behind the embers | Turn the food, not just the plank |
| Reflector oven | Tall, steady flames | Log wall behind the fire | Turn the tray halfway |
| Twist bread | Embers and small flames | Low wall behind the embers | Rest sticks at an angle, turn often |
| Drying socks and gloves | Small, steady fire | Normal wall behind the fire | At least 1 m away, on your side |
Reflector fire safety
A reflector wall makes a fire more efficient. It does not make it safer by itself. A wall of logs beside a fire is extra fuel, and the combination of a fire, a shelter and sleeping people needs a sober look at the risks. The core rules of campfire safety apply in full, plus a few that are specific to reflectors.
Safety checklist for a reflector fire
- Fire allowed, fire danger low, no strong wind forecast
- Ground cleared to mineral soil about 3 m around the fire, no branches overhead
- Wall of green, damp or thick logs, 0.5–1 m from the flames, not higher than about 90 cm
- Only cotton or poly-cotton roofs closer than 3 m; tents and hammocks at least 5 m away
- Water within reach: 10–20 litres for an evening fire, more after hours on thick logs
- Someone awake whenever the fire is burning
- Check the wall regularly for heat, smoke or charring
When the wall itself starts to burn
Watch the face of the wall that looks towards the fire. If it smokes, glows or shows small flames, act at once: pull the burning log out with a stick or gloves, lay it into the fire or douse it with water, and move the fire 20–30 cm further away. Dry wood in the wall is the usual cause, along with a fire that has grown too big. Logs that have been close to a fire for hours can smoulder inside long after the surface looks fine, so douse the whole wall at the end, not only the fire.
Smoke, carbon monoxide and children
Smoke rolling into a shelter is unpleasant and unhealthy. Lower the wall, move the fire out or turn the camp. Never bring embers, hot stones or a stove into a tent or closed shelter for warmth: smouldering material produces carbon monoxide, which can cause unconsciousness and death in enclosed spaces. With children, mark a clear no-go zone around both the fire and the wall, which gets hot and invites climbing. In a medical emergency, call 112 in the EU or the local emergency number; treating hypothermia covers what to do when someone gets dangerously cold.
Putting it out and leaving no trace
A reflector camp leaves more behind than a simple fire: stake holes, a pile of logs, perhaps moved stones and a large patch of ash. Plan the clean-up as part of the build. Where an established fire site exists, build the reflector there instead of creating a new one, and follow the principles in leave no trace.
Taking down a reflector camp
- Stop feeding early Let the fire burn down to embers about an hour before you leave, so less wood needs to be put out.
- Drown, stir, feel Pour water over all embers, stir down to the soil, pour again and feel with the back of your hand until everything is cold, as in putting out a campfire.
- Douse the wall Wet the logs of the wall on the side that faced the fire and check them by hand. Split any log that still feels warm inside.
- Dismantle and scatter Take the wall apart, pull the stakes and scatter the logs in the forest, charred side down. Put stones back where they came from, dirty side down.
- Restore the ground Fill stake holes, scatter cold ash thinly away from water and cover the fire site with leaf litter.
Take the time to look back at the site before you go. If nobody could tell that a fire and a wall stood there, you did it right.
Troubleshooting a campfire reflector
Most problems with reflectors come from the wrong distance, the wrong height or the wrong wind direction. The table lists common symptoms and fixes.
| What you notice | Likely cause | Fix |
|---|---|---|
| Hardly any extra warmth | Wall too far away or too low | Move the fire to 0.5–1 m from the wall, add logs up to 60–90 cm |
| Wall smokes or chars | Fire too close, dry wood in the wall | Move the fire away, replace dry logs with green or damp ones |
| Smoke rolls into the shelter | Wall too high, wind from the wrong side | Lower the wall, turn the camp, back of shelter to the wind |
| Wall leans or collapses | Stakes too shallow or untied | Drive stakes 25–30 cm deep, tie the pairs at the top |
| Heat on one spot only | Fire too short for the shelter | Build a long fire along the whole wall |
| Sparks on bags and tarp | Softwood, big fire, synthetic fabrics too close | Burn hardwood, keep the fire small, move synthetics to 3 m or more |
How much wood a reflector evening or a whole night needs is easy to underestimate; the firewood calculator gives quantities, and the fire lay picker suggests the right lay. On canoe trips and with groups, reflector camps on established sites are common, see canoe camping and group trips. More fire skills are collected on the fire hub.
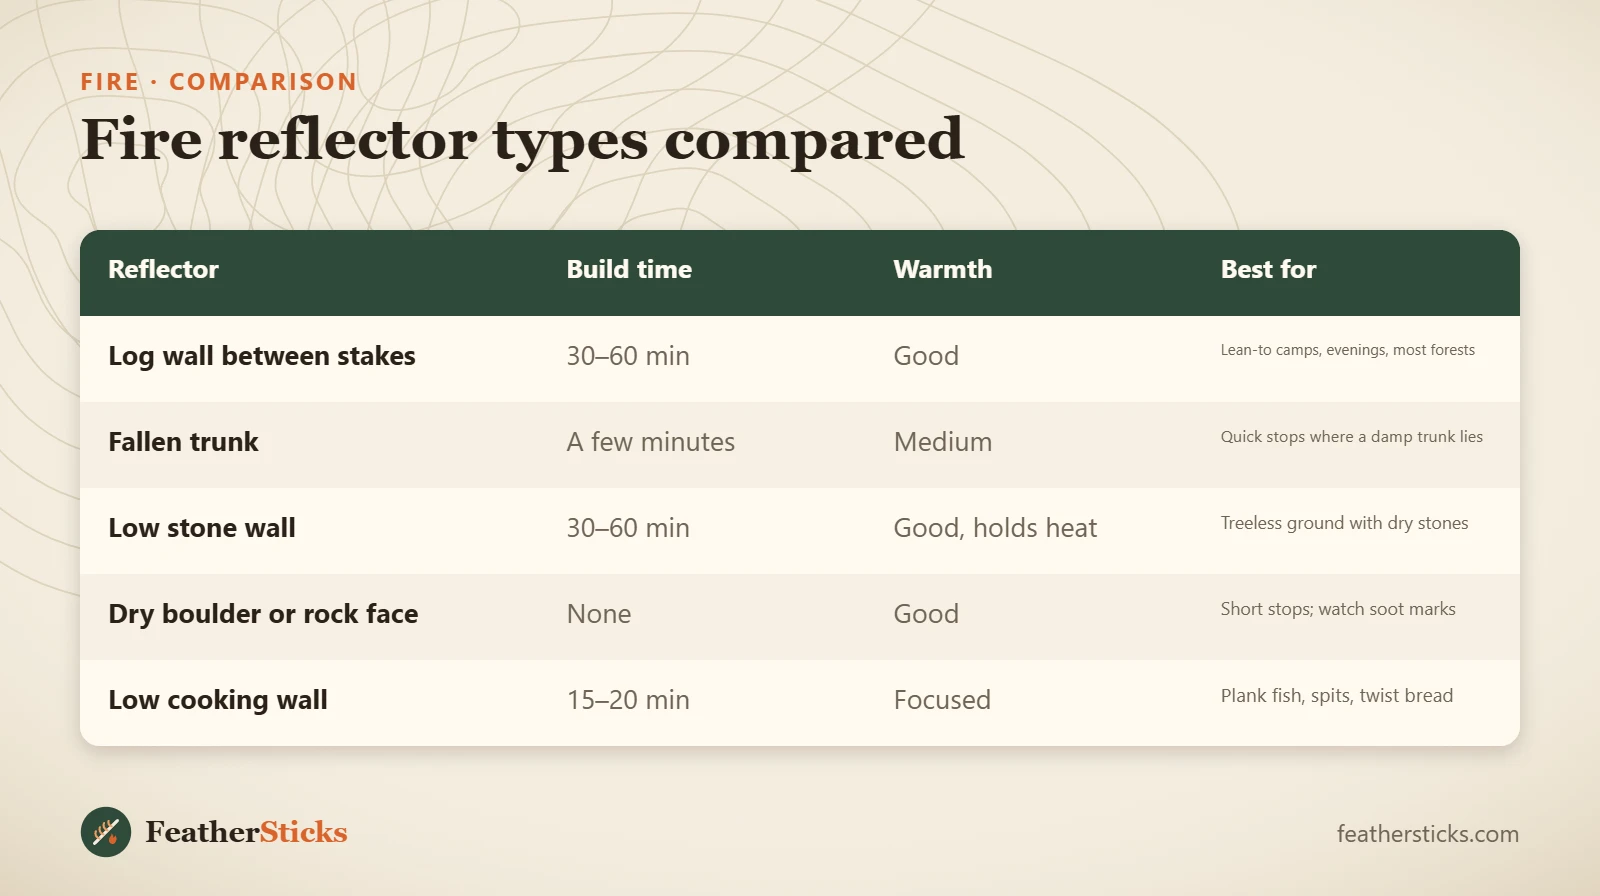
| Reflector | Build time | Warmth | Best for |
|---|---|---|---|
| Log wall between stakes | 30–60 min | Good | Lean-to camps, evenings, most forests |
| Fallen trunk | A few minutes | Medium | Quick stops where a damp trunk lies |
| Low stone wall | 30–60 min | Good, holds heat | Treeless ground with dry stones |
| Dry boulder or rock face | None | Good | Short stops; watch soot marks |
| Low cooking wall | 15–20 min | Focused | Plank fish, spits, twist bread |
Common mistakes
- Building the wall from dry, thin dead wood that catches fire.
- Using river stones or wet rock, which can crack or burst in the heat.
- Placing the wall 2–3 m from the fire, where it barely returns any heat.
- Building the wall higher than about 90 cm, so smoke rolls back into the shelter.
- Pitching a nylon or polyester tarp close to a reflector fire.
- Facing the shelter into the wind, so smoke and sparks blow inside.
- Leaving the wall standing and stakes in the ground after the trip.
What you need
- Folding saw for logs and stakes
- Axe or knife to point the stakes
- Wooden baton or mallet
- Cord to tie the stake pairs
- Leather gloves and a poker stick
- Collapsible bucket or bottles for 10–20 litres of water
- Cotton or poly-cotton tarp for a fire-facing lean-to
FAQ
How far should a reflector wall be from the fire?
How high should a fire reflector be?
Do campfire reflectors really work?
Why should you not use river stones near a fire?
What wood is best for a reflector wall?
Can I use a reflector with a nylon tarp?
Can I cook with a fire reflector?
Check yourself
Completed6 quick questions from this guide. Nothing is sent anywhere.
Related step-by-step guides
-
 1
-
 1
-
 1