Leading Group Trips: Planning, Roles, Camp Layout and Safety Outdoors
Leading a group outdoors means planning for the slowest member, giving clear roles to a leader at the front and a back marker at the back, counting heads at every stop and briefing everyone on times, signals and rules before you set off. On a group camping trip the same logic continues in camp: fixed zones for sleeping, fire, tools and toilet, and a written emergency plan that every adult knows.
This guide is for anyone running a scout trip, a youth or club outing, a family weekend with friends or a course in the woods. It builds on planning a bushcraft trip and bushcraft with kids, links to the other bushcraft skills where the details live and stays deliberately general on law: rules on supervision and duty of care differ by country and organisation, and nothing here is legal advice.
Step by step
-
1

Plan for the slowest member
Choose distance, terrain and timings for the least fit and least experienced person in the group, not for the strongest.
-
2

Give out the roles
A leader walks at the front and sets the pace, a back marker walks last and never lets anyone fall behind. Name a deputy.
-
3

Count heads, pair buddies
Number off at the start, after every break and at every junction. Buddies check on each other and report a missing partner at once.
-
4

Brief and set a turnaround
Before you go, explain route, times, whistle signals and rules. Fix a turnaround time and stick to it.
-
5

Lay out camp in zones
Tents, fire circle, tool zone, kitchen and latrine each get their place – latrine at least 60 m from water.
-
6

Have an emergency plan
Contact list, first aid kit, 112 and a clear rule: one leader helps, the other keeps the group together.
What changes when you lead a group outdoors?
Alone or with one friend, small problems stay small: you notice you are cold, you eat, you slow down. In a group, the same problems are spread over many people who may not say anything. A quiet teenager with a blister, a parent who is nervous about the dark or a child who stopped drinking two hours ago can all turn a good day into a hard one. The leader's job is to see these things early, and the tools for that are simple: a realistic plan, clear roles, regular headcounts and a few agreed rules.
Groups also move more slowly and need more of everything: more time at every gate and stream, more water, more toilet stops, more space in camp. Plan for that friction rather than fighting it. If you are new to the woods yourself, get the basics from bushcraft for beginners first and lead your first group on ground you know well.
Solo trip versus group trip
Alone or in a pair
- You decide and react at once
- Pace and breaks fit one person
- Problems are noticed early
- Kit is personal and light
- Safety rests on a check-in, see going solo
Leading a group
- Decisions must be explained and agreed
- Pace set by the slowest member
- Problems hide behind quiet faces
- Shared kit must be planned and split
- Safety rests on roles, counts and a written plan
Planning a group camping trip for the slowest member
The single most important planning rule for any group trip is this: the group's limits are set by its weakest point. That means the shortest legs, the least fitness, the heaviest pack relative to body weight, the least experience with rain and cold, and the most nervous mind. Ask about these honestly when people sign up, and plan the route, the pace and the camp so that this person can manage comfortably – then everyone else can too.
Distance and time
A common planning rule for walking time is about 5 km per hour on flat ground plus roughly one extra hour for every 600 m of ascent. Groups, children and beginners are slower, so the trip planning guide suggests planning about half the distance you would cover alone. Add breaks, a reserve and the time it takes to get a whole group through gates, over stiles and across a stream. The hiking time calculator does the arithmetic and lets you set a slower pace and a heavier pack.
Daylight and arrival
Check sunrise and sunset with the daylight calculator and plan to arrive in camp at least an hour or two before dark. A group needs that time: tents, water, wood, toilet direction, food and a briefing all take longer than for a single person. Arriving in the dark with tired children or beginners is the classic start of a stressful night.
Packs and shared kit
Weigh every pack before the trip. The pack weight calculator adds up base weight, water, food and fuel and shows the load as a share of body weight; for young people and small adults, keep loads clearly lower and move shared kit – tarps, pots, water containers, first aid kit – to the stronger members. A long trip with heavy packs also needs good feet: send everyone the basics on foot care and blisters and ask them to walk in their boots before the trip.
| Topic | What to ask | Why it matters |
|---|---|---|
| Fitness and walking | Longest walk recently, with or without a pack | Sets the realistic distance and pace |
| Experience | Nights outdoors, rain, cold, darkness | Tells you how many "firsts" the trip contains |
| Health | Allergies, medication, conditions, dietary needs | Goes into the confidential contact list and food plan |
| Kit | Sleeping bag rating, rain jacket, boots, headlamp | Gaps can be solved at home, not in the woods |
| Swimming and water | Can they swim? Comfortable near water? | Important near lakes, rivers and on canoe trips |
| Worries | What makes them nervous – dark, insects, toilets? | A quiet word now prevents a crisis later |
Group roles: leader, back marker and deputy
Clear roles stop the most common group problem: everyone assuming someone else is watching. Even in a small group, name at least two adults with fixed jobs, and tell the group who they are.
- Leader (front). Walks at the front, knows the route, sets the pace and decides when to stop. The leader stops at every junction and waits until the whole group is together.
- Back marker (sweep). Walks last, always. Nobody walks behind the back marker, and the back marker never overtakes anyone. If someone stops to tie a lace, the back marker stops too and calls the front to wait.
- Deputy. The second responsible adult, often the back marker. Knows the route and the emergency plan, and takes over the group if the leader has to deal with an injury.
With more people, hand out more jobs: navigator, timekeeper, first aider, water crew, fire keeper. Our trip planning guide lists walking roles, and the base camp guide has a camp rota. Older children and teenagers love real responsibility – "navigator to the next junction" or "keeper of the headcount" – as long as an adult still checks.

Where should the slowest walker go?
Put the slowest person directly behind the leader. It sounds unkind, but it is the opposite: the leader sees immediately when the pace is too high, the slow walker is not left alone at the back, and the group stays together. Fast walkers can carry a little more shared kit or take turns at navigating instead of racing ahead.
Keep the person behind you in sight
A simple rule keeps a long line together: every walker keeps the person behind them in sight. If they lose sight, they stop and wait. At a junction the leader stops until the back marker arrives, so nobody takes the wrong path. In fog, dense forest or darkness, close up the gaps and shorten the distance between people.
| Situation | Rule of thumb | Why |
|---|---|---|
| Any group outdoors | At least two responsible adults, however small the group | One deals with an incident, the other stays with everyone else |
| Children on a walk | More adults the younger the children; small groups for under-sixes | Young children wander off silently and quickly |
| Knife, saw or fire station | One adult per one or two children at that station | Same as our kids guide – full attention on the blade or flame |
| Water, darkness, rough terrain | Smaller groups, more adults, closer spacing | Less margin for mistakes |
Schools, clubs, youth associations and paid providers usually set their own ratios, qualifications and consent rules – follow those first.
Headcounts and the buddy system
A headcount takes ten seconds and is the cheapest safety measure there is. Make it a habit at fixed moments: at the start, after every break, at every junction, after a toilet stop, before leaving a campsite and whenever the group has been split. Counting yourself as "one" and then everyone in a row is error-prone in a moving group; having each person call out a number is faster and more reliable.
The buddy system adds a second layer. Every participant has a partner. Buddies stay within sight of each other, go to the toilet together, and tell a leader immediately if their partner is missing. In a group of children, colour-coded pairs (same coloured armband or hat) make it easier for adults to spot a missing pair at a glance. The safety framework for kids' games uses the same buddies and counts.
Headcount routine in three moves
 1Number off
At the start, everyone gets a fixed number and calls it out in order: one, two, three … If a number is missing, you know who at once. Keep the same numbers for the whole trip.
 2Check your buddy
Before any count, each person looks for their buddy. Pairs stay together for toilet stops, water runs and firewood collecting. A missing buddy is reported at once, not after the meal.
 3Wait and count at junctions
The leader stops at every junction, gate or stream and waits until the back marker arrives. Then count again before moving on – this is where groups usually split.
The briefing: route, turnaround time, signals and rules
A short briefing before you set off is where you turn your plan into shared knowledge. Keep it under ten minutes, standing in a circle where everyone can hear, and repeat the core points at the first break. People remember what they heard twice and what they can see, so show the map, write the turnaround time on a card and demonstrate the whistle signals.
Turnaround time
The turnaround time is the clock time at which the group stops going forward and heads back or takes a bail-out, wherever it is. Decide it at home, with the daylight times and your walking estimate in front of you, and tell the group in the briefing. The point of saying it out loud is to make turning back a plan, not a defeat. Leave a written trip plan with a contact at home, including an alarm time – the safety plan explains the difference.
What goes into the briefing
 1Route and times
Show the route on the map: start, breaks, the camp or turning point, the bail-out points and the turnaround time. Say when you expect to be back.
 2Only two whistle signals
One long blast means "gather at the leader". Three blasts mean "help" and are never used for anything else – they are the widely used distress signal.
 3If you get separated
Stop at the last junction or landmark you passed, stay there and blow three blasts. Do not try to catch up on a guessed path. Children follow the "stop, stay, whistle" rule from the kids guide.
 4Boundaries and camp rules
In camp, show the boundaries – ribbons on trees work well – plus the fire circle, the tool zone, the toilet direction and the water point. Nobody leaves the boundary alone.
Briefing checklist
- Who leads, who is back marker, who is deputy and first aider
- Route, breaks, camp or turning point, bail-out points
- Turnaround time and expected return time
- Whistle signals: one long = gather, three = help
- What to do if separated: stop at the last junction, stay, whistle
- Buddy pairs and headcount numbers
- Fire, tool, water and toilet rules for camp
- Weather for the day and what would make you change the plan
Camp layout for groups: fire circle, tool zone and latrine
A group camp works best when every activity has a fixed place. Zones prevent accidents (nobody walks through the tool area to reach their tent), keep the site tidy and make rules easy to explain. Start with a safe site: no dead branches overhead, no flood risk, enough flat ground for all tents, and permission from the landowner. Then lay out the zones, ideally before people unpack. The general principles of a well-organised camp apply; a group simply needs more space and clearer boundaries.

| Zone | Where and how far | Rule |
|---|---|---|
| Tents and hammocks | Grouped together, upwind of the fire, at least 5 m from it (synthetic tarps at least 3 m) | Quiet zone; no food, no tools, no flames |
| Fire circle | Open space, at least 3 m of clear air overhead, firewood 2–3 m away | Seat logs as a ring; nobody walks through it; see campfire safety |
| Tool zone | At the edge of camp, away from paths, clear circle of two axe lengths around the block | All cutting happens here and nowhere else |
| Kitchen and wash station | Between fire and tents, handwash on the way from the toilet | Hands washed before every meal |
| Water point | Camp about 60 m from the source; always two people fetching water | Raw and treated water in separate, labelled containers |
| Latrine or toilet direction | At least 60 m from water, camp and paths, downhill and away from the source | Trowel, paper and bags at a fixed place; see toilet and hygiene outdoors |
The fire circle
For a group, the fire is a meeting place, a kitchen and a hazard at once. Mark a safety ring of 1.5–2 m around the fire, set seat logs or sit mats in a circle outside it, and agree that nobody walks or runs across the circle. One person is the fire keeper at any time and never leaves it unattended. Keep a bucket of water or a pot ready, and check fire bans and forest fire warnings before every trip – where open fires are not allowed, a stove kitchen replaces the fire circle. When packing up, put the fire out until the ashes are cold to the touch.
The tool zone
Knives, saws and axes are the most common source of injuries in bushcraft groups. A fixed tool zone is the best single measure: all cutting happens there, in daylight, under supervision. Tools are handed out and handed back – counting them out and in, like people, means a lost knife is found before someone steps on it.

Tool rules for groups and children
- Tools live in a leader's pack or a marked box, not in pockets
- Carving only seated, with the blood circle checked and the stick outside the knee
- Only one person inside the chopping circle; everyone else outside two axe lengths – see axes and hatchets
- Saws for cross-cutting, gloves on the holding hand
- Sheathe or close every blade before standing up, walking or handing it over
- One adult per one or two children at the tool station
- Stop tool work when people are cold, tired or it gets dark
- Carry knives packed away on the way to the woods – knife laws differ, see knife laws
Food and water logistics for groups
Food and water become a logistics task as soon as more than a few people share a kitchen. Plan it on paper: who brings what, who carries what, and how much is needed per person and day.
Water
The water calculator estimates drinking and cooking water from body weight, temperature, effort and altitude – often 4–6 litres per person and day for drinking and cooking, more in heat. Add washing water, roughly 0.5–1 L per person and day for a careful cook. For a group that quickly adds up to large volumes, so a campsite with a tap or a reliable stream within reach is worth a lot. Treat water from streams before drinking: a rolling boil for 1 minute (3 minutes above 2,000 m) or a filter that suits the group size. Keep raw and treated water in separate, clearly labelled containers, and let a fixed water crew handle it.
Food
Use the calorie planner for teenagers and adults, then multiply by the number of people and days; for younger children, pack generously and bring more snacks than you think. Meal planning gets easier with simple one-pot meals that can be scaled up. Collect every allergy and dietary need in advance, label food boxes and keep allergen-free meals apart. A clean camp kitchen with a hand-wash station prevents the stomach bugs that can run through a whole group in a day.
| Item | Planning basis | Tip |
|---|---|---|
| Drinking and cooking water | Water calculator, often 4–6 L per person and day | Know the next source before you rely on it |
| Washing water | About 0.5–1 L per person and day | Wash 60 m or more from the source |
| Food | Calorie planner × people × days, plus a reserve | One spare meal for the whole group |
| Stove fuel | About 20–30 g of gas per person and day for boiling water in mild weather | More in cold and wind; see camp stoves |
| Allergies and diets | List from every participant or parent | Separate, labelled box; cook allergen-free first |
Weather decisions: when to change the plan
Weather decisions are harder in a group because people want the trip to happen and nobody wants to be the one who calls it off. Take the decision out of the moment: agree at home which conditions mean "shorten", "change" or "cancel", and write them into the plan. Check the forecast the evening before and the morning of the trip, and keep watching the sky – our guide to reading the weather explains the signs.
Go, change or turn back?
Thunderstorms forecast or thunder heard?
Yes → Leave summits, ridges and open ground, avoid single tall trees and water, spread the group out – see lightning safety.No → Next question.Strong wind or a storm warning for the forest?
Yes → Do not walk or camp under trees; choose open ground, a hut or postpone.No → Next question.Cold rain for hours, or people already wet and shivering?
Yes → Shorten the route, get to shelter, change into dry layers and warm people up early – see hypothermia.No → Next question.Heat, or no shade and little water?
Yes → Start early, rest at midday in the shade, drink often – see heat and sun.No → Carry on, but keep the turnaround time.
Remember that a group feels weather later and harder than a single fit adult. Children and quiet participants often do not say they are cold until they are miserable. Do regular "hand and neck checks" at breaks, add a layer before people get cold, and make the warm drink a routine. When in doubt, choose the easier option: a dry, happy group that turned back early will come again; a wet, frightened one may not.
The emergency plan: 112, contact list and first aid
An emergency plan for a group is one page that answers three questions: who do we call, who does what, and how do rescuers find us. Write it before the trip, give a copy to the deputy and leave one with your contact at home.
Contact list
For every participant: name, an emergency phone number (for minors, a parent or guardian who can be reached during the whole trip), allergies, medication and relevant health conditions. Treat this list as confidential – keep it in a sealed envelope or a waterproof bag with the leader and the deputy, and destroy or return it after the trip according to your organisation's rules.
Calling for help
In the European Union and many other countries the emergency number is 112; the UK also uses 999, North America 911. Give your location as precisely as possible: coordinates from the phone or map, the trail name, a landmark. Many German forests have rescue points (Rettungspunkte) with a code that tells the emergency service exactly where to go. Our first aid guide has the full emergency sequence.
When something happens: four moves
 1Make safe, then first aid
Protect yourself and the group first – fire, water, falling branches, tools. Then check the casualty and give first aid. Keep them warm and off the cold ground.
 2Call 112
Say where you are, what happened, how many people are hurt and what help you need. Stay on the line and follow instructions. Without signal, move to higher ground or send two people – never one, and never a child alone.
 3Deputy keeps the group together
One leader stays with the casualty, the other takes the rest of the group a little away, counts heads, keeps everyone warm and gives them a calm task.
 4Guide the rescuers in
If possible, send someone in a bright jacket to the nearest track, road or rescue point to meet the ambulance. Note the time of every step for the handover.
The group emergency kit
- Extended first aid kit with tick remover, burn dressings and enough plasters for everyone
- Personal medication of participants (inhalers, allergy pens), labelled with names
- Contact list in a waterproof bag, one copy each for leader and deputy
- Charged phones plus a power bank, offline maps, a paper map and compass
- Whistle for every participant, headlamps, an emergency blanket or group shelter
- Written trip plan with a contact at home and an agreed alarm time
At least one leader should have current first aid training, ideally an outdoor course that covers waiting longer for help. Before the trip, ask parents or participants about medication and doses that are appropriate, and keep medicines out of children's reach. Afterwards, check everyone for ticks. The safety principles from going solo – a written plan, a check-in and conservative choices – apply to groups too; the difference is that you have more people to look after and more hands to help.
Duty of care for minors: what leaders should know
Anyone who takes other people's children into the woods takes on responsibility for them. Many countries have a legal concept for this – often called a duty of care or a duty to supervise – but what it requires depends on the law of the country, the age and maturity of the children, the activity and the situation. Schools, scout and youth associations, sports clubs and commercial providers usually add their own rules on ratios, qualifications, consent forms and insurance. This guide cannot tell you what applies to you, and it is not legal advice.
What you can do is act in a way any reasonable organisation would recognise as careful:
- Ask your organisation first. Find out its rules for trips, ratios, overnight stays, fire, tools and water activities, and whether insurance covers your plan.
- Get written consent and information. Parents or guardians should know the plan, agree to it in writing and give health and contact information.
- Match the activity to the group. Age, experience and maturity matter more than what is technically possible.
- Supervise actively. Being nearby is not the same as watching. Plan who supervises what, especially at water, fire and tools.
- Write things down. The plan, the briefing, incidents and decisions. A short note made at the time is worth more than a long memory later.
After the trip: debrief and leave no trace
Before you leave, do a last headcount, a tool count and a litter sweep in a line across the site. Fill in catholes, scatter natural material from dens and fire wood, and leave the place as you found it – the leave no trace principles matter more with a group, because many feet do more damage. Report back to your contact that everyone is home.
A short debrief, the same evening or a few days later, makes the next trip better. Ask three questions: what went well, what was hard, and what should we change? Let participants answer first and keep the notes with the plan. A group that learns together is ready for a first night out or a longer journey.
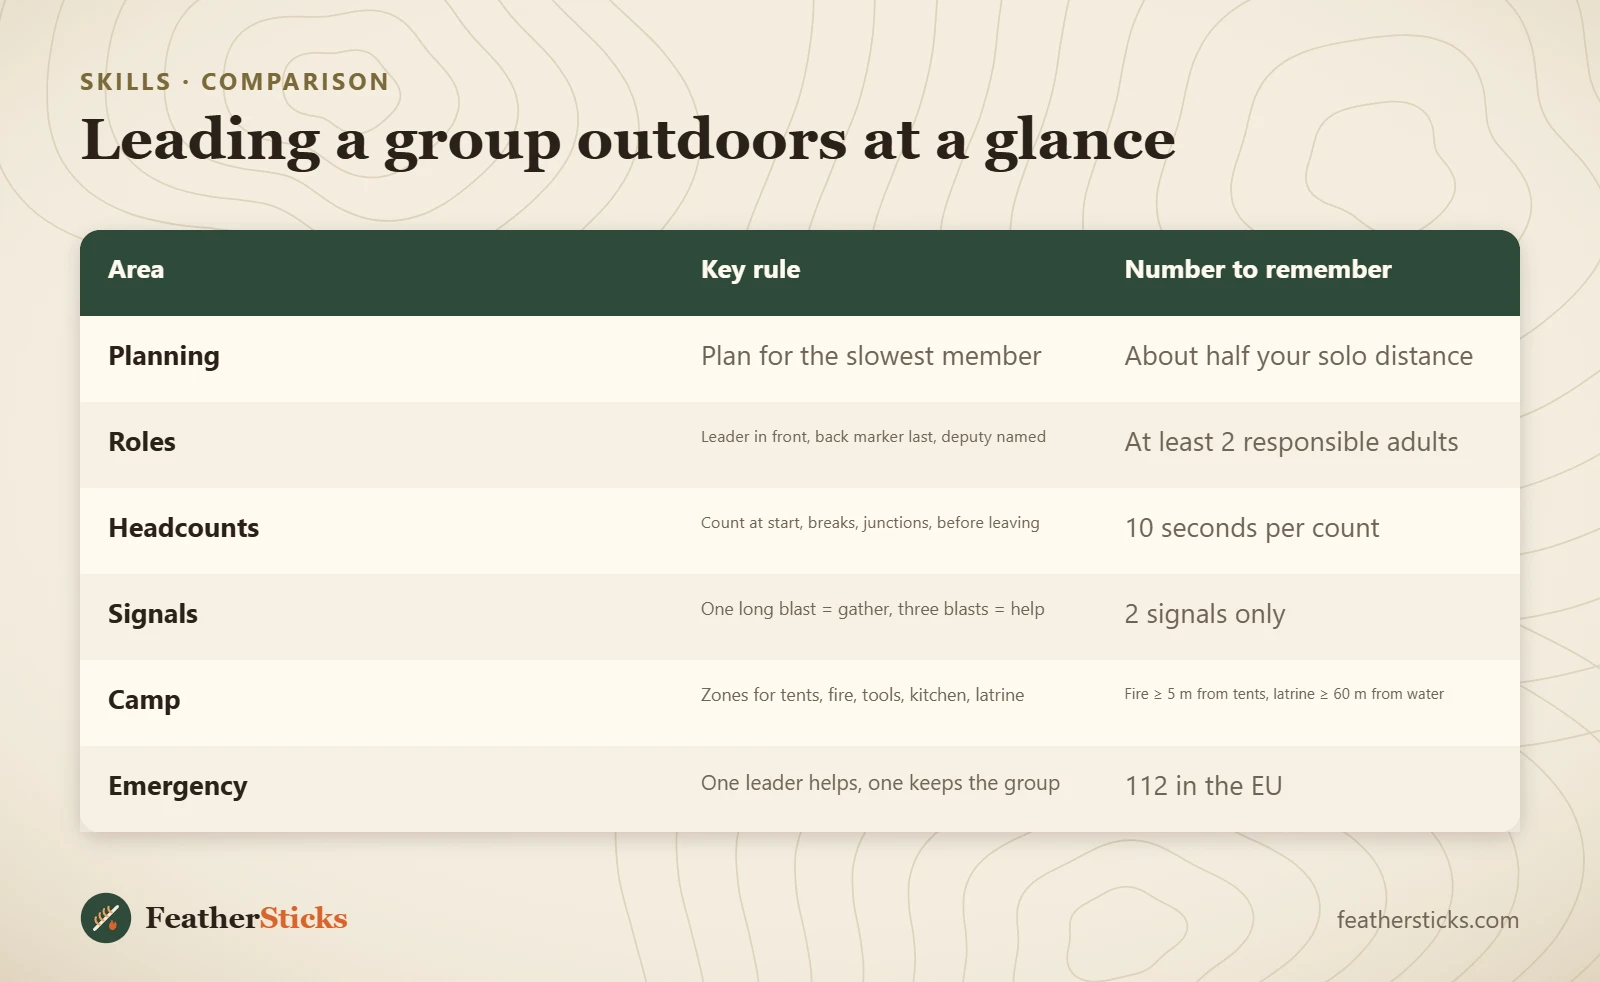
| Area | Key rule | Number to remember |
|---|---|---|
| Planning | Plan for the slowest member | About half your solo distance |
| Roles | Leader in front, back marker last, deputy named | At least 2 responsible adults |
| Headcounts | Count at start, breaks, junctions, before leaving | 10 seconds per count |
| Signals | One long blast = gather, three blasts = help | 2 signals only |
| Camp | Zones for tents, fire, tools, kitchen, latrine | Fire ≥ 5 m from tents, latrine ≥ 60 m from water |
| Emergency | One leader helps, one keeps the group | 112 in the EU |
Common mistakes
- Planning the route for the fittest adult instead of the slowest participant.
- Letting fast walkers race ahead so the group splits at the first junction.
- Only one responsible adult, so nobody is free when an incident happens.
- Skipping headcounts after breaks and toilet stops.
- Using three whistle blasts in games, so the distress signal loses its meaning.
- Letting people carve and saw anywhere in camp instead of in a tool zone.
- Pushing on past the turnaround time because the group "is nearly there".
What you need
- Whistle and headlamp for every participant
- Extended group first aid kit and emergency blanket or group shelter
- Contact list with health information in a waterproof bag
- Paper map, compass and charged phones with a power bank
- Coloured ribbons for boundaries and a tool box with sheaths
- Large water containers, labelled raw and treated
- Trowels, toilet paper and sealable bags for the latrine
FAQ
How do you lead a group outdoors safely?
What does a back marker do?
How many adults do you need for a group of children?
What is the buddy system?
What is a turnaround time and why does a group need one?
How far should the latrine be from water in a group camp?
What should be in a group emergency plan?
Check yourself
Completed6 quick questions from this guide. Nothing is sent anywhere.
Related step-by-step guides
-
 1
-
 1
-
 1