Foot Care & Blister Prevention for Hiking: Hot Spots, Taping, Dry Feet
Blister prevention for hiking comes down to three things: keep friction, moisture and heat in check, and stop the moment you feel a hot spot. Footwear that fits, a heel that stays locked in place, smooth dry socks and a strip of tape applied early prevent most blisters. Treating a hot spot takes about five minutes; walking on it until it tears can end a trip.
This guide explains how blisters form, how to lace and choose socks, how to tape a hot spot properly, what to do with an intact or an open blister, how to dry feet and socks at camp, how to avoid trench foot on wet trips, how to look after toenails and what goes into a small foot-care kit. It is part of our bushcraft skills, builds on the bushcraft basics and goes deeper than the foot section of our boots and foot care guide.
Step by step
-
1

Fit and lace for a locked heel
About a thumb's width of toe room, laced snug over the instep with a heel lock at the top so the heel stays back.
-
2

Wear dry socks without folds
Wool or wool-blend socks, pulled up smoothly, a thin liner if you blister easily. No cotton socks on longer walks.
-
3

Stop at the first hot spot
Warmth, rubbing or stinging is a blister starting. Sit down, take boot and sock off and look now.
-
4

Tape clean, dry skin smoothly
Wipe and dry the skin, then lay tape with rounded corners flat over the spot. Remove the grit or fold that caused it.
-
5

Protect a blister, keep it clean
Leave an intact blister closed and pad around it. Clean and cover an open one, and watch for signs of infection.
-
6

Dry feet and socks every evening
Boots open, insoles out, feet washed and dried, socks changed. Never sleep in wet socks.
Before you read on
How do blisters form? Friction, moisture and heat
A blister is not simply skin rubbed away. When a boot and sock move against the skin again and again, the outer skin layer grips the sock while the deeper layers move with the bone. The layers shear against each other, the area gets warm and red – the hot spot – and if the rubbing continues they separate. Fluid fills the gap, and the outer skin becomes the roof of a blister.
Three conditions make this much more likely, and every prevention method works on one of them:

| Cause | What happens | What helps |
|---|---|---|
| Friction | Repeated movement of skin against sock and boot, often from a heel that lifts or a foot that slides forward | Good fit, heel lock lacing, smooth socks, liners, tape over known spots |
| Moisture | Damp, softened skin tears more easily and grips the sock harder | Wool or synthetic socks, sock changes, airing the feet at breaks, dry skin before taping |
| Heat | Warm skin is softer and swells; long hot days and hard, hot ground add to it | Breaks with boots off, pace that suits the heat, socks that move sweat |
Everything else feeds into these three: new or badly fitting boots, a fold in the sock, a seam in the wrong place, grit in the boot, a heavy pack (see the pack weight calculator), long descents and feet that have not walked far for months. Wet feet are a special case – they are covered further down in the section on cold, wet feet.
Where blisters usually start

The place tells you the cause. A blister at the back of the heel almost always means the heel lifts in the boot – a lacing or fit problem. Blisters on the toe tips mean the foot slides forward downhill. Pressure on the side of the big toe joint or the little toe means the boot is too narrow there. Fixing the cause is better than taping the same spot every day.
Fit and lacing: stop the foot sliding
Most blisters are prevented before the walk starts. A boot or trail shoe should hold the heel firmly while the toes have room to move. Try footwear on in the afternoon, when feet are larger, with your own hiking socks. As a rule of thumb you need about a thumb's width (roughly 1–1.5 cm) in front of the longest toe. The fit tests and the choice between boots and trail shoes are explained in detail in the footwear fit guide.
New footwear needs to be broken in on short walks before it goes on a multi-day trip. Use those walks as a test: take the boots off afterwards and look for red patches, because a red patch after two hours is a blister after six.
Heel lock lacing step by step
The heel lock (also called lace lock or surgeon's lock) uses the top eyelets to pull the boot back against the ankle. The heel stays in the heel cup on climbs, and the foot cannot slide forward on descents. It is the single most useful lacing trick against heel and toe blisters.
Tying a heel lock
 1Lace as usual
Criss-cross the laces up to the second-last eyelet or hook. Snug over the instep, slightly looser over the forefoot if the toes feel tight.
 2Make two loops
Take each lace straight up on the same side into the top eyelet, from the outside, and leave a small loop on each side.
 3Cross and thread
Cross the ends over and thread each one through the loop on the opposite side.
 4Pull down, tie and test
Pull the ends down and outwards – the loops close and lock the ankle – then tie a normal bow. Walk a few steps uphill: the heel should barely lift.
Lacing is not something you do once in the morning. Tighten the top before a long descent and loosen it a little for a long, flat stretch or when the feet swell in the afternoon. Pressure on top of the foot is relieved by window lacing – skipping one cross over the sore spot. If the heel still lifts with a heel lock, the boot may be too long or too wide; a thicker sock or a different insole can help, a different boot helps more. Trekking poles take some load off the feet on steep descents, too.
| What you notice | Likely cause | Lacing fix |
|---|---|---|
| Heel rubs on the climb | Heel lifts in the boot | Heel lock at the top two eyelets |
| Toes hit the front downhill | Foot slides forward | Tighten the top and add a heel lock before the descent |
| Pressure on top of the foot | Too tight over the instep | Window lacing: skip one cross over the spot |
| Numb or tingling toes | Forefoot laced too tight | Loosen the lower crossings |
Socks and liners for blister-free feet
Socks are the layer between skin and boot, and they do three jobs: cushion, move sweat away and take some of the friction. Wool or wool-blend hiking socks are the standard because they stay warm when damp and cushion well; synthetic socks dry faster. Cotton socks hold sweat against the skin, go hard and lumpy and are a common reason for blisters on longer walks.
The foot system from outside to skin
- Holds the heel, gives the toes room, keeps out grit; gaiters help on sandy paths (rain gear and gaiters).
- Wool or wool blend, the right thickness for the boot, no holes and no thin, worn heel.
- Thin synthetic or merino sock: friction happens between the two sock layers instead of on the skin.
- Clean, dry, nails trimmed, known hot spots taped before the walk.
A liner sock under the hiking sock is worth trying if you blister easily. It adds a sliding layer, and it is quick to wash and dry at camp. Test the combination on a day walk first: two socks take up room, and a boot that was right with one sock can become too tight with two – which causes the problems you wanted to avoid.
- No folds: pull socks up smoothly, heel in the heel pocket. A wrinkle under the foot is a blister in the making. Check again after the first hour.
- Two pairs in rotation: wear one pair, carry the other drying on the outside of the pack in good weather. Swap at lunch on long, sweaty days.
- A dry pair for the night: keep one pair of socks only for camp and sleeping, packed in a waterproof bag (dry bags and waterproof packing).
- Worn socks out: a thin, felted heel or a darned lump is a friction point. Retire those socks to camp use.
Whether to use foot powder or an anti-friction balm is a matter of preference; some walkers find that balm helps on very long days, others that it makes the skin softer. Try anything new at home or on short walks, never for the first time on a long trip. For the rest of the clothing system see bushcraft clothing.
Hot spots: why you stop at the first warning
A hot spot is a patch that feels warm, rubbing, burning or stinging. It is the moment when a blister can still be prevented completely. The temptation is always to walk on "to the next junction" or "until lunch". That half hour of rubbing is usually exactly what turns a red patch into a fluid-filled blister. The rule that experienced walkers and group leaders keep is simple: whoever feels a hot spot says so, and the group stops.
Dealing with a hot spot in five minutes
 1Sit down, boot off
Stop at once, sit on your pack or a rock off the path and take boot and sock off. Looking costs less time than you think – a blister costs days.
 2Find the cause
Shake out the boot and check the sock. Grit, a fold in the sock, a seam, a lifted insole or a loose heel are the usual culprits. If you do not remove the cause, the tape only buys time.
 3Clean and dry the skin
Wipe the area and let it dry completely in the air. Tape does not stick to sweaty, damp skin, and it will peel off within the hour.
 4Tape, then test
Tape the spot smoothly, pull the sock on without folds, lace up again and walk a few steps. If you still feel it, redo it now rather than later.
On long days, plan a short break with boots off every two to three hours even without a problem – a rule of thumb that gives feet time to cool and dry, and gives you a chance to check them. Children rarely say "hot spot"; ask them at every stop and look at their feet at lunch (bushcraft with kids). In a group, make foot checks part of the routine at breaks, as described in leading group trips.
How to tape a hot spot properly
Tape works by taking the friction: the sock slides over smooth tape instead of dragging the skin. It only works when it stays flat and stays on. Most taping fails for three reasons – damp skin, square corners that catch the sock, and wrinkles that create a new pressure point.
Taping step by step
 1Cut and round the corners
Cut a piece large enough to overlap healthy skin on all sides and round all four corners with scissors. Square corners catch the sock and peel first.
 2Cover with a margin
Lay the tape on the clean, dry skin so that it extends roughly 2 cm beyond the hot spot on every side (a rule of thumb). Do not stretch it – tape under tension pulls and can cause a new blister at its edge.
 3Smooth and press
Smooth it from the middle outwards and press it on firmly with a warm hand for a moment, which helps the adhesive grip. No creases, especially on the curve of the heel.
| Material | Good for | Note |
|---|---|---|
| Strong cloth or zinc-oxide sports tape | Hot spots, pre-taping heels and known spots | Sticks well on dry skin; rounded corners |
| Thin paper or fabric medical tape | Toes, small areas, holding dressings | Less durable, easy to shape |
| Hydrocolloid blister plaster | Hot spots and intact or small open blisters | Leave on until it starts to come off by itself; do not peel it early |
| Felt or foam padding ("moleskin") | A ring around a blister to take pressure off | Cut a hole slightly larger than the blister |
| Duct tape | Emergency only, over a hot spot or to hold padding | Never directly on an open wound |
Pre-taping known spots
If you always get a hot spot in the same place – the back of the heel for many people – tape it in the morning before you put socks on, on clean, dry skin. That is not a substitute for fixing the fit, but on a multi-day trip it saves a lot of trouble. Toes are taped with narrow strips, loosely around the toe and never in a tight ring, because swelling during the day can turn a tight ring into a tourniquet.
Take the tape off carefully in the evening, slowly and close to the skin, unless it is a hydrocolloid plaster or the skin underneath has broken. Tape left on overnight keeps the skin damp. Check the skin, let it breathe, and re-tape in the morning.
Blister first aid: intact or open?
Once a blister has formed, the aim is to protect it, keep it clean and stop the rubbing. The approach matches the blister care in our first aid kit guide: keep an intact blister closed, clean and cover an open one, and watch for infection.
Intact blister vs open blister
Intact blister
- Leave the roof intact – it is the best sterile cover there is
- Pad around it with a ring of felt or foam so pressure goes to the padding
- Or cover it smoothly with a hydrocolloid blister plaster
- Remove the cause: grit, sock fold, loose heel
- Change into dry socks as soon as you can
Open or torn blister
- Wash your hands and clean the area gently with clean water
- Leave any loose skin flap in place as a natural cover; do not cut it off
- Cover with a sterile dressing or hydrocolloid plaster
- Pad around it so it is not rubbed again
- Change the dressing when it is wet or dirty, check daily for infection

Should you pop a blister?
In general, no. An intact blister protects the raw skin underneath, and every hole is a way in for germs. Some first aid courses teach that a very large, tense and painful blister that will clearly burst anyway may be drained through a small hole at its edge with a sterile needle, leaving the roof in place and covering it afterwards. Only do this if you have learned it and can keep it clean – never with an unsterile pin, never by cutting the roof away, and not at all if you have diabetes or poor circulation.
What do I do with this blister?
Is there spreading redness, warmth, pus, red streaks or a fever?
Yes → Signs of infection: clean, cover, stop walking on it and get medical help.No → Go on to the next question.Is the blister torn or open?
Yes → Clean gently, leave the skin flap, cover with a sterile dressing or hydrocolloid plaster, pad around it.No → Go on to the next question.Is it intact?
Yes → Leave it closed, pad around it or cover it with a blister plaster, remove the cause.No → Treat it as open.
Keep the blister care in a small, waterproof pouch at the top of the pack or in a hip-belt pocket, so you do not have to unpack everything for a five-minute stop. Clean water for cleaning a wound comes from your bottle – see water purification if you refill from streams.
Drying feet and socks at camp
The evening decides how your feet start the next day. Skin that stays damp overnight is soft, tears easily and is the starting point for both blisters and the cold injuries described below. The camp routine takes ten minutes and belongs right after the shelter is up.
Foot routine at camp
 1Boots open, insoles out
Loosen the laces fully, pull the tongue forward and take out the insoles so air can reach the inside. Store boots under the tarp or in the porch, not in the rain.
 2Wash and dry your feet
Wash feet with a little water in a pot or bowl 60–70 m from streams and lakes, as for all washing at camp, then dry them well, including between the toes. Check for hot spots, blisters and ticks.
 3Dry feet for the night
Put on the dry sleep socks or go barefoot in a warm bag. Never sleep in wet socks; damp socks can dry in the sleeping bag or inside a jacket overnight.
Wear camp shoes or light sandals in the evening (camp comfort) so feet and boots can both dry. Wet socks dry on a line under the tarp in a breeze, or overnight in the sleeping bag foot box or an inner jacket pocket if they are only damp. Very wet socks are wrung out first.
Never dry boots, insoles or socks right next to a fire or stove. Leather cracks, glue fails, synthetic socks melt, and wool scorches long before you smell it. At a fire, keep them at a distance where your hand feels only pleasant warmth – about an arm's length at the side – and keep the fire itself at least 5 m from tents and hammocks. More on boot care at camp is in the footwear guide.
Evening foot routine in five steps
- Shelter upTarp or tent first, so you have a dry place to sit.
- Boots off, openLaces loose, insoles out, camp shoes on.
- Wash, dry, checkAway from water; look for hot spots, blisters and ticks.
- Treat and airTake off tape, treat blisters, let skin breathe.
- Dry socks onSleep socks only for the night; wet pair to the line.
Cold, wet feet and trench foot
On rainy trips, in bogs, on canoe trips and after stream crossings, feet can be wet for most of the day. A few hours of wet feet are uncomfortable but harmless: the skin goes white and wrinkled and blisters more easily. Feet that stay wet and cool for many hours or days, however, can suffer a non-freezing cold injury well above 0 °C – trench foot, also called immersion foot.
Signs are cold, numb, pale or blotchy skin, tingling, swelling and pain when the feet warm up again. The first aid matches our guide to hypothermia and cold injuries:
First aid for cold, wet, numb feet
- Boots and wet socks off In shelter, out of wind and rain, with the person sitting or lying on a pad.
- Dry gently Pat the feet dry. Do not rub or massage them – damaged skin and tissue are fragile.
- Warm slowly Let them warm slowly at air temperature in dry insulation such as a sleeping bag or dry clothing, and raise them. No fire, no hot water, no heater.
- Get medical advice If numbness, colour changes, swelling or blisters remain, seek medical advice and do not walk far on the feet.
If the whole person is cold, wet and shivering, treat that first – the hypothermia guide explains how. In frost, cold feet can also mean frostbite, which is treated differently; the same guide covers it.
Preventing trench foot on wet trips
- Dry socks at least once a day and every night, without exception.
- Air the feet at every longer break, even in drizzle under a tarp, and dry them with a cloth.
- Lace loosely enough that blood can flow; tight boots on cold feet are a bad combination.
- Accept wet feet by day, guarantee dry feet by night – the usual strategy on very wet trips, see camping in the rain.
- Keep waterproofs working: washing and reproofing keeps gaiters and boots shedding water longer.
In snow and frost, room in the boot, insulation under the foot and dry spare socks keep feet warm; see moving through snow.
Toenails: trim straight, avoid black toes
Toenails cause more trip-ending pain than most people expect. A nail that is too long hits the front of the boot with every step downhill; a nail cut too deep at the corners can grow into the skin.

- Trim a few days before the trip, not the night before, so any sore edge can settle.
- Straight across, roughly level with the tip of the toe; smooth sharp edges with a file.
- Black or bruised toenails after long descents mean the toes are hitting the front of the boot: check boot length and use a heel lock before the descent.
- Painful pressure under a nail, an ingrown nail or a red, swollen nail fold belong to a doctor or a qualified foot-care professional. Do not drill or cut at them in the field.
A small foot-care kit for every trip
A foot-care kit fits into a small zip bag and weighs very little. Keep it within reach – in the lid or hip-belt pocket – and check it before every trip. Bigger items such as sterile dressings and gloves live in the main first aid kit.
Foot-care kit checklist
- A roll of strong tape, or tape wrapped around a pencil stub or trekking pole to save space
- Hydrocolloid blister plasters in two sizes
- Felt or foam padding to cut rings
- Small scissors with rounded tips (or the scissors of a multitool)
- Antiseptic or cleansing wipes and a small piece of cloth to dry the skin
- A couple of sterile dressings for an open blister
- Nail clippers or a nail file
- One pair of spare socks in a waterproof bag, plus a liner pair if you use them
On longer trips add more tape and plasters than you think you need – foot care is what runs out first in a group. The bushcraft kit list and the Kit Builder show where the kit fits into your pack, and a needle and strong thread from the repair kit keep a torn insole or boot seam going until you get home.
Planning for happy feet: distance, pace and groups
Feet are part of route planning. Distance and descent cause more blisters than anything else, especially at the start of a trip when the feet are not used to the load. Start with shorter days and increase them; the hiking time calculator gives a realistic time for distance and ascent, and the trip planning guide shows how to build in breaks and bail-out options.
Hot weather makes feet swell and sweat; plan longer breaks and more sock changes (hot weather). In groups, the slowest feet set the pace: a single blistered person can turn a day into a long one, so foot checks at breaks are a group habit, not a personal weakness. A first night out close to home, as in your first night out, is a good test of boots, socks and routine before a longer trip.
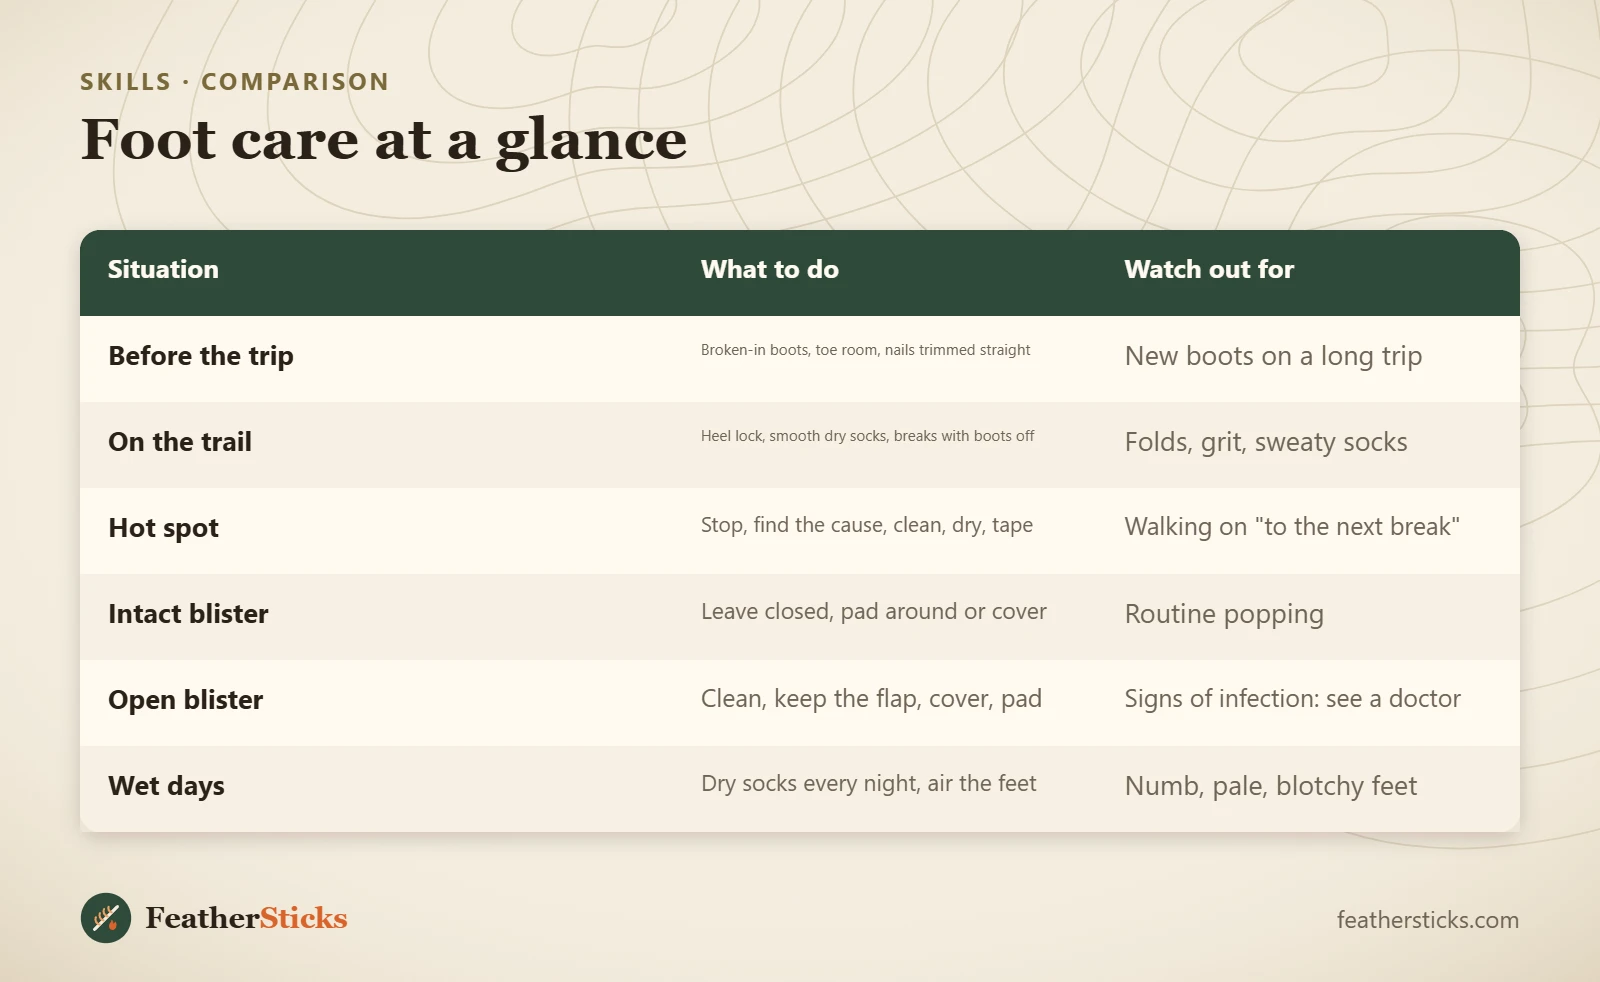
| Situation | What to do | Watch out for |
|---|---|---|
| Before the trip | Broken-in boots, toe room, nails trimmed straight | New boots on a long trip |
| On the trail | Heel lock, smooth dry socks, breaks with boots off | Folds, grit, sweaty socks |
| Hot spot | Stop, find the cause, clean, dry, tape | Walking on "to the next break" |
| Intact blister | Leave closed, pad around or cover | Routine popping |
| Open blister | Clean, keep the flap, cover, pad | Signs of infection: see a doctor |
| Wet days | Dry socks every night, air the feet | Numb, pale, blotchy feet |
Common mistakes
- Walking on with a hot spot "until the next break" instead of stopping at once.
- Taping damp, sweaty skin or using tape with square corners and wrinkles.
- Taping over the problem without removing the grit, sock fold or loose heel that caused it.
- Popping blisters as a routine or cutting away the skin roof.
- Wearing cotton socks or socks with worn, thin heels on long walks.
- Sleeping in wet socks or drying boots and socks right next to the fire.
- Starting a multi-day trip in new, untested boots.
What you need
- Well-fitting, broken-in boots or trail shoes
- Wool or wool-blend hiking socks, plus a dry pair for the night
- Thin liner socks (optional)
- Strong tape and hydrocolloid blister plasters
- Felt or foam padding and small scissors
- Cleansing wipes and sterile dressings
- Camp shoes or sandals
- Nail clippers
FAQ
How do I prevent blisters when hiking?
What is a hot spot on the foot?
Should you pop a blister when hiking?
How do you treat an open blister outdoors?
Do liner socks prevent blisters?
How do I stop my heel from slipping and blistering?
What is trench foot and how do you avoid it?
Check yourself
Completed6 quick questions from this guide. Nothing is sent anywhere.
Related step-by-step guides
-
 1
-
 1
-
 1