Tarp Ridgelines & Tensioners: Knots, Prusiks and the Right Height
A tarp ridgeline is the tight cord between two trees that carries your tarp: anchored with a secure hitch on one tree, tensioned with a trucker’s hitch on the other, and fitted with two prusik loops so the tarp can slide and be pulled taut without touching a knot. Get the ridgeline right and almost every tarp pitch becomes easy; get it wrong and the tarp sags, flaps and drips.
This guide covers the whole system: fixed versus adjustable ridgelines, which cord to use, the ridgeline knots for each end, prusiks, how high to set the line for common pitches, re-tensioning when the cord gets wet, protecting the trees and the structural ridgeline of a hammock. For the shelter types themselves, see the shelter hub.
Step by step
-
1

Choose trees and ridge height
Pick two healthy trees 4–6 m apart with no dead wood above. Decide the ridge height for your pitch: about 1.1–1.3 m for a ground A-frame.
-
2

Protect the bark, anchor tree 1
Put a wide strap round the trunk and tie off with a round turn and two half hitches, a timber hitch or a Siberian hitch.
-
3

Slide on two prusik loops
Fit both prusiks on the free end now. Once the second end is tied, you cannot add them without undoing it.
-
4

Tension with a trucker’s hitch
Tie a loop an arm’s length from tree 2, pass round the tree, back through the loop, pull and lock it with a slipped half hitch.
-
5

Hang the tarp, re-tension when wet
Clip the tarp to the prusiks, slide them out until the ridge seam is straight, and pull the trucker’s tail again at dusk and after rain.
What is a tarp ridgeline – and why does it matter?
The ridgeline is the backbone of a tarp shelter. It sets the height of the pitch, carries the weight of the fabric and holds the ridge seam straight so that rain runs off both sides instead of pooling in a belly. A tarp hung on a slack line can never be pitched tight, however hard you pull the guylines: the slack simply moves to the middle. That is why experienced campers spend more care on the ridgeline than on any other part of the pitch.
A complete tarp ridgeline has five parts: an anchor hitch on tree 1, a stretch of clean cord over the shelter, two prusik loops for the tarp’s ridge tie-outs, a tensioning hitch on tree 2 and two drip lines just outside the tarp ends. Each knot does one job, and the essential knots guide covers every one of them in detail. New to camp skills? Start with bushcraft basics.

Fixed vs. adjustable ridgelines
There are two basic ways to rig the line. A fixed ridgeline is tied off at both ends with ordinary knots, and you tension it by retying or by pulling the trucker’s tail again. An adjustable ridgeline carries its tensioner permanently: a pre-tied loop for a trucker’s hitch, a small mechanical line tensioner, or a toggle-locked slipped hitch, so you can tighten or slacken it in seconds without untying anything. Many campers pre-rig one end at home – a loop spliced or tied in, the prusiks already threaded – and only tie the second end in the field.
Fixed vs. adjustable ridgeline
Fixed (tied each time)
- Any cord, no extra parts
- Teaches the knots properly
- Works on any tree spacing
- Re-tensioning means re-pulling the trucker’s tail
- Slower in cold, wet hands
Adjustable (pre-rigged)
- Pitched in two to three minutes
- Tension changed in seconds at night
- Prusiks stay on the line in the bag
- Needs a fixed loop or a small tensioner
- Fixed length limits very wide tree spacing
Either system works. Learn the fixed version first, because the knots are the same ones you need when something breaks or the trees are an awkward distance apart. Then pre-rig the line you carry, as described in the pre-rigging section of the knots guide.
Which cord for a tarp ridgeline? Diameter, stretch and length
The ideal ridgeline cord is 3–5 mm thick, low in stretch, easy to grip and 10–15 m long. Thinner cord saves weight but is hard on cold hands, cuts into bark and lets prusiks slip; thicker cord is heavy and bulky for the small loads a tarp creates. More important than diameter is how much the cord stretches, especially when it gets wet and cold.
- Nylon kernmantle cord (paracord type): strong, cheap and pleasant to handle, but elastic by design and noticeably stretchier when wet. It works, but expect to re-tension at night. Our paracord guide explains why nylon behaves like this.
- Braided polyester cord: stretches far less and takes up less water, so the line stays tight through rain. A very good all-round choice.
- High-modulus polyethylene (HMPE) cord: very light, very strong and with almost no stretch, but slippery. Knots such as the bowline or taut-line hitch can slip in it, so use hitches with extra turns and check them under load.
- Tarred bank line or natural fibre: grippy and cheap, fine for short-term lines, but weaker and, in natural fibres, prone to rot. Better for lashings and guylines than for a ridgeline that carries a wet tarp all night.
| Cord type | Typical diameter | Stretch when wet | Knot grip | Verdict |
|---|---|---|---|---|
| Nylon kernmantle (paracord type) | 3–4 mm | Noticeable | Good | Works; re-tension at dusk |
| Braided polyester | 3–5 mm | Low | Good | Best all-rounder |
| HMPE / HMPE-core | 2–3 mm | Very low | Slippery | Light; use extra turns |
| Polyester accessory cord | 4–5 mm | Low | Very good | Heavier, very easy on hands |
| Tarred bank line | 1.5–2 mm | Low to medium | Very good | Too thin for most ridgelines |
Prusik loops must be noticeably thinner than the ridgeline: 2–3 mm loops on a 4–5 mm line. On very thin ridgelines use the thinnest loop cord you can, or add a wrap.
How long should a tarp ridgeline be?
Take the tree distance and add about 3 m: roughly 1.5 m at each end for the wraps, the hitch and the tail. With trees 5 m apart you need about 8 m of cord. A 10 m line covers tree spacings up to about 7 m; carry 15 m if you often camp in open woodland where suitable trees stand far apart. The tarp pitch and cordage planner uses the same rule and adds guylines and a 10 % reserve.
Ridgeline at a glance
- Diameter
- 3–5 mm
- Length
- Tree distance + 3 m (10–15 m carried)
- Stretch
- As low as possible (polyester or HMPE)
- Prusik loops
- 2 × 40–60 cm of 2–3 mm cord
- Tree spacing
- 4–6 m for a 3 × 3 m tarp
- Tails
- At least 10× the cord diameter
Ridgeline knots for tree 1: round turn, timber hitch or Siberian hitch
The first end of the ridgeline needs a hitch that holds under steady load and comes undone easily in the morning. Three ridgeline knots cover almost every situation. All three are taught step by step in the hitches section of the knots guide; the descriptions here match that guide.
Round turn and two half hitches on tree 1
 1Round turn
Wrap the working end twice round the trunk (over a strap if the bark is soft). The round turn takes most of the pull through friction, so you can hold the line with one hand while you tie.
 2First half hitch
Take the end round the standing part and back through the gap. Keep the turns lying side by side – crossed turns grip unevenly and loosen.
 3Second half hitch
Make a second half hitch in the same direction below the first. Together they form a clove hitch round the standing part. Opposite directions give a weaker cow hitch.
 4Slide snug
Push both hitches up against the round turn and leave a tail of at least 10 cord diameters. For quick release, make the last half hitch slipped.

Timber hitch – fast on a thick trunk
Pass the cord round the tree, take the working end round the standing part once, then twist it round its own part three to four times – five or more on smooth bark or slippery cord. Pull the standing part so the twists bite against the trunk. The timber hitch holds well while the line is under steady tension and falls apart almost by itself when you release it. Its weakness is a slack load: if the ridgeline goes loose in the night, check the timber hitch before you re-tension.

Siberian hitch – the quick-release start
The Siberian (Evenk) hitch is tied round your hand in a few seconds and released with a single pull on the slipped tail – ideal on cold mornings when your fingers do not want to pick at knots. It is good under load; push a small stick through the bight as a toggle when you want it extra secure, for example on a windy night or with slippery HMPE cord.

| Hitch | Strengths | Weaknesses | Use it when |
|---|---|---|---|
| Round turn & two half hitches | Very secure, easy to untie, holds a pull while you tie | Slightly slower | Default choice, any cord, any tree |
| Timber hitch | Very fast, releases by itself | Can loosen if the line goes slack | Thick trunks, short stays, steady load |
| Siberian hitch | Fast, one-pull release | Takes practice; toggle for slippery cord | Cold, wet hands; quick morning pack-up |
Tensioning the ridgeline: trucker’s hitch with a slippery finish
The second end is where the ridgeline gets tight. The classic answer is the trucker’s hitch: a loop in the standing part acts as a pulley wheel, giving a theoretical 3:1 advantage (friction reduces it in practice). With it, you can pull a ridgeline drum-tight with one hand, lock it, and release it in the morning with a single tug.
Trucker’s hitch on tree 2 in five moves
 1Pulley loop
About an arm’s length from tree 2, tie a fixed or slipped loop in the standing part – a slipped overhand, a directional figure eight or an alpine butterfly. Closer to the tree leaves too little pulling distance.
 2Round the tree
Pass the working end round the trunk or strap. One extra turn adds friction and holds the tension while you tie off.
 3Back through the loop
Feed the end through the loop from the anchor side. The cord now runs tree – loop – tree – your hand: that is the pulley.
 4Pull steadily
Pull the end towards the anchor until the line twangs when plucked. Pull steadily rather than sawing back and forth: friction in the loop can glaze synthetic fibres.
 5Lock with a slipped hitch
Pinch the crossing to hold the tension, then tie two half hitches round both strands below the loop and make the last one slipped. One pull on the tail releases it, even with frozen fingers.

Why a slippery finish?
A “slippery” or slipped finish means the last half hitch is tied with a bight instead of the end, like the bow of a shoelace. Pull the tail and the hitch falls out. You will untie the tension end more often than any other knot – to lower the pitch, re-tension or pack up – and a slipped finish makes each a two-second pull. Leave the tail long enough to find in the dark, coiled and hung on the tree.
Alternatives to the trucker’s hitch
- Toggle-locked slipped hitch: pass the line round the tree, form a slipped half hitch round the standing part and push a small stick through the bight. Fast and releasable, but with no pulley advantage.
- Taut-line hitch: adjustable and familiar from guylines, but it tends to slip on slippery low-stretch cord. Fine on nylon and polyester, less so on HMPE. See tensioning knots.
- Small mechanical line tensioners: light aluminium or plastic pieces that lock the cord by friction. Quick and neat on a pre-rigged line; carry the knot as a backup in case one breaks.
Prusik loops on the tarp ridgeline: slide, centre and tension the tarp
A prusik tarp set-up hangs the tarp below the ridgeline on two short loops of thinner cord. Wrapped three times round the line, a prusik grips when it is loaded and slides freely when you take the load off. That gives you three advantages over tying the tarp straight to the line: you can centre the tarp exactly between the trees, you can stretch the ridge seam taut by pushing the prusiks outwards, and you can take the tarp off in the morning without touching either ridgeline knot.
Tying a prusik onto the ridgeline
 1Loop behind the line
Use a closed loop of 2–3 mm cord, 40–60 cm long and joined with a double fisherman’s knot. Hold it behind the ridgeline with the knot off to one side.
 2Wrap through itself
Pass one end of the loop round the ridgeline and through the other end, then repeat until you have three wraps side by side.
 3Dress it
Arrange the wraps neatly and parallel, with no crossings, and pull the loop out from the middle. Crossed wraps grip unevenly and either jam or slip.
 4Clip and test
Clip the tarp’s ridge tie-out with a small carabiner or a toggle. Load it: it must grip. Unload it: it should slide by hand. If it slips under load, add a fourth wrap.

The diameter rule: the loop must be noticeably thinner than the ridgeline – for example 2–3 mm loops on a 4–5 mm line. If the two cords are similar in size, the prusik will slip. On a very thin ridgeline, add a wrap rather than reaching for a thicker loop. Make four loops at once – two for the tarp and two spares for a lantern, a gear bag or a drip line – as described in the prusik section.
Over-the-line instead? You can simply drape the tarp over the ridgeline. It is quick and needs no prusiks, but you cannot tension the tarp along its length, and water running along the cord reaches the fabric at the ridge seam. The under-slung prusik method is the bushcraft standard for good reason. The tarp’s own tie-out layout matters here too: see tie-outs and attachment points.
How high should a tarp ridgeline be? Heights for common pitches
The ridgeline height depends on the pitch, the tarp width and the wall angle you want. For a ridge pitch such as the A-frame, each half of the tarp slopes from the ridge to the ground, so ridge height = (tarp width ÷ 2) × sin(angle). For a lean-to the whole width forms one slope: height = width × sin(angle). The tarp geometry section explains the formulas, and the tarp planner calculates them for your tarp.

| Pitch | Ridgeline height | Wall angle | Notes |
|---|---|---|---|
| Low storm A-frame | 0.7–0.9 m | Steep, edges flush | Narrow end into the wind; crawl-in shelter |
| A-frame | 1.1–1.3 m (1.15 m at 50°) | 45–55° | Standard rain pitch for one or two |
| A-frame, raised walls | 1.4–1.7 m | 45–50° | Edges on 30–50 cm guylines for airflow |
| Lean-to | about 1.7–2 m (1.72 m at 35°) | 30–45° | Back to the wind; above 2 m is hard to tie from the ground |
| Diamond / A-frame over a hammock | about 30 cm above the strap points | 40–50° | Typically 1.5–2 m depending on strap height |
| Plow point | No ridgeline | – | High corner tied at 1.2–1.5 m to one tree or pole |
Values are rules of thumb for a 3 × 3 m tarp with edges on the ground. Wider tarps need a higher ridge for the same angle.
Field check without a calculator: at 45° the ridge height equals the horizontal distance from the point under the ridge to the tarp edge. Measure both with a stick. A ridge higher than that distance means steeper walls, which shed rain better.
Level or slightly lower at the foot end. Never let the ridgeline drop towards your head end: water follows the line and the seam, and runs to the low end. Sight along the line from one tree before you hang the tarp.
No trees? Two trekking poles or straight dead sticks of about 1.2 m replace the trees for a low A-frame. Run the ridgeline over each pole top and on to a stake about 45° outwards along the ridge axis; the tension holds the poles upright. Good stakes matter more here than anywhere else – see tent pegs and stakes.
Re-tensioning when the cord gets wet
A ridgeline that was perfect at 5 p.m. can sag by midnight. Three things cause it: the cord stretches when it gets wet and cold (nylon much more than polyester), the knots bed in under load, and a wet tarp is heavier and stretches too. None of this is a fault – it is why the tension end is slipped and easy to reach.
When to check and re-tension the ridgeline
- After pitchingPluck the line once the tarp hangs on it; re-pull the trucker’s tail if it sags more than a hand’s width.
- At duskDew and falling temperatures stretch nylon. Re-tension before you get into your sleeping bag.
- During or after rainPull the tail again, then tighten the guylines – ridgeline first, guylines second.
- Before a stormLower the ridgeline at the trucker’s hitch and stake the edges flush for a storm pitch.
- In the morningNylon shortens again as it dries; slacken a line you tightened while wet before the sun reaches it.
How to re-tension without starting again
Pull the slipped tail of the trucker’s hitch to release the half hitches, keep a pinch on the crossing so the line does not run back, take in the slack through the loop and tie the slipped half hitches again. With a pre-rigged mechanical tensioner, just pull the tail through. Then slide the prusiks outwards until the ridge seam is straight once more. Do not try to cure a sagging ridgeline by pulling the prusiks apart: they will slip, and the seam stays slack in the middle.
Guylines follow the same logic. Tension the corners first, then the side tie-outs, using adjustable hitches you can reach without leaving your sleeping bag in a hurry. The routine for long wet nights is in camping in the rain, and camping in strong wind covers storm pitches; the wind and Beaufort calculator helps judge when to lower the line.
| Symptom | Likely cause | Fix |
|---|---|---|
| Ridge sagged overnight | Nylon cord stretched when wet and cold | Pull the trucker’s tail again; switch to polyester or HMPE cord |
| Anchor hitch slid down the trunk | Smooth bark, too few turns, no strap | Add a turn, use a strap, tie above a branch stub |
| Prusiks slip when loaded | Loop cord too thick, wraps crossed | Thinner loop cord, dress the wraps, add a fourth wrap |
| Water drips from the ridge seam | No drip lines | Tie 20–30 cm drip lines outside each tarp end |
| Trucker’s hitch jammed | Last hitch not slipped, frozen cord | Always finish slipped; warm the knot in your hands |
| Tarp lower at the head end | Ridgeline not level | Re-tie the anchor higher or lower the foot end |
Protecting trees: wide straps instead of bare cord
Thin cord under tension acts like a saw on bark, especially when wind moves the tarp all night. It can damage the living layer beneath the bark that the tree needs to move water and nutrients. A ridgeline carries less load than a hammock, but the same courtesy applies: put a wide strap round the trunk and tie the ridgeline to the strap, or at least wrap a piece of fabric under the cord on soft or thin bark.

Tree check before you tie off
- Living, healthy trees – no cracks, fungus brackets or loose bark at tie-off height
- No dead branches or leaning dead trees overhead
- Straps 2.5 cm or wider, or padding under the cord
- No nails, screws or cutting of live branches to make room
- Different trees after a few nights in one spot
- Signs and local rules checked – some areas ban tying to trees
Choosing the trees is part of choosing the site: level, raised ground, no water channels and nothing overhead that can fall. The camp site selection guide shows how to read the canopy, and leave no trace explains why the strap matters even for one night. Hammock straps double as ridgeline straps; the hammock guide’s tree section covers sizes and soft-barked species.
Hammock ridgelines: tarp ridgeline vs. structural ridgeline
Hammock campers usually rig two different lines, and they are easy to confuse.
- The tarp ridgeline is a normal ridgeline between the same two trees, tied about 30 cm above the point where the hammock straps meet the trunks. It is independent of the hammock, so you can pitch the tarp first in rain and hang the hammock in the dry beneath it.
- The structural ridgeline is a short, fixed-length cord tied between the two ends of the hammock itself. It sets the same sag every night, regardless of how far apart the trees are or how high the straps go. As a rule of thumb it is about 83 % of the hammock’s length – for a 3.3 m hammock roughly 2.7 m.

| Hammock length | Structural ridgeline | Comment |
|---|---|---|
| 3.0 m | about 2.5 m | Short hammocks; tall sleepers lie less flat |
| 3.3 m | about 2.7 m | The common size for most adults up to about 1.90 m |
| 3.6 m | about 3.0 m | Long hammocks for tall sleepers |
A starting point, not a law: shorten it slightly for a deeper sag, lengthen it for a flatter one. Adjust in small steps and sit-test.
The structural ridgeline should be a low-stretch cord, tied with fixed loops or adjustable through a friction hitch while you fine-tune it. It is not a load-bearing tarp line and should never carry the tarp: if it is pulled taut by your weight, it is too short. It is, however, the perfect rail for a bug net, a small organiser or a head torch on a prusik. All the hanging details – the 30° hang angle, strap heights and the diagonal lay – are in our guide on how to hang a hammock.
Common ridgeline mistakes and three practice drills
Most ridgeline problems come from a handful of habits. Catch them in the garden and they never cost you a wet night:
- Knots in the middle: keep the section over the shelter as clean cord, with all knots at the trees, so the prusiks can slide.
- Thin cord straight round bark: use a strap – for the tree, and because a strap stops the hitch sliding down a smooth trunk.
- Unslipped tension knot: a jammed hitch in frozen cord can take many minutes or a knife to undo.
- Prusik loops as thick as the ridgeline: they slip; thinner loops or an extra wrap fix it.
- Ridgeline in the path: a taut line at chest or neck height is a hazard at night. Hang a bright marker on it, especially in group camps.
Three ridgeline drills
- The three-minute ridgeline Between two trees or posts, rig anchor, prusiks and trucker’s hitch from a coiled line. Repeat until it takes under three minutes without looking anything up.
- The height change Rig an A-frame height, then lower it to storm height and back without untying the anchor – only the trucker’s end moves. You learn which knots release and which jam.
- The dark pitch Rig the line by head torch with gloves on. If you cannot find the tail or the prusiks, change how you pack the line.
Once the ridgeline is automatic, the rest of the tarp pitch is quick. Add a cord repair to your kit – a spare 3 m line and two spare prusiks weigh almost nothing – and see the repair kit guide for what else to carry. The knot finder suggests a hitch when the trees, cord or weather do not match the textbook.
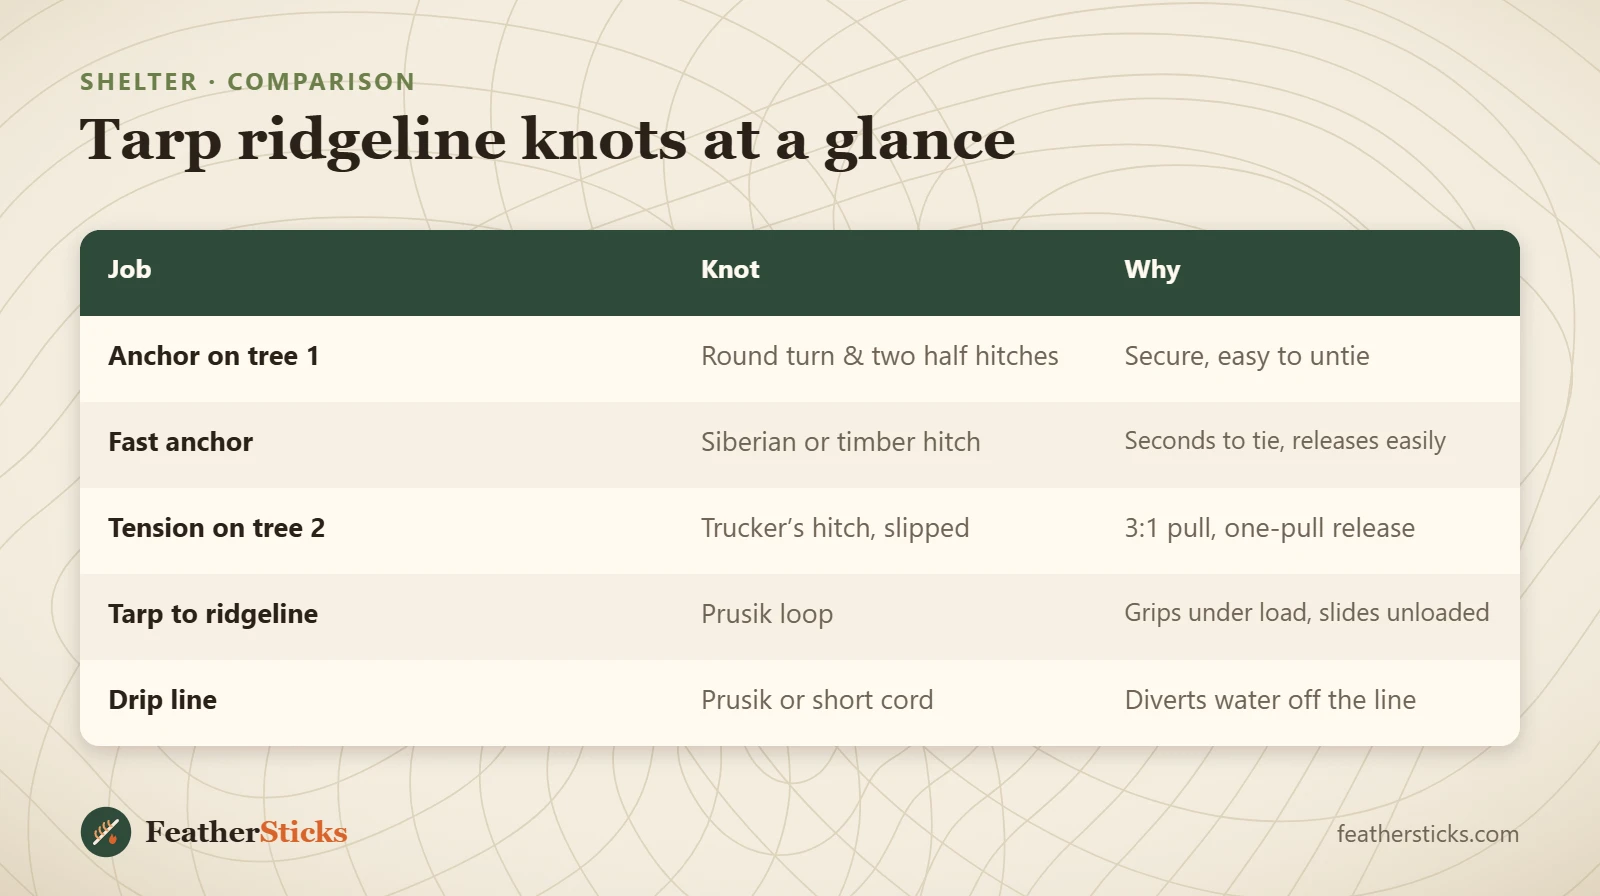
| Job | Knot | Why |
|---|---|---|
| Anchor on tree 1 | Round turn & two half hitches | Secure, easy to untie |
| Fast anchor | Siberian or timber hitch | Seconds to tie, releases easily |
| Tension on tree 2 | Trucker’s hitch, slipped | 3:1 pull, one-pull release |
| Tarp to ridgeline | Prusik loop | Grips under load, slides unloaded |
| Drip line | Prusik or short cord | Diverts water off the line |
Common mistakes
- Tying off both ends before the prusiks are on the line.
- Prusik loops as thick as the ridgeline, so they slip under load.
- A tension knot without a slipped finish that jams when wet or frozen.
- Bare thin cord round the bark instead of a wide strap.
- A ridgeline that drops towards the head end, so water runs to your face.
- Never re-tensioning a nylon line after dusk or rain.
- Knots in the middle of the line where the prusiks need to slide.
What you need
- Ridgeline cord, 10–15 m, 3–5 mm, low-stretch
- 2–4 prusik loops, 40–60 cm of 2–3 mm cord
- 2 small carabiners or wooden toggles
- 2 tree straps, 2.5 cm or wider
- Short cords for drip lines
- Optional: small mechanical line tensioner
- Line winder or small stuff sack
FAQ
What is the best knot for a tarp ridgeline?
How tight should a tarp ridgeline be?
How high should a tarp ridgeline be?
What cord is best for a ridgeline?
Why does my ridgeline sag overnight?
What is a structural ridgeline on a hammock?
Do I need tree straps for a tarp ridgeline?
Check yourself
Completed6 quick questions from this guide. Nothing is sent anywhere.
Related step-by-step guides
-
 1
-
 1
-
 1