Carving Tent Pegs, Toggles & Camp Gadgets: Wooden Stakes That Hold
To carve tent pegs that hold, saw a thumb-thick piece of sound hardwood to 20–25 cm, carve a short point with three or four flat facets, cut a ramp notch 3–5 cm below the head and chamfer the head so it does not split. Drive the peg at about 45°, head leaning away from the pull. With a saw and a sharp knife, each wooden tent stake takes 10–20 minutes the first time and far less with practice.
This guide goes beyond the single peg in our whittling projects for beginners: it shows a saw-and-knife workflow for a whole set, hook pegs, long pegs and deadmen for sand and snow, toggle carving for quick-release guylines, a wooden "dog-bone" tarp tensioner and how to rescue a split peg. Grips and safety rules match carving tools for beginners; all tools are in our bushcraft tools hub.
Step by step
-
1

Pick sound wood, legally
Use sound deadfall or green hardwood you are allowed to take. Rotten, crumbly wood breaks. Never cut a living tree without permission.
-
2

Clear your blood circle
Sit down, check that nobody is within arm plus blade length, and brace your work on a stump beside the knee.
-
3

Saw blanks to length
Saw thumb-thick rods into 20–25 cm blanks and saw each stop cut a third of the diameter deep.
-
4

Carve notch, point and chamfer
Slope thin cuts into the stop cut, carve a 5–6 cm point with three or four facets and chamfer the head all round.
-
5

Add toggles and a tensioner
A grooved toggle gives a quick release, a flat two-hole runner tensions a guyline without knots.
-
6

Drive at 45° and test
Drive the peg with a baton, head leaning away from the pull, line under the shoulder of the notch. Pull hard before you trust it.
Why carve tent pegs and camp gadgets?
Wooden tent stakes are the classic bushcraft fix for a lost peg, a forgotten stake bag or ground where thin metal pegs fail. They cost nothing, they can be made to any length, and a carved peg left behind rots away instead of rusting in the soil. The same few cuts – a stop cut, a ramp, a point and a chamfer – also make toggles, tensioners and pot hooks, so one evening of carving equips a whole tarp camp.
Carved pegs have honest limits. They are thicker than metal pegs and need a little more force to drive, they split in stony ground, and green wood shrinks a little as it dries. Take them as a reliable back-up and a skill, not as a reason to leave your stakes at home. The table shows the gadgets in this guide with typical sizes; adjust them to your cord and your ground.
| Gadget | Typical size | Time | Used for |
|---|---|---|---|
| Notch peg | 20–25 cm, thumb-thick (2–3 cm) | 10–20 min | Guylines and tie-outs in firm soil |
| Hook peg (from a fork) | 20–25 cm, stub 2–3 cm | 10 min | Fast pegs where forked sticks are allowed |
| Long peg | 30–35 cm, 3 cm thick | 15–20 min | Soft soil, leaf litter, moss |
| Deadman | 30–40 cm stick, thumb-thick or more | 5 min | Sand and snow, buried crosswise |
| Toggle | 6–8 cm × about 1.5 cm | 10–15 min | Quick-release tie-outs, bags, ridgelines |
| Dog-bone tensioner | 8–10 cm, holes 5–6 cm apart | 20–30 min | Adjustable guyline without a knot |

Which wood makes the best wooden tent stakes?
A good peg needs straight grain, few knots and wood that does not crush under the baton. That rules out two things straight away: rotten wood, which crumbles, and thin dry twigs, which snap. Within those limits you have two options.
Deadfall: hard and stable
Sound dead hardwood that has not lain on wet ground for long – a fallen branch of beech, oak, ash, maple or hornbeam – makes hard, stable pegs that do not shrink. Test it before you carve: it should be heavy for its size, the bark may come off but the wood beneath is firm, and a thumbnail barely marks it. If it breaks with a dull, crumbly snap or shows soft brown patches, put it on the fire instead. Dry hardwood is harder on your edge, so strop more often.
Green wood: easy to carve
Fresh hazel, ash, birch, maple and willow carve with little force, which is safer and quicker, and green wood resists splitting when you drive it. It shrinks slightly as it dries, so a toggle carved green may loosen in its groove later. Hazel rods are the bushcraft favourite: straight, thumb-thick and often available from coppice work or hedge cutting. More on species is in bushcraft carving and tree identification.
Deadfall vs green wood for pegs
Sound deadfall
- Hard, does not shrink, holds its notch shape
- Harder to carve, dulls the edge faster
- Splits more easily if knotty or very dry
- Check for rot before carving
Green wood
- Soft and quick to carve, kinder to the knife
- Flexible, so it splits less when driven
- Shrinks slightly; toggles may loosen later
- Needs the landowner's permission to cut
Safe knife grips and the blood circle
Pegs are short, and short work tempts you to hold the stick in your lap and carve towards yourself. Do not. The rules here are the same as in the five safe carving grips and carving-tool safety:
- Blood circle: nobody within your arm plus blade length, in every direction. Stop when someone steps in.
- Forehand grip, away from the body: for the point and for removing bark. Rest the tip on a stump beside your knee so a slipping blade ends in wood or air.
- Thumb push: for the ramp of a notch and for the chamfer. Short, controlled travel; the pushing thumb stays behind the edge.
- Chest lever: for thick blanks and long, flat shavings, with elbows tucked.
- Never over the thigh or between your legs. A large artery runs along the inside of the thigh.
Sit down, work in good light, and wear a cut-resistant glove on the holding hand if you have one; it reduces slips but is not cut-proof. Keep the knife sharp – a dull edge needs force, and force turns a slip into an injury. The site's sharpening angle calculator and sharpening guide keep the edge keen.

Saw and knife: a fast workflow for a set of pegs
One peg is a whittling exercise; six or eight pegs for a tarp are a small production run. Doing the same step on every blank before moving to the next is faster, keeps the pegs uniform and lets you concentrate on one grip at a time. A small folding saw does the cuts across the grain, the knife does the cuts along it. How many anchors your pitch needs depends on the shelter: the tarp pitch planner lists stakes for each pitch.
Batch workflow for six to eight pegs
- Cut one long rod Choose a straight rod of 2–3 cm and saw it into blanks of 20–25 cm. Hold it with your free hand well away from the blade, resting on a log or chopping block.
- Saw all stop cuts Mark 3–5 cm below one end of each blank and saw a stop cut about a third of the diameter deep. The saw is straighter and safer than rocking a knife in dry wood.
- Carve all ramps With the thumb push, slope thin cuts into each stop cut from 2–3 cm below it. Deepen stop cut and ramp alternately.
- Point them all Rest each blank on a stump and carve a point of 5–6 cm with three or four flat facets in the forehand grip.
- Chamfer and check Chamfer every head, then line the pegs up: same length, notches on the same side, no cracks. Retire any that split.
A saw is not essential – a knife alone can make a peg, as shown in the tent peg project – but in hard deadfall it saves much effort. Practise the cuts first on a try stick: one stick with a stop cut and ramp, a V-notch and a point shows you which cuts tear and which come clean. The try stick and try-stick drills explain it step by step.
How to carve a tent peg: point, notch and chamfered head
The classic peg has three working parts. The notch holds the line: a flat shoulder on top, made by the stop cut, and a ramp below it. The point opens the soil: short and blunt-ish with flat facets, because a long needle point snaps in stony ground. The chamfered head takes the blows: bevelling the rim stops the end grain from mushrooming and splitting under the baton.

Carving a notch peg, cut by cut
 1Saw the stop cut
Saw straight across the grain 3–5 cm below the head, about a third of the diameter deep. Hold the blank at the far end, well clear of the teeth.
 2Carve the ramp
Use thin thumb-push cuts from 2–3 cm below towards the stop cut. The chip breaks off at the kerf. Never lever it out with the knife tip; that can split the peg.
 3Carve the point
Rest the end on a stump and cut away from you towards the tip. Three or four flat facets over 5–6 cm make a strong point; a long thin taper snaps.
 4Chamfer the head
Shave the rim of the head with short cuts, turning the peg after each. The bevel stops end-grain fibres from splitting off when you strike it.
 5Seat the line
Drive the peg with the notch facing away from the load. The line belongs under the flat shoulder; a loop round the head simply slides off.
Which way should the notch face?
The guyline pulls the peg towards the shelter, so the loop presses on the back of the peg, the side away from the load. Cut the notch on that side and the loop sits under the shoulder; with the notch facing the shelter, the loop rides up the smooth back and off the head. If you tie on with a clove hitch instead of a loop, the notch still stops it climbing.
How deep is deep enough?
About a third of the diameter. Shallower and the line can pop out; deeper and the head breaks off at the notch under load, the most common failure of carved pegs. If a notch has gone too deep, cut a new one a little lower and turn the damaged side downwards.
| Ground | Wooden anchor | Tip |
|---|---|---|
| Firm forest or meadow soil | Notch peg 20–25 cm | Drive at about 45°, head away from the pull |
| Soft soil, leaf litter, moss | Long peg 30–35 cm, or two pegs | Push through the litter into mineral soil; a second peg behind the first shares the load |
| Stony ground | Rocks, roots, trees instead | Wooden pegs split on stones; tie off to a heavy rock |
| Sand, gravel | Deadman 30–40 cm, buried | Bury 20–30 cm deep, crosswise to the pull |
| Snow | Deadman, buried and stamped | Let it freeze in for 15–30 min before loading |
Hook pegs and long pegs for soft ground
The hook peg: nature cuts the notch
A forked stick gives you a peg without a notch. Choose a piece where a side branch leaves the main stem, saw the stem to 20–25 cm and cut the side branch back to a stub of 2–3 cm. Turn the stick so the stub points down towards the tip: the crotch then opens downwards and catches a line that pulls upwards. The fibres run continuously round the fork, so a hook peg is often stronger than a carved notch. Chamfer the head and carve the point as usual.
Long pegs for soft soil
Leaf litter, moss and loose forest soil give a short peg little to grip. Make it longer and thicker – roughly 30–35 cm and 3 cm – and push it through the litter into the firmer soil below. On the windward side, set a second peg 15–20 cm behind the first and run a short cord from the head of the front peg to the foot of the back one, so both share the load. In strong wind, read anchors that hold in wind before you pitch.
Which wooden anchor do I need?
Can you push a finger 3–4 cm into the ground easily?
Yes → Soft ground: use a long peg of 30–35 cm, or two pegs in line.No → Firm ground: a notch or hook peg of 20–25 cm is enough.Is the ground sand, gravel or snow?
Yes → Pegs pull out: bury a deadman crosswise 20–30 cm deep.No → Drive a peg at about 45°, head away from the pull.Do you hit stones after a few centimetres?
Yes → Stop driving; tie off to a rock, root or tree instead.No → Drive on with steady, moderate blows.
Sand and snow: carving and burying a deadman
In sand and fresh snow there is too little friction for any peg. A deadman solves this by spreading the pull over a large area underground. The carving is minimal: a straight stick of about 30–40 cm, thumb-thick or more, with a shallow groove carved round its middle so the cord cannot slide to one end. A stake, a sand-filled stuff sack or a bundle of sticks works the same way; see anchoring on the beach and the snow section of winter camping.
Building a deadman anchor
 1Dig across the pull
Dig a trench at right angles to the guyline, a little longer than the stick. The whole length of the stick then bears against undisturbed sand or snow.
 2Bury 20–30 cm deep
Tie the cord round the groove in the middle with a clove hitch, lay the stick in the bottom and lead the cord out through a narrow slot towards the shelter.
 3Backfill and stamp
Fill the trench and stamp it firm. In snow, wait 15–30 minutes for it to set before you tension the line, or it pulls straight out.
To recover a deadman frozen in snow, dig it out rather than yanking the cord, which can tear the tie-out. A toggle at the end of the guyline helps here: unclip the shelter, then dig at leisure. Fill in every trench when you leave, so nobody twists an ankle in it.
Toggle carving: quick-release fixings for guylines
A toggle is a short stick with a groove round its middle. Tie a cord into the groove and it becomes a fastener: push it through a loop and turn it crosswise, and the loop cannot slip off while the line is loaded; turn it lengthwise and pull, and it comes free in a second. On a tarp that means you can take a corner off the anchor without untying a single knot, even with cold or wet fingers.
Carve it from dense, straight wood about 1.5 cm thick, sawn to 6–8 cm. Chamfer both ends so they do not catch. Make two shallow stop cuts close together in the middle, slope into each from outside and rotate the piece until the groove runs all the way round. Keep the groove shallow – roughly a quarter of the thickness at most – or the toggle breaks at the groove. Dry wood keeps its size better, so a toggle carved green should be checked once it has dried.
Toggle as a quick release on a tarp corner
 1Push it through
Tie the guyline into the groove with a clove hitch or constrictor-style hitch. Push the toggle end-first through the cord loop at the tarp corner.
 2Turn it crosswise
Turn the toggle across the loop and tension the line. Under load the loop bites into the groove and cannot slide off.
 3Turn and pull to release
Ease the tension, turn the toggle lengthwise and pull it back through. Practise once in daylight so it works by feel at night.
More uses for a toggle
- Ridgeline: a toggle can lock a slipped hitch on a tarp ridgeline; pull the toggle and the hitch falls open. The marlinspike hitch, which takes a toggle well, is in bushcraft knots and the knot finder.
- Pack and bag closures: a toggle and loop replace a lost buckle.
- Handles: a thick toggle on a cord makes hauling a water container or a firewood bundle easier on the hands.
Use cord that suits the job: thin guyline for tie-outs, paracord for load-bearing loops.
A wooden "dog-bone" tarp tensioner
A guyline runner – often called a dog bone after its shape – is a flat piece of wood with two holes. The line runs from the tarp through the first hole, round the peg, back up through the second hole and ends in a stopper knot. Slide the runner up towards the tarp and the loop round the peg gets longer, so the line tightens; slide it down and it slackens. Under load the runner tilts, the cord kinks through the holes, and friction holds the setting. It is the wooden version of the plastic line-locks on many tarps.
Typical dimensions for 3–4 mm guyline are 8–10 cm long, about 2 cm wide and 1 cm thick, with the hole centres 5–6 cm apart; treat these as starting values. Holes a little wider than the cord, about 5 mm for 3–4 mm line, slide well yet still grip. Bore them with the awl or reamer of a pocket knife, twisting gently from both faces; do not twist the tip of a fixed-blade knife in the wood, it can snap. Round all edges so they do not saw through the cord.
Making and threading a dog-bone tensioner
 1Carve and bore
Split or carve a flat piece of dense wood, 8–10 cm long. Bore two holes 5–6 cm apart from both sides, then round every edge and the hole rims.
 2Thread it
Line from the tarp through hole 1, round the peg or its notch, back up through hole 2, then tie a stopper knot such as a figure-eight on top.
 3Slide to tension
Slide the runner towards the tarp to tighten. When the line takes the load, the runner tilts and holds. Re-tension after rain, when many lines stretch.
Pot hooks and tripod parts: the same cuts in the camp kitchen
Everything in this guide carries straight over to the fire. An adjustable pot hook is a forked green stick with a short hook stub for the bail and two or three ramp notches near the top, each cut like a peg notch: stop cut, ramp, never deeper than a third of the thickness. The same notches lock a crossbar on a pot crane, and pegs with notches hold the guylines of a cooking tripod in wind. The full build, safe heights and green-wood choice are in carving an adjustable pot hook; tripod and crossbar joints are in lashings and camp structures.
One difference matters: anything near flames should be green wood. Dry sticks char through, and a hook that fails drops a pot of boiling water. Test every hook at ground level with an empty pot first.
Driving and pulling wooden pegs
Drive a wooden peg at about 45°, with its head leaning away from the shelter, the same angle used for metal stakes in our stakes and anchors guide. Leave the notch 2–3 cm above the ground so the line cannot drag in mud. Strike with a baton, a piece of firewood or a carved mallet, with steady moderate blows square on the head. Never use the back of an axe or a stone: both crush the end grain and split the peg.
- Hard ground: start a pilot hole with a sturdier spare peg, then drive the real one.
- Peg stops dead: you have hit a stone or root. Pull it and move a hand's width; forcing it splits the point.
- Pulling out: loop a cord or a second peg through the notch and pull in line with the peg, not sideways, so you do not snap it.
- When you leave: pull every peg, fill the holes and put the pegs in your fire or scatter them out of sight.
Test before you trust it
- Peg at about 45°, head leaning away from the pull
- Notch facing away from the shelter, 2–3 cm above the ground
- Line under the flat shoulder, not round the head
- A hard pull by hand moves nothing
- Spare pegs ready on the windward side
How to fix a split peg
Even good pegs split sometimes, usually at the head or through the notch. Most can be saved in a few minutes; some belong on the fire.

| Damage | Fix | Why it happened |
|---|---|---|
| Head split or mushroomed | Saw off below the crack, re-chamfer, cut a new notch lower | No chamfer, struck with something hard, very dry wood |
| Crack runs through the notch | Replace; firewood | Notch too deep or levered out |
| Point broken | Re-point a little shorter | Long thin point, stony ground |
| Fine check in the head only | Whip a few turns of cord round it for the trip, replace later | Wood drying out |
| Peg bent or crushed | Replace with denser or greener wood | Soft or rotten wood |
To prevent splits, chamfer every head, avoid knots near the head and notch, keep notches to a third of the diameter and drive with wood, not steel or stone. Keep two or three spares; a peg that breaks at 2 a.m. in rain is easier to replace than to repair.
Troubleshooting: carved pegs and gadgets by symptom
| Symptom | Likely cause | Fix |
|---|---|---|
| Peg pulls out overnight | Too short for the soil, driven too upright | Longer peg at 45°, two pegs in line, or a deadman |
| Line slips off the peg | Notch too shallow or facing the shelter | Notch on the back, a third of the diameter deep |
| Head breaks off at the notch | Notch too deep, knot at the notch | Cut the notch shallower, avoid knots, use a hook peg |
| Toggle slips out of its loop | Groove too shallow, toggle too short for the loop | Deepen slightly, carve a longer toggle |
| Dog bone slips under load | Holes too wide or too close together | Narrower holes, centres 5–6 cm apart |
| Notch tears out while carving | Cutting uphill or with thick shavings | Turn the blank, take thin cuts, saw the stop cut |
| Knife skates off dry wood | Dull edge | Strop or sharpen; see bushcraft knives for steel and edge care |
Tools, kit and carrying a knife
You need very little: a sturdy fixed-blade knife or sloyd knife, a folding saw, a baton and a first aid kit. A baton also splits thick blanks for runners. Children can carve pegs with a rounded-tip knife, green wood and an adult beside them; bushcraft with kids covers knife rules. If you are new to all of this, start with bushcraft for beginners.
Carry your knife sheathed and packed away on the way to camp. Carry rules for fixed blades differ by country; see knife laws – orientation only, not legal advice.
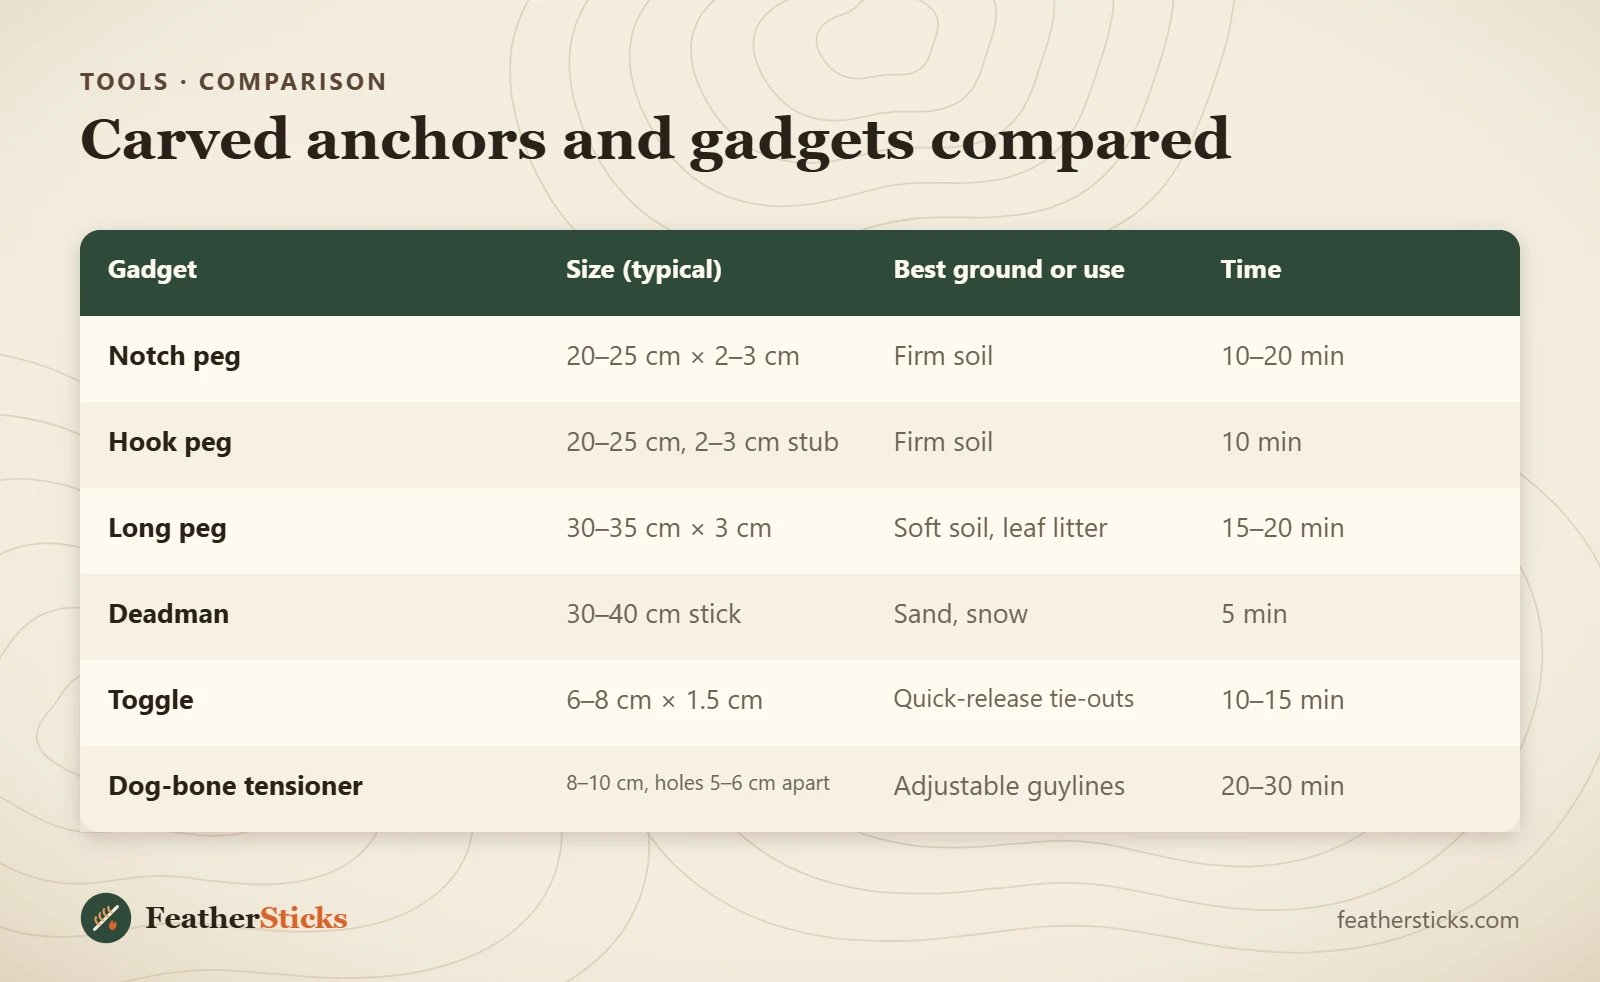
| Gadget | Size (typical) | Best ground or use | Time |
|---|---|---|---|
| Notch peg | 20–25 cm × 2–3 cm | Firm soil | 10–20 min |
| Hook peg | 20–25 cm, 2–3 cm stub | Firm soil | 10 min |
| Long peg | 30–35 cm × 3 cm | Soft soil, leaf litter | 15–20 min |
| Deadman | 30–40 cm stick | Sand, snow | 5 min |
| Toggle | 6–8 cm × 1.5 cm | Quick-release tie-outs | 10–15 min |
| Dog-bone tensioner | 8–10 cm, holes 5–6 cm apart | Adjustable guylines | 20–30 min |
Common mistakes
- Carving towards the thigh or with the stick in your lap.
- Cutting the notch deeper than a third of the diameter, so the head breaks off.
- Carving a long needle point that snaps in stony ground.
- Skipping the chamfer and striking the peg with an axe or a stone.
- Putting the notch on the side facing the shelter.
- Using rotten deadfall or cutting living trees without permission.
- Loading a snow deadman before it has set.
What you need
- Fixed-blade or sloyd knife with a strop
- Small folding saw for blanks and stop cuts
- Wooden baton or carved mallet
- Pocket-knife awl or reamer for tensioner holes
- Guyline or paracord for toggles and tests
- Cut-resistant glove for the holding hand
- First aid kit with pressure bandage
FAQ
How do you carve a tent peg?
What is the best wood for wooden tent stakes?
How long should a wooden tent peg be?
Why does my carved peg split?
How do you anchor a tarp in sand or snow without pegs?
What is a toggle used for in bushcraft?
How does a dog-bone tensioner work?
Can children carve tent pegs?
Check yourself
Completed6 quick questions from this guide. Nothing is sent anywhere.
Related step-by-step guides
-
 1
-
 1
-
 1